Normal view

Received before yesterday All PHP Tricks – Web Development Tutorials and Demos

Laravel 12 REST API with Sanctum Authentication

Download

In this tutorial, we will walk you through creating a Laravel 12 REST API with Sanctum authentication. You will learn how to build a complete Laravel 12 REST API step by step using a simple and beginner-friendly approach.

Laravel continues to be one of the most popular PHP frameworks for building powerful and scalable APIs. In this tutorial, we’ll guide you through the essential steps to develop a modern Laravel 12 REST API with ease and clarity.

Readers Also Read: Laravel 12 User Registration and Login

Steps to Create a Laravel 12 REST API Using Sanctum Authentication

Follow the simple, step-by-step guide below to create a Laravel 12 REST API with Sanctum authentication using a practical example application.

  1. Install Laravel 12 App and Sanctum API
  2. Add HasApiTokens Trait in User Model
  3. Create API Response Trait
  4. Create LoginRegister Controller
  5. Create Product Resource, Model with Migration and API Resource Controller
  6. Define API Routes in routes/api.php
  7. Test API on Postman

Readers Also Read: Laravel 12 CRUD Application Tutorial

Step 1. Install Laravel 12 App and Sanctum API

If you don’t have Laravel 12 installed, start by creating a new Laravel 12 application named laravel-12-api-sanctum using the following command:

composer create-project --prefer-dist laravel/laravel laravel-12-api-sanctum
cd laravel-12-api-sanctum

Enable api.php and install Sanctum in Laravel 12 by running the following command:

php artisan install:api

Step 2. Add HasApiTokens Trait in User Model

Add the following in your User model  \app\Models\User.php

use Laravel\Sanctum\HasApiTokens;

class User extends Authenticatable
{
    use HasApiTokens, HasFactory, Notifiable;
....

Step 3. Create API Response Trait

First, create the API Response trait. Run the following command in your terminal to generate the ApiResponseTrait.php file inside the Traits directory:

php artisan make:trait Traits\ApiResponseTrait

Next, add the following code to the file.

<?php

namespace App\Traits;
use Illuminate\Http\JsonResponse;

trait ApiResponseTrait
{
    protected function successResponse($data = null, $message = 'Success', $code = 200): JsonResponse
    {
        return response()->json([
            'success' => true,
            'message' => $message,
            'data'    => $data,
        ], $code);
    }

    protected function errorResponse($message = 'Error', $code = 400, $errors = null): JsonResponse
    {
        return response()->json([
            'success' => false,
            'message' => $message,
            'errors'  => $errors,
        ], $code);
    }
}

Step 4. Create LoginRegister Controller

Now we need to create the LoginRegister controller. Simply run the command below in your terminal.

php artisan make:controller Api\LoginRegisterController

Copy and paste the following code in app/Http/Controllers/Api/LoginRegisterController.php

<?php

namespace App\Http\Controllers\Api;

use App\Models\User;
use App\Http\Controllers\Controller;
use App\Traits\ApiResponseTrait;
use Illuminate\Http\Request;
use Illuminate\Support\Facades\Validator;
use Illuminate\Support\Facades\Hash;

class LoginRegisterController extends Controller
{
    use ApiResponseTrait;

    /**
     * Register a new user.
     *
     * @param  \Illuminate\Http\Request  $request
     * @return \Illuminate\Http\Response
     */

    public function register(Request $request)
    {
        $validator = Validator::make($request->all(), [
            'name'     => 'required|string|max:255',
            'email'    => 'required|string|email:rfc,dns|unique:users,email|max:250',
            'password' => 'required|string|min:6|confirmed',
        ]);

        if ($validator->fails()) {
            return $this->errorResponse('Validation Error!', 422, $validator->errors());
        }

        $user = User::create($request->all());

        $data['token'] = $user->createToken($request->email)->plainTextToken;
        $data['user'] = $user;

        return $this->successResponse($data, 'User is registered successfully', 201);
    }

    /**
     * Authenticate the user.
     *
     * @param  \Illuminate\Http\Request  $request
     * @return \Illuminate\Http\Response
     */
    public function login(Request $request)
    {
        $validator = Validator::make($request->all(), [
            'email'    => 'required|string|email',
            'password' => 'required|string',
        ]);

        if ($validator->fails()) {
            return $this->errorResponse('Validation Error!', 422, $validator->errors());
        }

        // Check email exist
        $user = User::where('email', $request->email)->first();

        // Check password
        if (! $user || ! Hash::check($request->password, $user->password)) {
            return $this->errorResponse('Invalid credentials', 401);
        }

        $data['token'] = $user->createToken($request->email)->plainTextToken;
        $data['user'] = $user;

        return $this->successResponse($data, 'Login successful');
    }

    public function logout(Request $request)
    {
        $request->user()->currentAccessToken()->delete();

        return $this->successResponse(null, 'Logged out successfully');
    }
}

Step 5. Create Product Resource, Model with Migration and API Resource Controller

Simply run the commands below in your terminal.

php artisan make:model Product -mcr --api
php artisan make:resource ProductResource

Now, navigate to the database/migrations directory and locate your product migration file named something like YYYY_MM_DD_TIMESTAMP_create_products_table.php. Open it and replace its contents with the following code.

<?php

use Illuminate\Database\Migrations\Migration;
use Illuminate\Database\Schema\Blueprint;
use Illuminate\Support\Facades\Schema;

return new class extends Migration
{
    /**
     * Run the migrations.
     */
    public function up(): void
    {
        Schema::create('products', function (Blueprint $table) {
            $table->id();
            $table->string('name');
            $table->text('description')->nullable();
            $table->decimal('price', 10, 2);
            $table->timestamps();
        });
    }

    /**
     * Reverse the migrations.
     */
    public function down(): void
    {
        Schema::dropIfExists('products');
    }
};

Run the migration:

php artisan migrate

Now, navigate to app/Models/Product.php and update the Product model with the following code.

<?php

namespace App\Models;

use Illuminate\Database\Eloquent\Model;

class Product extends Model
{
    protected $fillable = [
        'name',
        'description',
        'price'
    ];
}

Now, go to app/Http/Resources/ProductResource.php and update it with the following code.

<?php

namespace App\Http\Resources;

use Illuminate\Http\Request;
use Illuminate\Http\Resources\Json\JsonResource;

class ProductResource extends JsonResource
{
    /**
     * Transform the resource into an array.
     *
     * @return array<string, mixed>
     */
    public function toArray(Request $request): array
    {
        return [
            'id'          => $this->id,
            'name'        => $this->name,
            'description' => $this->description,
            'price'       => $this->price,
            'created_at'  => $this->created_at->format('d M, Y'),
        ];
    }
}

And finally, go to app/Http/Controllers and update the ProductController.php file with the following code.

<?php

namespace App\Http\Controllers;

use App\Models\Product;
use App\Traits\ApiResponseTrait;
use App\Http\Resources\ProductResource;
use Illuminate\Http\Request;
use Illuminate\Support\Facades\Validator;

class ProductController extends Controller
{
    use ApiResponseTrait;
    /**
     * Display a listing of the resource.
     */
    public function index()
    {
        $products = ProductResource::collection(Product::latest()->get());
        if (is_null($products->first())) {
            return $this->errorResponse('No product found!', 404);
        }
        return $this->successResponse($products);
    }

    /**
     * Store a newly created resource in storage.
     */
    public function store(Request $request)
    {

        $validator = Validator::make($request->all(), [
            'name'     => 'required|string|max:255',
            'description' => 'nullable|string',
            'price'       => 'required|numeric|min:0',
        ]);

        if ($validator->fails()) {
            return $this->errorResponse('Validation Error!', 422, $validator->errors());
        }

        $product = Product::create($request->all());

        return $this->successResponse(new ProductResource($product), 'Product is created', 201);
    }

    /**
     * Display the specified resource.
     */
    public function show($id)
    {
        $product = Product::find($id);

        if (! $product) {
            return $this->errorResponse('Product not found', 404);
        }

        return $this->successResponse(new ProductResource($product));
    }

    /**
     * Update the specified resource in storage.
     */
    public function update(Request $request, $id)
    {

        $validator = Validator::make($request->all(), [
            'name'        => 'sometimes|required|string|max:255',
            'description' => 'nullable|string',
            'price'       => 'sometimes|required|numeric|min:0',
        ]);

        if ($validator->fails()) {
            return $this->errorResponse('Validation Error!', 422, $validator->errors());
        }

        $product = Product::find($id);

        if (! $product) {
            return $this->errorResponse('Product not found', 404);
        }

        $product->update($request->all());

        return $this->successResponse(new ProductResource($product), 'Product is updated');
    }

    /**
     * Remove the specified resource from storage.
     */
    public function destroy($id)
    {
        $product = Product::find($id);

        if (! $product) {
            return $this->errorResponse('Product not found', 404);
        }

        $product->delete();

        return $this->successResponse(null, 'Product is deleted');
    }
}

Step 6. Define API Routes in routes/api.php

Now, we need to define the API routes (endpoints) for user registration, login, logout, and product CRUD operations.

Simply copy and paste the code below into routes/api.php.

<?php

use Illuminate\Http\Request;
use Illuminate\Support\Facades\Route;
use App\Http\Controllers\ProductController;
use App\Http\Controllers\Api\LoginRegisterController;

// Public routes of authtication
Route::controller(LoginRegisterController::class)->group(function() {
    Route::post('/register', 'register');
    Route::post('/login', 'login');
});

Route::apiResource('products', ProductController::class)->only(['index', 'show']);

// Protected routes of product and logout
Route::middleware('auth:sanctum')->group(function () {
    Route::post('/logout', [LoginRegisterController::class, 'logout']);

    Route::apiResource('products', ProductController::class)->except(['index', 'show']);
});

Step 7. Test API on Postman

It’s time to run the development server and test the Laravel 12 REST APIs built using Sanctum authentication.

Run the below command in terminal.
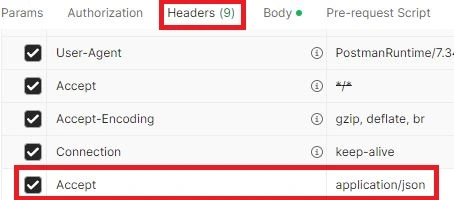
php artisan serve

Make sure to add Accept: application/json in the header of all API requests, as shown in the screenshot below.

Postman Header Accept JSON

List of API Endpoints and Methods

Below is a list of our API endpoints with their corresponding HTTP methods.

MethodEndpointAuthDescription
POST/api/registerNoRegister user and receive token
POST/api/loginNoLogin and receive token
POST/api/logoutYesInvalidate token
GET/api/productsNoGet all products
GET/api/products/{id}NoGet a specific product
POST/api/productsYesCreate a new product
PATCH/api/products/{id}YesUpdate product
DELETE/api/products/{id}YesDelete a product

Now, open your Postman application, click on the New button, and select HTTP.

1) User Registration API URL: http://127.0.0.1:8000/api/register

This is a public route. Enter the required fields and click the Send button to get a response from the Laravel user registration API. The response will appear in the Body section, as shown in the screenshot below.

User Registration API

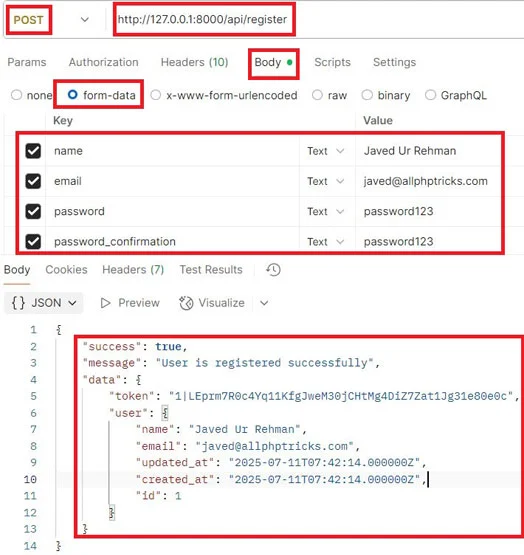
Note: In the data object, a token is generated, which will be used to access the protected routes.

Once the user is registered, you can log in anytime using the same credentials via the login route.

2) User Login API URL: http://127.0.0.1:8000/api/login

This is also a public route. Enter the required fields and click the Send button to get a response from the Laravel user login API. See the sample response in the screenshot below.

User Login API

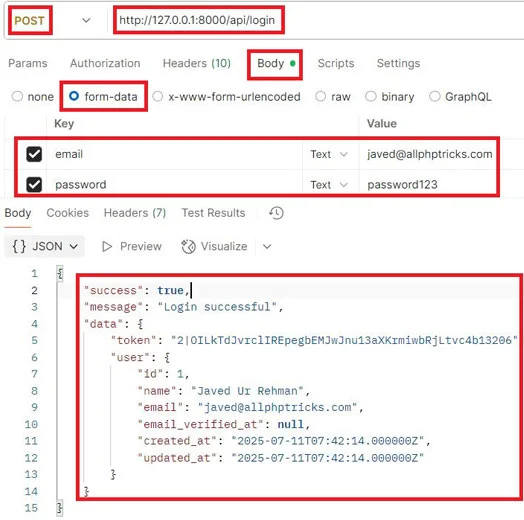
The login API also returns a token, which we’ll use to access the protected product routes for creating, reading, updating, and deleting a product.

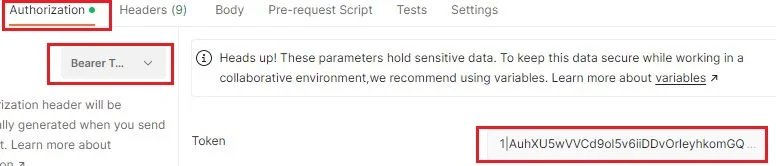
Make sure to include the token with all protected routes by setting it in the Authorization header: choose Bearer Token as the Auth Type and paste the token into the token field, as shown in the screenshot below.

Add Bearer Token in Authorization

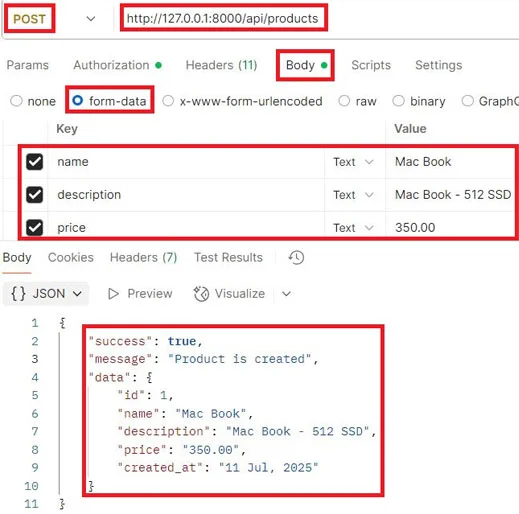
3) Create Product API URL: http://127.0.0.1:8000/api/products

This is a protected route. Add the token, enter the required fields, then click the Send button. See the sample response in the screenshot below.

Create Product API

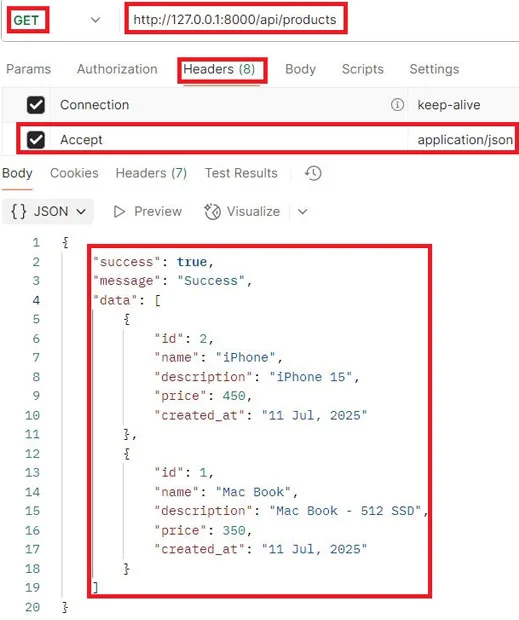
4) Show All Products API URL: http://127.0.0.1:8000/api/product

This is a public route. Simply click the Send button and check the sample response in the screenshot below.

Show All Products API

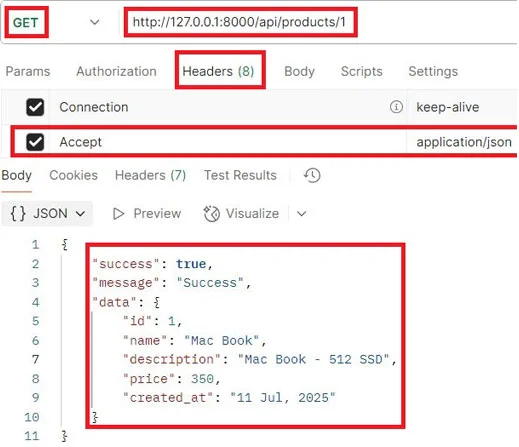
5) Show Single Product API URL: http://127.0.0.1:8000/api/products/{id}

This is a public route. Just pass the ID in the end of endpoint and click the Send button and refer to the sample response in the screenshot below.

Show Single Product API

6) Update Product API URL: http://127.0.0.1:8000/api/products/{id}

This is a protected route. Pass the ID in the end of endpoint and add the token, enter the required fields, then click the Send button and check the sample response in the screenshot below.

Update Product API

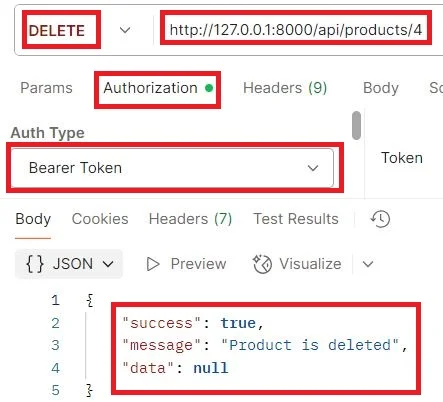
7) Delete Product API URL: http://127.0.0.1:8000/api/products/{id}

This is a protected route. Just pass the ID in the end of endpoint and add the token, click the Send button, and check the sample response in the screenshot below.

Delete Product API

Conclusion

We hope you’ve now learned how to create a Laravel 12 REST API with Sanctum authentication by following the step-by-step guide above.

If you found this tutorial helpful, please share it with your friends and developer groups.

I spent several hours creating this tutorial. If you’d like to say thanks, consider liking my pages on Facebook, Twitter, and GitHub — and don’t forget to share it!

Download

The post Laravel 12 REST API with Sanctum Authentication appeared first on All PHP Tricks - Web Development Tutorials and Demos.

Simple Laravel 12 CRUD Application Tutorial

Download

In this tutorial, I will show you how to create a Laravel 12 CRUD application by developing a complete system with a step-by-step guide.

CRUD stands for Create, Read, Update, and Delete — the four basic operations used in managing data in persistent storage.

I will create a simple products table and store product details in five columns: code (VARCHAR), name (VARCHAR), quantity (INT), price (DECIMAL), and description (TEXT).

The following screenshots show the Laravel 12 CRUD application, which can store, view, update, and delete products from the products table.

Product List Page

Product List Page

Add New Product Page

Add New Product Page

Edit Product Page

Edit Product Page

Show Product Page

Show Product Page

Readers Also Read: Laravel 12 Custom User Registration and Login Tutorial

Now, let’s begin building a Laravel 12 CRUD application with a straightforward example using a products table.

Steps to Create Laravel 12 CRUD Application

Follow the step-by-step guide below to create a Laravel 12 CRUD application.

  1. Install and Set Up Laravel 12 App
  2. Create a Model with Migration, Resource Controller and Requests for Validation
  3. Update Product Migration & Migrate Tables to Database
  4. Define Product Resource Routes
  5. Update Code in Product Model
  6. Update Code in Product Controller
  7. Update Code in Product Store and Update Requests
  8. Enable Bootstrap 5 in AppServiceProvider
  9. Create Layout and Product Resource Blade View Files
  10. Run Laravel Development Server

Step 1. Install and Set Up Laravel 12 App

If you don’t have Laravel 12 installed, start by creating a new Laravel 12 application named crud_app using the following command:

composer create-project --prefer-dist laravel/laravel crud_app

Now, navigate to the crud_app directory using the following command.

cd crud_app

By default, Laravel 12 uses SQLite. However, in this tutorial, we will use MySQL.

First, create a database named crud_app, and then configure your database credentials in the .env file as shown below:

DB_CONNECTION=mysql
DB_HOST=127.0.0.1
DB_PORT=3306
DB_DATABASE=crud_app
DB_USERNAME=your_db_username
DB_PASSWORD=your_db_password

Step 2. Create a Model with Migration, Resource Controller and Requests for Validation

In this step, we need to create a Model, Migration, Resource Controller, and Form Request for validating the products table.

Although we can create each of them individually, Laravel also allows us to generate them all at once using a single Artisan command.

Simply run the following command in your terminal:

php artisan make:model Product -mcr --requests

In the above command, the -m flag generates a migration for the model, the -cr flag creates a resource controller, and the --requests flag generates custom form request classes for the resource controller.

Step 3. Update Product Migration & Migrate Tables to Database

Now, we need to update the product migration file.

Navigate to the crud_app/database/migrations directory, where you will find the product migration file named something like:

YYYY_MM_DD_TIMESTAMP_create_products_table.php

Open this file and replace its content with the following code:

<?php

use Illuminate\Database\Migrations\Migration;
use Illuminate\Database\Schema\Blueprint;
use Illuminate\Support\Facades\Schema;

return new class extends Migration
{
    /**
     * Run the migrations.
     */
    public function up(): void
    {
        Schema::create('products', function (Blueprint $table) {
            $table->id();
            $table->string('code')->unique();
            $table->string('name');
            $table->integer('quantity');
            $table->decimal('price', 8, 2);
            $table->text('description')->nullable();
            $table->timestamps();
        });
    }

    /**
     * Reverse the migrations.
     */
    public function down(): void
    {
        Schema::dropIfExists('products');
    }
};

Once the product migration file is updated, we need to migrate all tables into our database.

Run the following Artisan command in the terminal to perform the migration:

php artisan migrate

Step 4. Define Product Resource Routes

In this step, we need to define the product resource routes for our application in the web.php file.

Simply copy and paste the following code into your routes/web.php file:

<?php

use Illuminate\Support\Facades\Route;
use App\Http\Controllers\ProductController;

Route::get('/', function () {
    return view('welcome');
});
Route::resource('products', ProductController::class);

After defining the application routes, you can verify them by running the following Artisan command in the terminal:

php artisan route:list

Step 5. Update Code in Product Model

Now, we need to allow mass assignment in the Product model.

Navigate to app/Models/Product.php and update the file with the following code:

<?php

namespace App\Models;

use Illuminate\Database\Eloquent\Model;

class Product extends Model
{
    protected $fillable = [
        'code',
        'name',
        'quantity',
        'price',
        'description'
    ];
}

Step 6. Update Code in Product Controller

In this step, we need to update our ProductController, which includes seven different methods to perform Laravel Eloquent CRUD operations in our Laravel 12 CRUD application.

By default, a resource controller comes with the following methods, and we will use all of them in our Laravel 12 CRUD app:

  1. index() – Displays a list of all products from the products table.
  2. create() – Shows the form to add a new product.
  3. store() – Handles the submission of the new product form and stores the data in the products table.
  4. show() – Displays the details of a single product.
  5. edit() – Shows the form to edit an existing product.
  6. update() – Updates the product data in the products table.
  7. destroy() – Deletes a product from the database.

Now, copy and paste the following code into the app/Http/Controllers/ProductController.php file.

<?php

namespace App\Http\Controllers;

use App\Models\Product;
use App\Http\Requests\StoreProductRequest;
use App\Http\Requests\UpdateProductRequest;
use Illuminate\View\View;
use Illuminate\Http\RedirectResponse;

class ProductController extends Controller
{
    /**
     * Display a listing of the resource.
     */
    public function index() : View
    {
        return view('products.index', [
            'products' => Product::latest()->paginate(3)
        ]);
    }

    /**
     * Show the form for creating a new resource.
     */
    public function create() : View
    {
        return view('products.create');
    }

    /**
     * Store a newly created resource in storage.
     */
    public function store(StoreProductRequest $request) : RedirectResponse
    {
        Product::create($request->validated());

        return redirect()->route('products.index')
                ->withSuccess('New product is added successfully.');
    }

    /**
     * Display the specified resource.
     */
    public function show(Product $product) : View
    {
        return view('products.show', compact('product'));
    }

    /**
     * Show the form for editing the specified resource.
     */
    public function edit(Product $product) : View
    {
        return view('products.edit', compact('product'));
    }

    /**
     * Update the specified resource in storage.
     */
    public function update(UpdateProductRequest $request, Product $product) : RedirectResponse
    {
        $product->update($request->validated());

        return redirect()->back()
                ->withSuccess('Product is updated successfully.');
    }

    /**
     * Remove the specified resource from storage.
     */
    public function destroy(Product $product) : RedirectResponse
    {
        $product->delete();

        return redirect()->route('products.index')
                ->withSuccess('Product is deleted successfully.');
    }
}

Step 7. Update Code in Product Store and Update Requests

In this step, we will update the code in our product store and update request classes.

First, copy and paste the following code into the app/Http/Requests/StoreProductRequest.php file.

<?php

namespace App\Http\Requests;

use Illuminate\Foundation\Http\FormRequest;

class StoreProductRequest extends FormRequest
{
    /**
     * Determine if the user is authorized to make this request.
     */
    public function authorize(): bool
    {
        return true;
    }

    /**
     * Get the validation rules that apply to the request.
     *
     * @return array<string, \Illuminate\Contracts\Validation\ValidationRule|array<mixed>|string>
     */
    public function rules(): array
    {
        return [
            'code' => 'required|string|max:50|unique:products,code',
            'name' => 'required|string|max:250',
            'quantity' => 'required|integer|min:1|max:10000',
            'price' => 'required',
            'description' => 'nullable|string'
        ];
    }
}

After that, copy and paste the following code into the app/Http/Requests/UpdateProductRequest.php file.

<?php

namespace App\Http\Requests;

use Illuminate\Foundation\Http\FormRequest;

class UpdateProductRequest extends FormRequest
{
    /**
     * Determine if the user is authorized to make this request.
     */
    public function authorize(): bool
    {
        return true;
    }

    /**
     * Get the validation rules that apply to the request.
     *
     * @return array<string, \Illuminate\Contracts\Validation\ValidationRule|array<mixed>|string>
     */
    public function rules(): array
    {
        return [
            'code' => 'required|string|max:50|unique:products,code,'.$this->product->id,
            'name' => 'required|string|max:250',
            'quantity' => 'required|integer|min:1|max:10000',
            'price' => 'required',
            'description' => 'nullable|string'
        ];
    }
}

Both of these form request files are responsible for validating the data before adding or updating records in the products table of our database.

Step 8. Enable Bootstrap 5 in AppServiceProvider

Since we are using Bootstrap v5.3.7 via CDN, some of its features—such as pagination—won’t work properly unless explicitly enabled in the App\Providers\AppServiceProvider.php file.

To fix this, we need to call Paginator::useBootstrapFive(); inside the boot() method.

Simply copy and paste the following code into your AppServiceProvider.php file:

<?php

namespace App\Providers;

use Illuminate\Support\ServiceProvider;
use Illuminate\Pagination\Paginator;

class AppServiceProvider extends ServiceProvider
{
    /**
     * Register any application services.
     */
    public function register(): void
    {
        //
    }

    /**
     * Bootstrap any application services.
     */
    public function boot(): void
    {
        Paginator::useBootstrapFive();
    }
}

Step 9. Create Layout and Product Resource Blade View Files

In this step, we need to create /layouts and /products directories inside the resources/views/ directory, and then create the necessary Blade view files within them.

These files can be created manually or by using Artisan commands. In this tutorial, we’ll use Artisan to generate them.

Simply run the following Artisan commands, and all five Blade view files will be created in their respective directories:

php artisan make:view layouts.app
php artisan make:view products.index
php artisan make:view products.create
php artisan make:view products.edit
php artisan make:view products.show

The above commands will generate the following Blade view files:

  1. app.blade.php
  2. index.blade.php
  3. create.blade.php
  4. edit.blade.php
  5. show.blade.php

Now, we need to update each of these view files with the appropriate code.

Starting with app.blade.php, which serves as the main layout view file for our Laravel 12 CRUD application:

Copy and paste the following code into resources/views/layouts/app.blade.php:

<!DOCTYPE html>
<html lang="{{ str_replace('_', '-', app()->getLocale()) }}">
<head>
    <meta charset="UTF-8">
    <meta name="viewport" content="width=device-width, initial-scale=1.0">
    <meta http-equiv="X-UA-Compatible" content="ie=edge">
    <title>Simple Laravel 12 CRUD Application Tutorial - AllPHPTricks.com</title>
    <link rel="stylesheet" href="https://cdn.jsdelivr.net/npm/[email protected]/dist/css/bootstrap.min.css" crossorigin="anonymous">
    <link rel="stylesheet" href="https://cdn.jsdelivr.net/npm/[email protected]/font/bootstrap-icons.css" crossorigin="anonymous">
</head>
<body>   

    <div class="container">
        <h3 class=" mt-3">Simple Laravel 12 CRUD Application Tutorial - <a href="https://www.allphptricks.com/">AllPHPTricks.com</a></h3>
            @yield('content')
            <div class="row justify-content-center text-center mt-3">
                <div class="col-md-12">
                    <p>Back to Tutorial: 
                        <a href="https://www.allphptricks.com/simple-laravel-12-crud-application-tutorial/"><strong>Tutorial Link</strong></a>
                    </p>
                    <p>
                        For More Web Development Tutorials Visit: <a href="https://www.allphptricks.com/"><strong>AllPHPTricks.com</strong></a>
                    </p>
                </div>
            </div>
    </div>

<script src="https://cdn.jsdelivr.net/npm/[email protected]/dist/js/bootstrap.bundle.min.js" crossorigin="anonymous"></script>
</body>
</html>

index.blade.php is the main landing page of the Laravel 12 CRUD application. It displays a list of all products from the database along with pagination.

Copy and paste the following code into the resources/views/products/index.blade.php file:

@extends('layouts.app')

@section('content')

<div class="row justify-content-center mt-3">
    <div class="col-md-12">

        @session('success')
            <div class="alert alert-success" role="alert">
                {{ $value }}
            </div>
        @endsession

        <div class="card">
            <div class="card-header">Product List</div>
            <div class="card-body">
                <a href="{{ route('products.create') }}" class="btn btn-success btn-sm my-2"><i class="bi bi-plus-circle"></i> Add New Product</a>
                <table class="table table-striped table-bordered">
                    <thead>
                      <tr>
                        <th scope="col">S#</th>
                        <th scope="col">Code</th>
                        <th scope="col">Name</th>
                        <th scope="col">Quantity</th>
                        <th scope="col">Price</th>
                        <th scope="col">Action</th>
                      </tr>
                    </thead>
                    <tbody>
                        @forelse ($products as $product)
                        <tr>
                            <th scope="row">{{ $loop->iteration }}</th>
                            <td>{{ $product->code }}</td>
                            <td>{{ $product->name }}</td>
                            <td>{{ $product->quantity }}</td>
                            <td>{{ $product->price }}</td>
                            <td>
                                <form action="{{ route('products.destroy', $product->id) }}" method="post">
                                    @csrf
                                    @method('DELETE')

                                    <a href="{{ route('products.show', $product->id) }}" class="btn btn-warning btn-sm"><i class="bi bi-eye"></i> Show</a>

                                    <a href="{{ route('products.edit', $product->id) }}" class="btn btn-primary btn-sm"><i class="bi bi-pencil-square"></i> Edit</a>   

                                    <button type="submit" class="btn btn-danger btn-sm" onclick="return confirm('Do you want to delete this product?');"><i class="bi bi-trash"></i> Delete</button>
                                </form>
                            </td>
                        </tr>
                        @empty
                            <td colspan="6">
                                <span class="text-danger">
                                    <strong>No Product Found!</strong>
                                </span>
                            </td>
                        @endforelse
                    </tbody>
                  </table>

                  {{ $products->links() }}

            </div>
        </div>
    </div>    
</div>
    
@endsection

create.blade.php is the Blade view file used to add a new product.

Simply copy and paste the following code into resources/views/products/create.blade.php:

@extends('layouts.app')

@section('content')

<div class="row justify-content-center mt-3">
    <div class="col-md-8">

        <div class="card">
            <div class="card-header">
                <div class="float-start">
                    Add New Product
                </div>
                <div class="float-end">
                    <a href="{{ route('products.index') }}" class="btn btn-primary btn-sm">&larr; Back</a>
                </div>
            </div>
            <div class="card-body">
                <form action="{{ route('products.store') }}" method="post">
                    @csrf

                    <div class="mb-3 row">
                        <label for="code" class="col-md-4 col-form-label text-md-end text-start">Code</label>
                        <div class="col-md-6">
                          <input type="text" class="form-control @error('code') is-invalid @enderror" id="code" name="code" value="{{ old('code') }}">
                            @error('code')
                                <span class="text-danger">{{ $message }}</span>
                            @enderror
                        </div>
                    </div>

                    <div class="mb-3 row">
                        <label for="name" class="col-md-4 col-form-label text-md-end text-start">Name</label>
                        <div class="col-md-6">
                          <input type="text" class="form-control @error('name') is-invalid @enderror" id="name" name="name" value="{{ old('name') }}">
                            @error('name')
                                <span class="text-danger">{{ $message }}</span>
                            @enderror
                        </div>
                    </div>

                    <div class="mb-3 row">
                        <label for="quantity" class="col-md-4 col-form-label text-md-end text-start">Quantity</label>
                        <div class="col-md-6">
                          <input type="number" class="form-control @error('quantity') is-invalid @enderror" id="quantity" name="quantity" value="{{ old('quantity') }}">
                            @error('quantity')
                                <span class="text-danger">{{ $message }}</span>
                            @enderror
                        </div>
                    </div>

                    <div class="mb-3 row">
                        <label for="price" class="col-md-4 col-form-label text-md-end text-start">Price</label>
                        <div class="col-md-6">
                          <input type="number" step="0.01" class="form-control @error('price') is-invalid @enderror" id="price" name="price" value="{{ old('price') }}">
                            @error('price')
                                <span class="text-danger">{{ $message }}</span>
                            @enderror
                        </div>
                    </div>

                    <div class="mb-3 row">
                        <label for="description" class="col-md-4 col-form-label text-md-end text-start">Description</label>
                        <div class="col-md-6">
                            <textarea class="form-control @error('description') is-invalid @enderror" id="description" name="description">{{ old('description') }}</textarea>
                            @error('description')
                                <span class="text-danger">{{ $message }}</span>
                            @enderror
                        </div>
                    </div>
                    
                    <div class="mb-3 row">
                        <input type="submit" class="col-md-3 offset-md-5 btn btn-primary" value="Add Product">
                    </div>
                    
                </form>
            </div>
        </div>
    </div>    
</div>
    
@endsection

edit.blade.php is the Blade view file used for editing a product.

Simply copy and paste the following code into resources/views/products/edit.blade.php:

@extends('layouts.app')

@section('content')

<div class="row justify-content-center mt-3">
    <div class="col-md-8">

        @session('success')
            <div class="alert alert-success" role="alert">
                {{ $value }}
            </div>
        @endsession

        <div class="card">
            <div class="card-header">
                <div class="float-start">
                    Edit Product
                </div>
                <div class="float-end">
                    <a href="{{ route('products.index') }}" class="btn btn-primary btn-sm">&larr; Back</a>
                </div>
            </div>
            <div class="card-body">
                <form action="{{ route('products.update', $product->id) }}" method="post">
                    @csrf
                    @method("PUT")

                    <div class="mb-3 row">
                        <label for="code" class="col-md-4 col-form-label text-md-end text-start">Code</label>
                        <div class="col-md-6">
                          <input type="text" class="form-control @error('code') is-invalid @enderror" id="code" name="code" value="{{ $product->code }}">
                            @error('code')
                                <span class="text-danger">{{ $message }}</span>
                            @enderror
                        </div>
                    </div>

                    <div class="mb-3 row">
                        <label for="name" class="col-md-4 col-form-label text-md-end text-start">Name</label>
                        <div class="col-md-6">
                          <input type="text" class="form-control @error('name') is-invalid @enderror" id="name" name="name" value="{{ $product->name }}">
                            @error('name')
                                <span class="text-danger">{{ $message }}</span>
                            @enderror
                        </div>
                    </div>

                    <div class="mb-3 row">
                        <label for="quantity" class="col-md-4 col-form-label text-md-end text-start">Quantity</label>
                        <div class="col-md-6">
                          <input type="number" class="form-control @error('quantity') is-invalid @enderror" id="quantity" name="quantity" value="{{ $product->quantity }}">
                            @error('quantity')
                                <span class="text-danger">{{ $message }}</span>
                            @enderror
                        </div>
                    </div>

                    <div class="mb-3 row">
                        <label for="price" class="col-md-4 col-form-label text-md-end text-start">Price</label>
                        <div class="col-md-6">
                          <input type="number" step="0.01" class="form-control @error('price') is-invalid @enderror" id="price" name="price" value="{{ $product->price }}">
                            @error('price')
                                <span class="text-danger">{{ $message }}</span>
                            @enderror
                        </div>
                    </div>

                    <div class="mb-3 row">
                        <label for="description" class="col-md-4 col-form-label text-md-end text-start">Description</label>
                        <div class="col-md-6">
                            <textarea class="form-control @error('description') is-invalid @enderror" id="description" name="description">{{ $product->description }}</textarea>
                            @error('description')
                                <span class="text-danger">{{ $message }}</span>
                            @enderror
                        </div>
                    </div>
                    
                    <div class="mb-3 row">
                        <input type="submit" class="col-md-3 offset-md-5 btn btn-primary" value="Update">
                    </div>
                    
                </form>
            </div>
        </div>
    </div>    
</div>
    
@endsection

show.blade.php is the Blade view file used to display a single product’s details.

Simply copy and paste the following code into resources/views/products/show.blade.php:

@extends('layouts.app')

@section('content')

<div class="row justify-content-center mt-3">
    <div class="col-md-8">

        <div class="card">
            <div class="card-header">
                <div class="float-start">
                    Product Information
                </div>
                <div class="float-end">
                    <a href="{{ route('products.index') }}" class="btn btn-primary btn-sm">&larr; Back</a>
                </div>
            </div>
            <div class="card-body">

                    <div class="row">
                        <label for="code" class="col-md-4 col-form-label text-md-end text-start"><strong>Code:</strong></label>
                        <div class="col-md-6" style="line-height: 35px;">
                            {{ $product->code }}
                        </div>
                    </div>

                    <div class="row">
                        <label for="name" class="col-md-4 col-form-label text-md-end text-start"><strong>Name:</strong></label>
                        <div class="col-md-6" style="line-height: 35px;">
                            {{ $product->name }}
                        </div>
                    </div>

                    <div class="row">
                        <label for="quantity" class="col-md-4 col-form-label text-md-end text-start"><strong>Quantity:</strong></label>
                        <div class="col-md-6" style="line-height: 35px;">
                            {{ $product->quantity }}
                        </div>
                    </div>

                    <div class="row">
                        <label for="price" class="col-md-4 col-form-label text-md-end text-start"><strong>Price:</strong></label>
                        <div class="col-md-6" style="line-height: 35px;">
                            {{ $product->price }}
                        </div>
                    </div>

                    <div class="row">
                        <label for="description" class="col-md-4 col-form-label text-md-end text-start"><strong>Description:</strong></label>
                        <div class="col-md-6" style="line-height: 35px;">
                            {{ $product->description }}
                        </div>
                    </div>
        
            </div>
        </div>
    </div>    
</div>
    
@endsection

Step 10. Run Laravel Development Server

Finally, we’ve completed all the steps of our Laravel 12 CRUD application tutorial. Now it’s time to test the application.

Start the Laravel development server by running the following Artisan command:

php artisan serve

After starting the development server, visit the following URL to test your Laravel 12 CRUD application:

http://127.0.0.1:8000/products

Download

Conclusion

We hope that by following the steps above, you have learned how to easily create a simple Laravel 12 CRUD application.

If you found this tutorial helpful, please share it with your friends and developer groups.

I spent several hours creating this tutorial. If you’d like to say thanks, consider liking my pages on Facebook, Twitter, and GitHub — and don’t forget to share it!

The post Simple Laravel 12 CRUD Application Tutorial appeared first on All PHP Tricks - Web Development Tutorials and Demos.

❌