How to Install Python 3.14 on Ubuntu Linux
21 November 2025 at 06:52
Extracting tables from PDF files in Python is not always a straightforward process unless you have a specific library to do that. For PDF data extraction, using Camelot is one of the go-to tools. The best part is that it is not very difficult to install, especially if you already have Python, as its package […]
The post How to Install Camelot in Python: Guide for Windows, macOS, and Linux appeared first on LinuxShout.
![]()
![]()
Data is everywhere. Every click, purchase, or social media like creates mountains of information, but raw numbers do not tell a story. That is where data analysts come in. They turn messy datasets into actionable insights that help businesses grow.
Whether you're looking to become a junior data analyst or looking to level up, here are the top 11 data analyst skills every professional needs in 2025, including one optional skill that can help you stand out.
SQL (Structured Query Language) is the language of databases and is arguably the most important technical skill for analysts. It allows you to efficiently query and manage large datasets across multiple systems—something Excel cannot do at scale.
Example in action: Want last quarter's sales by region? SQL pulls it in seconds, no matter how huge the dataset.
Learning Tip: Start with basic queries, then explore joins, aggregations, and subqueries. Practicing data analytics exercises with SQL will help you build confidence and precision.
Since it’s not going anywhere, it’s still worth it to learn Microsoft Excel. Beyond spreadsheets, it offers pivot tables, macros, and Power Query, which are perfect for quick analysis on smaller datasets. Many startups or lean teams still rely on Excel as their first database.
Example in action: Summarize thousands of rows of customer feedback in minutes with pivot tables, then highlight trends visually.
Learning Tip: Focus on pivot tables, logical formulas, and basic automation. Once comfortable, try linking Excel to SQL queries or automating repetitive tasks to strengthen your technical skills in data analytics.
Python and R are essential for handling big datasets, advanced analytics, and automation. Python is versatile for cleaning data, automation, and integrating analyses into workflows, while R excels at exploratory data analysis and statistical analysis.
Example in action: Clean hundreds of thousands of rows with Python’s pandas library in seconds, something that would take hours in Excel.
Learning Tip: Start with data cleaning and visualization, then move to complex analyses like regression or predictive modeling. Building these data analyst skills is critical for anyone working in data science. Of course, which is better to learn is still up for debate.
Numbers alone rarely persuade anyone. Data visualization is how you make your insights clear and memorable. Tools like Tableau, Power BI, or Python/R libraries help you tell a story that anyone can understand.
Example in action: A simple line chart showing revenue trends can be far more persuasive than a table of numbers.
Learning Tip: Design visuals with your audience in mind. Recreate dashboards from online tutorials to practice clarity, storytelling, and your soft skills in communicating data analytics results.
Strong statistical analysis knowledge separates analysts who report numbers from those who generate insights. Skills like regression, correlation, hypothesis testing, and A/B testing help you interpret trends accurately.
Example in action: Before recommending a new marketing campaign, test whether the increase in sales is statistically significant or just random fluctuation.
Learning Tip: Focus on core probability and statistics concepts first, then practice applying them in projects. Our Probability and Statistics with Python skill path is a great way to learn theoretical concepts in a hands-on way.
Data rarely comes perfect, so data cleaning skills will always be in demand. Cleaning and transforming datasets, removing duplicates, handling missing values, and standardizing formats are often the most time-consuming but essential parts of the job.
Example in action: You want to analyze customer reviews, but ratings are inconsistent and some entries are blank. Cleaning the data ensures your insights are accurate and actionable.
Learning Tip: Practice on free datasets or public data repositories to build real-world data analyst skills.
Analyzing data is only half the battle. Sharing your findings clearly is just as important. Being able to present insights in reports, dashboards, or meetings ensures your work drives decisions.
Example in action: Presenting a dashboard to a marketing team that highlights which campaigns brought the most new customers can influence next-quarter strategy.
Learning Tip: Practice explaining complex findings to someone without a technical background. Focus on clarity, storytelling, and visuals rather than technical jargon. Strong soft skills are just as valuable as your technical skills in data analytics.
Beyond visualizations, analysts need to build dashboards and reports that allow stakeholders to interact with data. A dashboard is not just a fancy chart. It is a tool that empowers teams to make data-driven decisions without waiting for you to interpret every number.
Example in action: A sales dashboard with filters for region, product line, and time period can help managers quickly identify areas for improvement.
Learning Tip: Start with simple dashboards in Tableau, Power BI, or Google Data Studio. Focus on making them interactive, easy to understand, and aligned with business goals. This is an essential part of professional data analytics skills.
Understanding the industry or context of your data makes you exponentially more effective. Metrics and trends mean different things depending on the business.
Example in action: Knowing e-commerce metrics like cart abandonment versus subscription churn metrics can change how you interpret the same type of data.
Learning Tip: Study your company’s industry, read case studies, or shadow colleagues in different departments to build context. The more you know, the better your insights and analysis will be.
Numbers can be misleading. Critical thinking lets analysts ask the right questions, identify anomalies, and uncover hidden insights.
Example in action: Revenue drops in one region. Critical thinking helps you ask whether it is seasonal, a data error, or a genuine trend.
Learning Tip: Challenge assumptions and always ask “why” multiple times when analyzing a dataset. Practice with open-ended case studies to sharpen your analytical thinking and overall data analyst skills.
Not every analyst uses machine learning daily, but knowing the basics—predictive modeling, clustering, or AI-powered insights—can help you stand out. You do not need this skill to get started as an analyst, but familiarity with it is increasingly valuable for advanced roles.
Example in action: Using a simple predictive model to forecast next month’s sales trends can help your team allocate resources more effectively.
Learning Tip: Start small with beginner-friendly tools like Python’s scikit-learn library, then explore more advanced models as you grow. Treat it as an optional skill to explore once you are confident in SQL, Python/R, and statistical analysis.
Want to become a data analyst? Dataquest makes it easy to learn the skills you need to get hired.
With our Data Analyst in Python and Data Analyst in R career paths, you’ll learn by doing real projects, not just watching videos. Each course helps you build the technical and practical skills employers look for.
By the end, you’ll have the knowledge, experience, and confidence to start your career in data analysis.
Being a data analyst is not just about crunching numbers. It is about turning data into actionable insights that drive decisions. Master these data analytics and data analyst skills, and you will be prepared to handle the challenges of 2025 and beyond.
This guide gives you 91 ways to practice Python — from quick exercises to real projects and helpful courses. Whether you’re a beginner or preparing for a job, there’s something here for you.
Some Python programming courses let you learn and code at the same time. You read a short lesson, then solve a problem in your browser. It’s a fast, hands-on way to learn.
Each course below includes at least one free lesson you can try.
![]()
These courses are a great way to practice Python online, and they're all free to start. If you're looking for more Python courses, you can find them on Dataquest's course page.
Exercises are a great way to focus on a specific skill. For example, if you have a job interview coming up, practicing Python dictionaries will refresh your knowledge and boost your confidence.
Each lesson is free to start.
![]()
Projects are one of the best ways to practice Python. Doing projects helps you remember syntax, apply what you’ve learned, and build a portfolio to show employers.
Here are some projects you can start with right away:
If none of these spark your interest, there are plenty of other Python projects to try.
If exercises, courses, or projects aren’t your thing, blog-style tutorials are another way to learn Python. They’re great for reading on your phone or when you can’t code directly.
The web is full of thousands of beginner Python tutorials. Once you know the basics, you can find endless ways to practice Python online.
You can download Python directly here, or use a program like Anaconda Individual Edition that makes the process easier. If you don’t want to install anything, you can use an interactive online platform like Dataquest and write code right in your browser.
Find a good Python project or some practice problems to apply what you’re learning. Hands-on coding is one of the best ways to improve.
Plan your practice sessions and stick to them. Regular, consistent practice is key to learning Python effectively.
It's always great to get help from a real person. Reddit has great Python communities, and Dataquest's Community is great if you're learning Python data skills.
Yes! There are many apps that let you practice Python on both iOS and Android.
However, mobile practice shouldn’t be your main way of learning if you want to use Python professionally. It’s important to practice installing and working with Python on a desktop or laptop, since that’s how most real-world programming is done.
If you’re looking for an app to practice on the go, a great option is Mimo.
Absolutely! While AI is a powerful support tool, we can’t always rely on it blindly. AI can sometimes give incorrect answers or generate code that isn’t optimal.
Python is still essential, especially in the AI field. It’s a foundational language for developing AI technologies and is constantly updated to work with the latest AI advancements.
Popular Python libraries like TensorFlow and PyTorch make it easier to build and train complex AI models efficiently. Learning Python also helps you understand how AI tools work under the hood, making you a more skilled and knowledgeable developer.
![]()
![]()
Python announced the new 3.14 version yesterday! See what’s new and how to install guide for Ubuntu users.
Python 3.14 is the latest stable release of the Python programming language, with 5 years support until 2030.
Since the release, the free-threaded build of Python is officially supported and no longer experimental. It’s so far optional, though will be make default in next phase.
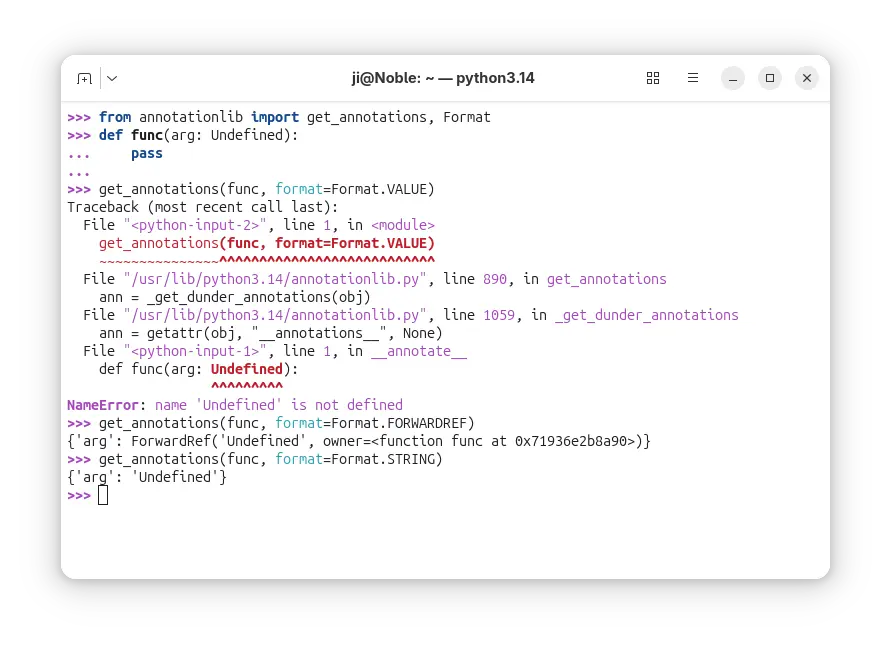
In Python 3.14, the evaluation of annotations is now deferred. It introduced the new annotationlib module, providing tools for inspecting deferred annotations. And, annotations may be evaluated in the VALUE format, the FORWARDREF format, and the STRING format. See PEP 649 for more.
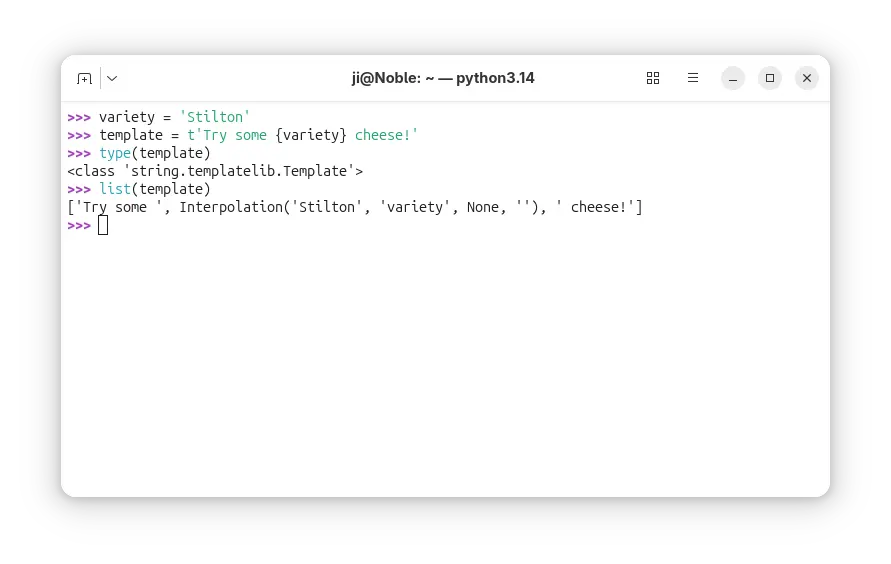
It added Template string literals (PEP 750), new mechanism for custom string processing. The new t-strings use the familiar syntax of f-strings, but return an object representing the static and interpolated parts of the string.
Python 3.14 finally added multiple interpreters in the standard library (PEP 734). With the new concurrent.interpreters module, it now supports running multiple copies of Python in the same process simultaneously without C-API.
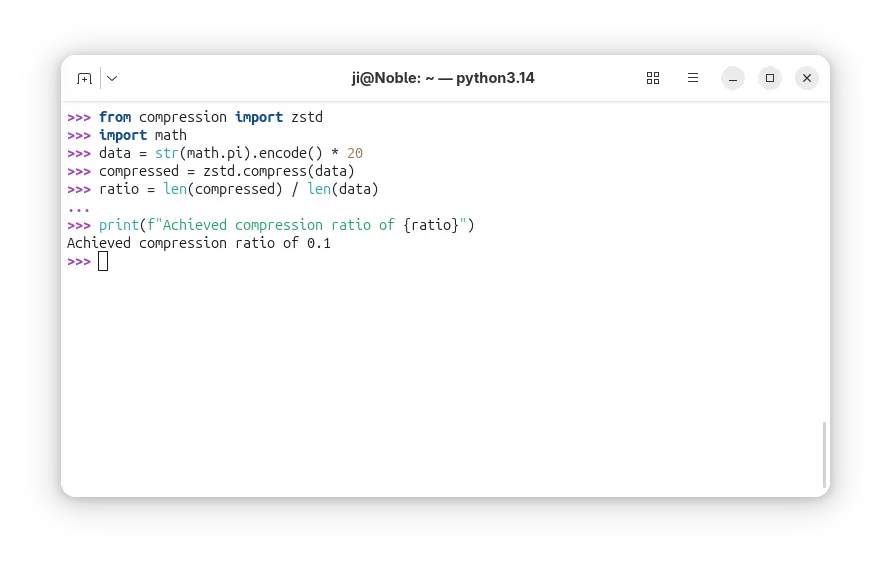
It as well introduced new compression package contains compression.lzma, compression.bz2, compression.gzip, compression.zlib, as well as compression.zstd modules.
Besides compression and decompression for the Zstandard format (PEP 784), the support for reading and writing Zstandard compressed archives has been added to the tarfile, zipfile, and shutil modules.
The release also introduced a zero-overhead debugging interface for CPython, that allows debuggers and profilers to safely attach to running Python processes without stopping or restarting them.
A new command-line interface is added to inspect running Python processes using asynchronous tasks, available via python -m asyncio ps PID or python -m asyncio pstree PID.
And the pdb module now supports remote attaching to a running Python process using a new -p PID command-line option. For example, run python -m pdb -p 1234 will connect to the Python process with the given PID and allow you to debug it interactively.
Other changes include:
except and except* expressions without brackets.For more details about Python 3.14, see the official docs.
The source tarball for Python 3.14 is available to download via the link below:
Ubuntu has made Python 3.14 in system repository in 25.10. For Ubuntu 22.04 and Ubuntu 24.04, the popular Deadsnakes PPA has been updated with the package for the 2 LTS releases.
To add the PPA and install the package, run commands below one by one:
sudo add-apt-repository ppa:deadsnakes/ppa
sudo apt update
sudo apt install python3.14-full
For other Ubuntu releases, it’s not hard to build from source. And, I’ve written a step by step guide for all current Ubuntu releases.
Python is often considered to be one of the most powerful, adaptable, and easy-to-learn high-level programming languages for developing websites,
The post 3 Highest-Rated Udemy Python Courses for Beginners first appeared on Tecmint: Linux Howtos, Tutorials & Guides.We are going to need smart engineering solutions to solve our planet’s problems (and soon in other celestial bodies in our solar system) in a smart and scalable manner. Parametric programming is a fantastic approach to optimize efficient engineering methods and achieve those goals.
We recently came across a very interesting platform named VIKTOR which introduces smart app development for engineering with our favorite programming language: Python. The Python-based software is applicable to so many disciplines in the engineering and applied science fields. From material science to organic chemistry, civil engineering to mechanical engineering, Viktor offers an impressive toolbox and takes care of tedious processes such as app hosting, app deployment, intellectual property management and server administration.
In this mini-tutorial we will demonstrate how to create parametric design elements using VIKTOR and Python. VIKTRO also helps package, save, deploy and distribute your engineering app with your colleagues or clients and it can be useful for both engineers and engineering-related business teams as well.
Creating a web app is an awesome way to let people interact with your Python code because people everywhere in the world can access it; even the ones without any Python skills can use a graphical interface. It brings a whole another level of visualization and interactivity to your engineering project. First, we will ask VIKTOR to create a folder with an empty app containing all files you need, and then install it.
Some years ago, you would be right, but nowadays, the low-code app development platform VIKTOR makes it so easy that virtually anyone with Python knowledge can do it.
In this tutorial, we will guide you to build your very first app with VIKTOR. We will start with a blank app and create an interactive 3D model of a radio tower step by step. So, let’s get started!
Note: In case you need it, we included a complete web app code at the end of this tutorial.
Contents:
Before we get started, we need to download and install VIKTOR. VIKTOR is the platform that will help us create and host the web app using nothing but Python.
Here, you can create your VIKTOR account for free. Just follow the installation instructions which are pretty straightforward. This will take approximately 10 mins.
First, we will first ask VIKTOR to create a folder with an empty app containing all files
you need, and then install it. We will use this app as a basis to make your app. So, let’s get started!
Right-click in this folder and click on ‘Open in Terminal’ (or similar, e.g. ‘Open PowerShell window here’) to open the command-line shell, as in the image below. Note that in older versions of Windows, you may need to Shift + Right-click on the folder.
viktor-cli create-app tower-app
This command creates an app with the name ‘tower-app’. After executing the command, you will find a folder called ‘tower-app’ inside the ‘viktor-apps’ folder.
1. In the PowerShell navigate to the ‘tower-app’ folder:
cd tower-app
2. Before installing a new app, you need to clear the database by running the following command:
viktor-cli clear
3. Now you can install your app using the command below. Installation can take up to 3 minutes, so just have a little patience and read the information below.
viktor-cli install
The command tells VIKTOR to install the app stored inside the folder where you run the command. That is why we ask you to navigate to the app folder first.
4. Start the app with:
viktor-cli start
Congratulations, your app is up and running! However, do not close your command-line shell; otherwise, your app will stop.
5. Open your app in your browser by visiting VIKTOR cloud as explained in the command-line shell
6. After logging in, open the “Development” card. Great, your app is up and running. Now let’s go to the fun part: start building the 3D model!
In this part of the tutorial, we will create a 3D model of the radio tower using the geometry module. Before we start building the 3D model, let’s check out what the current application looks like.
In your browser,
You should now see an empty page. So let’s start creating our 3D model.
First, we will visualize the base of the radio tower. The base will just be a cylinder, which will have a height and a diameter. The first part is a bit slow, but I promise that we will draw the rest of the tower at lighting speed.
tower-app and open app.py in your favourite code editors.app.py so that it looks like this:from viktor.core import ViktorController
from viktor.parametrization import ViktorParametrization
class Parametrization(ViktorParametrization):
pass
class Controller(ViktorController):
label = 'VIKTOR Tutorial'
parametrization = Parametrization
3. On the top, import some additional functions we will need to create the app:
from viktor.geometry import Point,Line,CircularExtrusion,Material,Color
from viktor.views import GeometryView,GeometryResult
4. First we will create a geometry view to show your 3D model and define a function to draw everything. We do this inside your controller like this.
...
class Controller(ViktorController):
  label = 'VIKTOR Tutorial'
  parametrization = Parametrization

  @GeometryView("3D", duration_guess=1)
  def visualize_tower(self, params, **kwargs):
    """Creates the 3D view and visualizes the Radio Tower"""

    return GeometryResult()
...
  @GeometryView("3D", duration_guess=1)
  def visualize_tower(self, params, **kwargs):
    """Creates the 3D view and visualizes the Radio Tower"""

    # Reference points

    base_start = Point(0, 0, 0)         #<--- Add this lines
    base_end = Point(0, 0, 50)          #<--- Add this lines

    return GeometryResult()
CirculerExtrusion, which draws a cylinder following a line between the points base_start and base_end. Under the two point we just created add: # Create tower base
line = Line(base_start, base_end)
base = CircularExtrusion(diameter=5, line=line)
return GeometryResult(base) # <--- don't forget to change this line
In case something went wrong, here you can see the complete code so far. Just copy/paste it in app.py and everything should work.
from viktor.core import ViktorController
from viktor.parametrization import ViktorParametrization
from viktor.geometry import Point, Line, CircularExtrusion, Cone, Sphere, Material, Color
from viktor.views import GeometryResult, GeometryView


class Parametrization(ViktorParametrization):
    pass


class Controller(ViktorController):
    label = 'VIKTOR Tutorial'
    parametrization = Parametrization

    @GeometryView("3D", duration_guess=1)
    def visualize_tower(self, params, **kwargs):
        """Creates the 3D view and visualizes the Radio Tower"""

        # Reference points

        base_start = Point(0, 0, 0)
        base_end = Point(0, 0, 50)

        # Create tower base

        line = Line(base_start, base_end)
        base = CircularExtrusion(diameter=5, line=line)

        return GeometryResult(base)
We created a 3D model in the last section, but what if you want a user to change the geometry dynamically? Using VIKTOR’s input fields you can. Let’s add a few input fields to change the length, width and height of your cylinder.
NumberField we need. At the top of you code add:from viktor.parametrization import NumberField
class Parametrization(ViktorParametrization): we will add 2 fields to change the dimensions of the cylinder, and don’t forget to eliminate pass. You code should look like this:...
class Parametrization(ViktorParametrization):
"""Parametrization of the Radio Tower"""
# Base of the tower
base_height = NumberField("Height base", default=50, min=1)
base_diameter = NumberField("Diameter base", default=3, min=1)
#pass <---- DELETE THIS LINE
...
app.py file. Go to your app, refresh the page and see the NumberFields appear in your app.Did you notice that changing the values does not modify the 3D model? This is because we have not connected the NumberFields to your 3D model yet. We’ll do this next.
from viktor.core import ViktorController
from viktor.parametrization import ViktorParametrization, NumberField
from viktor.geometry import Point, Line, CircularExtrusion, Cone, Sphere, Material, Color
from viktor.views import GeometryResult, GeometryView


class Parametrization(ViktorParametrization):
    """Parametrization of the Radio Tower"""

    # Base of the tower
    base_height = NumberField("Height base", default=50, min=1)
    base_diameter = NumberField("Diameter base", default=3, min=1)


class Controller(ViktorController):
    label = 'VIKTOR Tutorial'
    parametrization = Parametrization

    @GeometryView("3D", duration_guess=1)
    def visualize_tower(self, params, **kwargs):
        """Creates the 3D view and visualizes the Radio Tower"""

        # Reference points

        base_start = Point(0, 0, 0)
        base_end = Point(0, 0, 50)

        # Create tower base

        line = Line(base_start, base_end)
        base = CircularExtrusion(diameter=5, line=line)

        return GeometryResult(base)
We’ll connect the input fields to the 3D model to make it dynamic:
base_end from a static 50 to params.base_height and the value of diameter to params.base_diameter as shown below:...
@GeometryView("3D",duration_guess=1)
def visualize_tower(self, params, **kwargs):
"""Creates the 3D view and visualizes the Radio Tower"""
# Reference points
base_start = Point(0, 0, 0)
base_end = Point(0, 0, params.base_height) # <--- add params.base_height here
# Create tower base
line = Line(base_start, base_end)
base = CircularExtrusion(diameter=params.base_diameter, line=line) # <--- params.base_diameter here
return GeometryResult(base)
app.py file. This time, instead of refreshing your app, just change some input values. Did you see that? VIKTOR updated the app, and your 3D model is now dynamic!Awesome, we already created a fully functioning parametrized model of a beam including a 3D visualisation! If you were
wondering whether this is a good time: Yes, this is a perfect moment to pat yourself on the back!
So what happens in the background? Each time you change an input parameter, VIKTOR reruns the corresponding code and shows the results in the view. In technical words, your code is stateless.
params. That is why it is important to pass it to def visualize_tower(self, params, **kwargs).params is a Munch, which is like a Python dictionary. You can access the data inside params using dot-style notation. So, for example, to access height inside params, you write params.height.At the top of the tower we add a Sphere.
1. Let’s import Sphere
from viktor.geometry import Sphere
2. We will add and input field to determine the Sphere’s radius:
...
class Parametrization(ViktorParametrization):

 base_height = NumberField("Height base", default=50, min=1)
 base_diameter = NumberField("Diameter base", default=3, min=1)
 sphere_radius = NumberField("Radius sphere", default=4, min=1)      # <-- Add this line
3. Go to our @GeometryView and add a Sphere under the lines that define the base. Sphere needs a point and a diameter. Don’t forget to return the Sphere at the end, so it is visualized. Your code should look like this:
@GeometryView("3D", duration_guess=1)
def visualize_tower(self, params, **kwargs):
  """Creates the 3D view and visualizes the Radio Tower"""

  # Reference points

  base_start = Point(0, 0, 0)
  base_end = Point(0, 0, params.base_height)

  # Create tower base

  line = Line(base_start, base_end)
  base = CircularExtrusion(diameter=params.base_diameter, line=line)

  # Create tower cabin

  cabin = Sphere(base_end, params.sphere_radius)  # <-- Add this line

  return GeometryResult([base, cabin]) # <--- put base and cabin in a list, so they are shown.
4. Again. Save the file and refresh the app.
Now that you are used to VIKTOR, we ramp up the speed and quickly add the mast on top of our tower in the exact same way we have done before.
1. Import the code:
from viktor.geometry import Cone
2. Add the NumberField for the mast height:
mast_height = NumberField("Height mast", default=30, min=1)
3. Draw a cone and don’t forget to return it so it is visualized:
# Tower top

top = Cone(diameter=params.base_diameter, height=params.mast_height, origin=base_end) # <-- Add this line

return GeometryResult([base,cabin,top]) # <-- Update this line
4. Save the file and refresh.
Great, we created the full 3D model of the tower, but it is looking a bit pale. Let’s add some color, we don’t want a plane crashing into it 😉
We will add color, by creating some Material and adding them to the 3D models.
1. Import Material and Color:
from viktor.geometry import Material, Color
2. Add materials as constants under the imports and before the Parametrization class:
...

WHITE = Material("White", color=Color.white())  # <-- Add these lines too
RED = Material("Red", color=Color.red())        # <-- Add these lines too

class Parametrization(ViktorParametrization): # <-- this line is just for your reference

...
3. Add the materials to the different geometries we created before, as shown here:
...

# Create tower base
line = Line(base_start, base_end)
base = CircularExtrusion(diameter=params.base_diameter, line=line, material=WHITE)

# Create tower cabin

cabin = Sphere(base_end, params.sphere_radius, material=WHITE)

# Tower top

top = Cone(diameter=params.base_diameter, height=params.mast_height, origin=base_end, material=RED)
4. Save, refresh, and you should have a colorful tower:
If you managed to get this far, you have done a great job and successfully built your first Python app with VIKTOR! VIKTOR has a large collection of functions and visualizations that await exploring. Feel free to go and check out their docs and start making your own engineering apps powered by Python.
And if you need any help, want to request features or share your creations, you can head over to the Community Forum.
Just in case, here you can find the complete code of the app:
from viktor.core import ViktorController
from viktor.parametrization import ViktorParametrization, NumberField
from viktor.geometry import Point, Line, CircularExtrusion, Cone, Sphere, Material, Color
from viktor.views import GeometryResult, GeometryView

WHITE = Material("White", color=Color.white())
RED = Material("Red", color=Color.red())


class Parametrization(ViktorParametrization):

  base_height = NumberField("Height base", default=50, min=1)
  base_diameter = NumberField("Diameter base", default=3, min=1)
  sphere_radius = NumberField("Radius sphere", default=4, min=1)
  mast_height = NumberField("Height mast", default=30, min=1)


class Controller(ViktorController):
  label = 'VIKTOR Tutorial'
  parametrization = Parametrization

  @GeometryView("3D", duration_guess=1)
  def visualize_tower(self, params, **kwargs):
    """Creates the 3D view and visualizes the Radio Tower"""

    print("Params:", params)

    # Reference points

    base_start = Point(0, 0, 0)
    base_end = Point(0, 0, params.base_height)

    # Create tower base

    line = Line(base_start, base_end)
    base = CircularExtrusion(diameter=params.base_diameter, line=line, material=WHITE)

    # Create tower cabin

    cabin = Sphere(base_end, params.sphere_radius, material=WHITE)

    # Tower top

    top = Cone(diameter=params.base_diameter, height=params.mast_height, origin=base_end, material=RED)

    return GeometryResult([base, cabin, top])
Now although this web application is pretty simple, it’s effective and useful. Furthermore, this implementation opens a whole new world of opportunities to design engineering apps using minimal Python code base with VIKTOR which can be applied to pretty much any concept under engineering and science subdomains.
VIKTOR takes care of the cybersecurity, hosting, server administration, management of intangible assets such as intellectual property and low-level programming and the result is an intuitive app creation process which can hopefully yield fruitful discussions and/or presentations in projects with parametric design elements.
We will be publishing a number of professional Python tutorials in near future to continue demonstrating Python’s potential in sophisticated use cases in the field and help you gain inspiration that can result in real world outcomes.
You can find the Python source code and information regarding dependencies of this app at our Github Repository: Python-3D-Tower-Web-App source code.
The post How to Create an app with a 3D model using VIKTOR appeared first on HolyPython.com.
Red Hat launched the Ansible Lightspeed Code Assistant Generative AI with IBM Watson Code Assistant in May 2023. This preview is now available to all Ansible users, allowing them to explore the technology, provide feedback to Red Hat, and further train the AI model. In this brief blog post, I will share my personal experience with installing and utilizing Ansible Lightspeed AI to create playbooks in VSCode using Ubuntu Linux 20.04 LTS desktop.
Love this? sudo share_on: Twitter - Facebook - LinkedIn - Whatsapp - Reddit
The post Setting up VSCode for Ansible Lightspeed AI in Ubuntu 22.04 desktop appeared first on nixCraft.
Python is one of the most widely used programming languages that powers many popular web applications, AI/ML technologies, IoT devices, task automation, and many more.
Right now, Python 3 is the latest version, but if you are using an outdated system, you might be using an older version of Python, possibly Python 2, which is now deprecated.
Knowing the correct Python version is crucial, whether you are running a program that only works with a specific version or planning to start a Python project with the latest version.
In this quick guide, I’ll show you how to check the Python version in Ubuntu and other Linux distros from the command line.
There are multiple ways to find out the Python version from the command line; here I’ve provided you with the first two ways to identify if Python 2 or 3 is running on your Linux system, and the third method works for any Python version.
If you are running the older Python 2 version (which is now deprecated) on your Linux system, you can try running the “python” command with the “-V” or “–version” option to check its version information.
$ python -V

# OR

$ python --version
Output:
This method only works for Python 2, as Python 3 requires a different command, which you can find in the next section.
To check the Python 3 version information, you can try running the “python3” command with the “-V” or “–version” option.
$ python3 -V

# OR

$ python3 --version
Output:
This method works for any Linux distribution, as well as for Windows and macOS.
The previous two methods will help you find the Python version installed on your Linux system, but if you want to check the Python version in the interpreter (also known as the Python console) or within a Python script, you can do that too.
The “sys” and “platform” modules can help you check the installed Python version; the “sys” module provides detailed information, including the build number and date, while the “platform” module only prints the version.
You can use any one of them according to your needs, so when you’re ready, open your Python console or script and copy-paste any of the following Python snippets:
# Checking Python Version Using Sys Module
import sys
print(sys.version)

# Checking Python Version Using Platform Module
import platform
print(platform.python_version())
Output:
This method would work on any Linux distribution (such as Debian, Ubuntu, Red Hat, Fedora, Arch, Manjaro, etc.), as well as on Windows, macOS, or Raspberry Pi.
Knowing the correct Python version is crucial to ensuring compatibility among the program, libraries, framework, and applications. This article shows you various methods to check the installed Python version on your Linux system, whether from the command line, the Python interpreter, or programmatically.
If you have any questions, feel free to ask them in the comments.
Till then, peace!
The post How to Check Python Version in Linux (via 3 Methods) appeared first on Linux TLDR.