❌

Reading view

How to Use Chattr Command in Linux (for Beginners)

Chattr is a UNIX command-line program that’s pre-shipped in most Linux distributions. The role of this command is to allow the admin user to set file attributes that impose restrictions on files.

There are a handful of file attributes for different roles, such as the β€œ+i” attribute, which prevents a file from being renamed, deleted, or modified, and the β€œ+a” attribute, which only allows appending new content, as well as a few others that will be discussed later in this tutorial.

The benefit of using this command is that the restriction applies to both the normal user and the root user, making it a good choice for protecting important and sensitive files from accidental or retroactive changes.

In this beginner-friendly tutorial, I’ll explain to you how to use the chattr command with its various options, operators, and file attributes in a real-world scenario.

Tutorial Details

DescriptionChattr command
Difficulty LevelLow
Root or Sudo PrivilegesYes
OS Compatibility Ubuntu, Manjaro, Fedora, etc.
Prerequisites–
Internet RequiredNo

Syntax of the Chattr Command

The chattr command takes three arguments: the first is the option, the second is the file attribute, and the third is the file path where you want to apply the selected file attribute.

$ chattr [option] [attribute*] [path/to/file*]

When you specify the file attribute, you’ll mainly use the β€œ+” and β€œ-” operators: the β€œ+” operator adds the selected attribute restriction to the file, while the β€œ-” operator removes it. Besides this, you use the β€œ=” operator to remove all the existing attributes and replace them with the selected ones.

The available options for chattr are the β€œ-R” option to recursively apply the specified attribute to every file in the selected directory, the β€œ-V” option to display the changed files, and the β€œ-f” option to hide common errors.

Enjoying it, right? Now, let’s learn a bit more about some important file attributes that you’ll mainly use for setting restrictions using the chattr command, starting with…

List of File Attributes for Chattr Command

The following is a list of commonly used chattr attributes and their purposes.

  • a: Only allow appending new content while imposing write, rename, and delete restrictions.
  • A: Access time (or atime) record is frozen.
  • c: Enables the transparent compression of the file on the supported filesystem.
  • S: The changes to the file are updated synchronously, which will ensure the integrity of the critical data.
  • i: Enables immutable mode, which allows the file content to be viewed but prevents writing, renaming, deleting, or appending actions.
  • j: It will ensure that the changes are first applied to the ext3 journal before the file itself.
  • t: Disable the tail-merging.
  • d: It will reject the dump process for the selected file, which is often used for creating backups.
  • u: When a file is accidentally deleted, a copy of the file is generated and can be recovered later.
  • e: It’s a default attribute applied to all files that indicates the file system uses extents to map the file’s location on the disk.

The above list contains a few attributes from the complete list. To see the entire list, you can use the β€œman chattr” command. However, these are sufficient for a beginner, as your work will mostly revolve around them. Let’s now look at some practical examples of this attribute in use.

Apply Write, Rename, and Delete Restriction to File

The β€œ+i” attribute makes the file immutable, preventing any modifications, even by root. A real-life scenario would be protecting a critical configuration file from accidental changes.

$ sudo chattr +i myfile.txt

Output:

Applying modification restriction to file using chattr command

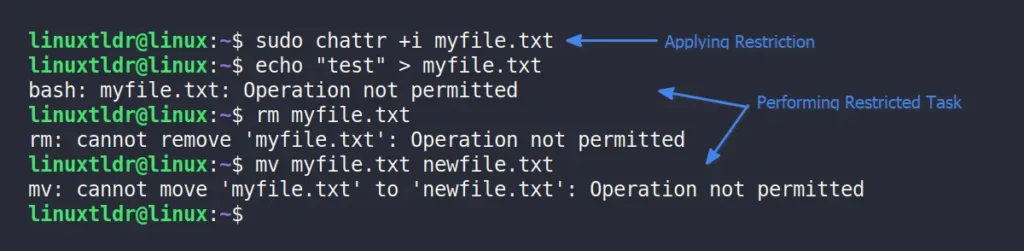
The content of the file can still be viewed despite the write, rename, and delete restrictions.

Remove Write, Rename, and Delete Restriction to File

To remove the restrictions placed on a file in the previous method, you can use the β€œ-i” attribute.

$ sudo chattr -i myfile.txt

Output:

Removing modification restriction to file using chattr command

Note that this will only remove the restriction for the β€œ+i” attribute. If the user assigns a different attribute or multiple attributes at the same time, they will still exist.

Apply Append-Only Permission

The β€œ+a” attribute is very similar to the β€œ+i” attribute and prevents write, rename, and delete actions but allows appending new content to the file. You can apply this attribute to log files to prevent retroactive changes.

$ sudo chattr +i myfile.txt

Output:

Allow append-only permission to the file using chattr command

To restore the file to its original state, use the β€œ-a” attribute to remove the append-only restriction.

Check the Applied Attribute to Selected File

To keep track of existing attributes or verify whether the applied attribute is set, you can use the β€œlsattr” command, which lists all the attributes assigned to the selected file.

$ lsattr myfile.txt

Output:

Check the file atrributes

The above output indicates that the file has two attributes: β€œiβ€œ, which means the file is immutable, and β€œeβ€œ, which is the default attribute applied to all files.

Replace the Existing Attribute With New Attribute

When a file has multiple attributes applied to it but you want to replace all of them with the selected one, you can specify the attribute with the β€œ=” operator for this task.

$ sudo chattr =u myfile.txt

Output:

replacing the existing attribute with new one

Apply the Attribute to All Files Within the Selected Directory

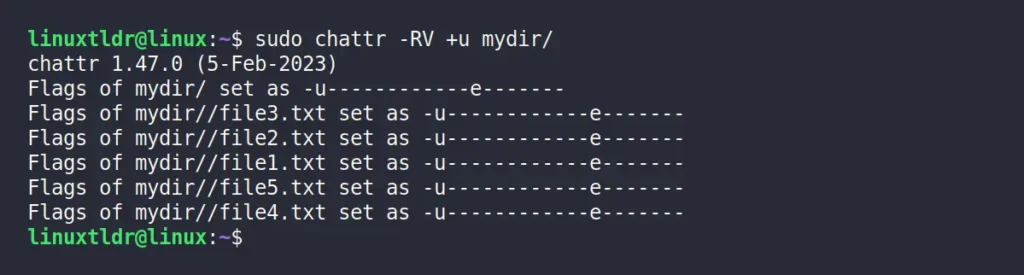
To apply a selected attribute to all files in the target directory, use the β€œ-RV” option to make changes recursively to all files, and then list the affected files.

$ sudo chattr -RV +u mydir/

Output:

Applying file attribute to all files in a directory

Wrap Up

In this article, you have learned how to use the chattr command with various operators and attributes, as well as its available options. If you have any questions about the topic, feel free to reach out to us via the comment section.

Till then, peace!

The post How to Use Chattr Command in Linux (for Beginners) appeared first on Linux TLDR.

  •  

Reset the WordPress Admin Password Using CLI (via 2 Methods)

WordPress is a popular CMS for bloggers and journalists, offering a range of features, including multi-user management, allowing admins to create separate accounts for different users with varying privileges.

The rule of thumb is to hand over the username and password to the user after account creation, but if the user or admin itself forgets the own password, the only option is to reset the user or admin password from the MySQL console or by using external tools.

In this article, I’ll show you how to reset (or change) the WordPress logins using the MySQL command-line client or the β€œwp-cli” command.

Method 1: Reset the WordPress Password via MySQL Command

The first step is to log in to your server running WordPress via SSH. Then, make sure to take a backup of your WordPress database. You can either create a snapshot of your server or use the backup option if you are using a hosting provider.

Alternatively, you can use the following command to export a specific MySQL database to an SQL file format by providing the MySQL username, password, and database name.

$ sudo mysqldump -u [user] -p [db_name] > [export_the_db.sql]

Once you have taken the backup, you can reset the WordPress password by first connecting to the MySQL or MariaDB server.

$ mysql -u [user] -p

Output:

connecting to mysql server

Then you need to select the WordPress database; if you forget the database name, you can use the β€œSHOW DATABASES;” SQL query to list all MySQL databases. Once you locate the correct database, use the following command to select it:

MySQL> use [wordpress_db]

Output:

selecting WordPress database

Then, for confirmation, you can run the following command to list all WordPress users:

MySQL> select user_login from wp_users;

Output:

listing wordpress username

I have only one user account named β€œlinuxtldrβ€œ, whose password I want to change. However, in your case, there could be one or more users, so note down the username and execute the following SQL query to update that user password (using the MD5 hashing algorithm):

πŸ“
Make sure all highlighted green fields are replaced with accurate information.
MySQL> UPDATE `wp_users` SET `user_pass` = MD5('changeme') WHERE `user_login` = 'wordpress-user';

Output:

updating wordpress user password in mysql command

When you are done, quit the MySQL console using the β€œexit” SQL query and return to WordPress to log in with the updated password.

Method 2: Reset the WordPress Password via WP-CLI Command

WP-CLI is a fantastic command-line tool for managing WordPress that you should definitely give a try. We’ve already covered its installation and command-line usage in a separate article, so we’ll skip those parts and focus on resetting the WordPress administrator password.

First, ensure you are connected to the system running WordPress, then open your terminal and navigate to the directory where the WordPress files are stored (typically, it’s β€œ/var/www/htmlβ€œ).

Then run the following command to list all the WordPress user accounts:

$ wp user list

Output:

listing wordpress users

Finally, select the username whose password you want to change, and pass it to the command below, along with the new password for resetting.

πŸ“
Make sure the green highlighted fields are replaced with the correct information.
$ wp user update wordpress-user --user_pass=changeme

Output:

changing wordpress login password using wp-cli

That’s it; you have successfully changed the WordPress password using the β€œwp-cli” tool.

Final Word

All the methods mentioned would work for resetting the WordPress password; you can choose one according to your preference. If you have any questions, feel free to ask them in the comments.

Till then, peace!

The post Reset the WordPress Admin Password Using CLI (via 2 Methods) appeared first on Linux TLDR.

  •  

How to Check Python Version in Linux (via 3 Methods)

Python is one of the most widely used programming languages that powers many popular web applications, AI/ML technologies, IoT devices, task automation, and many more.

Right now, Python 3 is the latest version, but if you are using an outdated system, you might be using an older version of Python, possibly Python 2, which is now deprecated.

Knowing the correct Python version is crucial, whether you are running a program that only works with a specific version or planning to start a Python project with the latest version.

In this quick guide, I’ll show you how to check the Python version in Ubuntu and other Linux distros from the command line.

How to Check Python Version in Linux (via 3 Methods)

There are multiple ways to find out the Python version from the command line; here I’ve provided you with the first two ways to identify if Python 2 or 3 is running on your Linux system, and the third method works for any Python version.

Method 1: Check Python 2 Version via Python Command

If you are running the older Python 2 version (which is now deprecated) on your Linux system, you can try running the β€œpython” command with the β€œ-V” or β€œβ€“version” option to check its version information.

$ python -V

# OR

$ python --version

Output:

checking Python 2 version in linux

This method only works for Python 2, as Python 3 requires a different command, which you can find in the next section.

Method 2: Check Python 3 Version via Python Command

To check the Python 3 version information, you can try running the β€œpython3” command with the β€œ-V” or β€œβ€“version” option.

$ python3 -V

# OR

$ python3 --version

Output:

checking Python 3 version in linux

This method works for any Linux distribution, as well as for Windows and macOS.

Method 3: Check Python Version via Python Interpreter

The previous two methods will help you find the Python version installed on your Linux system, but if you want to check the Python version in the interpreter (also known as the Python console) or within a Python script, you can do that too.

The β€œsys” and β€œplatform” modules can help you check the installed Python version; the β€œsys” module provides detailed information, including the build number and date, while the β€œplatform” module only prints the version.

You can use any one of them according to your needs, so when you’re ready, open your Python console or script and copy-paste any of the following Python snippets:

# Checking Python Version Using Sys Module
import sys
print(sys.version)

# Checking Python Version Using Platform Module
import platform
print(platform.python_version())

Output:

checking python version from python interpreter

This method would work on any Linux distribution (such as Debian, Ubuntu, Red Hat, Fedora, Arch, Manjaro, etc.), as well as on Windows, macOS, or Raspberry Pi.

Final Word

Knowing the correct Python version is crucial to ensuring compatibility among the program, libraries, framework, and applications. This article shows you various methods to check the installed Python version on your Linux system, whether from the command line, the Python interpreter, or programmatically.

If you have any questions, feel free to ask them in the comments.

Till then, peace!

The post How to Check Python Version in Linux (via 3 Methods) appeared first on Linux TLDR.

  •  

[Fixed] pkg-config script could not be found in Linux

Are you also facing the β€œpkg-config script could not be found” or β€œconfigure: error: pkg-config is required” error while compiling your favorite program? Then just run one of the following commands based on your Linux distribution, and the problem will be resolved.

# On Debian, Ubuntu, Kali Linux, Linux Mint, Zorin OS, Pop!_OS, etc.
$ sudo apt install pkg-config

# On Red Hat, Fedora, CentOS, Rocky Linux, AlmaLinux, etc.
$ sudo dnf install pkgconfig

# On Arch Linux, Manjaro, BlackArch, Garuda, etc.
$ sudo pacman -S pkgconf

# For macOS
$ brew install pkg-config

Interested in knowing more about this package? Then, let’s start.

What is pkg-config in Linux?

pkg-config is a helper tool that is used to provide the correct path of header files or libraries to the compiler option during the compilation of an application or program.Β 

It often happens that the path of header files or libraries varies for different systems; instead of hard-coding them, pkg-config helps determine the proper paths to header files and code to link them to your software project.

It’s free, open-source, and originally released for Linux and other UNIX-like systems, but later ported to Windows and macOS. The program code has been rewritten multiple times, with the first implementation by James Henstridge and the current one maintained by Tollef Fog Heen.

Let’s now see how pkg-config can help us find the correct path to pass to the compiler.

Usage of pkg-config command

pkg-config helps during the compilation of applications by providing paths to the installed header files and libraries. To learn its usage, you must first find out the list of available packages on your system using this command:

$ pkg-config --list-all

Output:

listing installed header library files

Once you have selected the package name, you mainly use the following two options:

  • β€œβ€“cflagsβ€œ: It will provide the path for the β€œ-I” (include) compiler option, typically for header files.
  • β€œβ€“libsβ€œ: It will return the path for the β€œ-L” (libs) compiler option, which is often used to link compiled libraries to new code.

Let’s say you want to find the compiler option for the β€œpython3” package, you can run:

$ pkg-config --libs --cflags python3

Output:

checking compiler option for python3

In this scenario, there is only one path for each β€œinclude” and β€œlibs” compiler option. However, certain packages, like β€œgtk+-3.0” may offer multiple paths.

$ pkg-config --libs --cflags gtk+-3.0

Output:

checking compiler option for gtk3

These outputs can be used for program compilation. You can either copy-paste it or assign it to a custom environment variable. For example, exporting the output of the pkg-config command to the compiler via environment variables would look like this:

$ export COMPILER_PATHS=$(pkg-config --libs --cflags LIBRARYNAME)

Afterward, you can use this environment variable to compile your program, like below:

$ COMPILER -c MYPROGRAM ${COMPILER_PATHS}  

If you’re not a programmer and aren’t involved in compilation, you might wonder why this matters. However, if you do end up involved in compiling other programs via source code, the β€œconfigure” file you use to set up the environment might include pkg-config for providing paths. In that case, pkg-config must be installed on your system, or you might encounter the error mentioned in the article introduction.

I hope you understood the concept of pkg-configβ€”what it is, when to use it, and why you should care. If you have further questions, feel free to ask them in the comments.

Till then, peace!

The post [Fixed] pkg-config script could not be found in Linux appeared first on Linux TLDR.

  •  

Kill a Process Running on a Specific Port in Linux (via 4 Methods)

A newbie user often struggles to identify the process behind a specific listening port. Indeed, it’s not all their fault, as some listening ports are started and managed by the OS. However, they may forget the name or struggle to find the process ID of the service they manually started.

The running (or unresponsive) process must be stopped to free the occupied port and make it available for other processes. Let’s assume you are running an Apache server that uses ports 80 (for HTTP) and 443 (for HTTPS). You won’t be able to launch an Nginx server that shares these common ports until the Apache server is stopped.

It’s one of the many scenarios, and listening ports are often overlooked by users until a process fails to launch due to port unavailability. Hence, in this quick guide, I’ll show you how to identify and kill a process running on a specific port in Linux.

How to Kill a Process Running on a Specific Port in Linux

There are many ways to find and terminate processes running on a certain port. However, IT Guy, SysAdmin, or network engineers often favor using the CLI tool for this job. In such cases, you can use the β€œkillportβ€œ, β€œfuserβ€œ, β€œlsofβ€œ, β€œnetstatβ€œ, and β€œss” commands as detailed in the following sections.

Method 1: Kill a Process Running on a Specific Port Using killport

Killport is a fantastic CLI tool for killing a process running on a specific port by using only the port number, without needing a service name or process ID. The only inconvenience is that it’s an external tool, but you can quickly install it on your Linux system by following our installation guide.

Once you have it installed, you can quickly terminate the process running on a certain port. Let’s assume you have an Apache server running on port 80. To stop it, simply execute this command:

$ sudo killport 80

Output:

kill process running on a specific port using killport

Well, ignore the last β€œNo such process” messageβ€”it’s simply the response to the last kill signal sent to the process. The key point is that the port is now available for use by any other process.

Method 2: Kill a Process Running on a Specific Port Using fuser

Fuser is another great tool used for identifying processes using specific files, file systems, or sockets. Despite using it to identify processes running on specific sockets (or ports), you can use it to troubleshoot issues related to file locking, process management, and system resources.

It comes preinstalled on some popular Linux distributions like Ubuntu, Fedora, and Manjaro, but if it’s not available on your system, you can install the β€œpsmisc” package that contains β€œfuser” and other command-line utilities.

# On Debian, Ubuntu, Kali Linux, Linux Mint, Zorin OS, Pop!_OS, etc.
$ sudo apt install psmisc

# On Red Hat, Fedora, CentOS, Rocky Linux, AlmaLinux, etc.
$ sudo dnf install psmisc

# On Arch Linux, Manjaro, BlackArch, Garuda, etc.
$ sudo pacman -S psmisc

# On OpenSUSE system
$ sudo zypper install psmisc

To find out the process running on a specific port, you can specify the port number and its TCP or UDP protocol in the β€œfuser” command.

$ sudo fuser 80/tcp

The above command will return the process ID in charge of handling the specified port.

finding out which process is running on a particular port

Instead of printing the running process ID, you can use the β€œ-k” option with the above command to terminate the process associated with that process ID.

$ sudo fuser -k 80/tcp

Output:

killing the process running on a specific port

Once you terminate the process with this method, you may need to wait a 60-second delay before the process fully shuts down. This is implemented as a security measure to avoid potential data corruption or conflicts. If you want to immediately stop the running process, you can specify the process ID in the β€œsudo kill -9 <PID>” command.

Method 3: Kill a Process Running on a Specific Port Using lsof

Lsof is another powerful tool used to identify the process responsible for managing specific files, directories, network sockets, and other system resources on the active system. It comes pre-installed with nearly all Linux distributions, requiring no additional installation.

To identify the process name and ID associated with a specific port, use the following command, followed by the port number you wish to check:

$ sudo lsof -i :80

The above command will return the output in multiple columns, with your focus areas being solely the β€œCOMMAND” and β€œPID” columns.

list process name and PID of particular port

Once you have the process ID, you can use the β€œkill” command to terminate the process.

$ sudo kill -9 36749 36751 36752

Output:

killing the process running for a specific port

The β€œ-9” option sends the β€œSIGKILL” signal to aggressively terminate the process, while you can alternatively use the β€œ-1” option to hang up the process (less secure) and the β€œ-15” option to gently kill the process (default).

Method 4: Kill a Process Running on a Specific Port Using netstat and ss

Netstat and ss are among the most widely used tools for SysAdmins to quickly pinpoint a process name and process ID associated with a specific port. However, netstat is considered depricated, and some major Linux distributions have removed it, requiring the installation of the β€œnet-tools” package for usage.

The ss command can be found in most Linux systems, and it’s basically an improved version of netstat. Both tools use almost identical command syntaxes, with the β€œ-tnlp” option being the most common to identify the listening port’s process name and process ID, where each option follows.

  • β€œ-tβ€œ: Shows the TCP sockets
  • β€œ-nβ€œ: Avoid resolving the service names
  • β€œ-lβ€œ: Show the listening sockets
  • β€œ-pβ€œ: Show the process ID and name

To find out the process name or ID of port 80, you can use either the netstat or ss command with the β€œ-tnlp” option, along with the grep command, to filter out the data for only the specified port number.

$ sudo netstat -tnlp | grep -i :80
$ sudo ss -tnlp | grep -i :80

Output:

find process name and id using the port number

Instead of specifying the port number in the grep command, you can also use the service name to identify its process ID and listening port.

$ sudo netstat -tnlp | grep -i apache
$ sudo ss -tnlp | grep -i apache

Output:

find process name and id using the service name

Finally, to kill the corresponding process, you can specify its process ID with the following command:

$ sudo kill -9 41005

Output:

terminating process listening to specific port

When terminating the process using the β€œkill -p” command, ensure that the service is not actively being used by any other process, as forcefully terminating it could lead to data corruption or loss.

Final Word

In this article, you learned different ways to terminate a process running on a specific port that would work for almost all major Linux distributions, such as Debian, Ubuntu, Red Hat, Fedora, Arch, Manjaro, etc. Well, if you have any questions or queries, feel free to tell us in the comment section.

Till then, peace!

The post Kill a Process Running on a Specific Port in Linux (via 4 Methods) appeared first on Linux TLDR.

  •