Reading view

Python Packaging: Hosting Code at Github

Github Code Sharing and Development Platform

Github is a great platform for open source software. It grew so much in recent years as the interest in computer programming grew but it’s also such a great platform for sharing, collaborating and contributing.

A lot of people even create repos (or repositories) as archiving their information in an open environment. 

It’s common to see lists of links, books, movies, knowledge sources etc although it’s mainly developed as a platform to share code.

So, our advice is don’t be shy, jump on the wagon if you don’t have a Github account yet, you will soon discover it offers so many amazing synergies and it’s not that complicated either.

Github Logo

So, in a nutshell, you host and share code on Github, no matter how advanced or basic it is. There is no such criteria as your code must be extraordinary so don’t be intimidated. You can start with something like:

msg = "Hello World!"
print(msg)

just to test the waters…

Creating a Github Account

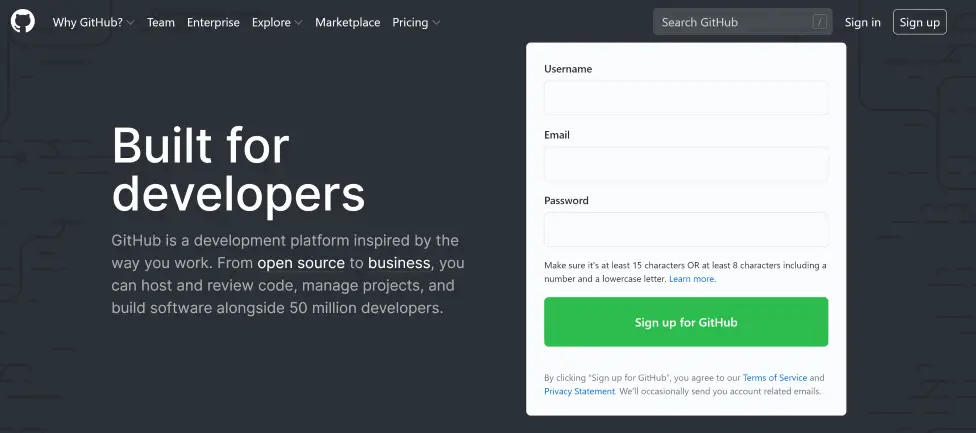
You can sign up for Github from the top right corner.

Creating a Github Account is simple. Just go to Github Signup Page. Just pick s unique username, set your password and game is on!

Github Sign Up Page

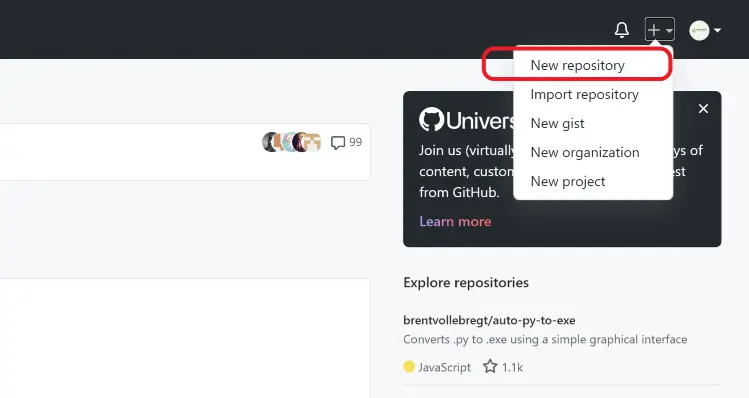
Once you sign up, you can start a repo. Think of repositories as individual projects, libraries, software, notebooks or products.

You can have any amount of repository in your Github account.

Just click New Repository and it will take you to repository initialization page.

Github New Repository Menu

Creating a Github Repository

Creating a repository is also easy. Just pick up a unique name. This name only has to be unique in your account. It doesn’t have to be globally unique. It will let you know with a green or red pop up message anyway.

You can also write a short description, why not. Although it’s optional it makes sense to at least jot a couple of words.

Recommended Reading:

Steps for Creating a Github Repository

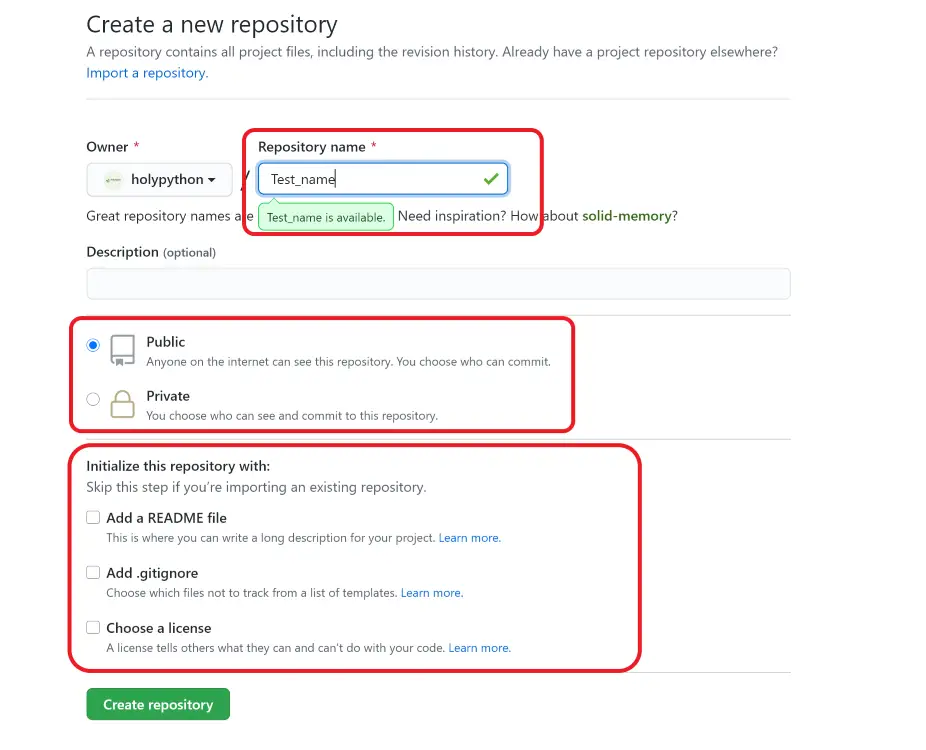
Some important criteria to consider are:

    • Public vs Private: This option is straightforward. If you’d like to keep your repo as private no one will be able to see it except you and people you assign it to. Public repos are open to public view and contribution. You can also change it later.
    • Adding a README file: Checking this option almost always makes sense. It’s great to have a Readme file, content of which also shows up on the main page of your repository. You can always delete it later if you don’t want it or you can change it as well.
    • Adding a gitignore file: This file tells setup file which files not to include in a setup. So, it’s an ignore template. This is genius because there can be lots of irrelevant files like temp files from your IDE or from Python itself that you actually want to avoid in software development.
    • Adding a licence: Adding license can be more serious than it sometimes seems. If you’re in a rush you can always uncheck this option and add a license you choose later.

Thank you for checking out Github component of the Python packaging series. When you are ready you can also consider uploading your unique Python library to PyPI.

If you need some inspiration check out this post:

I’ve been learning coding. What’s next? (Python Edition)

The post Python Packaging: Hosting Code at Github appeared first on HolyPython.com.

  •  

How to Use Watermarkd: A Batch Watermarking Library with GUI

What is watermarking?

Watermarking is a technology of printing less opaque text or symbols on images and items. Believe it or not it’s considered an ancient technology as old as paper since it’s been used on special letters, stamps and printed currency.

As digital imaging has never been such a humongous part of humans’ lives, the usage, creation and demand related to digital images rises as well. Despite the rise of open source and sharing mentality in the digital community, there seems to still be significant room for watermarking applications and so the demand for innovation continues.

Star shaped watermarks among with other patterns on 100 Euro banknote

Why Watermarkd?

Watermarkd is a Python library published by Holypython.com under the open source license Apache-2.0.

In this post we will try to demonstrate what can be accomplished with Watermarkd library.

Watermarkd library allows users to handle watermarking operations in Python directly from the terminal or through use of an optional GUI component.

Since it’s specialized only for watermarking tasks, Watermarkd has a very light graphical user interface. You can probably get an image watermarked (or watermarkd!) during the time it takes to start up a major Image Manipulation software.

It has the most commonly used features when it comes to watermarking and expected to cater to 90% or more of the people looking to watermark an image.

How does Watermarkd work?

Currently, Watermarkd library consists of one sole class named Spread which houses two functions that spread out watermark text on image(s):

  • single function: Spread.single() can be used to apply watermark on a single image (photo).
  • batch function: Spread.batch() can be used to apply watermark to multiple images in a folder.
Here are some images created with Watermarkd on the go.
Medical Field Watermarking
Business confidentiality communicated through watermark

Below you can see various usage types of Watermarkd Library under four titles:

– Single Function Usage

– Batch Function Usage

– Single Function Usage with GUI

– Batch Function Usage with GUI

Single Function Usage

Single function can be used in two main ways:

  • through command line without any interface using its parameters
  • through GUI by enabling gui parameter via True boolean.

as simple as passing True argument to gui as below:

single(gui=True)

Let’s first investigate usage scenarios without gui:

import Watermarkd as wmd

wmd.Spread.single(img_path=r"c:/myimage.png")

This code, once executed, will create a watermarkd image on the user’s Desktop. You don’t have to assign gui parameter to False since it’s the default option. So, basically it’s the same thing as this code:

wmd.Spread.single(gui=False, img_path=r"c:/myimage.png")

Also, please note that, when not using gui, the only parameter you have to pass an argument to is img_path, since all the other parameters have default values and hence, they are optional.

Let’s continue to explore other parameters that can be passed to the single function:


  • gui, (bool), default False : enables GUI
  • img_path, (string), mandatory parameter :signifies image path
  • wm_text,  (string), default= “Watermarkd”) : Watermark Text
  • wm_trans, (int [1-255]), default= 85 : Signifies Watermark Transparency 
  • font_size, (int), default= 55) : Watermark Font Size
  • font_name, (string), default= “arial.ttf” : Font Type
  • filename, (string), default=”Watermarkd” : File Name for Saving
  • save_to_path, (string), default=”Desktop/watermarkd_” : Saving Folder Path
  • save_to_suffix, (string), default=”.png” : File Type for Saving 
  • output_filename, (default= r”c:/Users/”+user_path+”/Desktop/watermarkd.png”) : File Name For Saving

Here is another example, in which watermark text is assigned to “Inception”:

from Watermarkd import Spread

f = r"c:/Users/ABC/Desktop/film.png"
Spread.single(img_path=f, wm_text="Inception")
Film Making Industry Watermarking

Batch Function Usage

Batch function is very similar to single function with a few subtle differences. First and foremost, it handles a folder of images rather than a single image. 

So, img_path parameter is exchanged with folder_path parameter.

Otherwise the rest of the differences are mainly internal which you can check out in the source code if you like.

from Watermarkd import Spread

Spread.batch(folder_path=r"c:/User/ABC/New_Photos")

This code will read all the images from the given folder New_Photos, and create an output folder named Watermarkd_ in user’s Desktop and save all the watermarked files there with the default values for optional parameters. Check out a list of parameters below for adjusting different values such as: watermark text, font size, font type, file name, path name, transparency etc.

If you check out the source code, most of the variable names are also conveniently borrowed from the single function.

Regarding the inner workings of the batch function, the main thing is: it doesn’t apply the watermarking algorithm to a single image, instead watermarking algorithm and positioning etc are placed inside a for loop which iterates through the images in the given folder.

So, in simpler words, folder is iterated with a for loop, image file name is taken which becomes the img_path similar to single function, then watermarking is applied and then files is saved and next iteration starts with the next file.

Here is another example:

from Watermarkd import Spread

f=r"c:/User/ABC/New_Photos"
Spread.batch(folder_path=f, wm_text="Photographer A. C. Jonah, #927-654-92**")
  • gui, (bool), default False : enables GUI
  • folder_path, (string), mandatory parameter  :signifies folder path
  • wm_text,  (string), default= “Watermarkd”) : Watermark Text
  • wm_trans, (int [1-255]), default= 85 : Signifies Watermark Transparency 
  • font_size, (int), default= 55) : Watermark Font Size
  • font_name, (string), default= “arial.ttf” : Font Type
  • filename, (string), default=”Watermarkd” : File Name for Saving
  • save_to_path, (string), default=”Desktop/watermarkd_” : Saving Folder Path
  • save_to_suffix, (string), default=”.png” : File Type for Saving 
  • output_filename, (default= r”c:/Users/”+user_path+”/Desktop/watermarkd.png”) : File Name For Saving
More Photo Examples:
Model Promoting Holypython.com Watermarked with Watermarkd
Young Model Posing For Photography Agency with Watermarkd
Univeristy of Utah Campus Watermarked with Watermarkd
New Release Poster for Software

Watermarkd Usage: Single Function with GUI

Usage with GUI is pretty straightforward.

  1. Pick an image file
  2. Type your watermark text
  3. Choose a watermark text size. Options are:
    • Normal (by default)
    • Small
    • Large
    • Value: Let’s a custom font value to be entered. Possibly something like ~150 for high rez images where something like 30 might suffice for a low resolution image.
  4. Transparency: This value defines the transparency (or opacity) of your watermark text. 85 is the default value but you can go all the way down to 0 for a completely transparent text (Watermark would be invisible then). 255, the maximum value will create a solid white watermark text (which is more just a white text than watermark since it’s not transparent at all. It can sometimes be useful nevertheless.)
  5. Save as: Different options to save watermarked image as different image types such as:
    1. png (default)
    2. jpg
    3. gif
    4. bmp
  6. Save to: Path or folder that you’d like to save your watermarked image to. You can either type it or choose it with the help of the Path button.
  7. Filename: Filename you’d like to save your watermarked image under.

Once submit is pressed all the inputs from the user get registered and watermarking process starts.

It can last anywhere between miliseconds to a couple of seconds depending on the resolution of the image. (For the very high resolutions you might need to allow 2-3 seconds which also depends on the availability of computation resources.)

Just as GUI is a new dimension for the Python coder, Packaging also is a new dimension that opens up a whole new world of opportunities and skillset.

To activate GUI component all you have to do is:

Spread.single(gui=True)

You don’t have to pass any other arguments to setting parameters since they’ll be overridden after the GUI is executed.

from Watermarkd import Spread

Spread.single(gui=True)
Single Function's GUI Component in Watermarkd

Watermarkd Usage: Batch Function with GUI

Usage with GUI in batch function is also simple and straightforward. It’s mostly overlapping with single function’s steps. Here are the main differences:

  • Pick a folder instead of a single image through the Browse button.
  • At the bottom file name will be used as a seed to generate multiple images with watermark. For instance, if you choose Work as file name, files will be saved as Work1.jpg, Work2.jpg, Work3.jpg etc.

Once submit is pressed all the inputs from the user get registered and watermarking process will start.

It can last anywhere between miliseconds to a couple of seconds per image depending on the resolution of the image. (For the very high resolutions you might need to allow 2-3 seconds per image which also depends on the availability of computation resources.)  After that time watermarked images will be created in the specified folder or default folder if none is specified.

Activate graphical user interface for bath watermarking a folder of images similar to the code in single() function’s case:

from Watermarkd import Spread

Spread.batch(gui=True)
Watermarkd batch function's GUI window

Further Steps with Watermarkd

As much as I’d love to see Watermarkd getting used by people with different backgrounds such as:

  • Photographers 
  • Bloggers
  • Entrepreneurs and Business Owners
  • Students
  • Teachers
  • Media Agencies
  • Artists, Illustrators

I’d also love to see it being checked out as a learning tool for Python packaging and Python coding in general. It has all the ingredients necessary to comprehend packaging in Python.

Besides packaging topics such as: Pypi repository publishing, Github hosting, licensing etc. It also has fundamental coding topics, but nothing too complicated to discourage an intermediate or even beginner coder, such as:

Additionally, it’s pretty simple to understand and demonstrates all the ingredients needed to publish a library on PyPI (Python Package Index), such as:

    • setup.py
    • requirements.txt
    • License
    • Readme.md
    • __init__.py
Every great coder was a beginner at some point. So, don’t be too shy. One step at a time you too can become great, and create great programs,  there is no doubt about it. Some helpful topics to discover can be:

Such topics open up whole new worlds for a programmer to progress towards, you can see them as paths you can take in your journey(Oftentimes you can combine these paths for a great product as well).

Final Thoughts

If you’re a beginner or intermediate programmer go ahead and create a Github account. Maybe create a trivial repository where you take some notes and save some files if you like, just to start getting familiar with the environment.

If you like Watermarkd or Holypython’s work in general, you’re welcome to visit our Github repos as well. You can read the Watermarkd.py source code along with other necessary files there (setup.py, requirements.txt, __init__.py etc.). 

As simple as it is, I hope Watermarkd library serves as a practical solution for people who might need watermarking and I’d love to see it serve educational purposes for coders and developers who never had a chance to explore packaging and publishing topics related to Python.

Thank you so much for visiting.

ps: I’d like to thank creators and contributors of Pillow the Friendly PIL Fork and PySimpleGUI libraries for creating such fantastic libraries and influencing further developments. Also, a huge thank you to Stack Overflow community for sharing so much expert level knowledge and being so kind.

The post How to Use Watermarkd: A Batch Watermarking Library with GUI appeared first on HolyPython.com.

  •  

Python Packaging: Quick Tutorial & Checklist

Packaging is a very exciting process for the coder. Packaging allows you to share your work with the world and step into a structured, real developer position rather than dealing with bits and pieces of code here and there. And I don’t mean position in a corporate sense here, after all you know your position better than everyone else.

So, this tutorial is about packaging and it can help you navigate the pretty standardized steps of Python packaging and all the intricacies that come with it.

Estimated Time

10 mins

Skill Level

Upper-Intermediate

Exercises

na

Posts from the Series

Course Provider

Provided by HolyPython.com

This page is a practical summary version of all the steps involved in Python library packaging. You can also find links for longer versions of each step with more detailed explanations, comments and remedies for potential pitfalls at the bottom of this page along with a Python packaging checklist.

If you’re reading this tutorial you might already have a cool invention or an improved version of some other program. In that case congratulations! You’re one step closer to creating wealth for yourself and also for the world.

If you don’t have something tangible yet don’t worry, it’s something that comes with sustained practice. I don’t mean to be corny but, just continue coding and exploring and if you stay at it it’s almost guaranteed to happen. When the inspiration is there though, it’s advised not to sleep on it, so when the moment comes, don’t put it off, don’t delay, act and realize!

So, here is a summary of the major Python packaging cornerstones:

  1. Getting the Code Ready for Packaging
  2. Hosting at Github
  3. Open Source Software Licenses
  4. Necessary Files (setup.py, readme.md, license, __init__.py, requirements.txt, setup.cfg)
  5. Local Installation, tests and __init__.py File
  6. Uploading to PyPI with Twine
Long version links at the bottom.
A routine startup portrait, members discussing in front of computers

At some point in your coding journey, eventually you realize the power of publishing. Open source is really cool and it enables sharing technical knowledge and intellectual products at an unprecedented level. But only when you experience first hand:

  • An open source program development on Github
  • Publishing your program on a library like Pypi. Maybe at different stages like:
    • Pre-alpha,
    • Alpha,
    • Beta,
    • Release Candidate,
    • Stable Release)

you really start to feel the incredible power of open source synergies.

It is recommended to every programmer, yet, the knowledge gap seems to prevent many people from getting to that stage.

It’s not that difficult, but there is an open source terminology involved which can be confusing for a lot of people.

This is a huge value loss for everyone, for the programmer, for his environment, eventually for the whole world. Because you never know how far that programmer is going to be able to go if those gaps are bridged and dots are connected.

So, hopefully this Python tutorial empowers coders at the beginning stages of their journey and helps them understand how to package Python code, how to create a library, how to create a module. You might not necessarily be a beginner programmer, but you might not have discovered these topics yet or had the opportunity or occasion for it.

Nevertheless, understanding library structures and entering open source world really expands a coders horizons and we recommend stepping into this knowledge space as soon as possible since the benefits are so high.

You might have just learned how to print “Hello World” or you might actually be producing advanced level programs already and just not have stumbled upon this knowledge yet. In the end, it’s all good. Everyone’s journey is unique and it’s important to embrace and strive to progressively move forward.


Let’s check out the general frame of the packaging process and if you’d like to go deeper in any of the steps we have links for that too.

Python Packaging Preparation

After you have a functioning code you will want to do a certain type of cleaning up on it because, code in a library is slightly different than the code in a local .py file that’s used for personal tasks and development. Here are some common practices:

  • Clean up the unnecessary comments
  • Clean up the part or all of print functions not to cloud user’s terminal too much
  • If something can be expressed as a user-defined function, then consider building some functions.
  • Tidy up via Python classes. Try to place everything inside a class or multiple classes. User-defined functions can be run from inside the class when needed. For example:
    • class A:
      • def alpha():
  • A.alpha()

Before we advance, and after certain improvements on your code you also need a few tools for packaging so you might want to get them ready. These are:

  1. A Github account
  2. A PyPI account
  3. Command Prompt that works with Python (or PowerShell), we suggest Anaconda Command Prompt as a practical and complete solution.
  4. twine library installed in Python for uploading to PyPI

Creating a Github Repository

Lorem ipsum dolor sit amet, consectetur adipiscing elit. Ut elit tellus, luctus nec ullamcorper mattis, pulvinar dapibus leo.

python setup.py sdist

Choosing a license

If you’re sharing your code you need a license so that important aspects of usage, development, price, modification, reselling, responsibility, sublicensing etc. are more clear.

Most common open source licenses are:

Apache-2.0

GNU GPL

GNU LGPL

MIT License

BSD Licenses

More on open source licenses here.

Necessary Files

You need a couple of files that you might not be familiar with in order to package your Python library and turn it into an installable repository. These files are:

setup.py

requirements.txt (optional)

readme.md (optional)

setup.cfg (optional)

__init__.py (optional)

So, before being misleading, although it seems only setup.py is obligatory for Python installation and this is technically true, all of the files above are pretty obligatory in practical sense. You don’t really want to miss any of them.

python setup.py sdist

Creating a Release on Github

Github is a great platform for coding collaboration, version management and open source sharing. It’s free and you simply sign up and create a new repository.

You might want to skip the license selection for your project at the very beginning if you’re not informed on the topic yet.

Local Installation & Testing

First off, you can just navigate to the root folder which hosts your package and import the package after launching Python there. This is as simple as navigating with cd command and then launching Python and trying to import the library as intended.

Eventually though you will want to make a real installation to see if everything is going through smoohtly. 

You can use the code below for a local installation, first create a source distribution, it will create a Python egg and source distribution in the folder where your package exists.

Installing a library locally is very simple and straightforward. Just navigate to the package’s root folder where setup.py can be found and execute the command below:

pip install .

This one will properly install the package inside the site-packages folder under your Python installation folder.

It can be more convenient if you don’t want to have to navigate to the specific directory to import your library and it’s still a local installation and has nothing to do with uploading.

After installation is successful, you can just import your library like any other library:

import [library_I_developed]

At this point, you can make the final checks, see if library is installing and functioning as it’s supposed to, you can also check if __init__.py files are functioning properly and creating the correct importing structure you intend for your users.

Uploading to PyPI

If everything is looking absolutely fine it’s time to step into the wild. Wild in this case is Python Package Index or PyPI.

Egg and source distribution terminology can be confusing. Source distribution is just your library packaged in a .zip or .tar.gz compressed archive formats. Installation occurs through these source distributions.

Egg is pretty much the same thing and it’s a zip file, it’s just a bit specialized and distinct so it’s extension is .egg instead of .zip. You can still open it as a zip file and check out the content if you’re curious.

So, let’s create the source distribution:

python setup.py sdist

This will create a source distribution which is basically a tar.gz or zip file as mentioned above.

Now you have a source distribution ready to be shipped to PyPI however, it’s beneficial to add one more step. It takes a couple of seconds but it can save you lots of headache.

Using twine check all the distributions inside the package. If there is an error with the setup.py file or readme.md file or any of the other ones, it will tell you what the error is so you can fix it and ship again.

import twine

twine check dist/*

Once everything clears 100%, it’s time to upload. Just execute the command below:
Don’t forget to import twine if you haven’t before.

twine upload dist/*

You’ll be asked your PyPI username and then password, just type those in order and press enter and your package will be uploaded.

If update to PyPI is successful, that means that now your library can be installed on any computer with Python and internet connection all around the world. All that’s needed is the execution of this simple pip command:

pip install [Library_Name]

Just get rid of the brackets around your library name when you’re actually installing it.

Updating the package in PyPI

You will likely have new versions every now and then just create a new source distribution and repeat the check and upload steps and your package will be updated automatically.

python setup.py sdist
import twine

twine check dist/*
twine upload dist/*

After that you might want to update your library in your computer from PyPI. Just run this code for that:

pip install [Library_Name] --upgrade 

If you still have question, each step included here has its own long version below and maybe the answers you’re looking for are there. It can still be a good idea to check them out even if you don’t have any questions since there are some cool knowledge included regarding each step of Python packaging.

The post Python Packaging: Quick Tutorial & Checklist appeared first on HolyPython.com.

  •