How to Install OpenJDK 21 on Ubuntu
16 December 2025 at 07:48
![]()
Use apt or apt-get to install/upgrade PPA packages but the download speed is slow? Here’s a workaround to speed it up in Ubuntu or Linux Mint.
By choosing a download mirror that nears to me using “Software & Updates” usually can fix slow downloading issue when installing packages from official Ubuntu repositories.
But for app packages from Ubuntu PPAs, in most time it downloads at a speed of few hundreds KB/S.
It’s OK for small apps, but for PPA packages with large file sizes (e.g. NVIDIA driver from Graphics Driver Team PPA, or Plasma Desktop from KUbuntu PPA), it can take half an hour and even more time to install due to slow download speed.
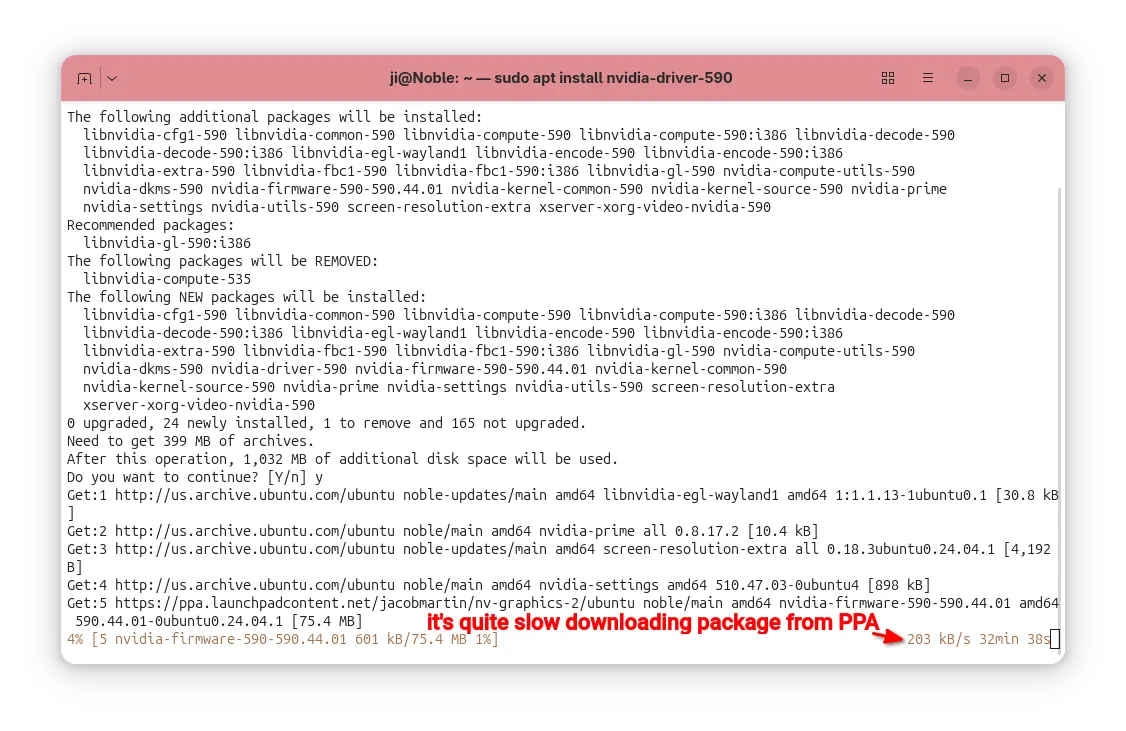
downloading packages from PPA using apt is quite slow
In the case, apt-fast can help!
It’s a free open-source shell script wrapper for apt/apt-get, by using aria2 multi-connection download utility. It works by splitting large file into multiple small pieces, then downloading them from multiple sources in parallel.
Though, the launchpad PPA does not have mirrors, it can still speed up the large file downloading probably due to multi-connections. In my case, it reduced the nvidia-590 packages downloading time from about 30 minutes to less than 3 minutes.
apt-fast has an official PPA that contains the most recent packages for all current standard supported Ubuntu releases (e.g., Ubuntu 22.04, Ubuntu 24.04, Ubuntu 25.04/25.10), as well as the old Ubuntu 20.04, 18.04, 16.04, and even 14.04 LTS releases.
To add the PPA, press Ctrl+Alt+T to open terminal and run command:
sudo add-apt-repository ppa:apt-fast/stable
Type your user password when it asks (no visual feedback) and hit Enter to continue.
![]()
All current Ubuntu releases will automatically refresh cache while adding PPA. But for Linux Mint and old Ubuntu, you may run the command below to update cache manually:
sudo apt update
Finally, install the wrapper by running command:
sudo apt install apt-fast
![]()
After installed the package, it will automatically run the post-install script to configure the basic things, like which package manager (apt, apt-get, or aptitude) to use for installing packages, maximum allowed number of connections, and, whether to ask for confirmation before downloading.
![]()
Besides the basic settings you set above, you can configure more about apt-fast, including:
Simply, run the command below to open the configuration file via nano command line text editor:
sudo nano /etc/apt-fast.conf
Then edit according to the description text if need, finally Ctrl+S to save and Ctrl+X to exit.
![]()
You can use apt-fast just by replacing apt or apt-get in all install, upgrade, etc commands with apt-fast.
For example, install app packages:
sudo apt-fast install package1 package2 package3
Install all available updates, but never remove existing packages:
sudo apt-fast upgrade
Install all available updates, allow removing existing packages if required:
sudo apt-fast full-upgrade
Clean download files in cache directory and temporary download folder:
sudo apt-fast clean
For more, see manual by running man apt-fast command.
![]()
If something goes wrong, or you don’t need it anymore, then open terminal (Ctrl+Alt+T) and run command to remove it:
sudo apt remove apt-fast aria2 libaria2-0
And, remove the PPA either by using “Software & Updates -> Updates”(or Software Sources for Linux Mint) utility or by running command:
sudo add-apt-repository --remove ppa:apt-fast/stable
Also, you may need to run sudo apt update to refresh cache afterward in Linux Mint or old Ubuntu 14.04.
![]()
![]()
This is a step by step guide shows how to block certain app packages from Ubuntu local repositories, PPAs, or other apt repositories in Ubuntu 25.10 and higher.
Previously, we can set package pin-priority to prevent from or prior to installing certain app packages. Now, in Debian/Ubuntu with apt 3.1+, a new method is available to include/exclude packages for specified apt sources (repositories).
Say you have a Ubuntu PPA or apt repository installed in Ubuntu. It contains many app packages, but you only need one or few of them. In the case, you may use the new method below to completely exclude all other packages from that repository, so they are not installable with any apt option or other graphical tool.
NOTE 1: This tutorial only works for classic .deb packages. Though, you may use the method to block snap and flatpak entirely.
NOTE 2: This tutorial needs apt 3.1+, meaning Debian Unstable/Testing or Ubuntu 25.10+.
Before getting started, it might be helpful to first find out all the package names available in the target PPA or apt repository.
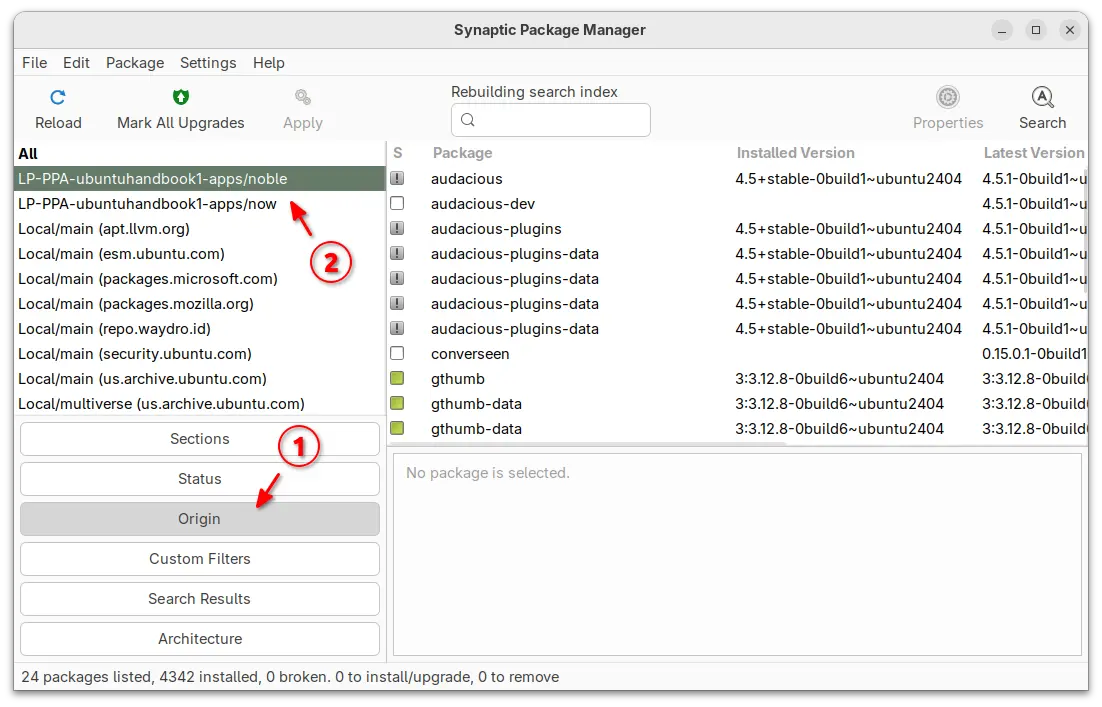
For Ubuntu desktop, you can simply install and launch Synaptic package manager. Then, choose “Origin” in left and select the target repository to show all the packages.
For server without GUI, you may view the package index files instead.
sudo apt update
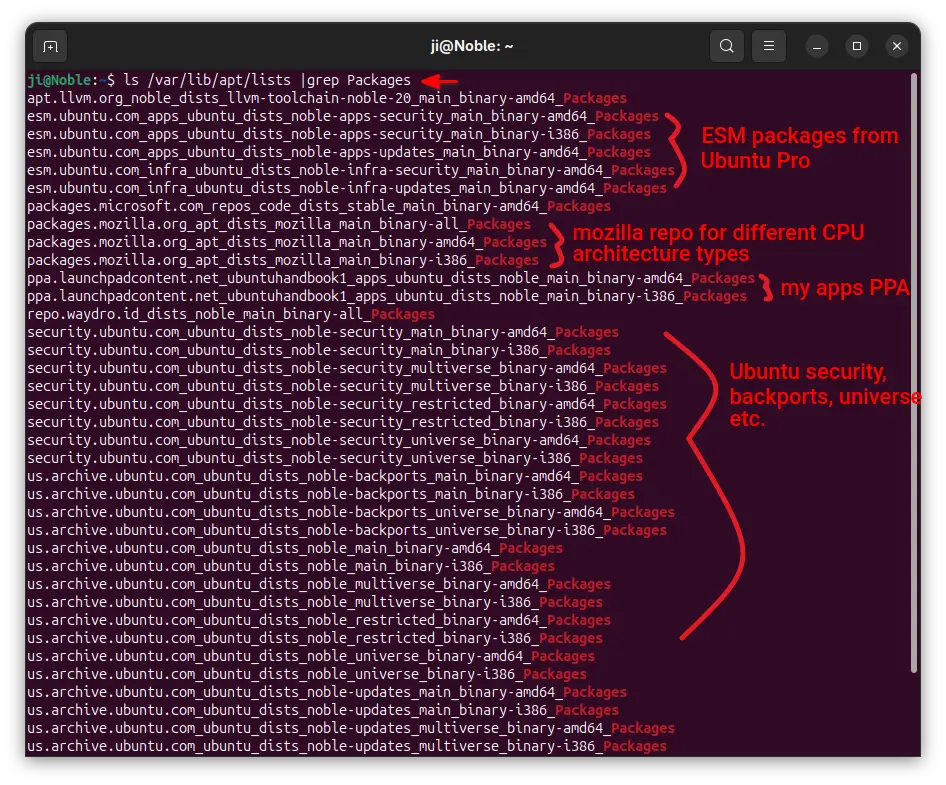
/var/lib/apt/lists directory:
ls /var/lib/apt/lists/ |grep Packages
The files contain the package names, their versions, origin, maintainers, sizes, and hash-code, etc information.
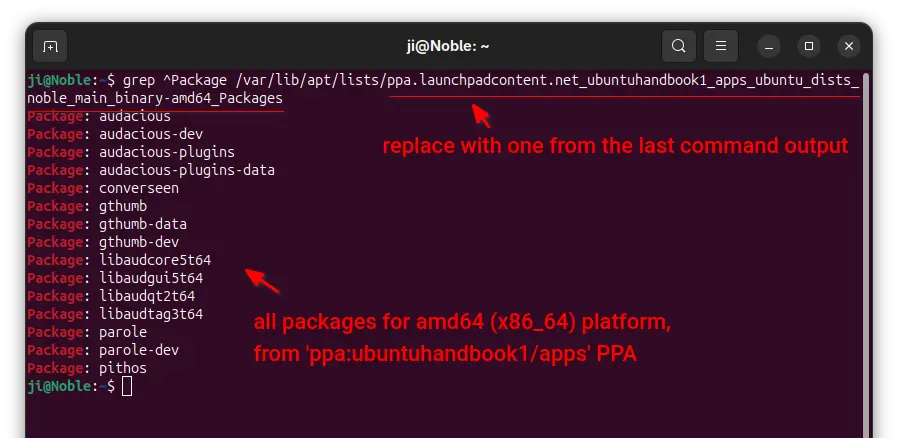
grep ^Package /var/lib/apt/lists/ppa.launchpadcontent.net_ubuntuhandbook1_apps_ubuntu_dists_noble_main_binary-amd64_Packages
Here you need to replace the long file-name with yours.
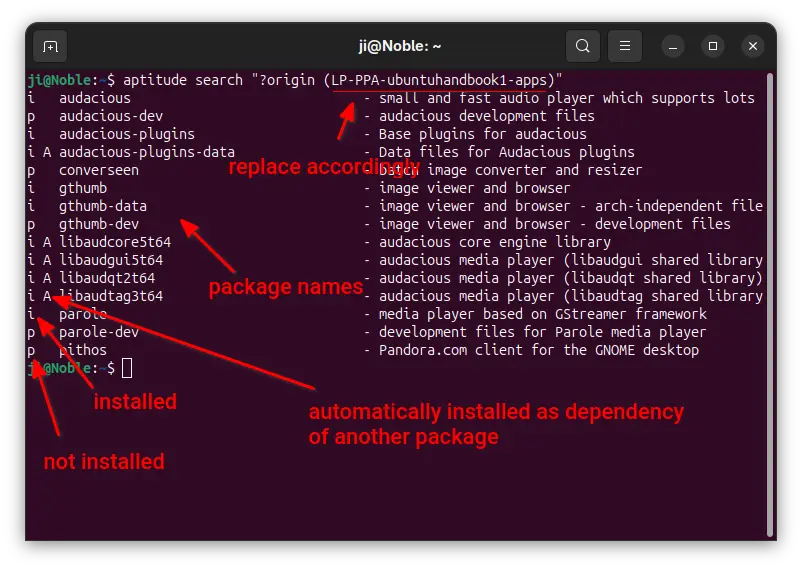
For choice, you may install aptitude, then use the command below instead to list all packages from target repository:
aptitude search "?origin (LP-PPA-ubuntuhandbook1-apps)"
Here replace LP-PPA-ubuntuhandbook1-apps accordingly, while ubuntuhandbook1 is PPA maintainer name, and apps is PPA name. For other repositories, run apt-cache policy |grep "o=" to list and get the target value of “o=”.
For Ubuntu, all the apt sources are handled by .sources and .list files under /etc/apt/sources.list.d directory.
To block specific packages from Ubuntu official repositories, open terminal (Ctrl+Alt+T) and run command to edit the file below:
sudo nano /etc/apt/sources.list.d/ubuntu.sources
For next Ubuntu 26.04, there’ll be ubuntu-esm-apps.sources and ubuntu-esm-infra.sources in that directory for ESM packages if Ubuntu Pro is enabled.
When file opens, simply add Exclude: package1 package2 package3 ... in the end of the 2 sections.
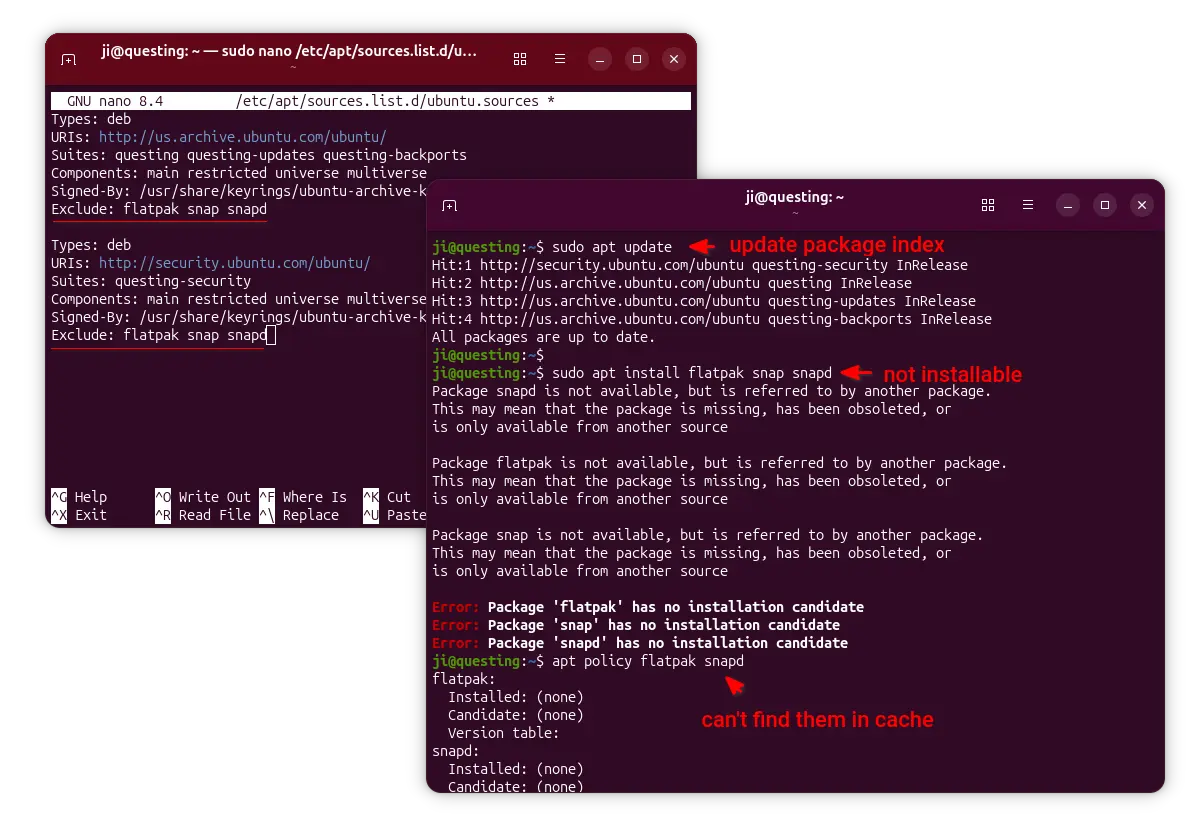
In the screenshot above, it tells to block flatpak, snap, and snapd packages. After saved file (Ctrl+S, then Ctrl+X), run sudo apt update to apply changes.
To block certain PPA packages, simply launch “Software & Updates” utility and navigate to “Other Software tab”.
Then, highlight the PPA source and edit it. Finally, click Add an additional fields, and:
Include and value package1 package2 package3, so to block all others.Exclude and value package1 package2 ... to block certain packages.Also refresh cache via either sudo apt update or Software Updater after saving the changes.
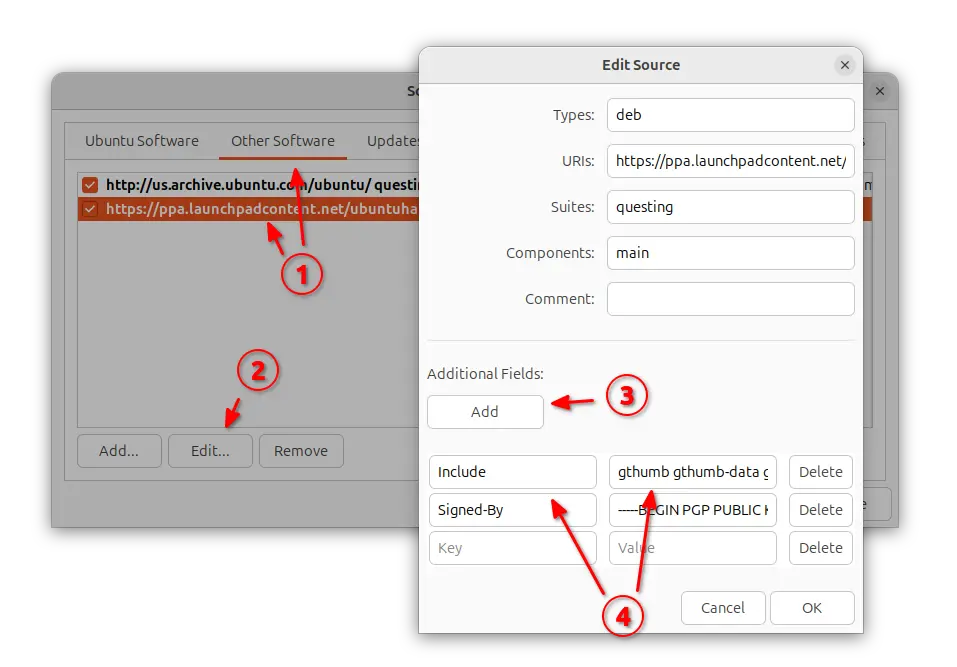
NOTE: When using “Include” (leaving others blocked), don’t forget to also include the dependency packages (if any) in that repository!
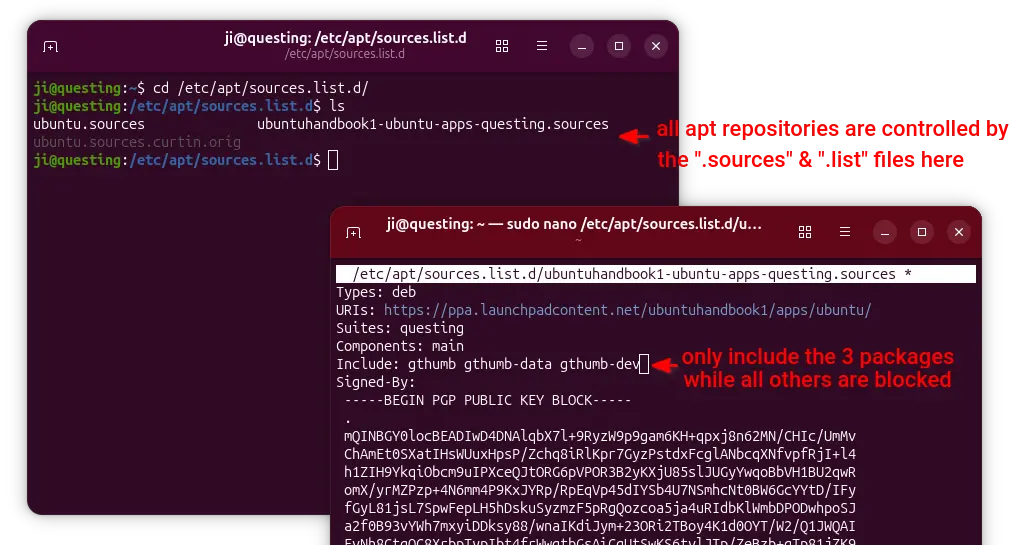
For server without GUI, run commands below and finally refresh cache.
ls /etc/apt/sources.list.d
sudo nano /etc/apt/sources.list.d/ubuntuhandbook1-ubuntu-apps-questing.sources
Finally, add new line with either Include: package1 package2 or Exclude: package accordingly
For apt repository installed in the classic .list file, edit it and add the include="package" or exclude="package" section between the brackets after ‘signed-by’ section.
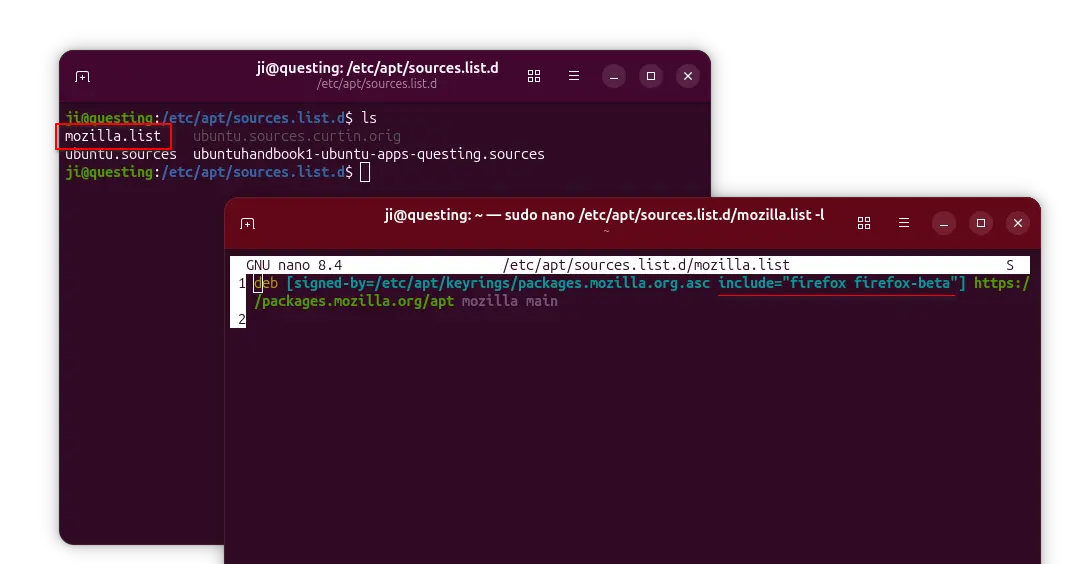
And, finally run sudo apt update to apply changes.
![]()