Red Hat Releases RHEL 10.1 with Offline AI Guidance

MySQL Database Recovery Tool by Stellar is designed to assist in resolving various issues that may occasionally arise while managing MySQL and MariaDB databases.
It can efficiently repair all inaccessible or corrupted database objects (tables, primary keys, views, triggers, etc.) created in the InnoDB and MyISAM MySQL database engines without altering or deleting the original databases.
MySQL versions 8.x, 6.x, 5.x, 4.x, and 3.x are compatible as of writing, and since it’s available for Windows, Ubuntu, and Red Hat-based distributions, you can easily recover your MySQL database on these systems. Otherwise, you can copy the MySQL data folder from an unsupported OS to either Windows or Linux, repair it, and move it back to the original OS.
After saving the repaired database in MySQL or MariaDB formats, this tool allows us to save it in various other file formats, such as SQL Script, CSV, HTML, and XLS, which can be crucial when repairing MySQL on a system without MySQL or MariaDB installed.
| Pros | Cons |
|---|---|
| Available for Windows, Ubuntu, and Red Hat-based distributions. | Not available for macOS. |
| Efficiently can repair the latest version of MySQL and MariaDB databases. | It’s proprietary software. |
| Export the database file in SQL script, CSV, HTML, and XLS file formats. | It’s premium software with a free trial given, which can only perform repairs and display the repaired database but does not apply the changes. |
| The “Save log report” option allows viewing and analyzing the log content later for forensic analysis. | The software’s license key is quite expensive compared to alternatives. |
| A user-friendly interface that allows navigation and selection of the MySQL data directory for repairing corruption and applying necessary patches. | It’s not completely ready for Linux systems. You might need to move your MySQL data folder to Windows for repair, as the Windows version of this tool works perfectly. |
Since it’s available for both Windows and Linux (especially Ubuntu and Red Hat-based distributions), I’ll show you the steps to install it on a Linux distribution.
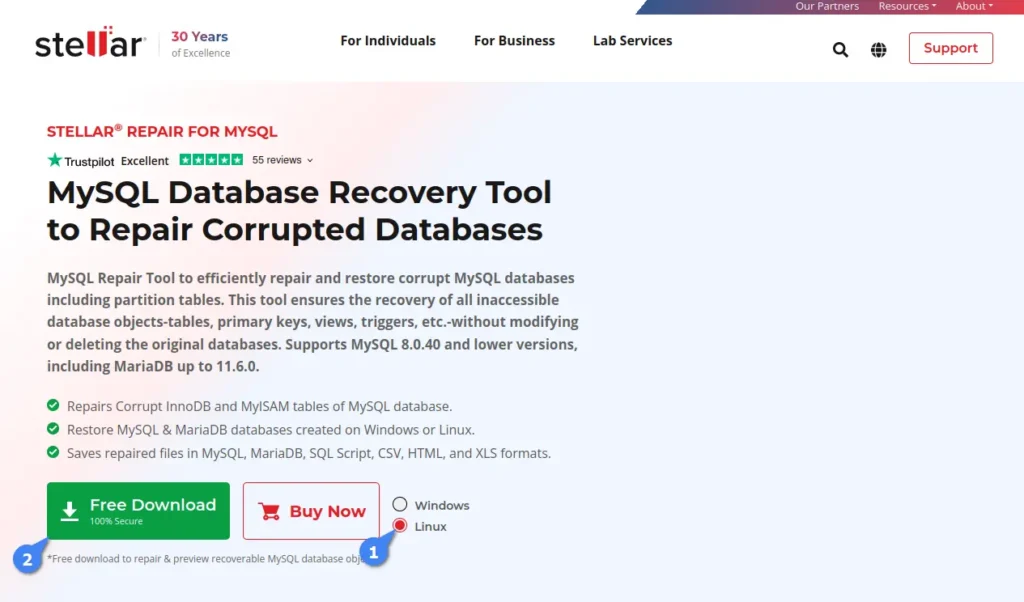
So, start by navigating to its product page to download Stellar Repair for MySQL, select “Linux“, and then click on “Free Download” (you can begin with the free version and activate it with a license key later).
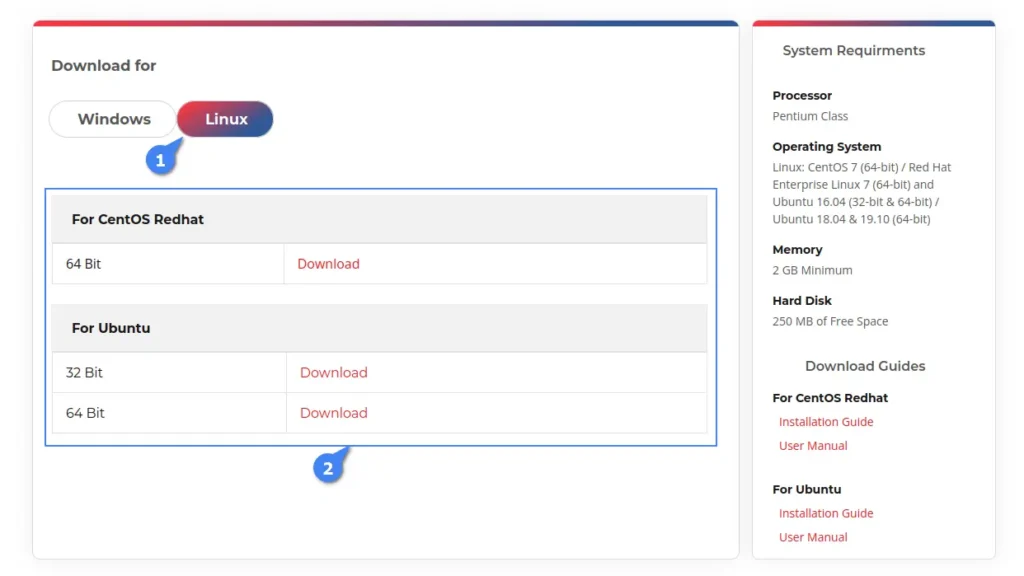
You’ll be redirected to the Linux download page, where you can download the package file based on your Linux distribution type. For example, clicking the download button under “For CentOS Redhat” will download the “.rpm” file, while “For Ubuntu” will download the “.deb” file.
Once the file is downloaded, open your terminal, navigate to the “~/Downloads/” directory, and execute one of the following commands according to your Linux distribution.
# Navigating to Downloads directory
$ cd ~/Downloads/

# Installation Command for Ubuntu-based distributions
$ sudo dpkg -i ./StellarRepairforMySQL-U.deb

# Installation Command for Red Hat-based distributions
$ sudo rpm -i ./StellarRepairforMySQL.rpm
When the installation is finished, you can launch the program by searching “Repair for MySQL” in the Activity Overview.

When launched for the first time, it prompts you to provide the current logged-in username (auto-detected) and password. Before entering the credentials, make sure the logged-in user has sudo privileges to allow the program to perform repairs without interruption.

Once logged in, you will be presented with the dashboard where you can activate the program using a license key (which is only needed when you want to apply the changes), but for demonstration purposes, you can test it without a license key.
To achieve this, stop your MySQL services and copy the MySQL data folder, typically located at “/var/lib/mysql” in Linux, to a safe location like your home directory for use as a backup.
$ sudo systemctl stop mysql
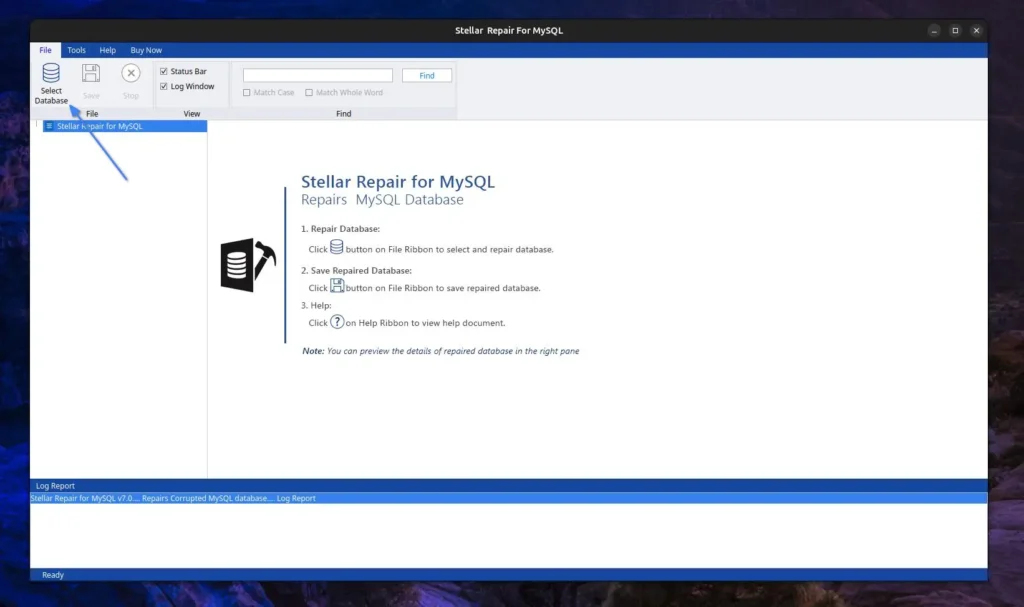
$ cp /var/lib/mysql $HOME/Afterward, open the “MySQL Database Recovery Tool” and click the “Select Database” option.
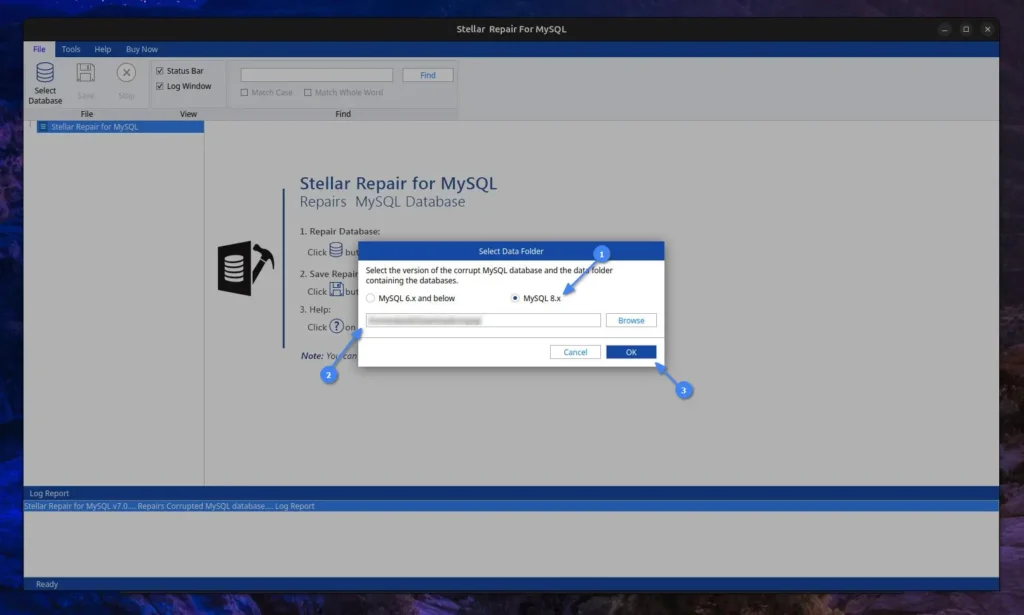
A prompt will pop up asking to select the relevant MySQL version and data folder. Since I use the latest MySQL version, I will select the “MySQL 8.x” option and “provide the path to the MySQL data folder” that needs repair.
Next, you will see a list of databases detected by the program from the provided MySQL data folder path. Simply “Select the database that needs repair” and proceed by clicking the “Repair” button.

Now, it will look for errors or corruption in the selected database, perform the necessary steps to recover it, and display a success message once completed.
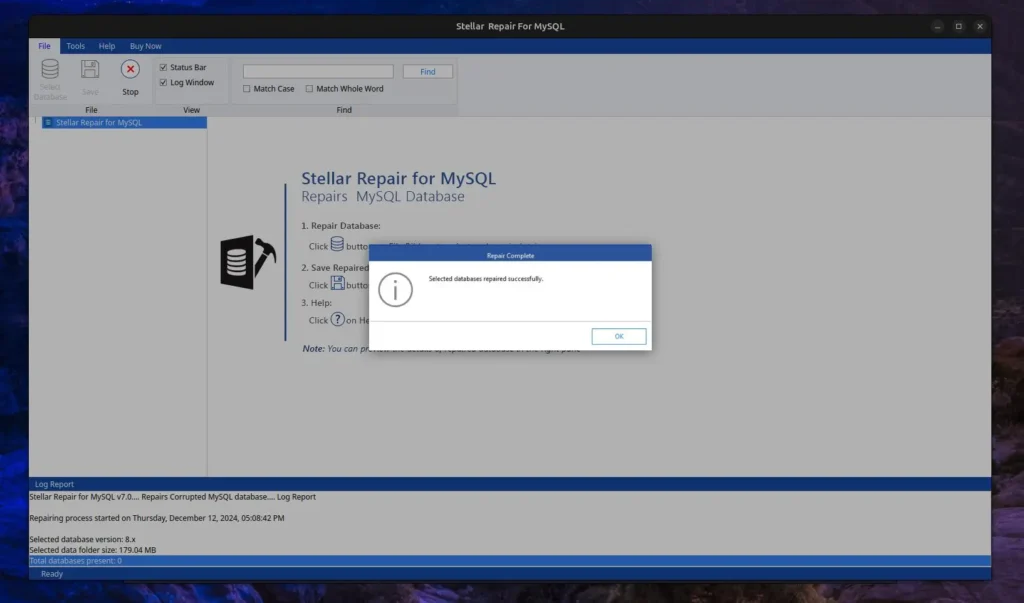
Since the MySQL data folder that I’ve provided does not have any issues or corruption, it did not detect any errors, as shown in the log report below. However, in your case, it might be different.
When you’re done repairing, make sure to start the MySQL service.
$ sudo systemctl start mysqlThis article wouldn’t be complete without including the removal steps, so in the future, if you no longer need this tool, you can easily uninstall it from your system using the default package manager via the terminal.
# Removal Command for Ubuntu-based distributions
$ sudo apt remove stellarrepairformysql

# Removal Command for Red Hat-based distributions
$ sudo dnf remove stellarrepairformysqlThe Stellar MySQL Database Recovery Tool works perfectly on Windows, but I encountered difficulties using it on Linux. For instance, providing the MySQL data folder path and selecting the target database for repair resulted in an “Either incorrect path or no tables in the database” error message.
At first glance, I thought it might be a database issue, but after some trial and error, I moved the data folder in Windows and repeated the same steps, which worked without issues. This suggests that the Linux version of this tool is not fully ready and requires a workaround to function properly.
I’m still exploring this tool myself and will continue updating this article with new updates. If you have any questions or queries regarding the tool, feel free to ask them in the comment section.
Till then, peace!
The post Stellar Repair for MySQL – Product Review appeared first on Linux TLDR.
RQuickShare is a Rust implementation of the smartphone NearbyShare/QuickShare feature for Linux and macOS. It’s a free, open-source, lightweight tool designed to seamlessly transfer files between desktops and smartphones.
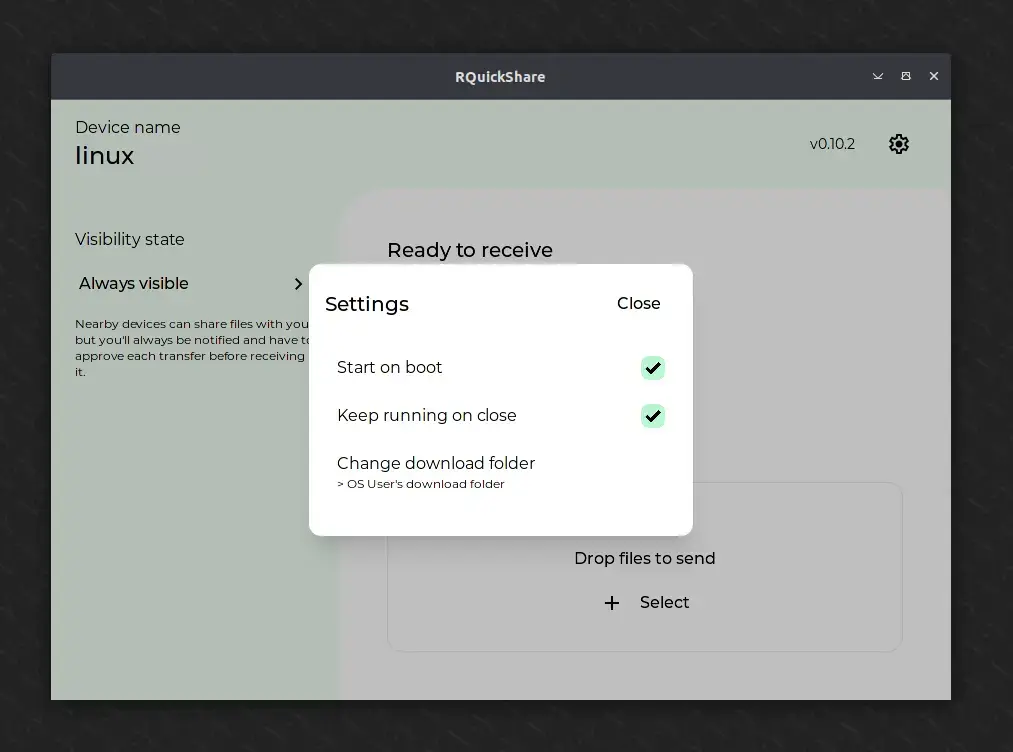
There are very few options available in the settings; you can only adjust the default bootup settings, run in background settings, and change the download directory to something else.
You can install it on your Linux system using the DEB package for Debian and Ubuntu-based distributions, the RPM package for Red Hat and Fedora-based distributions, or the Snap package.
If you dislike installing applications on your system, don’t worry; it also comes as an AppImage that you can use without installing, but make sure your system has the libfuse2 package installed (the step will be shown later on this article).
In this quick tutorial, I’ll show you how to quickly install RQuickShare on major Linux distributions such as Debian, Ubuntu, Red Hat, Fedora, Arch, and more.
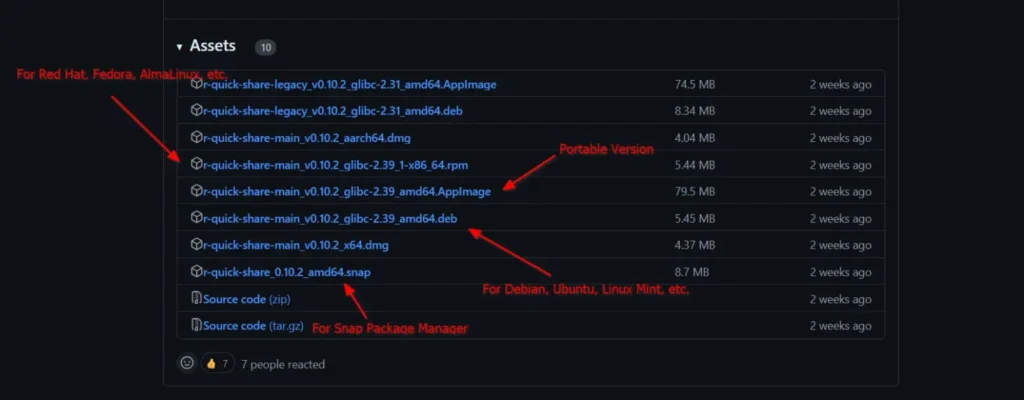
The RQuickShare package is available in two variants: main and legacy. The main variant offers future support and the latest features, while the legacy variant is only for use if you’re on an older version of your Linux distribution, though it is not recommended.
To start, visit the GitHub download page and download the appropriate distribution package for your Linux system. For instance, you can download the DEB package for Debian and Ubuntu-based distributions, the RPM package for Red Hat and Fedora-based distributions, the Snap package for the Snap package manager, and the AppImage package for portable versions.
Once the download is complete, open your terminal from the application launcher or use the Ctrl+Alt+T shortcut, then follow one of the provided instructions to install it on your Linux system.
# Navigate to the downloads directory
$ cd ~/Downloads/

# Install the DEB Package
$ sudo apt install ./r-quick-share-main_*_amd64.deb# Navigate to the downloads directory
$ cd ~/Downloads/
# Install the RPM Package
$ sudo rpm install ./r-quick-share-main_*-x86_64.rpmFor Arch Linux, you can quickly install it from the AUR (Arch User Repository) using an AUR helper such as Yay.
$ yay -S r-quick-shareIt’s not currently available on the Snap Store, but you can download the Snap package and install it using the following command:
# Navigate to the downloads directory
$ cd ~/Downloads/

# Install the Snap Package
$ sudo snap install --dangerous r-quick-share_*_amd64.snapThe AppImage requires libfuse to function properly, so make sure it is installed on your Linux distribution before using the RQuickShare AppImage.
# On Debian and Ubuntu-based distributions
$ sudo apt install libfuse2

# On Red Hat and Fedora-based distributions
$ sudo yum install fuse fuse-devel
Once the installation is complete, you can navigate to the download directory, assign executable permissions, and run it just like a shell script.
# Navigate to the downloads directory
$ cd ~/Downloads/
# Assign Executable Permission
$ sudo chmod u+x ./r-quick-share-main_*_amd64.AppImage
# Launch AppImage
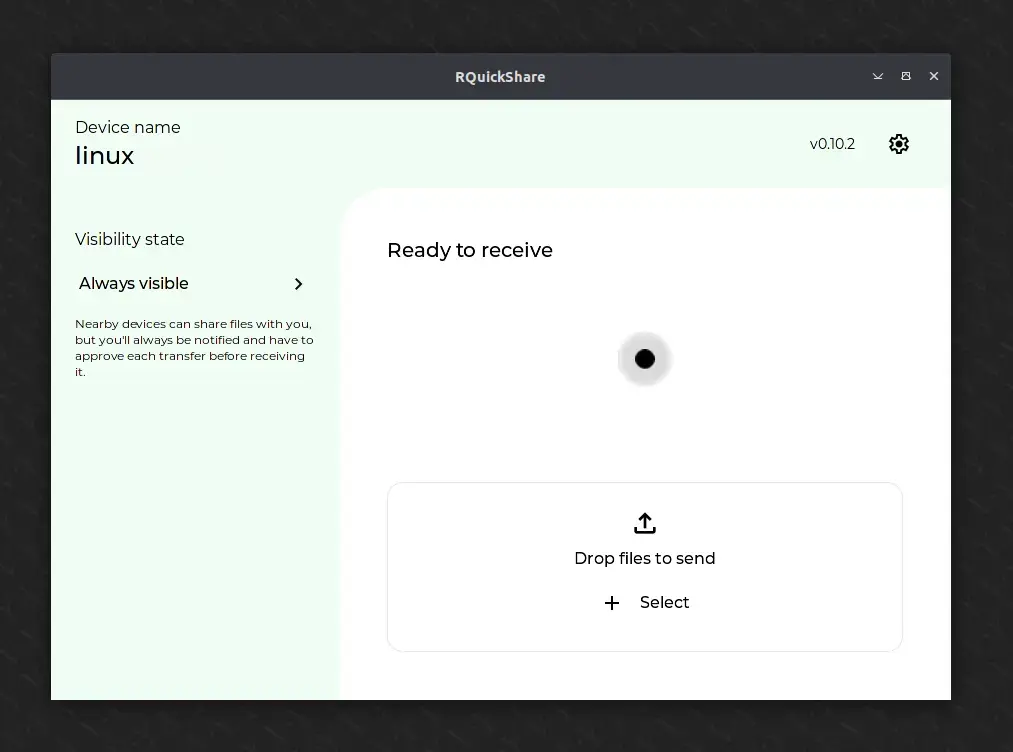
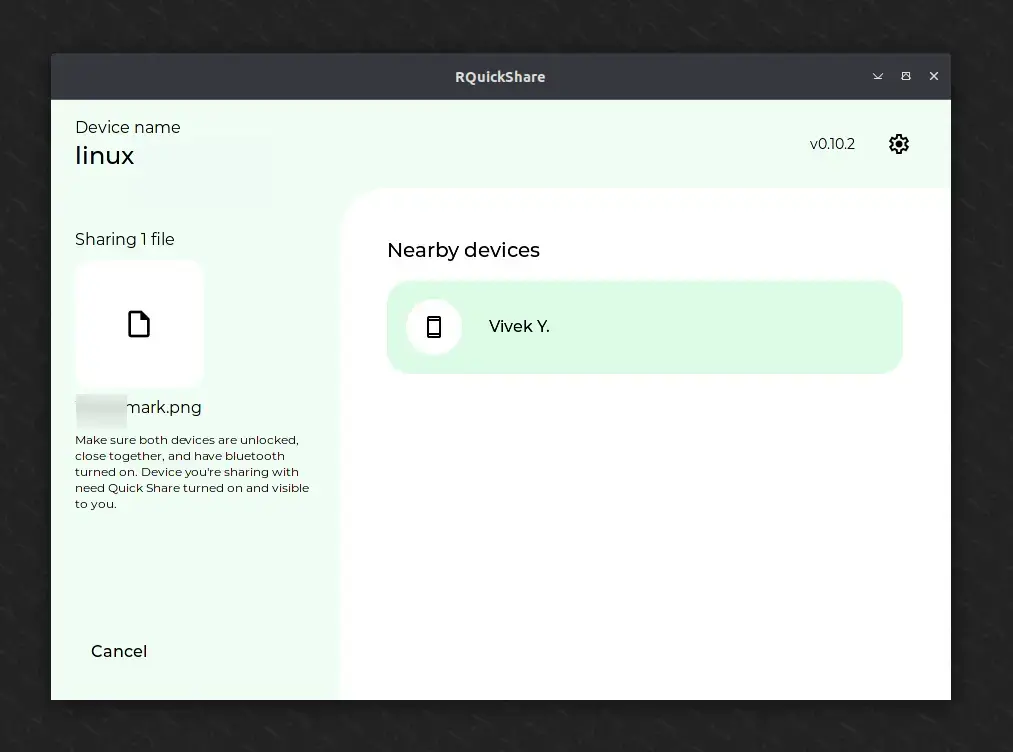
$ ./r-quick-share-main_*_amd64.AppImageOnce the installation is complete, you can find and launch it from the application menu. Upon your first launch, you’ll see the following screen where RQuickShare will scan for nearby devices (with Quick Share) connected to the same network.
To customize settings like auto-launch on boot, keeping the application running in the background, and the default download directory, click the gear icon in the top right corner.
When you’re ready to transfer a file, simply drag and drop or select your file, and make sure both devices are on the same Wi-Fi network. Once the other device is discovered, click on it to share your file from your desktop to your smartphone.
That’s it! This way, you can share your file between your desktop and smartphone in a quick and easy way.
RQuickShare is a fantastic tool that lets you easily share files between your desktop and smartphone. Most modern smartphones come with QuickShare or NearbyShare, so you don’t need any external applications installed on your smartphone; just install RQuickShare on your desktop and start sharing your files.
The post How to Install RQuickShare (NearbyShare/QuickShare) on Linux appeared first on Linux TLDR.
RabbitMQ is a free and open-source message-broker program used for real-time communication between users in chat applications, supporting protocols such as STOMP, MQTT, AMQP, HTTP, WebSocket, and RabbitMQ Streams.
Its functionality might remind you of Apache Kafka, but the difference is that RabbitMQ prioritizes end-to-end message delivery, while Kafka is a distributed event streaming platform designed for the real-time exchange of continuous big data.
In this tutorial, you’ll learn how to install and configure the RabbitMQ server on major Linux distributions, create an administrator account, set up the management dashboard, and access it via a browser.
There are two ways to install RabbitMQ Server on Linux: either through the default package manager (as it’s available in most Linux repositories) or using the Cloudsmith Mirror, a third-party repository that guarantees the latest version.
You can choose the one that is best suited to you and your work environment. For beginners, I suggest starting with the default package manager, as it’s the easiest and most straightforward to follow.
The RabbitMQ server package is available for several popular Linux distributions, such as Debian, Ubuntu, Red Hat, and Fedora. Users of these systems can directly install the stable version using the system’s default package manager.
# On Debian, Ubuntu, Linux Mint, or Kali Linux
$ sudo apt install rabbitmq-server

# On Red Hat, Fedora, CentOS, or AlmaLinux
$ sudo dnf install rabbitmq-serverCloudsmith Mirror is a third-party repository officially provided by RabbitMQ to deliver the latest RabbitMQ server package to users ahead of its availability in the Linux repository.
To add the Cloudsmith Mirror for the RabbitMQ server package on Debian, Ubuntu, Linux Mint, and other related distributions, run:
$ curl -1sLf 'https://dl.cloudsmith.io/public/rabbitmq/rabbitmq-erlang/setup.deb.sh' | sudo -E bashFor Red Hat, Fedora, CentOS, and other related distributions, run:
$ curl -1sLf 'https://dl.cloudsmith.io/public/rabbitmq/rabbitmq-erlang/setup.rpm.sh' | sudo -E bashAfter adding the repository, you can proceed to install the latest version of RabbitMQ Server using the default package manager.
# On Debian, Ubuntu, Linux Mint, or Kali Linux
$ sudo apt install rabbitmq-server

# On Red Hat, Fedora, CentOS, or AlmaLinux
$ sudo dnf install rabbitmq-serverOnce the RabbitMQ Server installation is complete, make sure to check that the RabbitMQ service created during installation is enabled and active by running the following commands:
$ systemctl is-enabled rabbitmq-server
$ systemctl status rabbitmq-server
Output:
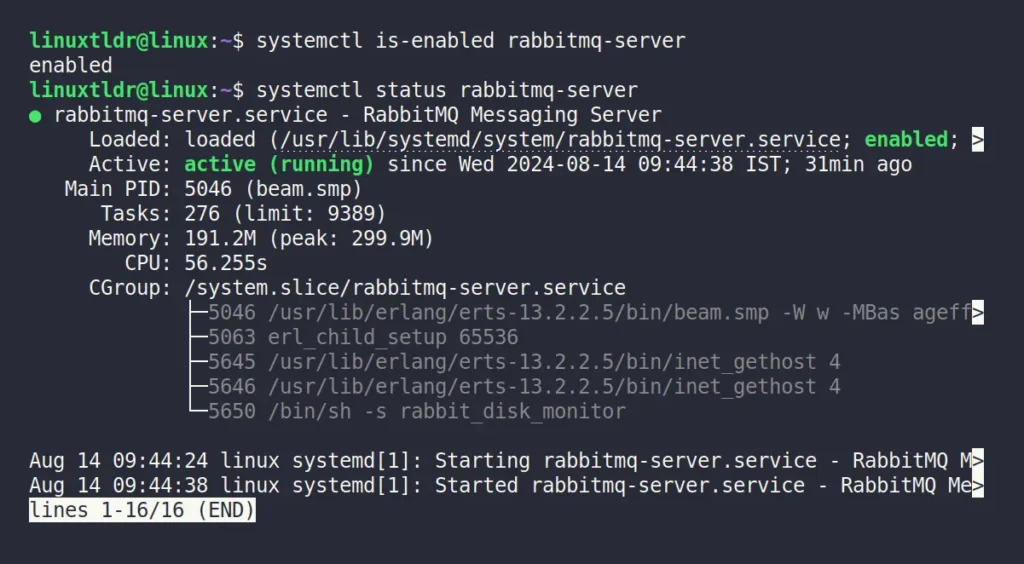
As you can see, it’s enabled and active in my case. If it’s not for you, make sure to enable and start the service in the background using the following command:
$ sudo systemctl enable --now rabbitmq-serverOutput:

If you encounter a service failure when starting the services, ensure that the default 5672 port used by the RabbitMQ Server is not occupied by another service by using the ss command:
$ sudo ss -tulpn | grep 5672Output:

In the above output, the “beam.smp” process is managed by RabbitMQ Server, so the issue is not with it. However, if another user or service is utilizing the port, make sure to close the service by its port number or service name.
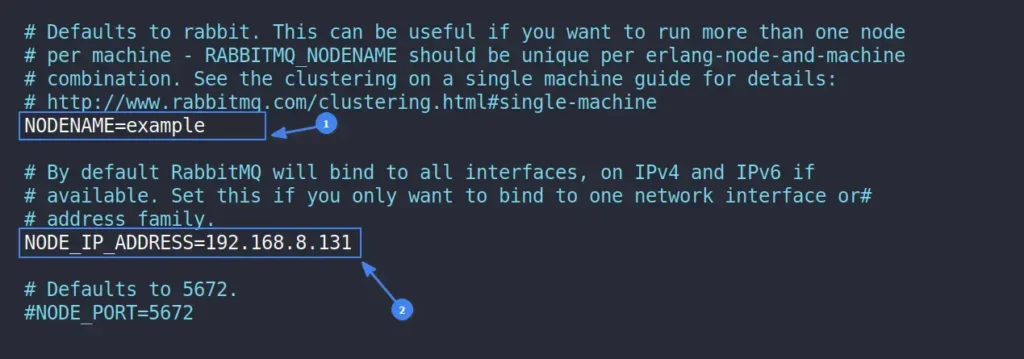
To configure the RabbitMQ server with the hostname and network settings. We need to adjust the parameters in the “rabbitmq-env.conf” file. This configuration file is used to set global environment variables for RabbitMQ, like node names, directory locations, runtime flags, etc.
Our main motivation for editing this file is to configure it with our hostname and internal network (DO NOT EXPOSE IT TO PUBLIC IP ADDRESSES). To proceed, first open the file using your preferred text editor (I selected Nano).
$ sudo nano /etc/rabbitmq/rabbitmq-env.confOnce the file is open, you will see the following parameters commented with a “#” prefix.
#NODENAME=rabbit
#NODE_IP_ADDRESS=127.0.0.1
#NODE_PORT=5672
To configure it with the internal network, find your hostname and internal (or local) IP address, uncomment the NODENAME and NODE_IP_ADDRESS lines by removing the “#” prefix, and replace their parameter values with your chosen ones. After making the necessary changes, your file should appear like this:
If needed, you can adjust the port by uncommenting the NODE_PORT parameter and replacing the port number with your desired one. However, I don’t recommend doing this unless it’s your only option. Beside this, you can now save and close the file, and don’t forget to restart the RabbitMQ Server by running:
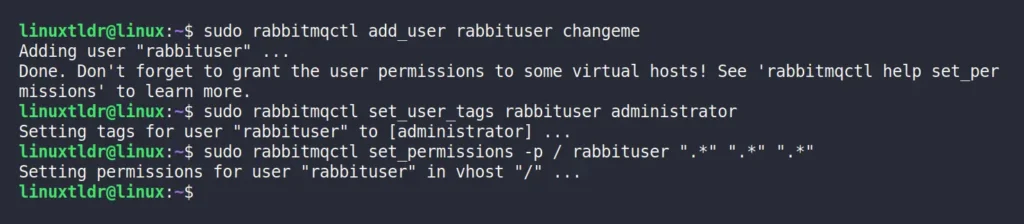
$ sudo systemctl restart rabbitmq-serverTo access the RabbitMQ web interface (which will be discussed later), you need an administrator account. For that purpose, you can use the following command to create a new administrator account with full permissions for all vhosts on the RabbitMQ server.
$ sudo rabbitmqctl add_user rabbituser changeme
$ sudo rabbitmqctl set_user_tags rabbituser administrator
$ sudo rabbitmqctl set_permissions -p / rabbituser ".*" ".*" ".*"
Output:
Once the administrator account is created, we can use the following credentials to log in:
RabbitMQ offers a set of community-contributed plugins to extend its existing features. We are particularly interested in the “rabbitmq_management” plugin, which provides access to a web interface that simplifies the monitoring and configuration of RabbitMQ.
To enable this plugin, run the following command:
$ sudo rabbitmq-plugins enable rabbitmq_managementThis will enable the other required plugins, such as “rabbitmq_management,” “rabbitmq_management_agent,” and “rabbitmq_web_dispatch” that together enable the RabbitMQ management interface.

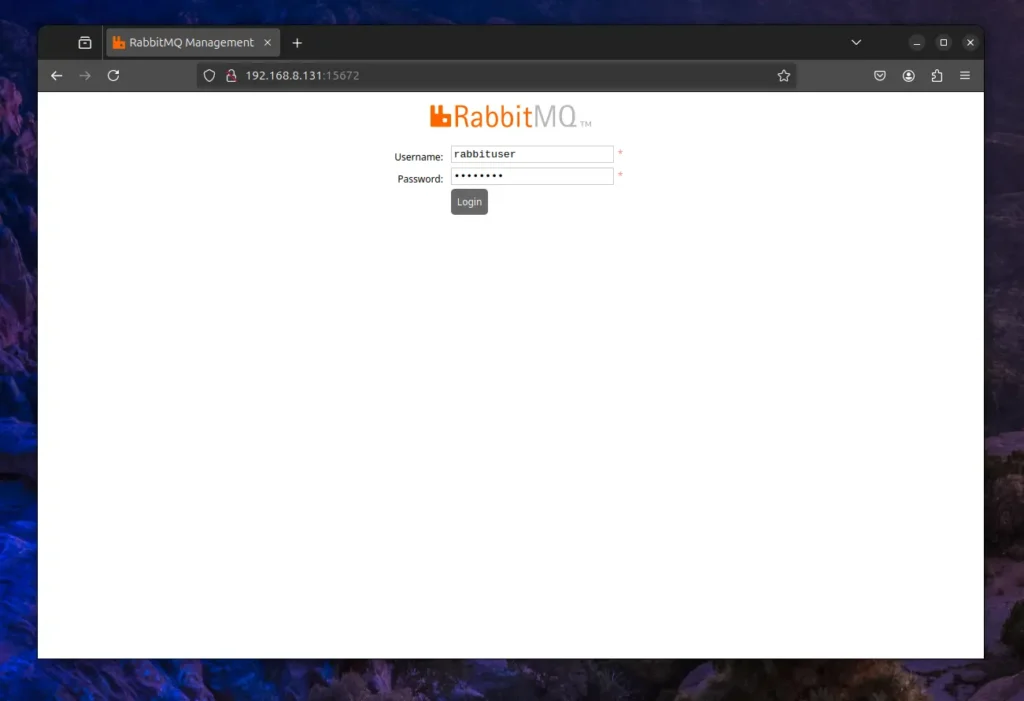
Finally, to access the RabbitMQ web interface, open your preferred browser and navigate to your internal IP address, followed by the 15672 port (like this: http://ip-address:15672). On your first visit, you will be redirected to the login page, where you can use the previously created administrator credentials to login.
Once the authentication is successful, you will be redirected to the RabbitMQ dashboard, which will appear like this:
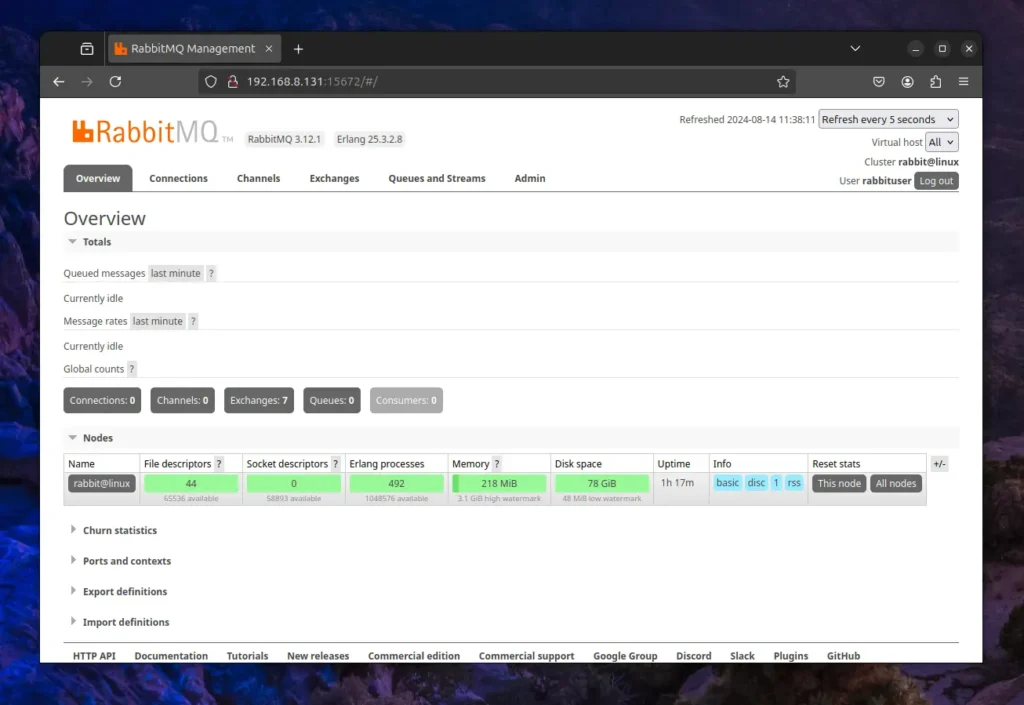
That’s it! You have successfully installed and configured RabbitMQ on your Linux system.
To remove RabbitMQ from your Linux system, first ensure that you remove the Cloudsmith Mirror repository if it was used for installation. For Debian, Ubuntu, Linux Mint, and other related distributions, use the following command:
$ rm /etc/apt/sources.list.d/rabbitmq-rabbitmq-erlang.list
$ apt-get clean
$ rm -rf /var/lib/apt/lists/*
$ apt update
For Red Hat, Fedora, CentOS, and other related distributions, use this command:
$ rm /etc/yum.repos.d/rabbitmq-rabbitmq-erlang.repo
$ rm /etc/yum.repos.d/rabbitmq-rabbitmq-erlang-source.repo
Once the repository is removed, you can proceed to remove the RabbitMQ Server package using the appropriate command for your Linux distribution:
# On Debian, Ubuntu, Linux Mint, or Kali Linux
$ sudo apt uninstall rabbitmq-server

# On Red Hat, Fedora, CentOS, or AlmaLinux
$ sudo dnf uninstall rabbitmq-serverIn this article, you’ve learned how to install and configure the RabbitMQ server on major Linux distributions, create an administrator account, set up the management dashboard, and access the dashboard via a browser.
If you have any questions or queries related to the article, do let us know in the comment section.
Till then, peace!
The post How to Install RabbitMQ Server on Linux (Quick Guide) appeared first on Linux TLDR.
Chattr is a UNIX command-line program that’s pre-shipped in most Linux distributions. The role of this command is to allow the admin user to set file attributes that impose restrictions on files.
There are a handful of file attributes for different roles, such as the “+i” attribute, which prevents a file from being renamed, deleted, or modified, and the “+a” attribute, which only allows appending new content, as well as a few others that will be discussed later in this tutorial.
The benefit of using this command is that the restriction applies to both the normal user and the root user, making it a good choice for protecting important and sensitive files from accidental or retroactive changes.
In this beginner-friendly tutorial, I’ll explain to you how to use the chattr command with its various options, operators, and file attributes in a real-world scenario.
| Description | Chattr command |
| Difficulty Level | Low |
| Root or Sudo Privileges | Yes |
| OS Compatibility | Ubuntu, Manjaro, Fedora, etc. |
| Prerequisites | – |
| Internet Required | No |
The chattr command takes three arguments: the first is the option, the second is the file attribute, and the third is the file path where you want to apply the selected file attribute.
$ chattr [option] [attribute*] [path/to/file*]When you specify the file attribute, you’ll mainly use the “+” and “-” operators: the “+” operator adds the selected attribute restriction to the file, while the “-” operator removes it. Besides this, you use the “=” operator to remove all the existing attributes and replace them with the selected ones.
The available options for chattr are the “-R” option to recursively apply the specified attribute to every file in the selected directory, the “-V” option to display the changed files, and the “-f” option to hide common errors.
Enjoying it, right? Now, let’s learn a bit more about some important file attributes that you’ll mainly use for setting restrictions using the chattr command, starting with…
The following is a list of commonly used chattr attributes and their purposes.
a: Only allow appending new content while imposing write, rename, and delete restrictions.A: Access time (or atime) record is frozen.c: Enables the transparent compression of the file on the supported filesystem.S: The changes to the file are updated synchronously, which will ensure the integrity of the critical data.i: Enables immutable mode, which allows the file content to be viewed but prevents writing, renaming, deleting, or appending actions.j: It will ensure that the changes are first applied to the ext3 journal before the file itself.t: Disable the tail-merging.d: It will reject the dump process for the selected file, which is often used for creating backups.u: When a file is accidentally deleted, a copy of the file is generated and can be recovered later.e: It’s a default attribute applied to all files that indicates the file system uses extents to map the file’s location on the disk.The above list contains a few attributes from the complete list. To see the entire list, you can use the “man chattr” command. However, these are sufficient for a beginner, as your work will mostly revolve around them. Let’s now look at some practical examples of this attribute in use.
The “+i” attribute makes the file immutable, preventing any modifications, even by root. A real-life scenario would be protecting a critical configuration file from accidental changes.
$ sudo chattr +i myfile.txtOutput:
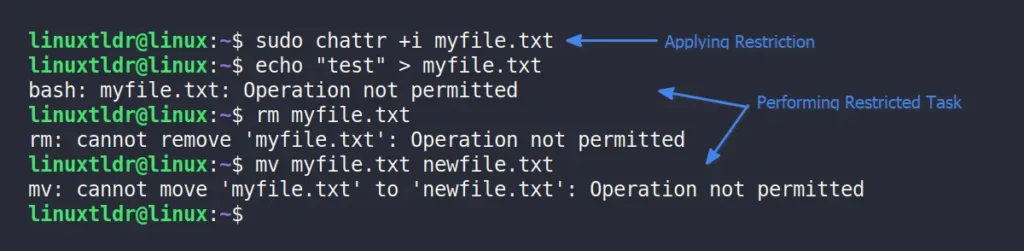
The content of the file can still be viewed despite the write, rename, and delete restrictions.
To remove the restrictions placed on a file in the previous method, you can use the “-i” attribute.
$ sudo chattr -i myfile.txtOutput:

Note that this will only remove the restriction for the “+i” attribute. If the user assigns a different attribute or multiple attributes at the same time, they will still exist.
The “+a” attribute is very similar to the “+i” attribute and prevents write, rename, and delete actions but allows appending new content to the file. You can apply this attribute to log files to prevent retroactive changes.
$ sudo chattr +i myfile.txtOutput:

To restore the file to its original state, use the “-a” attribute to remove the append-only restriction.
To keep track of existing attributes or verify whether the applied attribute is set, you can use the “lsattr” command, which lists all the attributes assigned to the selected file.
$ lsattr myfile.txtOutput:

The above output indicates that the file has two attributes: “i“, which means the file is immutable, and “e“, which is the default attribute applied to all files.
When a file has multiple attributes applied to it but you want to replace all of them with the selected one, you can specify the attribute with the “=” operator for this task.
$ sudo chattr =u myfile.txtOutput:

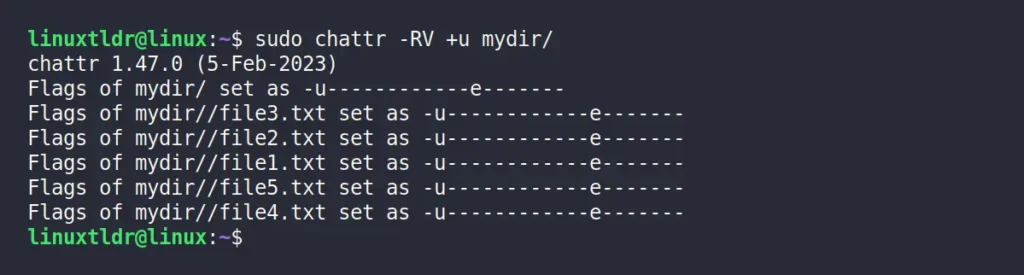
To apply a selected attribute to all files in the target directory, use the “-RV” option to make changes recursively to all files, and then list the affected files.
$ sudo chattr -RV +u mydir/Output:
In this article, you have learned how to use the chattr command with various operators and attributes, as well as its available options. If you have any questions about the topic, feel free to reach out to us via the comment section.
Till then, peace!
The post How to Use Chattr Command in Linux (for Beginners) appeared first on Linux TLDR.
VPNs are popular these days, but many users still prefer using a SOCKS proxy to tunnel network connections through them, as it offers faster internet connections and is ideal for managing torrent traffic, despite the generic drawback of unencrypted traffic.
You can even access blocked sites in your country using a SOCKS proxy. There are many public SOCKS proxy servers available, but as mentioned earlier, traffic on a SOCKS proxy is not encrypted, so using a public one could be risky.
In this article, I’ll show you how to install and set up a SOCKS5 proxy server on Linux using MicroSocks.
MicroSocks is a lightweight and multi-threaded SOCKS5 proxy server designed to robustly handle requests on servers with low resources by consuming minimal resources and gently denying new connections during heavy loads instead of aborting them.
It supports IPv4, IPv6, DNS, uses TCP (no UDP currently) for network proxy, and allows users to connect with or without a password or by providing a one-time password, all without needing to create or edit any configuration file.
Let’s now see how to install MicroSocks on popular Linux distributions like Debian, Ubuntu, Linux Mint, Red Hat, Fedora, Rocky Linux, Arch, or any others.
MicroSocks is available in most Linux repositories, such as Debian, Ubuntu-based distributions, and Arch systems, where you can quickly install it using one of the appropriate commands based on your Linux distribution.
# On Debian, Ubuntu, Kali Linux, Linux Mint, Zorin OS, Pop!_OS, etc.
$ sudo apt install microsocks

# On Arch Linux, Manjaro, BlackArch, Garuda, etc.
$ sudo pacman -S microsocks
On Red Hat and Fedora-based distributions, or on older Debian and Ubuntu distributions, you can build and install it from the source, which also provides you with the latest version.
To start, ensure the development tools are installed on your Linux system, then run the following series of commands to install MicroSocks from source.
$ wget http://ftp.barfooze.de/pub/sabotage/tarballs/microsocks-1.0.4.tar.xz
$ tar -xvf microsocks-1.0.4.tar.xz && cd microsocks*/
$ make && sudo make install
Once the installation is complete, the MicroSocks executable file will be added to the “/usr/local/bin” directory.
Now that the installation is complete, the “microsocks” command is available to use, but before that, let’s look at a few options you can use with it.
| Option | Description |
|---|---|
| “-1“ | It allows you to authenticate once, after which your IP address will be included in a whitelist, enabling you to connect to the proxy server later without authentication. |
| “-q“ | Disable logging. |
| “-i ip-address“ | Specify the IP address to listen on; not providing one means listening on all network interfaces in the server (default is “0.0.0.0“). |
| “-p port“ | Set the port to use for listening (default is “1080“). |
| “-u user” and “-P password“ | Specify the username and password for authentication in plain text, which can be anything regardless of existing users on the server. |
In my case, I’ve set up the MicroSocks proxy server on a DigitalOcean VPS and started it using the following command, which listens on all server IPs with port 8484, the username “proxyuser“, and the password “securepassword“.
$ microsocks -1 -p 8484 -u proxyuser -P securepasswordOutput:

To connect to the above MicroSocks proxy server from the local machine, run the following command, replacing the green highlighted fields with the correct proxy server information.
$ curl --socks5 user:password@server-ip:port https://www.google.com/Output:

Once you do that, your local machine will be whitelisted for the MicroSocks proxy server due to the “-1” option, allowing you to configure SOCKS5 with your browser or Linux system without providing credentials.
To connect to your MicroSocks proxy server from Firefox, navigate to “Preferences“, then “General“, scroll down to the “Network Settings” section, and click on “Settings“.
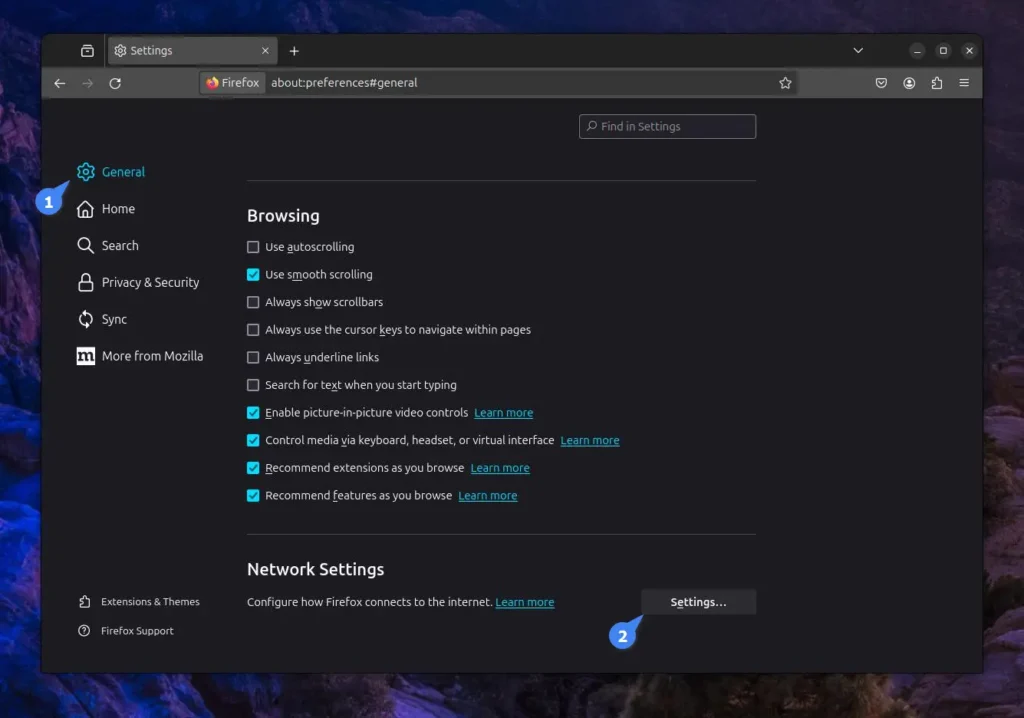
Then, ensure you enable manual proxy configuration, select SOCKS v5, and provide the host and port number of your SOCKS5 proxy server.
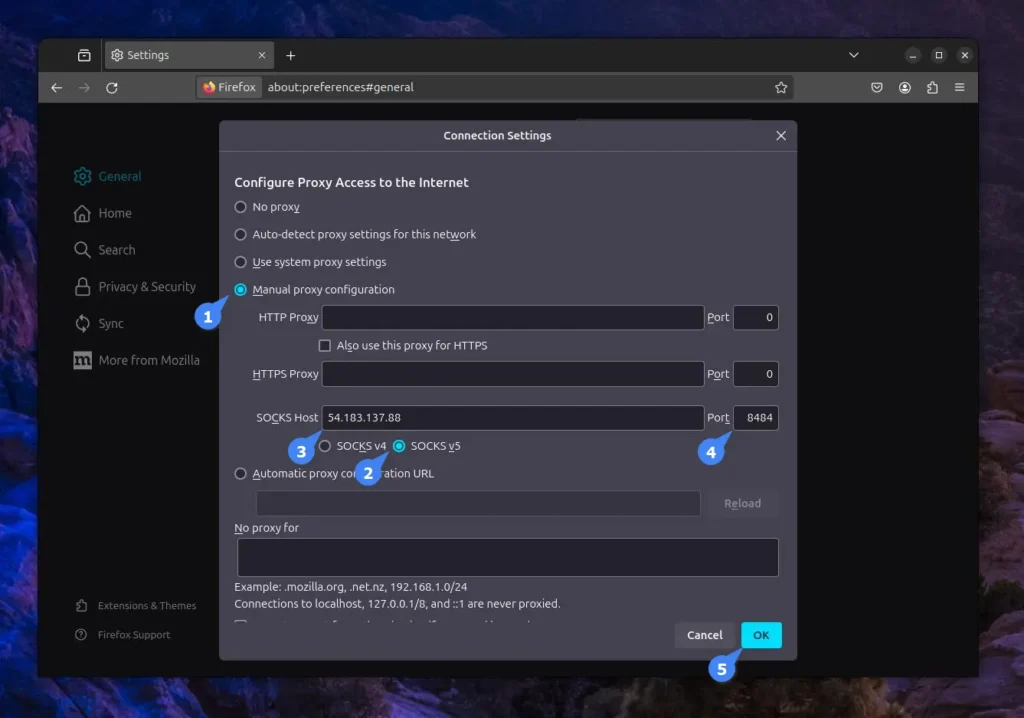
Your Firefox is now configured with the MicroSocks proxy server, so all your browsing will go through the proxy server. If you encounter a connection failure error, make sure to re-execute the previous curl command.
To connect your local machine (running on GNOME) with the MicroSocks proxy server, first open “Settings“, navigate to “Network“, and then “Proxy“.
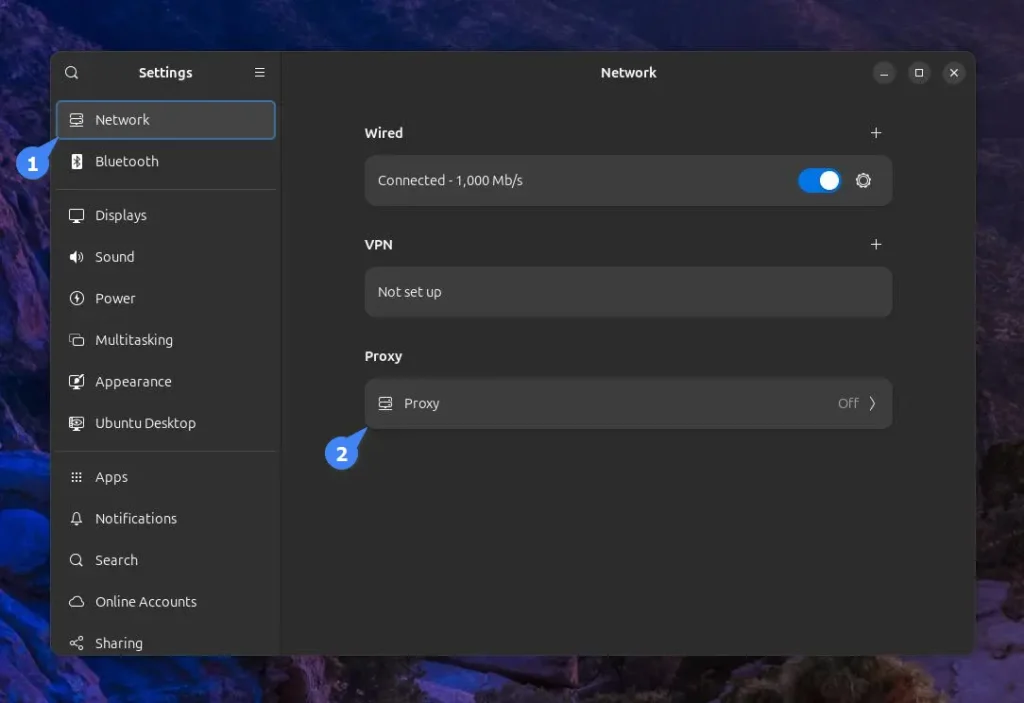
Next, toggle the “Network Proxy” and choose the “Manual” configuration.

Finally, enter the host and port of your MicroSocks proxy server in the “SOCKS5 HOST” section and save the changes.
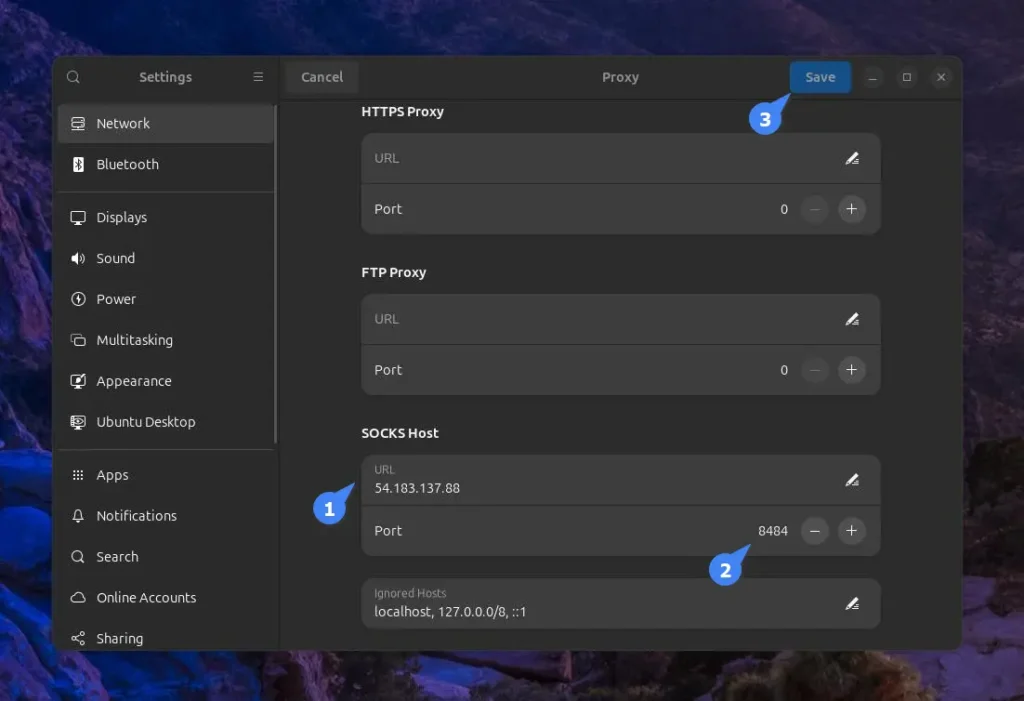
You now have your system running on GNOME, connected to your MicroSocks proxy server.
If you are running an Ubuntu system with UFW (Uncomplicated Firewall), you need to open the port your proxy server listens on. First, check the firewall status:
$ sudo ufw statusIf it’s active and running, then open the port for the MicroSocks proxy server, which by default is 1080; however, since I’ve opted for a custom port of 8484 using the “-p” option, I need to allow this port with the following command:
$ sudo ufw allow 8484/tcpOutput:

To keep the MicroSocks proxy server running in the background and autostart on boot without any manual intervention, you can create a Systemd service.
To begin, open your terminal and create a Systemd service file using the command below.
$ sudo nano /etc/systemd/system/microsocks.serviceThen copy-paste the following snippet.
[Unit]
Description=microsocks SOCKS5 server
Documentation=https://github.com/rofl0r/microsocks
After=network.target auditd.service

[Service]
EnvironmentFile=/etc/microsocks.conf
ExecStart=/usr/bin/microsocks -1 -u ${MICROSOCKS_LOGIN} -P ${MICROSOCKS_PASSW}

[Install]
WantedBy=multi-user.target
Save and close the file, then create a MicroSocks configuration file for the user and password variables used in the above Systemd service file.
$ sudo nano /etc/microsocks.confCopy and paste the following snippet, ensure to replace the user and password information with the correct MicroSocks proxy server details. Also, if you’ve customized the port or restricted IP in the Systemd service file, set their values accordingly in this configuration file.
# used by the systemd service file
MICROSOCKS_LOGIN="proxy-user"
MICROSOCKS_PASSW="proxy-password"
Save and close the file, then use the following command to enable and start the service:
$ sudo systemctl enable --now microsocks.serviceTo verify the status of the service, run the “systemctl status microsocks” command.

To uninstall the MicroSocks proxy server from your Linux system installed via the package manager, run:
# On Debian, Ubuntu, Kali Linux, Linux Mint, Zorin OS, Pop!_OS, etc.
$ sudo apt remove microsocks

# On Arch Linux, Manjaro, BlackArch, Garuda, etc.
$ sudo pacman -R microsocks
If you have installed it directly from the source, then run:
$ sudo rm /usr/local/bin/microsocksTo disable and remove the Systemd service, run:
$ sudo systemctl disable --now microsocks.service
$ sudo rm /etc/microsocks.conf
If you’ve allowed the MicroSocks listening port on UFW, then execute the following command to locate its index number:
$ sudo ufw status numberedThen remove the corresponding port using the “sudo ufw delete [no]” command.
The post How to Setup SOCKS5 Proxy Server on Linux Using MicroSocks appeared first on Linux TLDR.
WordPress is a popular CMS for bloggers and journalists, offering a range of features, including multi-user management, allowing admins to create separate accounts for different users with varying privileges.
The rule of thumb is to hand over the username and password to the user after account creation, but if the user or admin itself forgets the own password, the only option is to reset the user or admin password from the MySQL console or by using external tools.
In this article, I’ll show you how to reset (or change) the WordPress logins using the MySQL command-line client or the “wp-cli” command.
The first step is to log in to your server running WordPress via SSH. Then, make sure to take a backup of your WordPress database. You can either create a snapshot of your server or use the backup option if you are using a hosting provider.
Alternatively, you can use the following command to export a specific MySQL database to an SQL file format by providing the MySQL username, password, and database name.
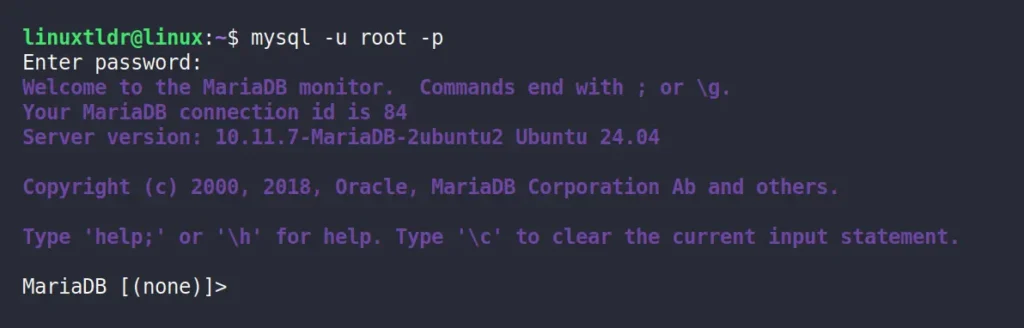
$ sudo mysqldump -u [user] -p [db_name] > [export_the_db.sql]Once you have taken the backup, you can reset the WordPress password by first connecting to the MySQL or MariaDB server.
$ mysql -u [user] -pOutput:
Then you need to select the WordPress database; if you forget the database name, you can use the “SHOW DATABASES;” SQL query to list all MySQL databases. Once you locate the correct database, use the following command to select it:
MySQL> use [wordpress_db]Output:

Then, for confirmation, you can run the following command to list all WordPress users:
MySQL> select user_login from wp_users;Output:
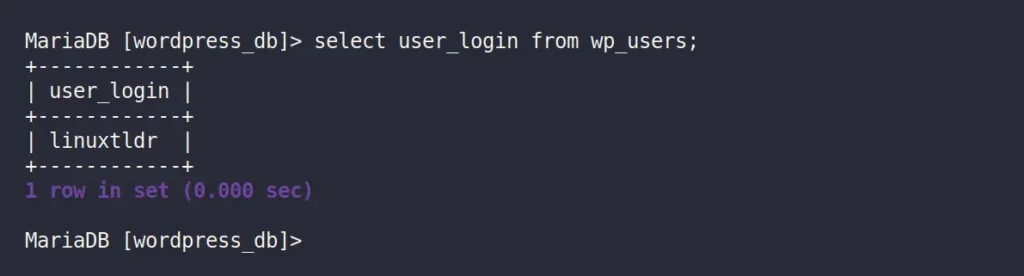
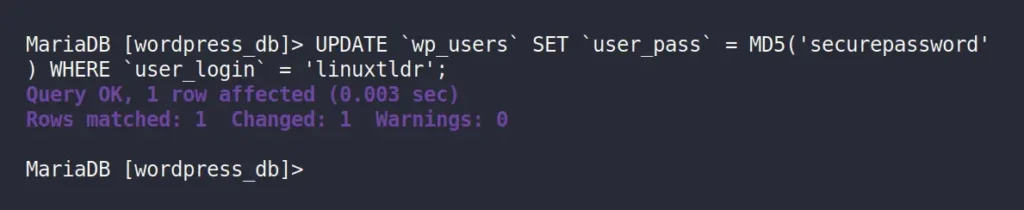
I have only one user account named “linuxtldr“, whose password I want to change. However, in your case, there could be one or more users, so note down the username and execute the following SQL query to update that user password (using the MD5 hashing algorithm):
MySQL> UPDATE `wp_users` SET `user_pass` = MD5('changeme') WHERE `user_login` = 'wordpress-user';Output:
When you are done, quit the MySQL console using the “exit” SQL query and return to WordPress to log in with the updated password.
WP-CLI is a fantastic command-line tool for managing WordPress that you should definitely give a try. We’ve already covered its installation and command-line usage in a separate article, so we’ll skip those parts and focus on resetting the WordPress administrator password.
First, ensure you are connected to the system running WordPress, then open your terminal and navigate to the directory where the WordPress files are stored (typically, it’s “/var/www/html“).
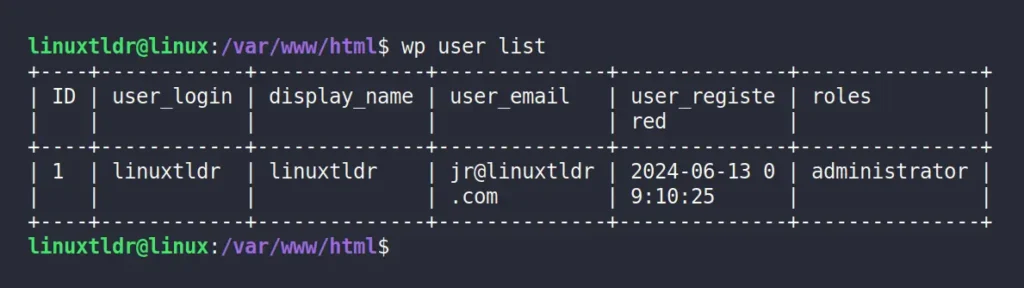
Then run the following command to list all the WordPress user accounts:
$ wp user listOutput:
Finally, select the username whose password you want to change, and pass it to the command below, along with the new password for resetting.
$ wp user update wordpress-user --user_pass=changemeOutput:

That’s it; you have successfully changed the WordPress password using the “wp-cli” tool.
All the methods mentioned would work for resetting the WordPress password; you can choose one according to your preference. If you have any questions, feel free to ask them in the comments.
Till then, peace!
The post Reset the WordPress Admin Password Using CLI (via 2 Methods) appeared first on Linux TLDR.
Python is one of the most widely used programming languages that powers many popular web applications, AI/ML technologies, IoT devices, task automation, and many more.
Right now, Python 3 is the latest version, but if you are using an outdated system, you might be using an older version of Python, possibly Python 2, which is now deprecated.
Knowing the correct Python version is crucial, whether you are running a program that only works with a specific version or planning to start a Python project with the latest version.
In this quick guide, I’ll show you how to check the Python version in Ubuntu and other Linux distros from the command line.
There are multiple ways to find out the Python version from the command line; here I’ve provided you with the first two ways to identify if Python 2 or 3 is running on your Linux system, and the third method works for any Python version.
If you are running the older Python 2 version (which is now deprecated) on your Linux system, you can try running the “python” command with the “-V” or “–version” option to check its version information.
$ python -V

# OR

$ python --version
Output:

This method only works for Python 2, as Python 3 requires a different command, which you can find in the next section.
To check the Python 3 version information, you can try running the “python3” command with the “-V” or “–version” option.
$ python3 -V

# OR

$ python3 --version
Output:

This method works for any Linux distribution, as well as for Windows and macOS.
The previous two methods will help you find the Python version installed on your Linux system, but if you want to check the Python version in the interpreter (also known as the Python console) or within a Python script, you can do that too.
The “sys” and “platform” modules can help you check the installed Python version; the “sys” module provides detailed information, including the build number and date, while the “platform” module only prints the version.
You can use any one of them according to your needs, so when you’re ready, open your Python console or script and copy-paste any of the following Python snippets:
# Checking Python Version Using Sys Module
import sys
print(sys.version)

# Checking Python Version Using Platform Module
import platform
print(platform.python_version())
Output:

This method would work on any Linux distribution (such as Debian, Ubuntu, Red Hat, Fedora, Arch, Manjaro, etc.), as well as on Windows, macOS, or Raspberry Pi.
Knowing the correct Python version is crucial to ensuring compatibility among the program, libraries, framework, and applications. This article shows you various methods to check the installed Python version on your Linux system, whether from the command line, the Python interpreter, or programmatically.
If you have any questions, feel free to ask them in the comments.
Till then, peace!
The post How to Check Python Version in Linux (via 3 Methods) appeared first on Linux TLDR.
PHP is a popular scripting language used in the backend during web development to take the client request, process the request and respond to it, or execute MySQL queries.
Many popular CMS (content management systems), such as WordPress, Joomla, Drupal, Laravel, Magento, Symfony, and many more, are based on PHP.
As the popularity of PHP grows, each PHP version undergoes multiple changes, such as performance improvements, functionality updates, and security enhancements.
With this release, knowing the PHP version installed on your system is crucial, especially if you plan to develop a new web app based on PHP; ensure you check the PHP version on your system and strategize your development accordingly.
In this article, I’ll show you how to check the PHP (or PHP-FPM) version on Ubuntu and other Linux distros using the command line.
There are multiple ways to find out the PHP version installed on your system: I’ll show you four methods— the first three work for any Linux distribution such as Debian, Ubuntu, Red Hat, Fedora, Arch, Manjaro, etc., while the fourth method only works for Ubuntu-based distributions such as Debian, Pop!_OS, Linux Mint, etc.
The simplest way to find out the PHP version is by using the “-h” or “–help” flag with the “php” command in your command line.
$ php -vOutput:

This method will work for the majority of Linux distributions with PHP installed through a package manager.
When PHP is installed using a different method, such as source code, the previous method might not work as it relies on passing the help flag to the PHP binary file that resides in the bin folder.
If you’re using the absolute path of the PHP binary file to run your PHP script, you can create a new PHP file named “phpversion.php” and include the following content:
<?php
	phpinfo();
?>
Then, you have two options: either run the PHP server and access the PHP file in your web browser to check the PHP version, or pass the PHP file to the absolute path of the PHP binary file and use the grep command to find the PHP version.
$ /path/to/php phpversion.php | grep "PHP Version"Output:

This method would work for all Linux distributions, as well as Windows and macOS.
If you’ve relocated the PHP directory and can’t locate it, neither of the previous methods will work. In such cases, you can use a few command-line tools to find the PHP directory.
For example, in the given command, “locate” will search for a file or directory named PHP, “grep” will filter the results for files ending with the name PHP, and the final command is “xargs” and “ls“, which are used to follow symbolic links, taking stdin data from the previous piped command.
$ locate php | grep -P "/php$" | xargs ls -LWhen you run the above command, it will return all PHP files, sometimes including the PHP version in the output, as shown.
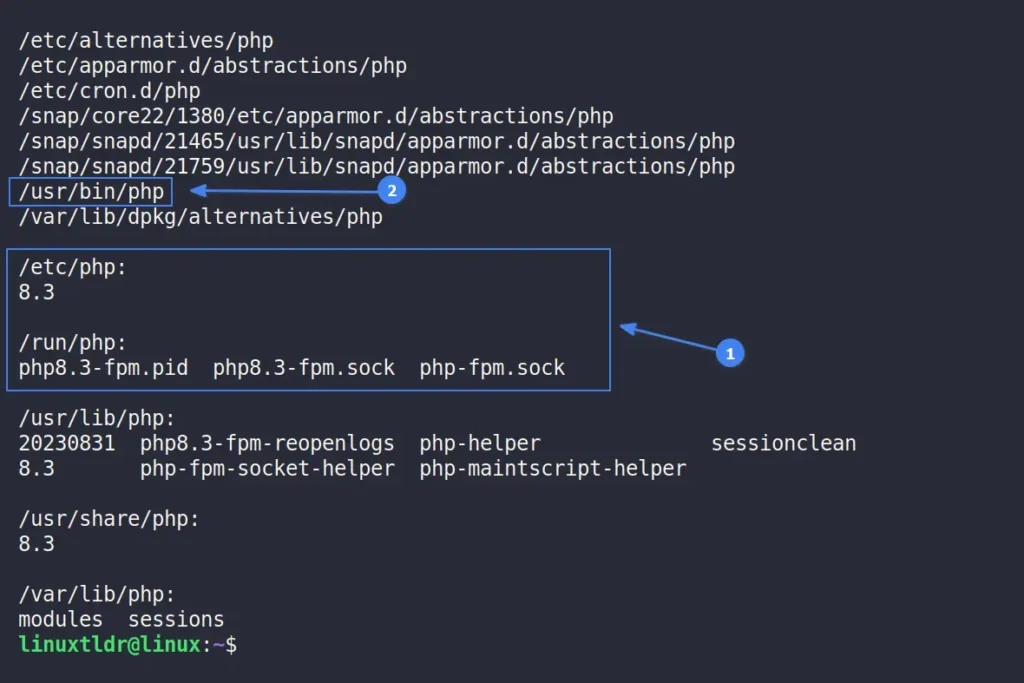
If the PHP version isn’t displayed, you can look for a PHP file in a bin directory or use tools like the file command to identify a binary file. Then, use the absolute path to the PHP binary file along with the help option to determine the PHP version.
$ /usr/bin/php -vOutput:

This method is quite effective but might be a bit trickier for beginners, so if you’re using a Debian or Ubuntu-based distribution, you can follow the next method to verify the PHP version.
When you install a program on a Debian or Ubuntu-based distribution, it adds an entry in the APT list that you can use to check the PHP version installed on your system.
$ apt list --installed | grep phpOutput:
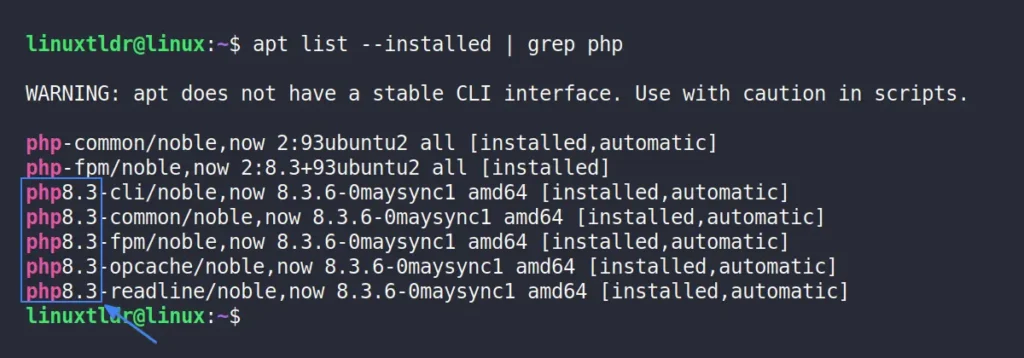
This method would only work for Debian or Ubuntu-based distributions; if you’re uncertain about the Linux distribution you’re running, use the command “cat /etc/os-release” to identify it.
In this article, you’ve learned various methods to check the PHP version running on your Linux system. If you have any questions, feel free to ask them in the comment section.
Till then, peace!
The post How to Check PHP Version in Linux (via 4 Methods) appeared first on Linux TLDR.
Are you also facing the “pkg-config script could not be found” or “configure: error: pkg-config is required” error while compiling your favorite program? Then just run one of the following commands based on your Linux distribution, and the problem will be resolved.
# On Debian, Ubuntu, Kali Linux, Linux Mint, Zorin OS, Pop!_OS, etc.
$ sudo apt install pkg-config

# On Red Hat, Fedora, CentOS, Rocky Linux, AlmaLinux, etc.
$ sudo dnf install pkgconfig

# On Arch Linux, Manjaro, BlackArch, Garuda, etc.
$ sudo pacman -S pkgconf

# For macOS
$ brew install pkg-config
Interested in knowing more about this package? Then, let’s start.
pkg-config is a helper tool that is used to provide the correct path of header files or libraries to the compiler option during the compilation of an application or program.
It often happens that the path of header files or libraries varies for different systems; instead of hard-coding them, pkg-config helps determine the proper paths to header files and code to link them to your software project.
It’s free, open-source, and originally released for Linux and other UNIX-like systems, but later ported to Windows and macOS. The program code has been rewritten multiple times, with the first implementation by James Henstridge and the current one maintained by Tollef Fog Heen.
Let’s now see how pkg-config can help us find the correct path to pass to the compiler.
pkg-config helps during the compilation of applications by providing paths to the installed header files and libraries. To learn its usage, you must first find out the list of available packages on your system using this command:
$ pkg-config --list-allOutput:
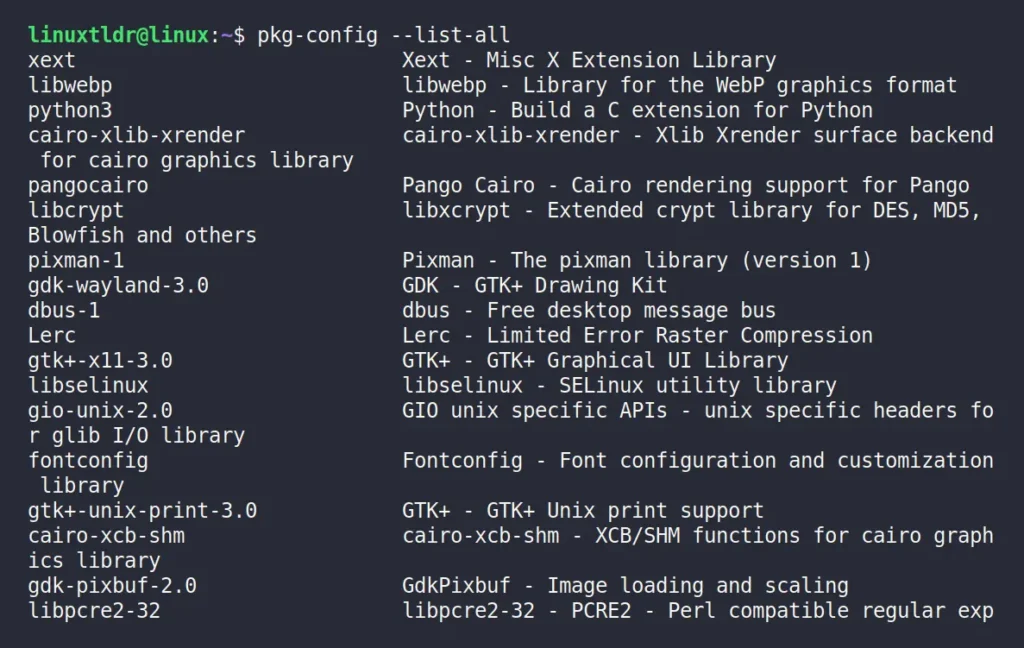
Once you have selected the package name, you mainly use the following two options:
Let’s say you want to find the compiler option for the “python3” package, you can run:
$ pkg-config --libs --cflags python3Output:

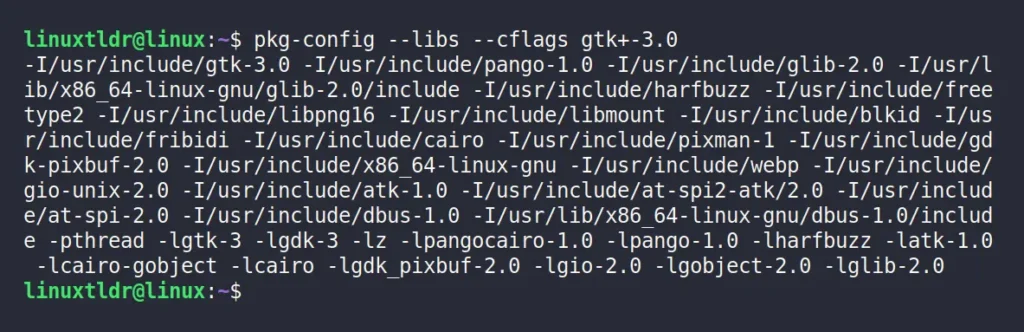
In this scenario, there is only one path for each “include” and “libs” compiler option. However, certain packages, like “gtk+-3.0” may offer multiple paths.
$ pkg-config --libs --cflags gtk+-3.0Output:
These outputs can be used for program compilation. You can either copy-paste it or assign it to a custom environment variable. For example, exporting the output of the pkg-config command to the compiler via environment variables would look like this:
$ export COMPILER_PATHS=$(pkg-config --libs --cflags LIBRARYNAME)Afterward, you can use this environment variable to compile your program, like below:
$ COMPILER -c MYPROGRAM ${COMPILER_PATHS} If you’re not a programmer and aren’t involved in compilation, you might wonder why this matters. However, if you do end up involved in compiling other programs via source code, the “configure” file you use to set up the environment might include pkg-config for providing paths. In that case, pkg-config must be installed on your system, or you might encounter the error mentioned in the article introduction.
I hope you understood the concept of pkg-config—what it is, when to use it, and why you should care. If you have further questions, feel free to ask them in the comments.
Till then, peace!
The post [Fixed] pkg-config script could not be found in Linux appeared first on Linux TLDR.
A newbie user often struggles to identify the process behind a specific listening port. Indeed, it’s not all their fault, as some listening ports are started and managed by the OS. However, they may forget the name or struggle to find the process ID of the service they manually started.
The running (or unresponsive) process must be stopped to free the occupied port and make it available for other processes. Let’s assume you are running an Apache server that uses ports 80 (for HTTP) and 443 (for HTTPS). You won’t be able to launch an Nginx server that shares these common ports until the Apache server is stopped.
It’s one of the many scenarios, and listening ports are often overlooked by users until a process fails to launch due to port unavailability. Hence, in this quick guide, I’ll show you how to identify and kill a process running on a specific port in Linux.
There are many ways to find and terminate processes running on a certain port. However, IT Guy, SysAdmin, or network engineers often favor using the CLI tool for this job. In such cases, you can use the “killport“, “fuser“, “lsof“, “netstat“, and “ss” commands as detailed in the following sections.
Killport is a fantastic CLI tool for killing a process running on a specific port by using only the port number, without needing a service name or process ID. The only inconvenience is that it’s an external tool, but you can quickly install it on your Linux system by following our installation guide.
Once you have it installed, you can quickly terminate the process running on a certain port. Let’s assume you have an Apache server running on port 80. To stop it, simply execute this command:
$ sudo killport 80Output:

Well, ignore the last “No such process” message—it’s simply the response to the last kill signal sent to the process. The key point is that the port is now available for use by any other process.
Fuser is another great tool used for identifying processes using specific files, file systems, or sockets. Despite using it to identify processes running on specific sockets (or ports), you can use it to troubleshoot issues related to file locking, process management, and system resources.
It comes preinstalled on some popular Linux distributions like Ubuntu, Fedora, and Manjaro, but if it’s not available on your system, you can install the “psmisc” package that contains “fuser” and other command-line utilities.
# On Debian, Ubuntu, Kali Linux, Linux Mint, Zorin OS, Pop!_OS, etc.
$ sudo apt install psmisc

# On Red Hat, Fedora, CentOS, Rocky Linux, AlmaLinux, etc.
$ sudo dnf install psmisc

# On Arch Linux, Manjaro, BlackArch, Garuda, etc.
$ sudo pacman -S psmisc

# On OpenSUSE system
$ sudo zypper install psmisc
To find out the process running on a specific port, you can specify the port number and its TCP or UDP protocol in the “fuser” command.
$ sudo fuser 80/tcpThe above command will return the process ID in charge of handling the specified port.

Instead of printing the running process ID, you can use the “-k” option with the above command to terminate the process associated with that process ID.
$ sudo fuser -k 80/tcpOutput:

Once you terminate the process with this method, you may need to wait a 60-second delay before the process fully shuts down. This is implemented as a security measure to avoid potential data corruption or conflicts. If you want to immediately stop the running process, you can specify the process ID in the “sudo kill -9 <PID>” command.
Lsof is another powerful tool used to identify the process responsible for managing specific files, directories, network sockets, and other system resources on the active system. It comes pre-installed with nearly all Linux distributions, requiring no additional installation.
To identify the process name and ID associated with a specific port, use the following command, followed by the port number you wish to check:
$ sudo lsof -i :80The above command will return the output in multiple columns, with your focus areas being solely the “COMMAND” and “PID” columns.
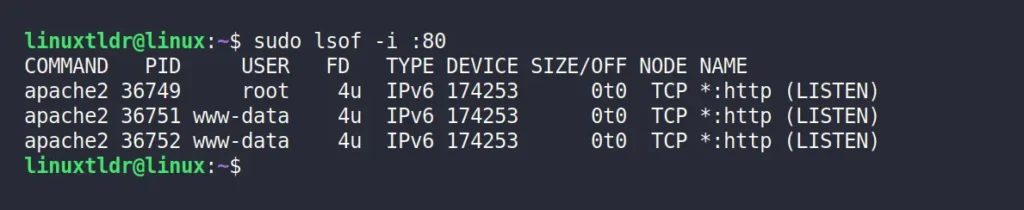
Once you have the process ID, you can use the “kill” command to terminate the process.
$ sudo kill -9 36749 36751 36752Output:

The “-9” option sends the “SIGKILL” signal to aggressively terminate the process, while you can alternatively use the “-1” option to hang up the process (less secure) and the “-15” option to gently kill the process (default).
Netstat and ss are among the most widely used tools for SysAdmins to quickly pinpoint a process name and process ID associated with a specific port. However, netstat is considered depricated, and some major Linux distributions have removed it, requiring the installation of the “net-tools” package for usage.
The ss command can be found in most Linux systems, and it’s basically an improved version of netstat. Both tools use almost identical command syntaxes, with the “-tnlp” option being the most common to identify the listening port’s process name and process ID, where each option follows.
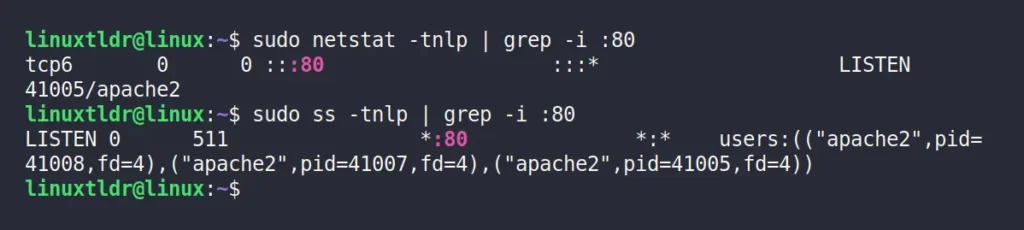
To find out the process name or ID of port 80, you can use either the netstat or ss command with the “-tnlp” option, along with the grep command, to filter out the data for only the specified port number.
$ sudo netstat -tnlp | grep -i :80
$ sudo ss -tnlp | grep -i :80
Output:
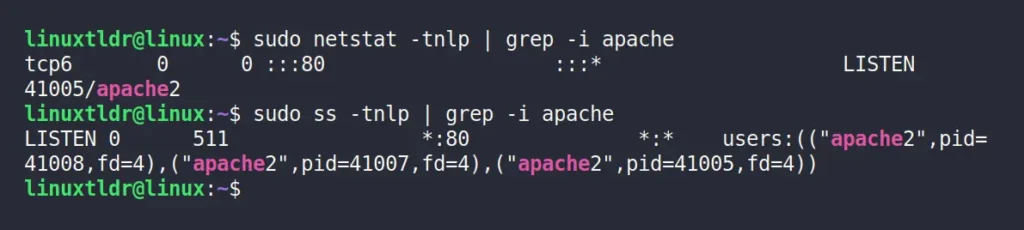
Instead of specifying the port number in the grep command, you can also use the service name to identify its process ID and listening port.
$ sudo netstat -tnlp | grep -i apache
$ sudo ss -tnlp | grep -i apache
Output:
Finally, to kill the corresponding process, you can specify its process ID with the following command:
$ sudo kill -9 41005Output:

When terminating the process using the “kill -p” command, ensure that the service is not actively being used by any other process, as forcefully terminating it could lead to data corruption or loss.
In this article, you learned different ways to terminate a process running on a specific port that would work for almost all major Linux distributions, such as Debian, Ubuntu, Red Hat, Fedora, Arch, Manjaro, etc. Well, if you have any questions or queries, feel free to tell us in the comment section.
Till then, peace!
The post Kill a Process Running on a Specific Port in Linux (via 4 Methods) appeared first on Linux TLDR.
Hoarder is a fantastic app for keeping your notes, images, and bookmarks in a single place. It’s a free, open-source, and self-hostable application for bookmarking that offers AI-based automatic tagging and full-text search, powered by the one and only ChatGPT.
After giving it a try for five minutes, it immediately became my favorite application. To be honest, previously I used Pocket, which was quite annoying because it didn’t allow us to add notes or images; it was only for bookmarking pages.
Also, I don’t understand why they add the “?utm_source=pocket_saves” slug to every page I bookmark. Don’t they realize that some sites are strict about CSRF? Well, let’s leave them aside, as I’ve already deleted my Pocket account.
Hoarder is a fun tool for quickly creating notes, saving links, and saving images. You can later add tags to your bookmarks and organize them into lists, like one for notes, another for links, or a separate list for images.
Interestingly, it also features a Chrome plugin and a Firefox addon that allow you to quickly bookmark pages, add tags, or add them to a list.
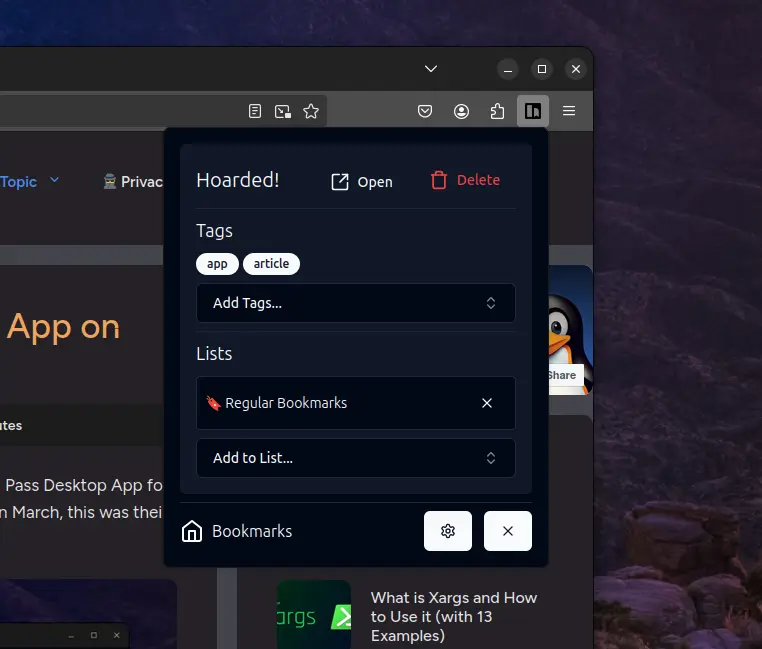
The experience is remarkable, and it also provides an option to delete bookmarks directly from the extension, unlike Pocket, which forces us to remove bookmarks from the dashboard. (Alright, that’s my final rant.)
The following is a list of features offered by Hoarder:
Make sure your system has Docker and Docker Compose installed for a smooth Hoarder setup. If not, consider referring to our dedicated installation guide. Once you have them, you can quickly set up Hoarder on Linux, Windows, or macOS, whether locally or on cloud servers.
1. Create a new directory for storing the compose file and environment variables.
$ mkdir ~/hoarder/ && cd ~/hoarder/Output:

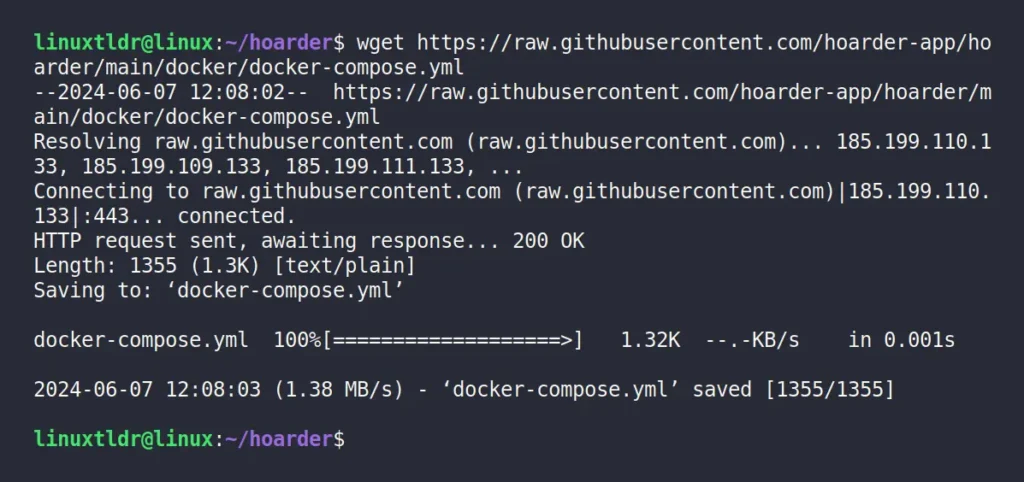
2. Download the docker compose file inside the created directory by running this command:
$ wget https://raw.githubusercontent.com/hoarder-app/hoarder/main/docker/docker-compose.ymlOutput:
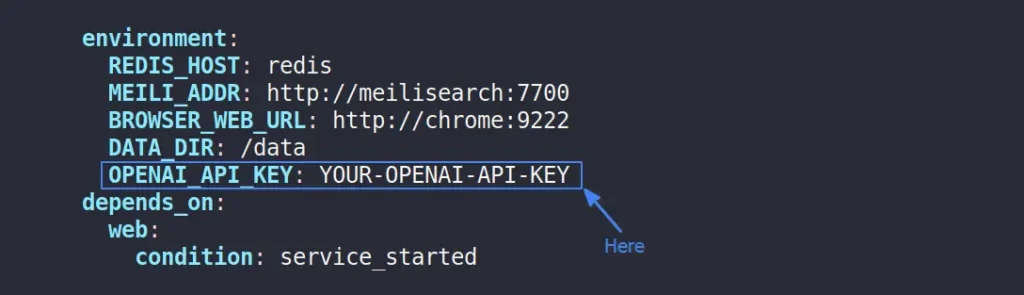
3. (Optional) To change the volume location, you can edit the docker compose file with your choice of text editor. To implement OpenAI’s automatic tagging, acquire an OpenAI API key and set it up in the docker compose file environment section.
4. Create a “.env” file in the same directory with the following content:
HOARDER_VERSION=latest
NEXTAUTH_SECRET=2fjLEIJKKl016/nJmlZnp2UpvaFCccwMkVan1ufigxqsuOtD
MEILI_MASTER_KEY=tZcjeGqwy8DEu7GqxbBupvLexsSSEit7FchT4WnAmi0ewxPb
NEXTAUTH_URL=http://localhost:3000
If you want to modify the secret keys, use “openssl rand -base64 36” to generate new random strings for “NEXTAUTH_SECRET” and “MEILI_MASTER_KEY“. And when configuring Hoarder on a cloud server, make sure to update the “NEXTAUTH_URL” variable to match your server address.
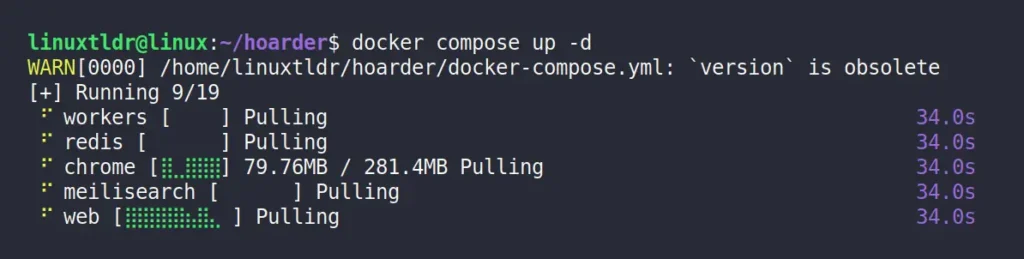
5. Finally, you can start the Hoarder server by running this command:
$ docker compose up -dOutput:
Once the Hoarder is up and running on your system, you can launch your preferred browser (Chrome or Firefox) and navigate to the “http://localhost:3000” URL to access the dashboard.
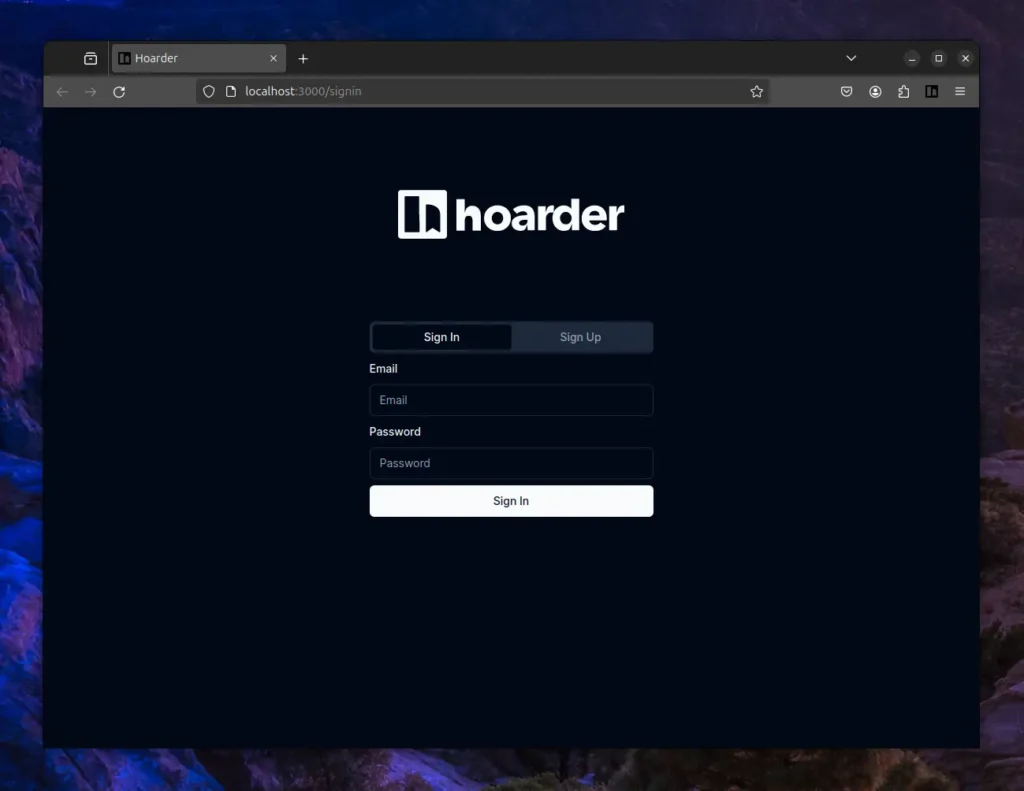
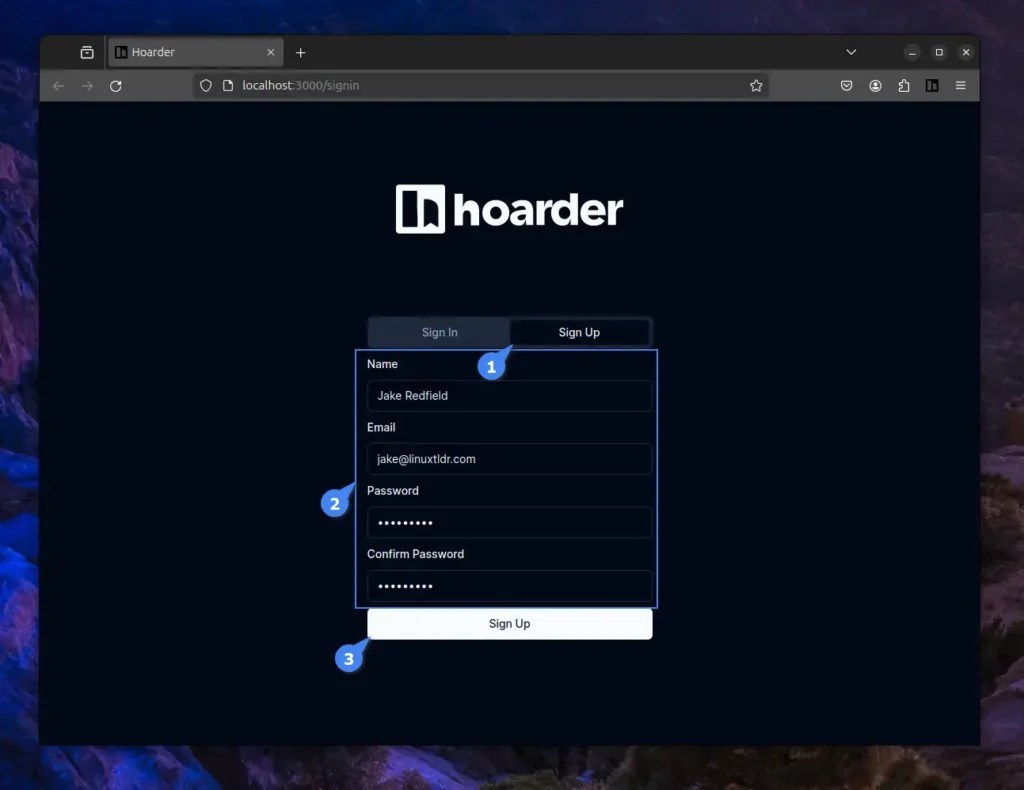
To begin using Hoarder, you need to first register a new account by providing your name, email, password, and confirming the password. The first account will be designated as the administrator of Hoarder.
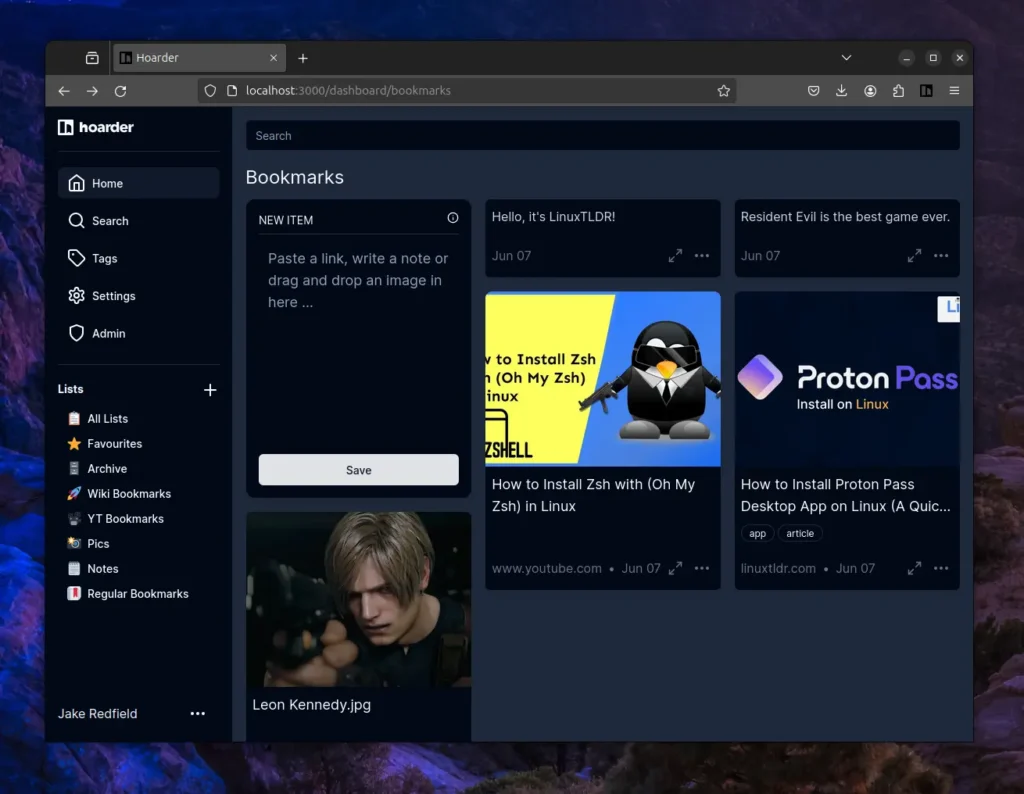
Once you successfully create the account, you will be redirected to the Hoarder dashboard, where you can quickly start adding bookmark links, taking simple notes, or saving images, including attaching them with tags or adding them to lists.
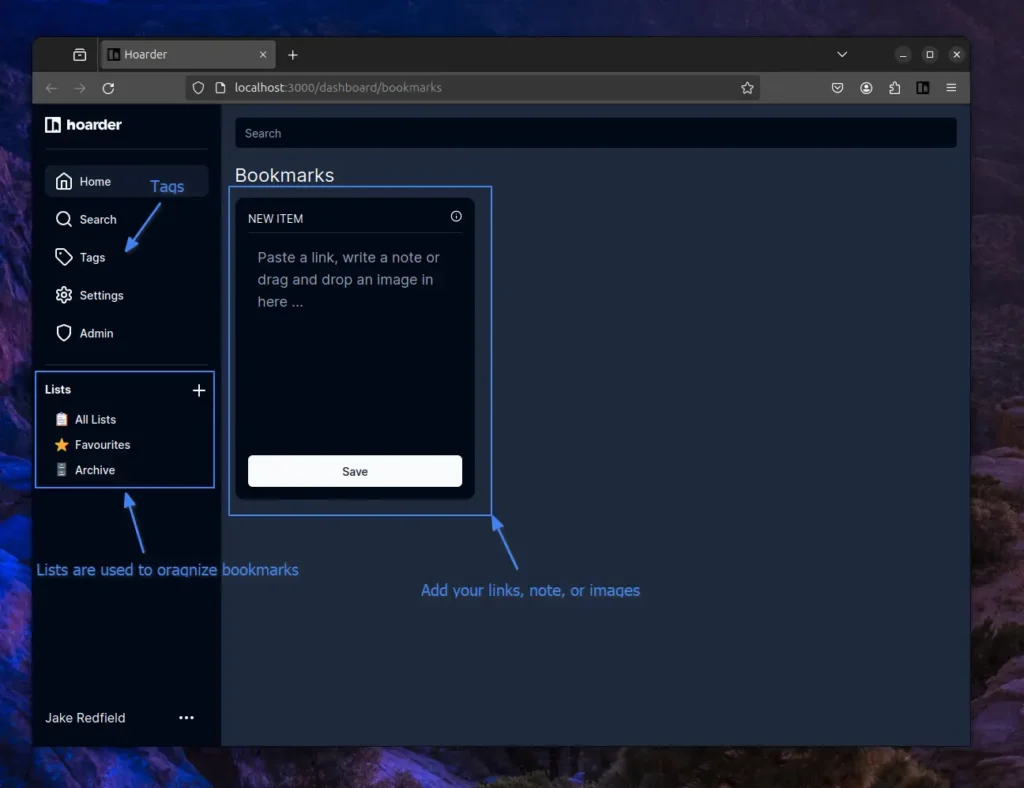
The default layout for the bookmarks is set to masonry, but it can be switched to grid or list view.
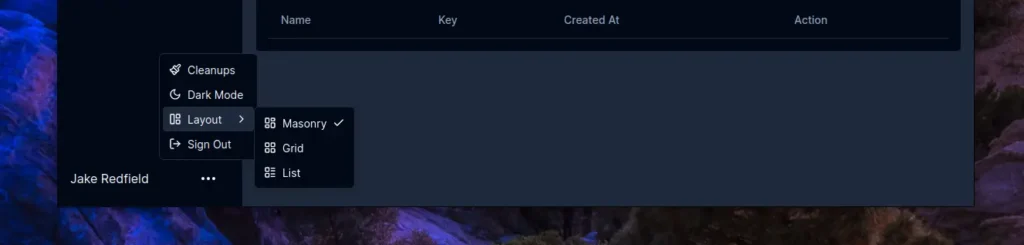
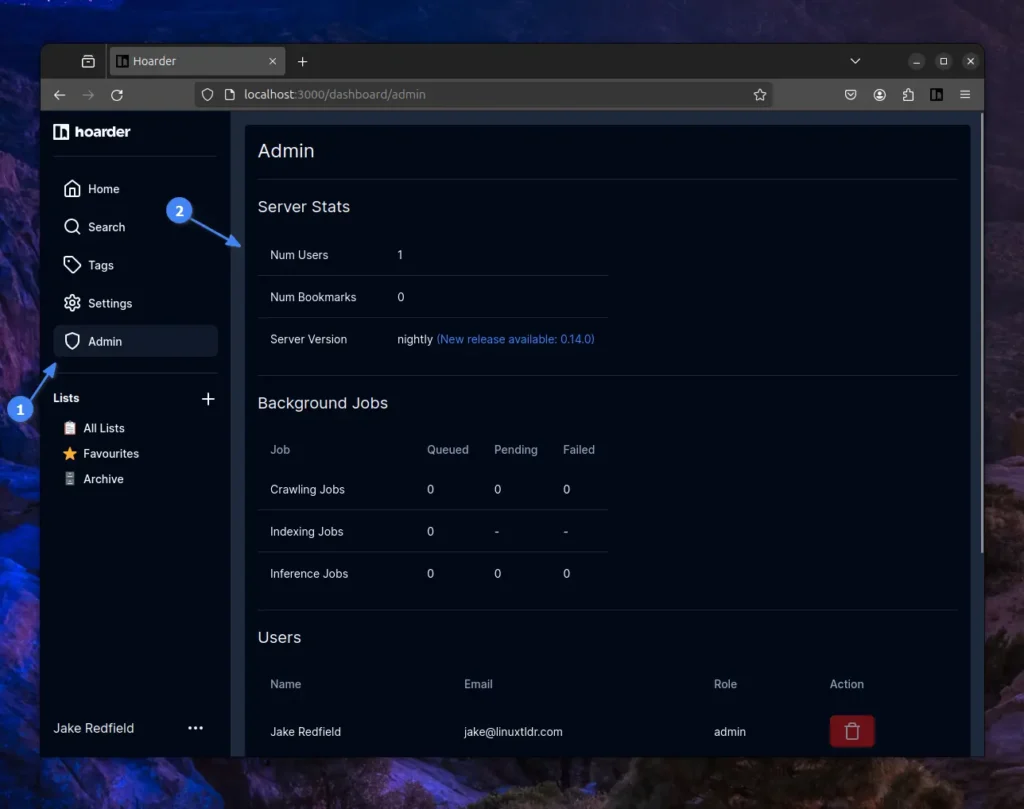
To check the number of users, bookmarks, server version, and background jobs (crawling, indexing, and inference), navigate to the “Admin” page.
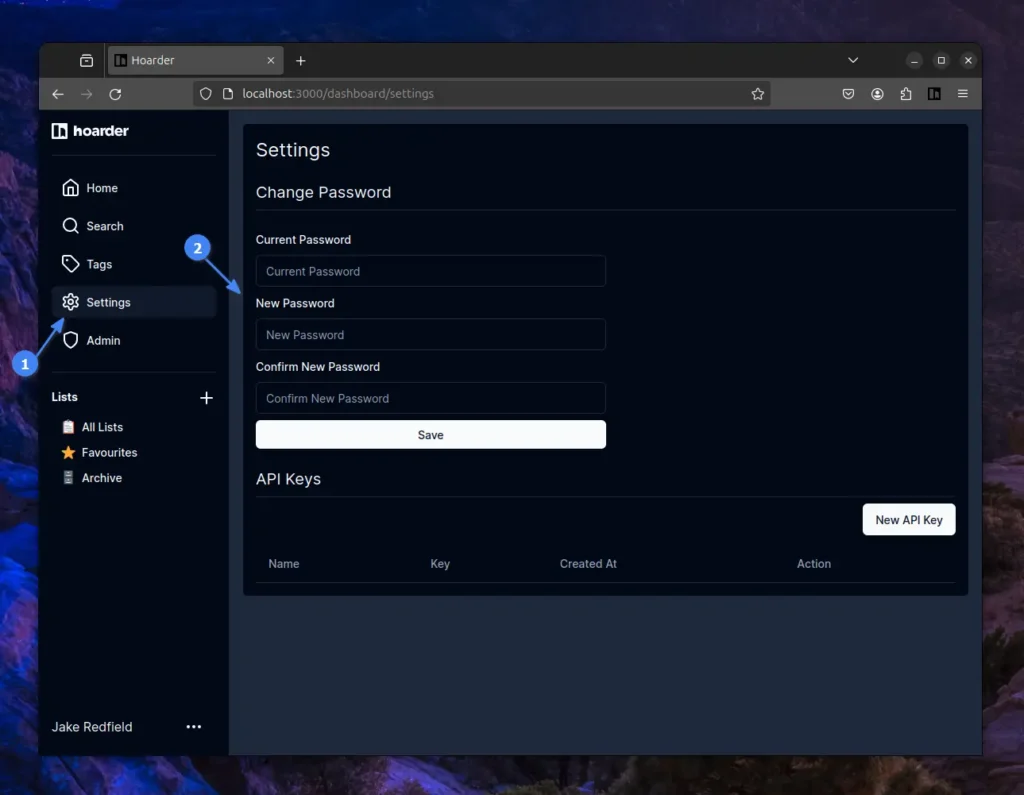
Changing the current password or generating a new API key can be done from the “Settings” page.
You can further explore the Hoarder yourself, as it is very user-friendly. Happy exploring!
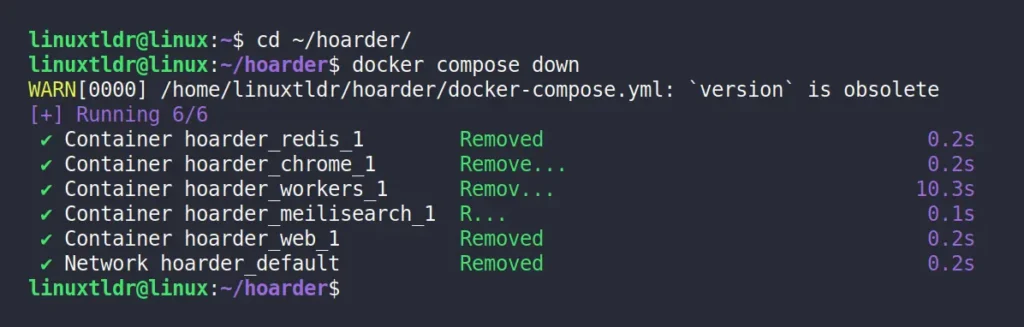
To stop the Hoarder service, navigate to the directory where the Hoarder docker compose file is stored and run the following command:
$ cd ~/hoarder/
$ docker compose down
Output:
Hoarder is a fantastic app that I’ve been using for a while on my Homelab, and honestly, my experience with bookmarking has been great. The Hoarder installation method discussed in this article will seamlessly work on Windows, macOS, or Linux (including Ubuntu, Debian, Linux Mint, Fedora, Red Hat, Arch, Manjaro, and others).
If you have any questions regarding the topic, feel free to ask them in the comment section.
Till then, peace!
The post Hoarder: A Bookmark and Note Taking App (Install via Docker) appeared first on Linux TLDR.