Chattr is a UNIX command-line program that’s pre-shipped in most Linux distributions. The role of this command is to allow the admin user to set file attributes that impose restrictions on files.
There are a handful of file attributes for different roles, such as the “+i” attribute, which prevents a file from being renamed, deleted, or modified, and the “+a” attribute, which only allows appending new content, as well as a few others that will be discussed later in this tutorial.
The benefit of using this command is that the restriction applies to both the normal user and the root user, making it a good choice for protecting important and sensitive files from accidental or retroactive changes.
In this beginner-friendly tutorial, I’ll explain to you how to use the chattr command with its various options, operators, and file attributes in a real-world scenario.
The chattr command takes three arguments: the first is the option, the second is the file attribute, and the third is the file path where you want to apply the selected file attribute.
$ chattr [option] [attribute*] [path/to/file*]
When you specify the file attribute, you’ll mainly use the “+” and “-” operators: the “+” operator adds the selected attribute restriction to the file, while the “-” operator removes it. Besides this, you use the “=” operator to remove all the existing attributes and replace them with the selected ones.
The available options for chattr are the “-R” option to recursively apply the specified attribute to every file in the selected directory, the “-V” option to display the changed files, and the “-f” option to hide common errors.
Enjoying it, right? Now, let’s learn a bit more about some important file attributes that you’ll mainly use for setting restrictions using the chattr command, starting with…
List of File Attributes for Chattr Command
The following is a list of commonly used chattr attributes and their purposes.
a: Only allow appending new content while imposing write, rename, and delete restrictions.
A: Access time (or atime) record is frozen.
c: Enables the transparent compression of the file on the supported filesystem.
S: The changes to the file are updated synchronously, which will ensure the integrity of the critical data.
i: Enables immutable mode, which allows the file content to be viewed but prevents writing, renaming, deleting, or appending actions.
j: It will ensure that the changes are first applied to the ext3 journal before the file itself.
t: Disable the tail-merging.
d: It will reject the dump process for the selected file, which is often used for creating backups.
u: When a file is accidentally deleted, a copy of the file is generated and can be recovered later.
e: It’s a default attribute applied to all files that indicates the file system uses extents to map the file’s location on the disk.
The above list contains a few attributes from the complete list. To see the entire list, you can use the “man chattr” command. However, these are sufficient for a beginner, as your work will mostly revolve around them. Let’s now look at some practical examples of this attribute in use.
Apply Write, Rename, and Delete Restriction to File
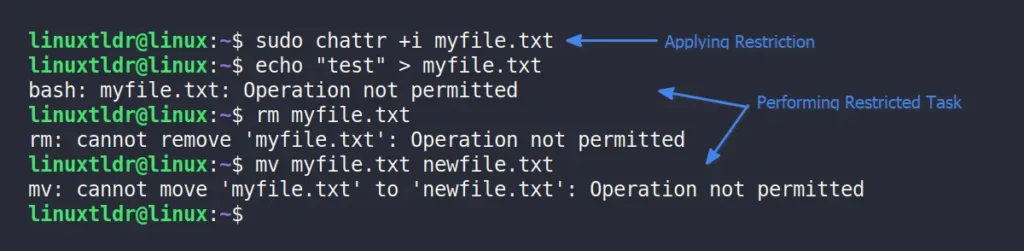
The “+i” attribute makes the file immutable, preventing any modifications, even by root. A real-life scenario would be protecting a critical configuration file from accidental changes.
$ sudo chattr +i myfile.txt
Output:
The content of the file can still be viewed despite the write, rename, and delete restrictions.
Remove Write, Rename, and Delete Restriction to File
To remove the restrictions placed on a file in the previous method, you can use the “-i” attribute.
$ sudo chattr -i myfile.txt
Output:
Note that this will only remove the restriction for the “+i” attribute. If the user assigns a different attribute or multiple attributes at the same time, they will still exist.
Apply Append-Only Permission
The “+a” attribute is very similar to the “+i” attribute and prevents write, rename, and delete actions but allows appending new content to the file. You can apply this attribute to log files to prevent retroactive changes.
$ sudo chattr +i myfile.txt
Output:
To restore the file to its original state, use the “-a” attribute to remove the append-only restriction.
Check the Applied Attribute to Selected File
To keep track of existing attributes or verify whether the applied attribute is set, you can use the “lsattr” command, which lists all the attributes assigned to the selected file.
$ lsattr myfile.txt
Output:
The above output indicates that the file has two attributes: “i“, which means the file is immutable, and “e“, which is the default attribute applied to all files.
Replace the Existing Attribute With New Attribute
When a file has multiple attributes applied to it but you want to replace all of them with the selected one, you can specify the attribute with the “=” operator for this task.
$ sudo chattr =u myfile.txt
Output:
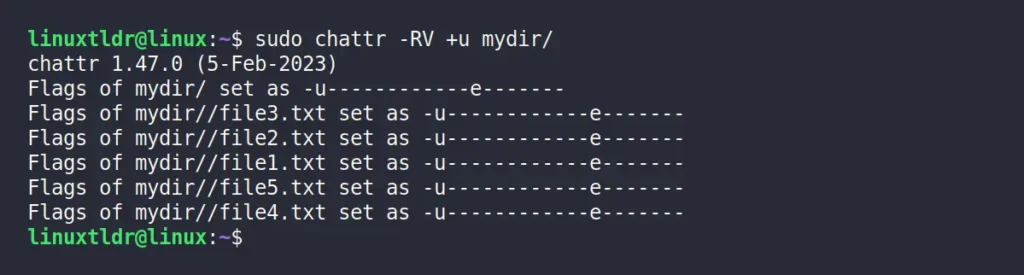
Apply the Attribute to All Files Within the Selected Directory
To apply a selected attribute to all files in the target directory, use the “-RV” option to make changes recursively to all files, and then list the affected files.
$ sudo chattr -RV +u mydir/
Output:
Wrap Up
In this article, you have learned how to use the chattr command with various operators and attributes, as well as its available options. If you have any questions about the topic, feel free to reach out to us via the comment section.
VPNs are popular these days, but many users still prefer using a SOCKS proxy to tunnel network connections through them, as it offers faster internet connections and is ideal for managing torrent traffic, despite the generic drawback of unencrypted traffic.
You can even access blocked sites in your country using a SOCKS proxy. There are many public SOCKS proxy servers available, but as mentioned earlier, traffic on a SOCKS proxy is not encrypted, so using a public one could be risky.
In this article, I’ll show you how to install and set up a SOCKS5 proxy server on Linux using MicroSocks.
MicroSocks is a lightweight and multi-threaded SOCKS5 proxy server designed to robustly handle requests on servers with low resources by consuming minimal resources and gently denying new connections during heavy loads instead of aborting them.
It supports IPv4, IPv6, DNS, uses TCP (no UDP currently) for network proxy, and allows users to connect with or without a password or by providing a one-time password, all without needing to create or edit any configuration file.
Let’s now see how to install MicroSocks on popular Linux distributions like Debian, Ubuntu, Linux Mint, Red Hat, Fedora, Rocky Linux, Arch, or any others.
Install MicroSocks on Linux
MicroSocks is available in most Linux repositories, such as Debian, Ubuntu-based distributions, and Arch systems, where you can quickly install it using one of the appropriate commands based on your Linux distribution.
# On Debian, Ubuntu, Kali Linux, Linux Mint, Zorin OS, Pop!_OS, etc.
$ sudo apt install microsocks

# On Arch Linux, Manjaro, BlackArch, Garuda, etc.
$ sudo pacman -S microsocks
On Red Hat and Fedora-based distributions, or on older Debian and Ubuntu distributions, you can build and install it from the source, which also provides you with the latest version.
To start, ensure the development tools are installed on your Linux system, then run the following series of commands to install MicroSocks from source.
$ wget http://ftp.barfooze.de/pub/sabotage/tarballs/microsocks-1.0.4.tar.xz
$ tar -xvf microsocks-1.0.4.tar.xz && cd microsocks*/
$ make && sudo make install
Once the installation is complete, the MicroSocks executable file will be added to the “/usr/local/bin” directory.
Start MicroSocks SOCKS5 Proxy Server
Now that the installation is complete, the “microsocks” command is available to use, but before that, let’s look at a few options you can use with it.
Option
Description
“-1“
It allows you to authenticate once, after which your IP address will be included in a whitelist, enabling you to connect to the proxy server later without authentication.
“-q“
Disable logging.
“-i ip-address“
Specify the IP address to listen on; not providing one means listening on all network interfaces in the server (default is “0.0.0.0“).
“-p port“
Set the port to use for listening (default is “1080“).
“-u user” and “-P password“
Specify the username and password for authentication in plain text, which can be anything regardless of existing users on the server.
In my case, I’ve set up the MicroSocks proxy server on a DigitalOcean VPS and started it using the following command, which listens on all server IPs with port 8484, the username “proxyuser“, and the password “securepassword“.
To connect to the above MicroSocks proxy server from the local machine, run the following command, replacing the green highlighted fields with the correct proxy server information.
Once you do that, your local machine will be whitelisted for the MicroSocks proxy server due to the “-1” option, allowing you to configure SOCKS5 with your browser or Linux system without providing credentials.
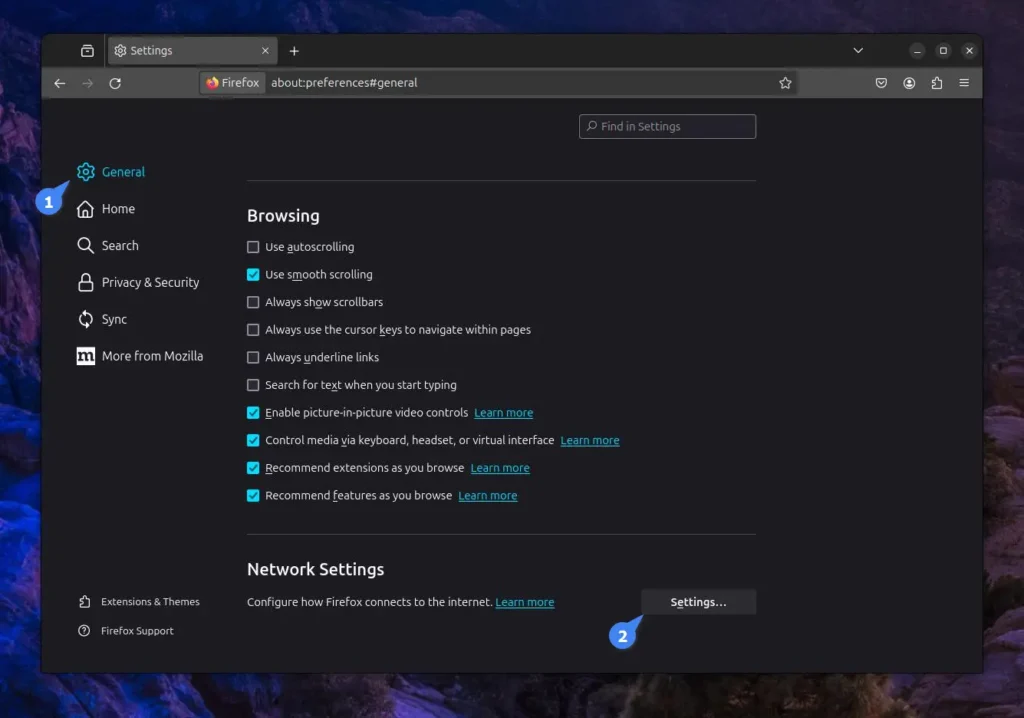
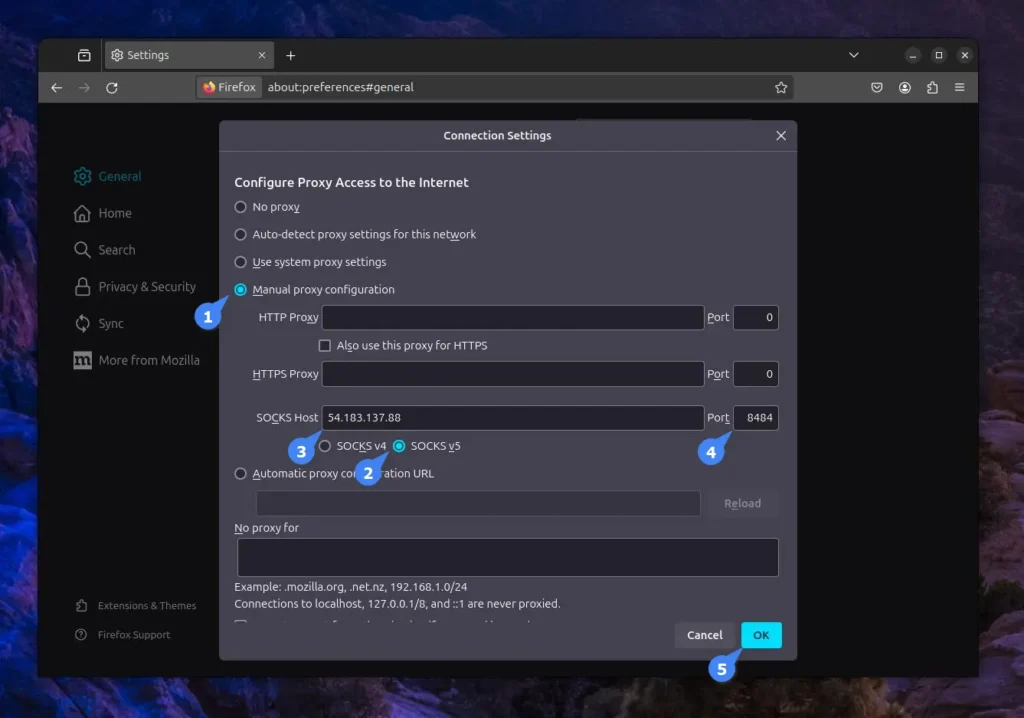
To connect to your MicroSocks proxy server from Firefox, navigate to “Preferences“, then “General“, scroll down to the “Network Settings” section, and click on “Settings“.
Then, ensure you enable manual proxy configuration, select SOCKS v5, and provide the host and port number of your SOCKS5 proxy server.
Your Firefox is now configured with the MicroSocks proxy server, so all your browsing will go through the proxy server. If you encounter a connection failure error, make sure to re-execute the previous curl command.
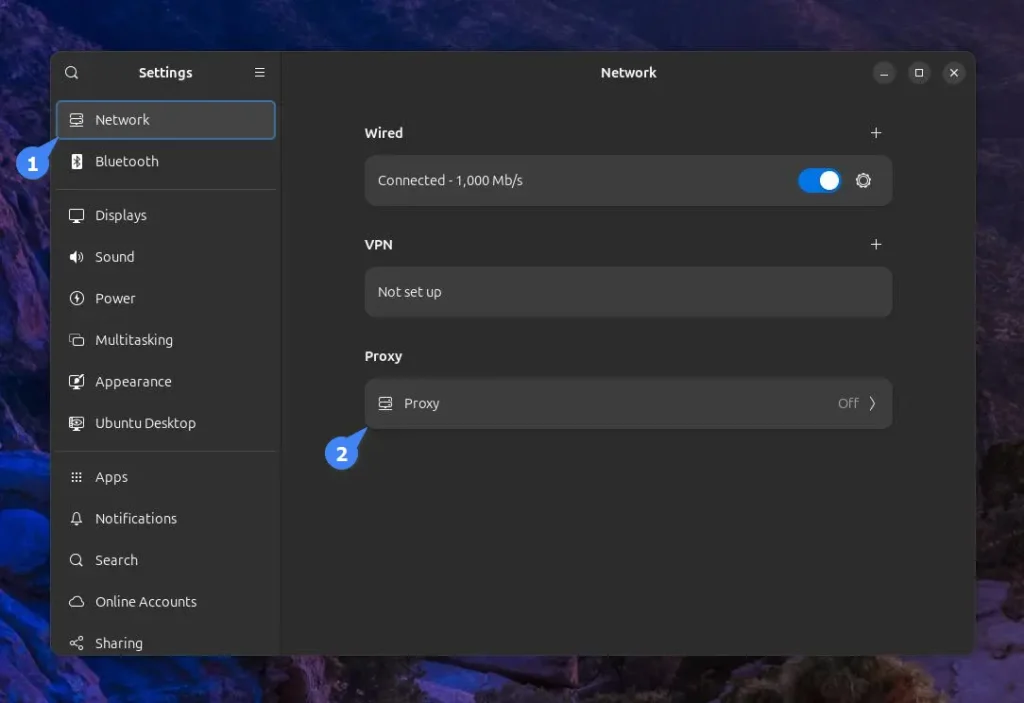
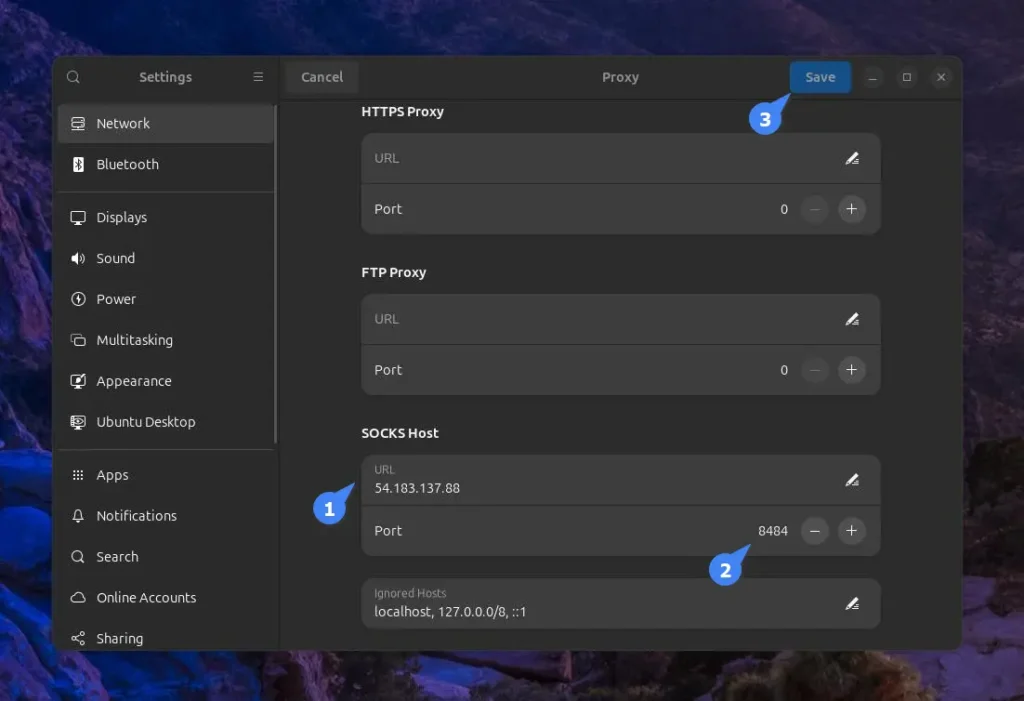
To connect your local machine (running on GNOME) with the MicroSocks proxy server, first open “Settings“, navigate to “Network“, and then “Proxy“.
Next, toggle the “Network Proxy” and choose the “Manual” configuration.
Finally, enter the host and port of your MicroSocks proxy server in the “SOCKS5 HOST” section and save the changes.
You now have your system running on GNOME, connected to your MicroSocks proxy server.
Allow MicroSocks Proxy Server Listening Port on Firewall
If you are running an Ubuntu system with UFW (Uncomplicated Firewall), you need to open the port your proxy server listens on. First, check the firewall status:
$ sudo ufw status
If it’s active and running, then open the port for the MicroSocks proxy server, which by default is 1080; however, since I’ve opted for a custom port of 8484 using the “-p” option, I need to allow this port with the following command:
$ sudo ufw allow 8484/tcp
Output:
Create MicroSocks Proxy Server Systemd Service
To keep the MicroSocks proxy server running in the background and autostart on boot without any manual intervention, you can create a Systemd service.
To begin, open your terminal and create a Systemd service file using the command below.
If you’ve installed the MicroSocks proxy server from source, ensure to replace “/usr/bin/microsocks” with “/usr/local/bin/microsocks“. Additionally, you can add or remove the existing “-u” and “-P” options as needed.
Save and close the file, then create a MicroSocks configuration file for the user and password variables used in the above Systemd service file.
$ sudo nano /etc/microsocks.conf
Copy and paste the following snippet, ensure to replace the user and password information with the correct MicroSocks proxy server details. Also, if you’ve customized the port or restricted IP in the Systemd service file, set their values accordingly in this configuration file.
# used by the systemd service file
MICROSOCKS_LOGIN="proxy-user"
MICROSOCKS_PASSW="proxy-password"
Save and close the file, then use the following command to enable and start the service:
$ sudo systemctl enable --now microsocks.service
To verify the status of the service, run the “systemctl status microsocks” command.
To uninstall the MicroSocks proxy server from your Linux system installed via the package manager, run:
# On Debian, Ubuntu, Kali Linux, Linux Mint, Zorin OS, Pop!_OS, etc.
$ sudo apt remove microsocks

# On Arch Linux, Manjaro, BlackArch, Garuda, etc.
$ sudo pacman -R microsocks
If you have installed it directly from the source, then run:
WordPress is a popular CMS for bloggers and journalists, offering a range of features, including multi-user management, allowing admins to create separate accounts for different users with varying privileges.
The rule of thumb is to hand over the username and password to the user after account creation, but if the user or admin itself forgets the own password, the only option is to reset the user or admin password from the MySQL console or by using external tools.
In this article, I’ll show you how to reset (or change) the WordPress logins using the MySQL command-line client or the “wp-cli” command.
Method 1: Reset the WordPress Password via MySQL Command
The first step is to log in to your server running WordPress via SSH. Then, make sure to take a backup of your WordPress database. You can either create a snapshot of your server or use the backup option if you are using a hosting provider.
Alternatively, you can use the following command to export a specific MySQL database to an SQL file format by providing the MySQL username, password, and database name.
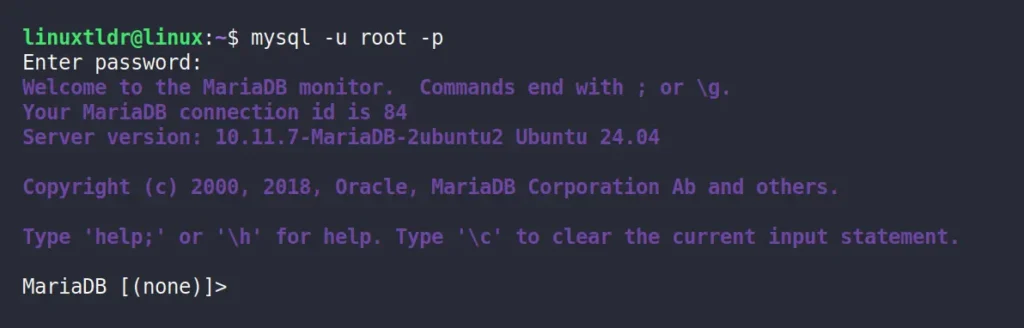
Once you have taken the backup, you can reset the WordPress password by first connecting to the MySQL or MariaDB server.
$ mysql -u [user] -p
Output:
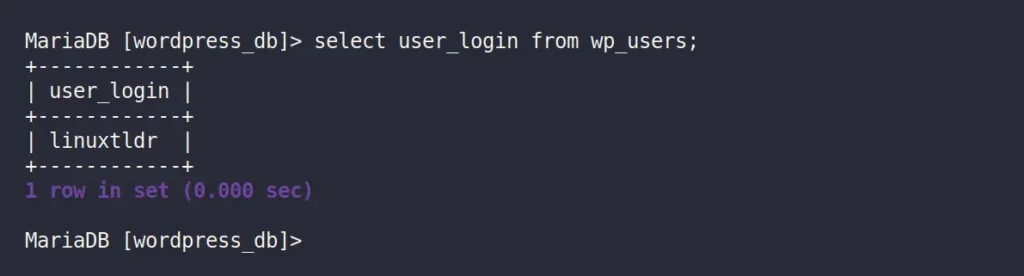
Then you need to select the WordPress database; if you forget the database name, you can use the “SHOW DATABASES;” SQL query to list all MySQL databases. Once you locate the correct database, use the following command to select it:
MySQL> use [wordpress_db]
Output:
Then, for confirmation, you can run the following command to list all WordPress users:
MySQL> select user_login from wp_users;
Output:
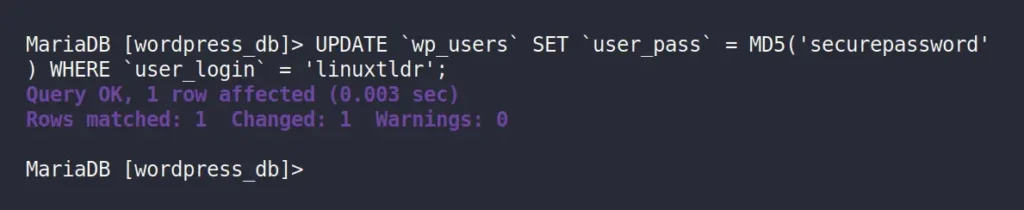
I have only one user account named “linuxtldr“, whose password I want to change. However, in your case, there could be one or more users, so note down the username and execute the following SQL query to update that user password (using the MD5 hashing algorithm):
📝
Make sure all highlighted green fields are replaced with accurate information.
MySQL> UPDATE `wp_users` SET `user_pass` = MD5('changeme') WHERE `user_login` = 'wordpress-user';
Output:
When you are done, quit the MySQL console using the “exit” SQL query and return to WordPress to log in with the updated password.
Method 2: Reset the WordPress Password via WP-CLI Command
WP-CLI is a fantastic command-line tool for managing WordPress that you should definitely give a try. We’ve already covered its installation and command-line usage in a separate article, so we’ll skip those parts and focus on resetting the WordPress administrator password.
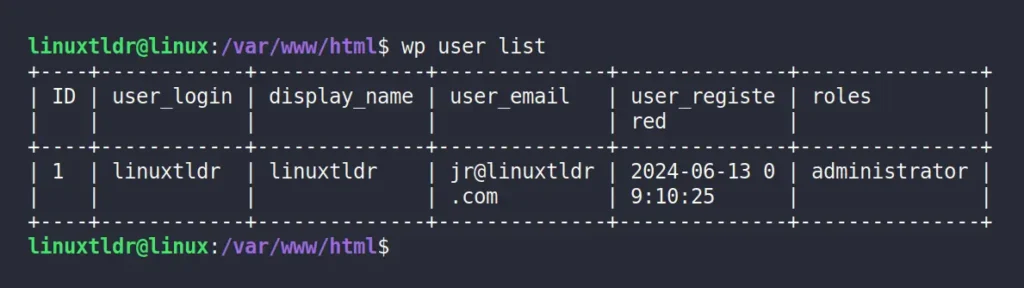
First, ensure you are connected to the system running WordPress, then open your terminal and navigate to the directory where the WordPress files are stored (typically, it’s “/var/www/html“).
Then run the following command to list all the WordPress user accounts:
$ wp user list
Output:
Finally, select the username whose password you want to change, and pass it to the command below, along with the new password for resetting.
📝
Make sure the green highlighted fields are replaced with the correct information.
$ wp user update wordpress-user --user_pass=changeme
Output:
That’s it; you have successfully changed the WordPress password using the “wp-cli” tool.
Final Word
All the methods mentioned would work for resetting the WordPress password; you can choose one according to your preference. If you have any questions, feel free to ask them in the comments.
Python is one of the most widely used programming languages that powers many popular web applications, AI/ML technologies, IoT devices, task automation, and many more.
Right now, Python 3 is the latest version, but if you are using an outdated system, you might be using an older version of Python, possibly Python 2, which is now deprecated.
Knowing the correct Python version is crucial, whether you are running a program that only works with a specific version or planning to start a Python project with the latest version.
In this quick guide, I’ll show you how to check the Python version in Ubuntu and other Linux distros from the command line.
How to Check Python Version in Linux (via 3 Methods)
There are multiple ways to find out the Python version from the command line; here I’ve provided you with the first two ways to identify if Python 2 or 3 is running on your Linux system, and the third method works for any Python version.
Method 1: Check Python 2 Version via Python Command
If you are running the older Python 2 version (which is now deprecated) on your Linux system, you can try running the “python” command with the “-V” or “–version” option to check its version information.
$ python -V

# OR

$ python --version
Output:
This method only works for Python 2, as Python 3 requires a different command, which you can find in the next section.
Method 3: Check Python Version via Python Interpreter
The previous two methods will help you find the Python version installed on your Linux system, but if you want to check the Python version in the interpreter (also known as the Python console) or within a Python script, you can do that too.
The “sys” and “platform” modules can help you check the installed Python version; the “sys” module provides detailed information, including the build number and date, while the “platform” module only prints the version.
You can use any one of them according to your needs, so when you’re ready, open your Python console or script and copy-paste any of the following Python snippets:
# Checking Python Version Using Sys Module
import sys
print(sys.version)

# Checking Python Version Using Platform Module
import platform
print(platform.python_version())
Output:
This method would work on any Linux distribution (such as Debian, Ubuntu, Red Hat, Fedora, Arch, Manjaro, etc.), as well as on Windows, macOS, or Raspberry Pi.
Knowing the correct Python version is crucial to ensuring compatibility among the program, libraries, framework, and applications. This article shows you various methods to check the installed Python version on your Linux system, whether from the command line, the Python interpreter, or programmatically.
If you have any questions, feel free to ask them in the comments.