Normal view

Received before yesterday

New Extension to Enable GNOME Top Bar in Multiple Displays

By:Ji m
10 December 2025 at 20:09

For Ubuntu, Fedora Workstation, and other Linux with recent GNOME Desktop, there’s now a new extension to enable the top-bar in multiple monitors.

As you know, GNOME top-bar by default only shows in the primary display for multi-monitors working in the “Join Mode”.

There was a multi-monitors-add-on extension which can add multiple monitors overview and panel. It’s however discontinued and support ends at Gnome 3.38.

Some forked that extension making it work in GNOME from v42 to 26, and I’ve written about how to install it in Ubuntu 22.04 & 24.04.

Now with the new Multi Monitor Bar extension, all Linux Distributions with recent GNOME v45 ~ 49 (e.g., Ubuntu 24.04, Ubuntu 25.04/25.10, Fedora 42/43, Debian 13, and Arch) can easily enable the top-bar on multiple monitors.

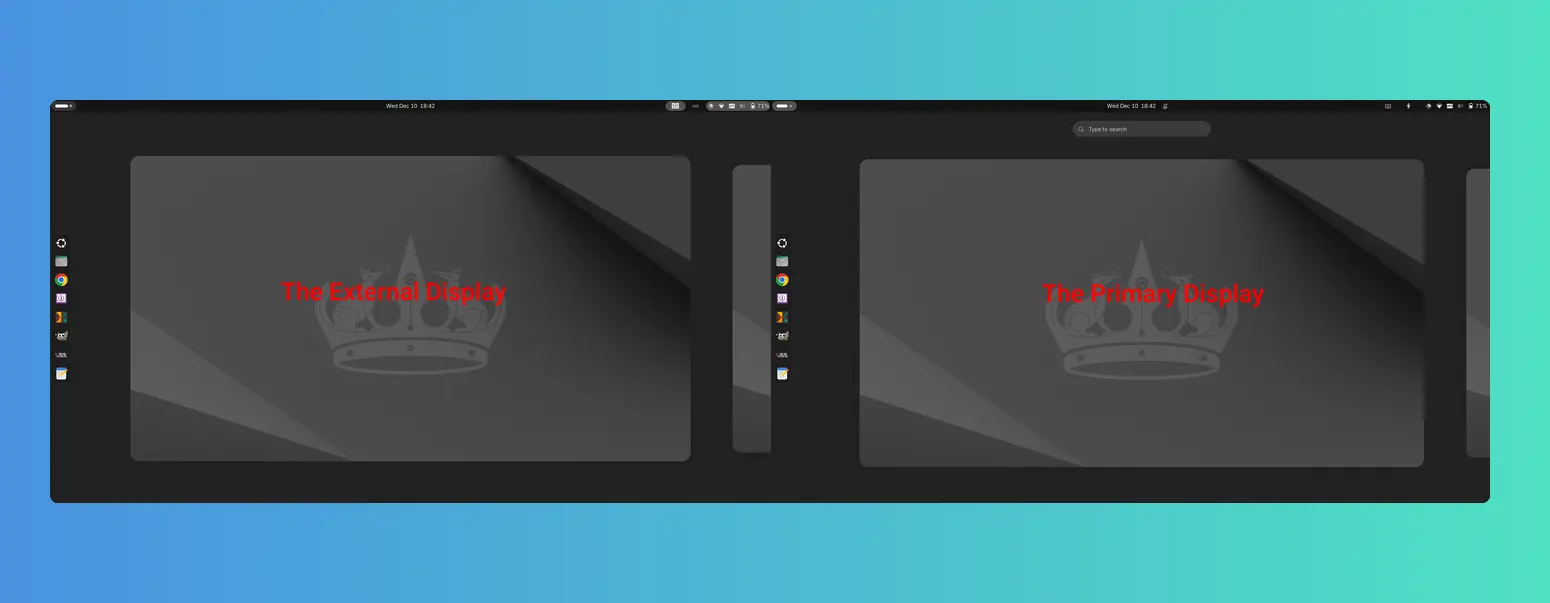
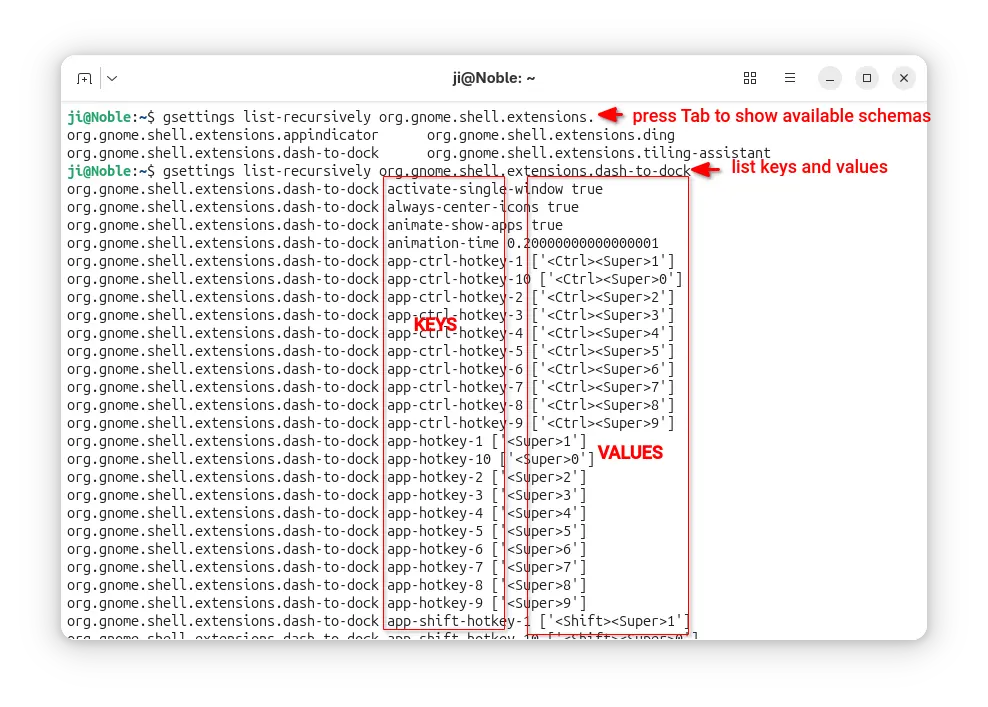
As you see via the screenshot above, besides the top-bar, it also shows following items in the non-primary displays:

  • Activities button (dot and pill icon).
  • date and time menu.
  • system tray icons and indicators.
  • the overview screen.

However, there are still some downsides. There’s neither overview search-box nor app grid to launch apps from the non-primary display. And, following things do NOT work properly either:

  • Scroll on dot-and-pill icon does not switch workspace.
  • Some indicator icons do not show in non-primary display.
  • The built-in screenshot UI options only available in primary display, and “Screen” selection only take the primary screen, though area selection works in all screens.
  • System tray icons display incorrectly when you full-screen something in primary screen. See this issue. In which case, you need to restart the extension to reset.

Install the extension to Enable Gnome Top-bar in Multi-monitors

For Ubuntu 24.04 and higher, simply launch App Center, search & install Extension Manager (filter by Debian package).

Install Extension Manager in Ubuntu Software/App Center

Next, launch Extension Manager and switch to “Browse” tab, finally search & install the “Multi Monitor Bar” extension.

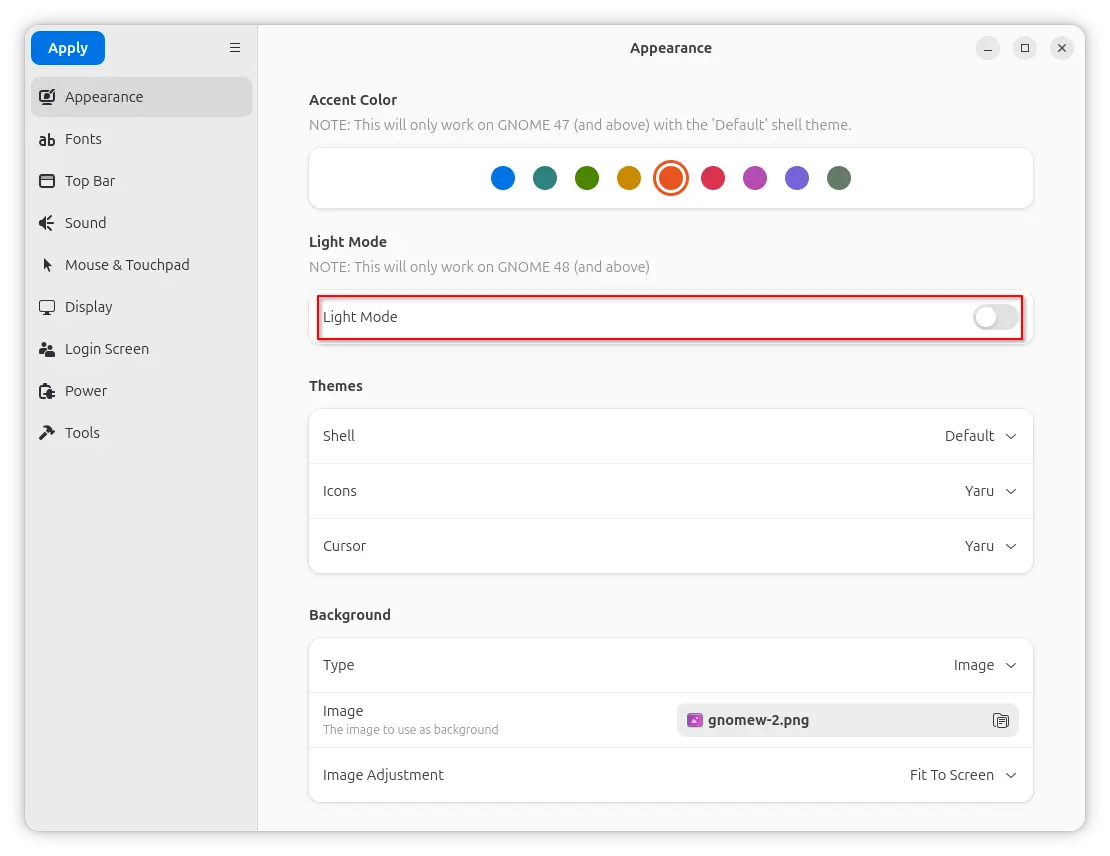
After installed the extension, Gnome top-bar should display automatically on your external monitors. And, you may switch to “Installed” tab in Extension Manager to configure that extension with following options:

  • Turn on/off panel, activities-button, date and time button in additional monitors.
  • Enable/disable hot-corners function.
  • Add more indicators to additional monitors.

For other Linux, simply launch web browser and visit the extension on EGO:

Then, install the browser extension (if it asks) with the link in that page and refresh. Finally, use the ON/OFF toggle to install the extension.

Tips: besides installing the browser extension, Debian/Ubuntu need to also install the agent package by running the command below in terminal:

sudo apt install chrome-gnome-shell

Finally refresh the page to see the toggle option.

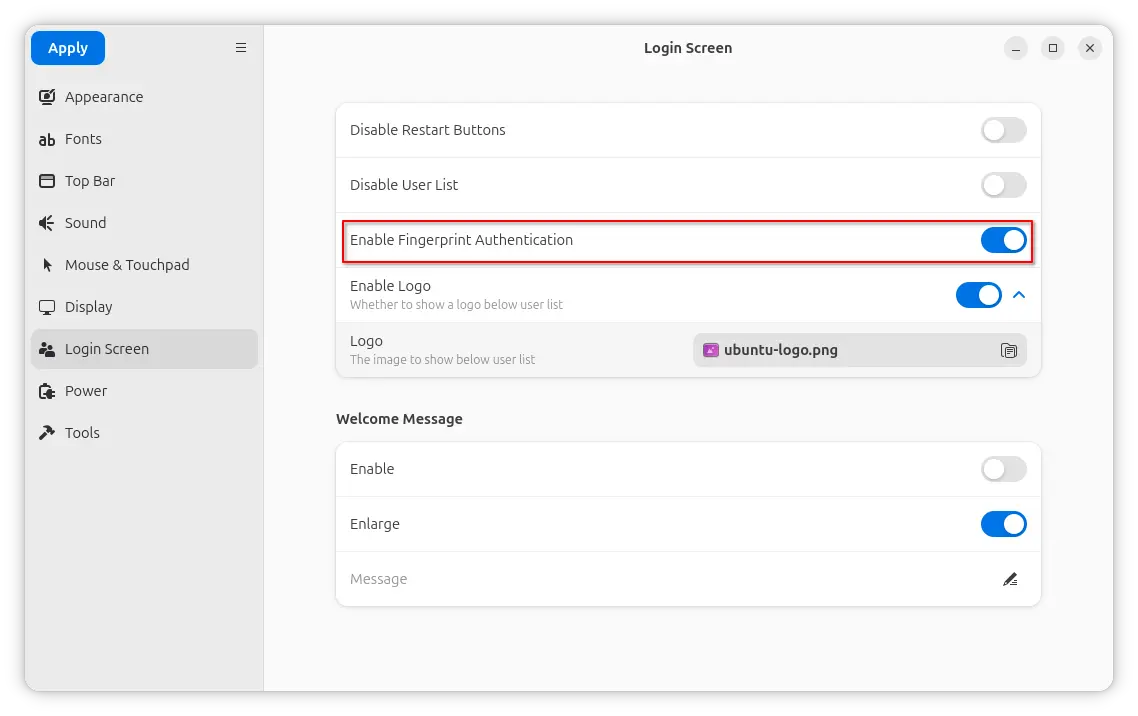
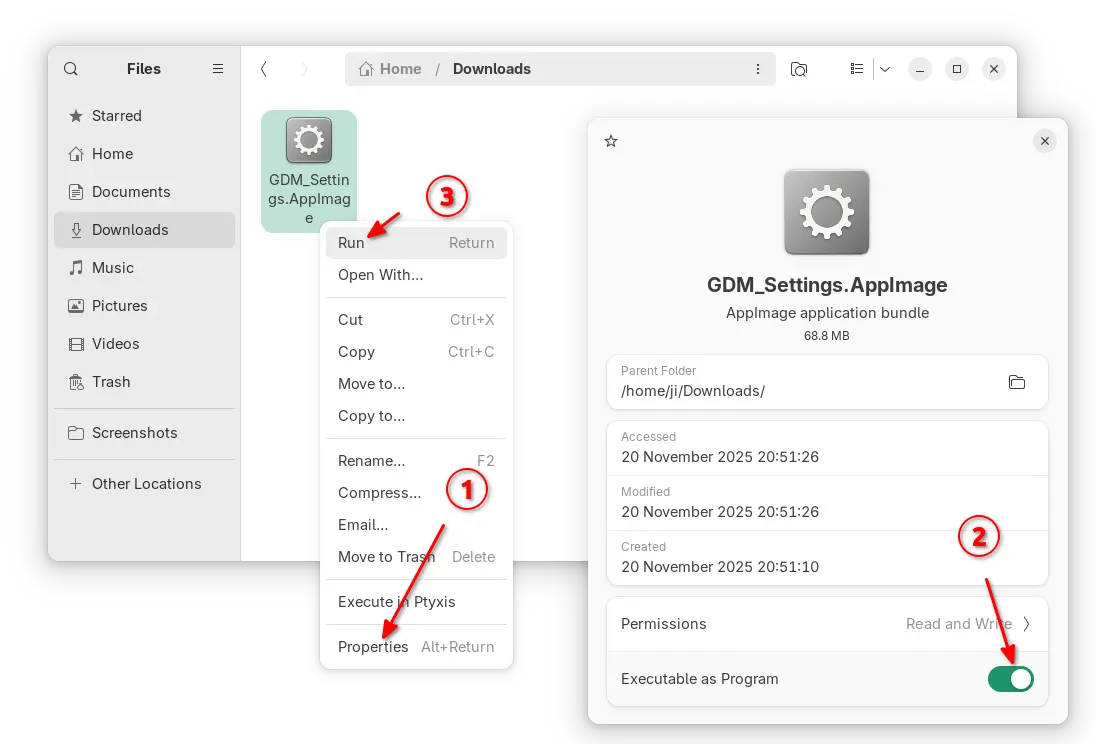
After installed the extension, install “Gnome Extensions” in GNOME Software or your system package manager and use it to manage the extension preferences.

That’s all. Enjoy!

Ubuntu 26.04 Will Look More Like Vanilla GNOME Shell

10 December 2025 at 07:57

Ubuntu's Yaru theme will closely follow the vanilla GNOME Shell design in the upcoming 26.04 release, as its developers aim to reduce the maintenance burden.

You're reading Ubuntu 26.04 Will Look More Like Vanilla GNOME Shell, a blog post from OMG! Ubuntu. Do not reproduce elsewhere without permission.

GDM Settings adding Toggles for Light Mode & Fingerprint Authentication

By:Ji m
20 November 2025 at 21:14

GDM Settings, the graphical configuration tool for GNOME Login Screen, updated recently with new toggle options!

As you know, GDM Settings is a free open-source Python written settings app for GNOME’s Login/Display Manager.

With it, you may change the login screen background image, set the fonts and themes, tweak top-bar colors, disable user list, show welcome message, and configure more about the login screen.

GNOME Login Screen with custom background

The latest of the app is so far at version 5.0 which was release one year ago. The development slows down however after that release.

In the past 12 months, only few features were added. One is the “Light Mode” toggle option under Appearance tab, which works for GNOME 48 and above.

It works by setting the org/gnome/desktop/interface/color-scheme key to ‘prefer-light‘ for GDM. Though, in vanilla Gnome both top-bar and menus are dark in either mode. And, I didn’t see anything goes light after enabled the option in my test in Ubuntu 25.10.

Another is a new Enable Fingerprint Authentication toggle option added to ‘Login Screen’ page. It can be useful when you want to use fingerprint authentication for your GNOME desktop environment except the login screen, as you know log-in without password will cause unlock keyring pop-up when launching Chrome etc application though it can be skipped.

And, the function is done by setting org/gnome/login-screen/enable-fingerprint-authentication key for GDM silently in the background.

Besides that, it also updated to GNOME 49 platform for the Flatpak package. For more about the development of GDM Settings, see the commits page.

Install GDM Settings

The changes mentioned above are still in development stage. Meaning you need to manually build it from source code.

NOTE: GDM Settings has the potential to break your login screen. Don’t use it on production machine!

For the 5.0 version, it’s available to install in most Linux Distributions through Flatpak package.

Just enable Flatpak support, then run the command below to install it:

flatpak install flathub io.github.realmazharhussain.GdmSettings

While, Fedora Workstation may simply search for and install it from GNOME Software, if you have 3rd party repository enabled.

GDM Settings flatpak package in Fedora GNOME Software

For choice, there’s also non-install AppImage available to download in the Github releases page under Assets section.

As both AppImage and Flatpak were built with most recent GNOME runtime, they may be NOT working good in old GNOME Desktops.

So, I built the app package into this unofficial PPA for Ubuntu 22.04, Ubuntu 24.04, 25.04 and 25.10.

To add the PPA and install GDM Settings, open terminal (Ctrl+Alt+T) and run commands below one by one:

sudo add-apt-repository ppa:ubuntuhandbook1/gdm-settings
sudo apt update
sudo apt install gdm-settings

Optionally, you may remove the PPA package and remove the PPA at any time by running commands:

sudo apt remove gdm-settings
sudo add-apt-repository --remove ppa:ubuntuhandbook1/gdm-settings

Manage Gnome Shell Extensions from Command Line

By:Ji m
10 November 2025 at 21:19

This tutorial shows how to install, remove, enable or disable Gnome Shell extensions and configure extensions’ preferences in Ubuntu, Fedora, etc Linux distributions with Gnome Desktop.

We usually install/uninstall Gnome Shell extension by either visiting extensions.gnome.org in web browser or using Extension Manager app, then manage them through either GNOME Extensions or Extension Manager.

Gnome Extension Manager App

For choice, Gnome has a built-in command line tool that can help sometimes without using a graphical user interface.

Why using Command Line

The command line tool gnome-extensions is useful for advanced users and developers for scripting purpose.

It’s also a good choice for installing extensions from local packages (e.g., ZIP archive) without internet connection. And, in some cases you may use gsettings command to configure extension preferences.

Install an Extension from Command Line

Besides using web browser or Extension Manager, user may manually install an extension by putting the source folder (usually [email protected]) to .local/share/gnome-shell/extensions directory.

Say you downloaded an extension package from extensions.gnome.org, by choosing Gnome Shell version and Extension version.

Download an extension from extensions.gnome.org

You may then install it by running command:

gnome-extensions install /path/to/extension.zip

The command do the job decompressing the ZIP archive (.tar.xz, .tar.gz etc also supported) and moving the source to the user’s extension directory mentioned above.

This method however need a log out and back in, before being able to enable the new installed extension.

List Installed Extensions from Command Line

To list all the installed extensions, simply use command:

gnome-extensions list

For choice, you may list user installed extensions via --user option, or system extensions via --system.

gnome-extensions list --user

And, use --enabled option for enabled extensions, --disabled for disabled extensions, and --details for more about extensions, including name, description, source URL, version, and state.

gnome-extensions list --user --enabled

Enable/Disable Extensions

Once you got the extension IDs via the command above, you may get more about it by running command:

gnome-extensions info [email protected]

Here replace the ID [email protected] with yours.

Then, enable or disable an extension by running command:

gnome-extensions enable [email protected]

or:

gnome-extensions disable [email protected]

Also replace the extension ID [email protected], and optionally add --quiet flag to ignore error messages (if any).

Configure Extension Preferences from Command Line

NOTE: if you just want to launch the graphical configuration dialog from command line, then use command (replace extension ID):

gnome-extensions prefs [email protected]

To configure extension preferences from command line, use gsettings command.

For system extensions, first run command below to list all the available keys and the values:

gsettings list-recursively org.gnome.shell.extensions.dash-to-dock

Here replace dash-to-dock (Ubuntu Dock) to the extension name you’re going to configure. Or, press Tab twice before typing its name to print available choices.

After that, run similar command below to configure an extension key value:

gsettings set org.gnome.shell.extensions.dash-to-dock always-center-icons false

Also replace extension name dash-to-dock, key-name always-center-icons, and key-value false according to the last command output.

Or, run command to reset an extension’s key value to default.

gsettings reset org.gnome.shell.extensions.dash-to-dock always-center-icons

For user extensions, run gnome-extensions list --user to find the ID, then do following steps instead:

  • First, print the extension info, Just Perfection for example, and find out the PATH.
    gnome-extensions info just-perfection-desktop@just-perfection
  • Then, print the extension metadata according to its PATH, and find out the settings schema:
    cat /home/ji/.local/share/gnome-shell/extensions/just-perfection-desktop@just-perfection/metadata.json

  • After found out the extension PATH and settings schema, set the following constants.
    SCHEMADIR=/home/ji/.local/share/gnome-shell/extensions/just-perfection-desktop@just-perfection/schemas
    
    SCHEMA=org.gnome.shell.extensions.just-perfection

    So that I can use $SCHEMADIR and $SCHEMA in next commands without typing full PATH and settings schema.

  • Next, run command to list all the available keys and their values:
    gsettings --schemadir $SCHEMADIR list-recursively $SCHEMA

  • Finally, according to last command output, run commands below to set or reset something:
    gsettings --schemadir $SCHEMADIR set $SCHEMA top-panel-position 1
    gsettings --schemadir $SCHEMADIR reset $SCHEMA top-panel-position

    Also replace the key and value accordingly.

For more, see the Ubuntu gsettings and gnome-extensions man-pages

Run Custom Actions Automatically When Switch to Light or Dark

By:Ji m
8 November 2025 at 23:58

Want to do some actions automatically when you switch desktop theme to light or dark style? Here’s a new application can do the job for GNOME Desktop.

It’s switchcraft, a free open-source Vala written application that provides a modern simple interface, allowing to add custom commands to run automatically when the theme changes.

The app monitors the org.gnome.desktop.interface color-scheme key value and executes commands instantly when it’s changed to “prefer-dark” or “prefer-light”.

It can be useful for doing the following things automatically when switching desktop between light and dark style:

  • Change the legacy GTK3 theme, though Ubuntu already does it automatically.
  • Change Qt app theme.
  • Enable/Disable extensions, or configure extensions’ preferences.
  • Change Gnome Shell theme.
  • Or do whatever that you want.

Simply add your desired commands in the “Light” and “Dark” tabs, and turn on “Enable Monitor” option in Preferences.

Then, it will auto-run the switchcraft-monitor.sh script under .local/bin folder in next login, monitoring your desktop color scheme and running the commands automatically.

Besides that, it supports adding reusable constants for common variables in commands. And, it support exporting all the commands and importing to other systems.

Install switchcraft

Switchcraft provides official installer packages which are available to download in the link below:

They include .rpm package for Fedora/RHEL and .deb package for Debian/Ubuntu, which can be installed by system software app (e.g., Gnome Software and App Center).

For other Linux, it also provides non-install AppImage package that can be run directly to launch to the app, though you need to add executable permission from file properties dialog.

NOTE: switchcraft requires GNOME 40+, GLib >= 2.66, and jq command-line JSON processor.

Example Commands:

For those who are new to Linux, here are some example commands that may help.

1. change legacy GTK3/Icon theme

NOTE: The commands are written for Debian, Fedora, etc Linux Distributions, as Ubuntu automatically set Yaru and its variants as legacy GTK3 theme.

gsettings set org.gnome.desktop.interface gtk-theme 'adw-gtk3-dark'

This command changes the GTK3 theme to adw-gtk3 dark mode. You need to replace adw-gtk3-dark depends on which theme you want to set.

gsettings set org.gnome.desktop.interface icon-theme 'MacTahoe-light'

This will change the icon theme to MacTahoe-light. Also you need to change the theme name accordingly.

Go to gnome-look.org for more themes, and use “Gnome Tweaks -> Appearance” to see all available choices.

2. Enable/Disable Extensions

First, run command to list all the installed extensions.

gnome-extensions list

Then, disable an extension by command:

gnome-extensions disable [email protected]

Here replace disable with enable if you want to enable an extension. And, replace extension ID [email protected] accordingly.

3. Configure Extension

For system default extensions, use similar command below to configure:

gsettings set org.gnome.shell.extensions.dash-to-dock background-color "#ffffff"

You may install and use the graphical “Dconf Editor” tool to get available extension names, keys, and key values.

For user installed extensions, you may first run command to list them:

gnome-extensions list --user --enabled

Then, print metadata of an extension (User Themes for example), to get the setting schema:

cat $HOME/.local/share/gnome-shell/extensions/user-theme\@gnome-shell-extensions.gcampax.github.com/metadata.json

Next, set constants:

THEME_SCHAMA=org.gnome.shell.extensions.user-theme
THEME_SCHAMADIR=$HOME/.local/share/gnome-shell/extensions/user-theme\@gnome-shell-extensions.gcampax.github.com/metadata.json/schemas

Finally, run command to configure the “name” (get the key from ‘gschema.xml’ file in extension folder) for the extension.

gsettings --schemadir $THEME_SCHEMADIR set $THEME_SCHEMA name "ChromeOS-dark-compact-shell"

Feel free to leave command below if you want more commands.

How to Install GNOME 46 on Linux Mint 22.x

31 October 2025 at 23:38

If you’re running Linux Mint 22.x (“Xia”) and want to experience the modern GNOME 46 desktop environment instead of the default Cinnamon, you’re in the right place. Since Mint 22 is built on Ubuntu 24.04 LTS (Noble Numbat), you’ve got direct access to GNOME 46 — the latest stable release that brings significant performance improvements and a […]

The post How to Install GNOME 46 on Linux Mint 22.x appeared first on LinuxShout.

GNOME 49.1 Released with Fixes across Shell, Mutter, and Core Apps

17 October 2025 at 01:35

GNOME 49.1 refines the desktop experience with major stability fixes in Shell and Mutter, improved session reliability, and updated core apps and toolkits marking a solid maintenance release for Linux users. GNOME 49.1, the latest point release in the 49 series, focuses on refinement and regression fixes across the stack. It prioritizes smoother performance, improved […]

The post GNOME 49.1 Released with Fixes across Shell, Mutter, and Core Apps appeared first on UbuntuPIT.

GNOME 49.1 Desktop Released with Various Improvements and Bug Fixes

16 October 2025 at 22:00

GNOME 49.1

GNOME 49.1 is now available as the first point release to the latest GNOME 49 desktop environment series with various bug fixes and improvements.

The post GNOME 49.1 Desktop Released with Various Improvements and Bug Fixes appeared first on 9to5Linux - do not reproduce this article without permission. This RSS feed is intended for readers, not scrapers.

GNOME 49 Officially Drops 32-bit Support from Flatpak Runtime

13 October 2025 at 22:33

The GNOME project has removed the 32-bit compatibility extension from its Flatpak Runtime with the release of GNOME 49, ending a long-running path for legacy 32-bit support. The org.gnome.Platform.i386.Compat extension is no longer published, leaving the runtime available only for x86_64 and AArch64. The dropped component provided a 32-bit environment used mainly by Wine and […]

The post GNOME 49 Officially Drops 32-bit Support from Flatpak Runtime appeared first on UbuntuPIT.

GNOME 48.5 Improves Support for WPA(2) Enterprise Networks, Legacy Tray Icons

18 September 2025 at 19:44

GNOME 48.5

GNOME 48.5 is now available as the fifth maintenance update to the GNOME 48 desktop environment with various enhancements and bug fixes. Here’s what’s changed!

The post GNOME 48.5 Improves Support for WPA(2) Enterprise Networks, Legacy Tray Icons appeared first on 9to5Linux - do not reproduce this article without permission. This RSS feed is intended for readers, not scrapers.

GNOME 49 “Brescia” Desktop Environment Officially Released, Here’s What’s New

17 September 2025 at 23:12

GNOME 49

GNOME 49 desktop environment is now available as a major release that introduces numerous new features and improvements. Here's what's new!

The post GNOME 49 “Brescia” Desktop Environment Officially Released, Here’s What’s New appeared first on 9to5Linux - do not reproduce this article without permission. This RSS feed is intended for readers, not scrapers.

GNOME 49 Officially Released with New Video Player & Document Viewer

By:Ji m
18 September 2025 at 17:30

GNOME developer team finally announced the 49 release of this popular Linux Desktop environment!

If everything goes well, GNOME 49 will be the default desktop for Ubuntu 25.10, Fedora Workstation 43, and optional for Arch, Manjaro, etc Linux distributions.

The new desktop release introduced Showtime to replace Totem as the default video player, and Papers to replace Evince as the default document viewer.

Both use the GTK4 plus LibAdwaita libraries for the modern user interfaces with native look and touch friendly experience in today’s GNOME desktop.

Showtime video player

Gnome on Xorg (or Ubuntu on Xorg) is finally removed in the release, meaning there’s no longer Xorg/X11 session but only Wayland for GNOME. Though, the GDM login screen still can load other Xorg sessions, e.g., XFCE and Cinnamon.

It as well features new accessibility menu in login screen, with Quick Settings style buttons to toggle access to screen keyboard, screen reader, etc tools.

And, user can now control music playback and power-off/restart (though not enabled by default) from the lock screen.

GNOME 49 also improved Remote Desktop support, by adding multi-touch input support for client device with touch-screen, relative mouse input for better 3D app or gaming experience, and ability to have additional virtual monitors even when there aren’t additional displays physically present.

The image loading and the background wallpaper now are handled by the Glycin library, which is sandboxed to help prevent security exploits.

And, the release now supports changing the display brightness in the Quick Settings when HDR is enabled. While, these new HDR brightness controls support external displays, and allow multiple displays to be adjusted at the same time.

There are also many improvements to the Gnome Weather, Gnome Maps, Gnome Calendar apps, as well as following changes:

  • Move “Do Not Distrub” to Quick Settings.
  • Indicate when Preserve Battery Health enabled.
  • New wallpapers for HDR displays.
  • Improved Flatpak app data parsing for GNOME Software.
  • New option to disable “Super” shortcut key.
  • Support relative dials on tablet pads.
  • Hardware accelerated video encoding for Camera app.
  • Add ‘Donate’ button in About page.
  • Add configuration for pointing stick (aka TrackPoint)

For more about GNOME 49, see the official release note.

Get GNOME 49

As mentioned above, GNOME 49 will be available in Ubuntu 25.10, Fedora Workstation 43, etc Linux Distributions. And, Arch has already made the new release into GNOME Unstable repository.

For choice, there’s GNOME OS Nightly available for trying it out in either virtual machine (only support Gnome Boxes) or real hardware.

GNOME 49 Officially Released, This is What’s New

18 September 2025 at 00:17

A new version of the GNOME desktop environment has been released with new default video and document apps, Lock Screen features, and more - exciting!

You're reading GNOME 49 Officially Released, This is What’s New, a blog post from OMG! Ubuntu. Do not reproduce elsewhere without permission.

GNOME’s Tetris Clone Quadrapassel Drops a Huge Update

16 September 2025 at 06:23

Quadrapassel 49 modernises GNOME’s Tetris clone on Linux with GTK4, adds touch support, and improves scoring and gameplay for casual gamers.

You're reading GNOME’s Tetris Clone Quadrapassel Drops a Huge Update, a blog post from OMG! Ubuntu. Do not reproduce elsewhere without permission.

❌