Normal view

Received — 4 September 2025 Linux News & Update

GIMP 3.1.4 Released! Link Layers, Vector Layers & MyPaint Brushes 2

By:Ji m
4 September 2025 at 00:08

GIMP 3.1.4, the second development release for next major 3.2, was released few days ago!

The new release of this popular image editor introduced some exciting new features, including link layers, vector layers, MyPaint brushes version 2, and more.

First, by using File -> Open as Link Layer... or press Ctrl+Alt+Shift+O on keyboard, user can now open an image as link layer.

In the case, you may make changes to the image file via any other image editors (e.g., Krita, Inkscape), and see it instantly updated inside GIMP!

You can also non-destructively scale and rotate the link layer without impacting the quality of the original image. And, use “Discard Link Information” context menu option to convert it to a normal raster layer.

GIMP 3.1.4 also implemented the vector layer feature. After drawing a path (via Paths tool), user can now click “Create New Vector Layer” button to generate a vector layer associated with that path, then set the fill and stroke colors and other properties.

You can continue to edit the path, as the vector layer will automatically update. It as well has a “Discard Vector Information” context menu option to convert it to a regular raster layer.

The release also updated MyPaint Brushes to version 2, along with 20 new brushes from the Dieterle set. They include the long requested arrow brush and Posterizer brush.

For Ubuntu users, GIMP is going to make official SNAP package, which can be installed directly from Ubuntu Software or App Center, and also be installed in other Linux.

The current GIMP Snap package is maintained by the snapcrafters developers. The GIMP developers are talking to them to pass over the ownership, so they can maintain it as official package.

GIMP Snap package in APP Center. GIMP to take over this community maintained package

Other changes in GIMP 3.1.4 include:

  • New GEGL Filter Browser.
  • New Gain slider in MyPaint Brush tool, to adjust strength of input pressure.
  • Add boldd, italicize, underline keyboard shortcuts for Text tool.
  • Live preview outline color for text tool.
  • Add import support for HRZ, signed JPEG 2000, non-DXT PAA textures, Seattle Filmworks (SFW93A, SFW94A).
  • Support loading TIFF layer visibility, blending modes, and color tags
  • Support System Colors theme for macOS.
  • New API to change the paintbrush fade length and repeat settings.
  • New public API for creating vector layers.
  • Add ARM64 build of nightly Flatpak pacakge.

Compare to current GIMP 3.0 stable, there are as well many changes introduced since 3.1.2:

  • Add system color scheme support for Linux (Flatpak package) and Windows.
  • New brush preview toggle.
  • New overwrite paint mode.
  • New Outline Direction option for text tool
  • Import support for Photoshop RGB and grayscale patterns, APNG animations, multi-layer OpenEXR images, Over-the-Air Bitmap format, Jeff’s Image Format (.jif).
  • Export Krita .kpl, PSB Photoshop Large format, JPEG 2000, HEJ2.
  • Support Photoshop .acv and .alv presets in GIMP Curves and Levels filters.

For more about GIMP 3.1.4, see the official release note.

How to Install GIMP 3.1.4

The official GIMP packages for Windows, Linux, and macOS are available to download at the link below:

Linux user may choose the non-install AppImage package, which can be run directly to launch the image editor, after adding executable permission.

NOTE: Ubuntu since 22.04 needs to run command in terminal (Ctrl+Alt+T) to install required library first:

sudo apt install libfuse2

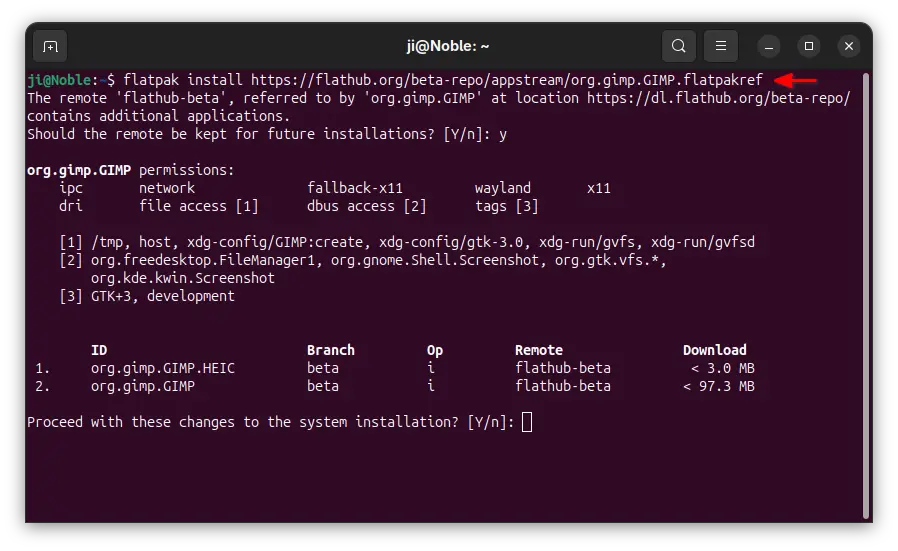
Or, run the command below to install the Flatpak package instead which runs in sandbox environment.

flatpak install https://flathub.org/beta-repo/appstream/org.gimp.GIMP.flatpakref

If you already have GIMP 3.1.2 installed as Flatpak, then try the command below to update it:

flatpak update org.gimp.GIMP//beta

If you have both the Devel and Stable versions of GIMP installed as Flatpak, and don’t know which icon to use, then use the command below to start the GIMP 3.1.4 from terminal:

flatpak run org.gimp.GIMP//beta

NVIDIA 580.82.07 Added Smooth Motion for RTX 40 Series GPUs

By:Ji m
3 September 2025 at 19:48

For NVIDIA users with GeForce RTX 40 Series GPUs (e.g., 4060, 4090), it finally supports Smooth Motion frame generation for better gaming performance in Linux.

NVIDIA Smooth Motion is a feature designed for games without native DLSS support. It uses AI to generate additional frames between two rendered frames for overall smoothness of game-play.

The feature was initially added for Linux via NVIDIA 575 driver series, but only for RTX 50 series GPUs. Now with NVIDIA 580.82.07, the feature also works for RTX 40 GPUs. While, Windows users will probably get it in 590 driver series.

As the latest production branch driver, NVIDIA 580 also added fifo-v1 protocol support to reduce visual inconsistencies and potential stuttering for apps/games running in Wayland with Vulkan backend.

It as well enabled RMIntrLockingMode feature by default, which can help reduce stutter especially when using virtual reality (VR).

There are as well new “OutputBitsPerComponent” MetaMode attribute, allowing to control the number of bits per color component transmitted via a display connector in Xorg with multiple displays.

Other changes in NVIDIA 580 so far include:

  • Feature to reduce time spent in the interrupt top half for low latency display interrupts by deferring the work until later.
  • Update GPU clock value reporting in nvidia-settings, NVML, and nvidia-smi to show clocks before thermal and idle slowdowns.
  • Fix Bigscreen Beyond Head Mounted Displays compatibility.
  • And various bug-fixes.

How to Install NVIDIA 580.82.07

The official package and release note for NVIDIA 580.82.07 is available at the link below:

For Ubuntu, it’s HIGHLY recommended to wait the Ubuntu’s official package, though it’s still in proposed testing stage at the moment.

Or, use either the popular “Graphics Drivers” team PPA which now contains NVIDIA 580.82.07 for Ubuntu from 18.04 to 25.04, or “Canonical Kernel Team” team PPA for 22.04 and higher.

To add the Canonical Kernel Team PPA, open terminal (Ctrl+Alt+T) and run command:

sudo add-apt-repository ppa:canonical-kernel-team/nvidia-graphics2

Then, you may either use “Additional Drivers” (graphical tool) to install nvidia-580 for desktop, or nvidia-580-server for server computing use.

Or run one of the commands below instead in terminal to install the driver:

sudo ubuntu-drivers install nvidia:580
sudo ubuntu-drivers install --gpgpu nvidia:580-server

GNOME 49 Restores Ability to Launch X11 Desktop Sessions

4 September 2025 at 10:07

GNOME desktop foot logoGNOME 49 re-enables X11 session support in GDM after it broke the ability to launch other desktop environments. It plans full removal in GNOME 50.

You're reading GNOME 49 Restores Ability to Launch X11 Desktop Sessions, a blog post from OMG! Ubuntu. Do not reproduce elsewhere without permission.

Linux Mint 22.2 Finally Released, This is What’s New

4 September 2025 at 06:40

Laptop with white text in front reading "Linux Mint 22.2 New Release"The new Linux Mint 22.2 release is available for download. It features theme changes, fingerprint support, and updated apps. More details inside.

You're reading Linux Mint 22.2 Finally Released, This is What’s New, a blog post from OMG! Ubuntu. Do not reproduce elsewhere without permission.

💾

💾

Warp (AI Coding Tool) Touts New ‘Prompt to Production’ Workflow

4 September 2025 at 00:57

Warp, the Agentic Development Environment, for Windows, macOS and Linux has launched a suite of new features to improve prompt-based coding.

You're reading Warp (AI Coding Tool) Touts New ‘Prompt to Production’ Workflow, a blog post from OMG! Ubuntu. Do not reproduce elsewhere without permission.

Received — 3 September 2025 Linux News & Update

Google Can Keep Paying for Firefox Search Deal, Judge Rules

3 September 2025 at 06:43

US judge in antitrust case rules Google can keep paying Mozilla and other companies for default search placement, but bans exclusive contracts.

You're reading Google Can Keep Paying for Firefox Search Deal, Judge Rules, a blog post from OMG! Ubuntu. Do not reproduce elsewhere without permission.

Compile FFmpeg 8.0 in Ubuntu with NVIDIA GPU Acceleration

By:Ji m
2 September 2025 at 21:44

This is a step by step guide shows how to manually compile & install FFmpeg 8.0 from source with NVIDIA GPU acceleration support through cuda-nvcc and enable-libnpp in Ubuntu 24.04 & 22.04.

FFmpeg 8.0 so far is the latest version of this popular multi-media library, that features APV and ProRes RAW decoders, hardware accelerated VP9 and VVC encoding, and new Vulkan compute-based codecs support for FFv1 (encoding and decoding).

This tutorial is tested in Ubuntu 24.04 & 22.04, though it should also works in Debian, Linux Mint

Before Getting Started

FFmpeg now supports hardware accelerated NVENC encoding (AV1, H.264, HEVC) and NVDEC decoding (H.264, HEVC, MJPEG, MPEG-1/2/4, VP8/VP9, VC-1, AV1) through ffncodec, and scale_cuda filters to replace scale_npp.

They are usually enabled by default in FFmpeg packages from Ubuntu system repository or PPAs (e.g., my PPA and Rob Savoury’s PPA).

Meaning, you don’t need to build FFmpeg by yourself, just install it from one the previous sources, then you have the basic NVIDIA GPU acceleration support.

FFmpeg in Ubuntu & PPA repositories has nvenc & nvdec out-of-the-box

You ONLY need to follow this tutorial, when you need specific or more advanced CUDA-dependent features and/or scale_npp only filters.

And, you need:

  • a NVIDIA GPU that support NVENC/NVDEC (see the support list).
  • Install NVIDIA proprietary driver, though either Additional Drivers utility or ubuntu-drivers CLI tool. See the official guide.

Step 1: Install Nvidia Codec SDK headers

nv-codec-headers, the FFmpeg version of Nvidia Codec SDK headers, is available in Ubuntu repositories, but a bit old.

For the most recent version, press Ctrl+Alt+T on keyboard to clone the source code:

git clone https://git.videolan.org/git/ffmpeg/nv-codec-headers.git

Run sudo apt install git to install git first, if you don’t have it.

Then, run the command below to navigate to the source folder, and install it:

cd nv-codec-headers && sudo make install

Step 2: Install Build Dependencies

To build the source, we need some dependency libraries.

First, run command in terminal (Ctrl+Alt+T) to install the essential dependency packages:

sudo apt install build-essential nasm cmake libtool libc6 libc6-dev unzip wget libnuma1 libnuma-dev nvidia-cuda-toolkit pkg-config

For choice, you may install more via sudo apt install package-name (replace package-name) for more features, e.g.,

  • libvulkan-dev, for Vulkan compute-based hardware acceleration (the package in 22.04 is outdated).
  • libjxl-dev, for JPEG-XL support (the package is not available in 22.04).
  • libgme-dev, for Game Music Emu.
  • libvpx-dev, for VP8, VP9 decoding and encoding.

And, below are the packages I use for building FFmpeg into PPA:

libmp3lame-dev zlib1g-dev libvorbis-dev libsdl2-dev libxvidcore-dev liblzo2-dev texinfo libgcrypt-dev libx264-dev libtheora-dev libgsm1-dev libsnappy-dev libdc1394-dev libbs2b-dev libspeex-dev libopencore-amrwb-dev libfreetype-dev libopenmpt-dev nasm libopenjp2-7-dev libharfbuzz-dev libvdpau-dev libtesseract-dev libopencore-amrnb-dev libxfixes-dev libgl-dev libbz2-dev libssl-dev libass-dev libasound2-dev libva-dev libjack-jackd2-dev libvpx-dev frei0r-plugins-dev libvo-amrwbenc-dev libsctp-dev libopus-dev gnutls-dev frei0r-plugins-dev libsoxr-dev linux-libc-dev ladspa-sdk libaom-dev libfontconfig-dev libfdk-aac-dev libpulse-dev libzvbi-dev libiec61883-dev libavc1394-dev libleptonica-dev liblzma-dev libx265-dev libxext-dev libcaca-dev libopenh264-dev librubberband-dev libwebp-dev libgme-dev glslang-dev opencl-c-headers libshine-dev libfribidi-dev libxcb1-dev libxcb-shm0-dev libxcb-xfixes0-dev libcdio-paranoia-dev libcodec2-dev ocl-icd-opencl-dev libzimg-dev libmysofa-dev libbluray-dev libzmq3-dev libaribb24-dev liblensfun-dev liblilv-dev flite1-dev librsvg2-dev libtwolame-dev libopenal-dev librabbitmq-dev libvulkan-dev libxavs2-dev libsrt-gnutls-dev libdavs2-dev libomxil-bellagio-dev libxml2-utils libsmbclient-dev libchromaprint-dev libunwind-dev libdvdnav-dev libdvdread-dev

Step 3: Compile & install FFmpeg 8.0

1. Download & extract the source

Now download FFmpeg 8.0 source tarball from its website, decompress, then right-click on extracted folder and choose “Open in Terminal” to open terminal with source folder as working directory.

open FFmpeg source folder in terminal

For Ubuntu server without GUI, run the command below to download the source:

wget https://ffmpeg.org/releases/ffmpeg-8.0.tar.xz

Then, decompress and navigate to the source folder:

tar -Jxf ffmpeg-8.0.tar.xz && cd ffmpeg-8.0

2. Configure the source

Now, configure the source by running command:

./configure --enable-nonfree --enable-cuda-nvcc --enable-libnpp --extra-cflags=-I/usr/local/cuda/include --extra-ldflags=-L/usr/local/cuda/lib64 --disable-static --enable-shared

Here, you may add more configure options, e.g.,:

  • --enable-libvpx, need ‘libvpx-dev’ to be installed.
  • --enable-vulkan, need ‘libvulkan-dev’ to be installed.
  • --enable-libjxl, need ‘libjxl-dev’ to be installed.

And even more. See either configure file, or run ./configure --help to list more choices.

Configure the source

3. build & install FFmpeg

If configure is done without error, you may then run the command below to build it:

make -j4

Here j4 means to start 4 threads in parallel. You may replace it with j8, or even j16 depends on your CPU, or use -j$(nproc) to use all CPU cores.

build with ‘make’ command

If everything goes well, finally install FFmpeg by running command:

sudo make install

install ffmpeg via ‘make install’

Step 4: Verify

After installed FFmpeg, run the command below to print its version and configuration.

ffmpeg

If it said error while loading shared libraries, then run command to add /usr/local/lib as LD_LIBRARY_PATH environment variable, which works for current terminal session.

export LD_LIBRARY_PATH="/usr/local/lib:$LD_LIBRARY_PATH"

Or, write the command into end of .profile or .bashrc file in user home to make it permanent for current user.

Finally, try to transcode with GPU acceleration via command (replace input.mp4 with path to an existing media file):

ffmpeg -hwaccel cuda -i input.mp4 -vf scale_npp=-1:720 -c:v h264_nvenc -preset slow output.mkv

Uninstall:

To uninstall, open the source folder again in terminal and run command:

sudo make uninstall

If you’ve already deleted that folder, then manually remove the executable files from /usr/local/bin and libraries from /usr/local/lib:

GIMP 3.1.4 Dev Release Adds Link Layers, Vector Support

3 September 2025 at 01:31

GIMP 3.1.4 is out, a fresh development snapshot of what will become the next major stable release. It introduces two long-awaited new features.

You're reading GIMP 3.1.4 Dev Release Adds Link Layers, Vector Support, a blog post from OMG! Ubuntu. Do not reproduce elsewhere without permission.

💾

Received — 2 September 2025 Linux News & Update

How to Install Zip and Unzip in Linux

The post How to Install Zip and Unzip in Linux first appeared on Tecmint: Linux Howtos, Tutorials & Guides .

Zip is a command-line utility tool used for compressing files and folders. Compression of files & folders enables faster and

The post How to Install Zip and Unzip in Linux first appeared on Tecmint: Linux Howtos, Tutorials & Guides.

Linux App Release Roundup (August 2025)

2 September 2025 at 06:59

This is a recap of Linux app releases in August 2025, taking in updates to Qemu, Constrict, Gradia, Zen Browser, PeaZip and more!

You're reading Linux App Release Roundup (August 2025), a blog post from OMG! Ubuntu. Do not reproduce elsewhere without permission.

Distribution Release: Linux From Scratch 12.4

2 September 2025 at 03:13
The DistroWatch news feed is brought to you by TUXEDO COMPUTERS. The Linux From Scratch project (also called LFS) has announced the release of version 12.4 of the project's guide. This guide walks the reader through the steps to create a minimal Linux distribution from source code. The release announcement reads: "The Linux From Scratch community announces the release....
Received — 1 September 2025 Linux News & Update

Distribution Release: AerynOS 2025.08

1 September 2025 at 11:00
The DistroWatch news feed is brought to you by TUXEDO COMPUTERS. The AerynOS project has announced the release of AerynOS 2025.08, a new version of the project's independently-developed, rolling-release Linux distribution for general desktop use and with a custom package manager called "moss": "Closing out August 2025, we are proud to announce our third release of the year. This....

Gnome UI Tweak Tool “Just Perfection” Added Gnome 49 Support

By:Ji m
1 September 2025 at 21:02

Just Perfection, the popular tool to configure Gnome Shell behavior and UI elements, release new 35.0 version few days ago.

In case you don’t know about it, it’s an extension for GNOME desktop that provides a graphical interface to toggle visibility of the desktop elements, and change the common desktop behavior.

The extension provides pre-defined profiles to one click switch between default, minimal, and super minimal desktop appearance.

While, user may customize by hiding the top-panel, panel in overview, dash (dock), on-screen display (OSD), panel items (e.g., clock, indicators), menu items (e.g., calendar and events in clock menu), items in overview and more.

It as well can adjust the panel size (height), position, padding, clock position, OSD position, alt-tab preview size. And, it allows to disable or change animation speed, choose login to blank desktop or overview, maximize new window, disable Super (window logo) key, and more.

In the past few releases, it keeps adding new features, such as ability to hide quick settings buttons (e.g., Dark Mode, Night Light, Airplane), and use accent color for top panel icons though it requires GNOME 47+ and not work for Ubuntu.

Accent Color for icons

The new Just Perfection version 35 added support for GNOME 49, which is default in Ubuntu 25.10 and Fedora 43, though they are all in development stage at the moment of writing.

And, it added ability to toggle visibility (show or hide) of window menu. It’s the menu that pops-up when you right-clicking on header of an app window, which contains options to take screenshot, set always on top, move, resize, or close window.

The Window Menu when your right-click on header of an app window

There are as well fixes for startup freeze in NixOS, and the page icon issue in preferences window for GNOME Shell 48.

How to Install Just Perfection:

The new Just Perfection releases supports GNOME from version 45 to 49. User may install it by visiting the EGO page via web browser:

Then use the ON/OFF toggle to install. Though you need to first install browser extension (if it asks) and refresh. And, Debian/Ubuntu needs to run command (Ctrl+Alt+T) to install the agent package first:

sudo apt install chrome-gnome-shell

For Ubuntu since 22.04, user may also install Extension Manager first from App Center (filter by Debian package), then use it to search & install Just Perfection.

Finally, use either GNOME Extensions or Extension Manager to open Just Perfection preferences page to tweak your desktop.

SuperFile is a Terminal File Manager You’ll Actually Enjoy Using

1 September 2025 at 06:49

SuperFile adds colour and clarity to terminal file management. If you're looking for a modern alternative to Midnight Commander on Ubuntu, it's worth trying.

You're reading SuperFile is a Terminal File Manager You’ll Actually Enjoy Using, a blog post from OMG! Ubuntu. Do not reproduce elsewhere without permission.

LibreOffice 25.8.1 Update Delivers Almost 100 Bug Fixes

1 September 2025 at 00:46

LibreOffice 25.8.1 brings almost 100 bug, crash and other regression fixes. This is the first of several planned point updates to the latest stable release series.

You're reading LibreOffice 25.8.1 Update Delivers Almost 100 Bug Fixes, a blog post from OMG! Ubuntu. Do not reproduce elsewhere without permission.

Install & Set Ptyxis as Default Terminal in Ubuntu 24.04 | 22.04

By:Ji m
31 August 2025 at 15:07

Like the new Ptyxis terminal emulator introduced in Ubuntu 25.10, here’s how to install and set it as default in current Ubuntu 24.04 and 22.04 LTS.

Ptyxis is a modern terminal emulator designed for GNOME with first-class container integration, such as auto-discovery and option to launch a container in new tab, preferences profiles with container integration for Podman, Toolbox, Distrobox, and JHBuild.

The terminal uses GTK4 + LibAdwaita for its modern user interface well integrated into GNOME. And, it supports configurable keyboard shortcuts, user-installable color palettes, GPU acceleration, integrated developer tool, and more.

Ubuntu 25.10 since snapshot 4 has added this terminal app as a replacement of GNOME Terminal. For current 2 Ubuntu LTS releases, it’s easy to install through Flatpak via the steps below.

1. Install Ptyxis

The latest Ptyxis (48.5 so far) won’t build in current Ubuntu 24.04 or 22.04 due to outdated GTK4 and libadwaita libraries. User may choose to install it as Flatpak package, which runs in sandbox environment.

NOTE: This step works only on X86_64 (modern Intel/AMD) and ARM64 platforms.

First, press Ctrl+Alt+T on keyboard to open terminal. When it opens, run the command below to install the flatpak daemon:

sudo apt install flatpak

You may run sudo apt update to refresh your system package cache, if the last command failed.

Then, install the terminal emulator by running command:

flatpak install https://dl.flathub.org/repo/appstream/app.devsuite.Ptyxis.flatpakref

This will install the app system wide, so all users can access it. For choice, you may add --user flag in command to install it for current user only.

Finally, either launch the terminal from menu (log out and back in if app icon not visible) or run flatpak run app.devsuite.Ptyxis to start from terminal.

And for future updates, run the command below to check & install:

flatpak update app.devsuite.Ptyxis

Step 2: Set Ptyxis as default terminal

If you would like to make your terminal apps use Ptyxis as default, and Ctrl+Alt+T launch this terminal instead of Gnome-Terminal, then run following commands one by one.

NOTE 1: Ptyxis has an option in its preferences dialog to set as default, though NOT work in my case.

NOTE 2: This step no longer works for Ubuntu 25.04 and later due to policy change.

Ubuntu until 25.04 uses /etc/alternatives/x-terminal-emulator symbolic link to determine the default terminal app. To configure it, use update-alternatives command to add alternatives and set which to use as default.

1. First, create a wrapper for Ptyxis executable by running command:

sudo nano /usr/bin/ptyxis.wrapper

This command will create a script ptyxis.wrapper under /usr/bin with nano command line text editor.

When it opens, paste the line below, so it will launch Ptyxis with --new-window flag.

#!/bin/sh
flatpak run app.devsuite.Ptyxis --new-window

Finally, press Ctrl+S to save and Ctrl+X to exit. And, run command below to add executable permission:

sudo chmod a+x /usr/bin/ptyxis.wrapper

You may skip creating the wrapper, and use /var/lib/flatpak/exports/bin/app.devsuite.Ptyxis in next commands. Which however only allows to open a single Ptyxis window when pressing Ctrl+Alt+T keyboard shortcut for multiple times.

2. Next, run command to install Ptyxis as an alternative:

sudo update-alternatives --install /usr/bin/x-terminal-emulator x-terminal-emulator /usr/bin/ptyxis.wrapper 10

Here you may replace /usr/bin/ptyxis.wrapper with one of the PATH to Ptyxis executable file below. As mentioned, it however allows only one Ptyxis window, unless passing --new-window flag.

  • /var/lib/flatpak/exports/bin/app.devsuite.Ptyxis for default system-wide installation.
  • $HOME/.local/share/flatpak/exports/bin/app.devsuite.Ptyxis if installed the terminal with --user flag.

Then, run the command below to choose default terminal:

sudo update-alternatives --configure x-terminal-emulator

In my case (see the screenshot), type 4 and hit Enter to select Ptyxis.

Step 3: Add “Open in Terminal” Context Menu option for Ptyxis

If you would like to add “Open in Terminal” look-like context menu to open selected folder in Ptyxis, the popular nautilus-open-any-terminal extension can do the job for Nautilus (aka GNOME Files).

1. First, run command in terminal to install dependency libraries:

sudo apt install python3-pip python3-nautilus gir1.2-gtk-4.0

2. Then, install the extension through pip:

python3 -m pip install --user nautilus-open-any-terminal --break-system-packages

The --break-system-packages flag is required in 24.04 due to PEP 668, though not for 22.04.

3. After installed the Nautilus extension, run the command below to generate dconf configuration:

glib-compile-schemas ~/.local/share/glib-2.0/schemas/

Then quit Nautilus to apply changes:

nautilus -q

4. Finally, launch Dconf Editor which can be installed from either Ubuntu Software or App Center (filter by Debian package).

Then, navigate to “com/github/stunkymonkey/nautilus-open-any-terminal”, and disable default values and set:

  • flatpak to ‘system’ (or ‘user’ if you used --user flag when installing Ptyxis).
  • terminal to ‘ptyxis’.

Finally, right-click on any folder or blank area in file manager to see the new option.

And, remove nautilus-extension-gnome-terminal package to get rid of the default ‘Open in Terminal’ option.

DistroWatch Weekly, Issue 1137

1 September 2025 at 09:21
The DistroWatch news feed is brought to you by TUXEDO COMPUTERS. This week in DistroWatch Weekly:
Review: Tribblix 0m37
News: KDE introduces first-run setup wizard, CalyxOS plans final update before infrastructure overhaul, FreeBSD status update
Tips and tricks: Malware warnings about Linux ISO files
Released last week: GhostBSD 25.02, Br OS 13.0, MODICIA O.S. 6.12.41, FreedomBox 2025-08-28
Torrent corner: Armbian, BigLinux, GhostBSD, Linux....
❌