GNOME Flatpak Runtime Drops 32-Bit Compatibility Extension


 Ubuntu 25.10 was released on October 9, but if you're on Ubuntu 25.04 and have not gotten an upgrade notification yet, there is a reason for it – all explained inside.
You're reading Waiting to Upgrade to Ubuntu 25.10? Here’s When You Can, a blog post from OMG! Ubuntu. Do not reproduce elsewhere without permission.
In Linux and other Unix-like operating systems, the init (initialization) process is the first process executed by the kernel at
The post 6 Best Modern Linux ‘init’ Systems (1992-2025) first appeared on Tecmint: Linux Howtos, Tutorials & Guides.Pasar kripto sempat terguncang hebat ketika Dogecoin jatuh hampir 60% pada hari Jumat, setelah Donald Trump mengguncang sentimen dengan ancaman tarif 100% terhadap China. Meski demikian, DOGE berhasil bangkit cepat dan menutup hari dengan koreksi hanya 22%.
Yang lebih penting, harga harian DOGE tetap bertahan di atas garis tren naik yang telah menjadi support kuat sejak Agustus tahun lalu. Garis ini sebelumnya menjadi pemicu reli 100% yang terjadi pada Juni–Juli 2025. Setelah DOGE sukses menguji ulang area support akhir pekan ini, analis memanggil “senjata besar” yakni kecerdasan buatan Grok untuk menggali prediksi harga Dogecoin lebih dalam.
Untuk analisis ini, digunakan Grok AI, chatbot yang memiliki akses real-time ke platform X, mulai dari harga pasar langsung, opini analis, hingga sentimen publik. Grok melihat pola breakout bersih dari formasi descending triangle.
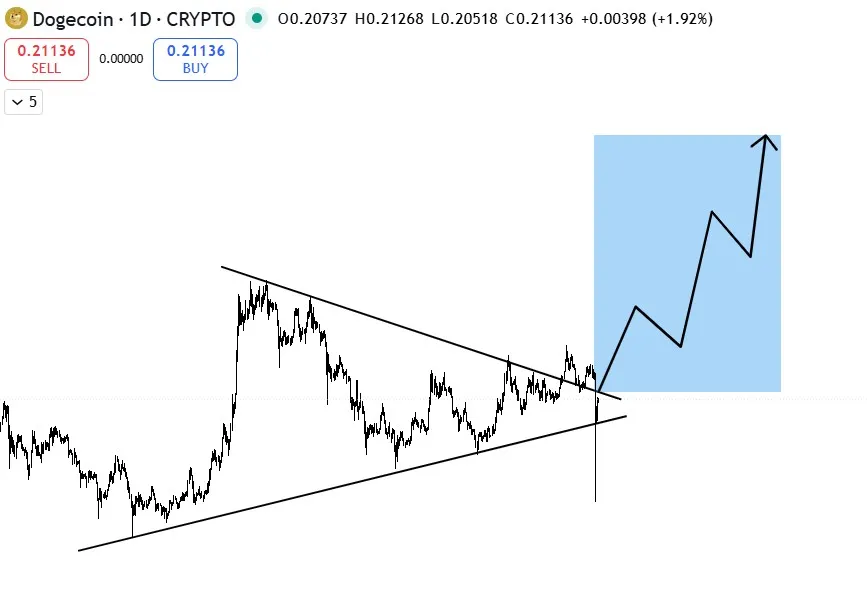
DOGE telah keluar dari zona konsolidasi sejak awal September, lalu menguji ulang garis resistance yang kini menjadi support, sebuah sinyal teknikal klasik sebelum reli besar. Saat ini, DOGE kembali menantang garis atas pola segitiga tersebut.
Grok mengukur lebar pola segitiga dan memproyeksikan target ke titik breakout sekitar $0.22. Hasilnya? Target potensial DOGE berada di kisaran $1.30, kenaikan sekitar 500% dari posisi saat ini. Namun, AI juga mengingatkan bahwa DOGE harus lebih dulu menembus rekor tertingginya di $0.79 sebelum mencapai target ambisius tersebut.
Meskipun Dogecoin sempat mengalami penurunan dramatis pada Jumat lalu karena ulah Donald Trump yang mengancam China dengan tarif 100%, namun hal ini tentu tidak hanya berdampak pada token meme bertema anjing ini saja, namun seluruh pasar crypto mengalami kerontokan.
Meskipun begitu, banyak investor yang menjadikan ini sebagai momentum untuk melakukan pembelian. Bagi investor lama, angka 500% bukan hal yang mengejutkan untuk DOGE. Pada 2017, Dogecoin sempat terbang 10.000%, dan pada 2021 melesat lagi hingga 30.000%.
Meski kini lebih “matang”, Dogecoin tetap menjadi raja meme coin dan reli DOGE kerap memicu meme season besar di pasar. Anda bisa melihat prediksi harga Dogecoin dalam beberapa tahun kedepan. Di tengah momentum ini, satu nama baru mencuri perhatian yaitu Maxi Doge ($MAXI). Proyek crypto baru yang mengklaim dirinya sebagai “saudara jauh Dogecoin” yang siap balas dendam.
Maxi Doge bukan sekadar token yang menempel nama Doge demi popularitas. Narasinya unik, diceritakan sebagai saudara iri yang memoles dendamnya menjadi kekuatan. Dari sentimen itu lahirlah proyek yang menargetkan viralitas ekstrem dan potensi 1000x ala meme coin legendaris.
Salah satu kekuatan utama MAXI adalah tokenomics agresif, 40% dari total suplai dialokasikan khusus untuk marketing, mulai dari kerja sama influencer kelas atas, kampanye media sosial, hingga PR global.
Tak hanya itu, MAXI juga merancang komunitas aktif dengan event trading eksklusif mingguan untuk holder dan istem leaderboard dan hadiah loyalitas, Rencana listing tidak hanya di CEX & DEX, tetapi juga platform futures untuk trader leverage.
Distribusi token Maxi Doge tidak dibuat asal-asalan. Setiap persen punya misi, bukan hanya membangun proyek, tetapi menciptakan gelombang yang sulit dihentikan di dunia meme coin.

Bukan sekadar token, $MAXI sedang membangun ekosistem yang sengaja disusun untuk viral, bertahan lama, dan mencuri dominasi Doge.
Saat ini Maxi Doge masih berada di fase presale, dan telah mengumpulkan lebih dari $3,57 juta dari investor awal. Harga 1 $MAXI saat ini hanya $0,0002625. Jika Anda pemula dan tertarik dengan token crypto yang satu ini, Anda bisa menemukan artikel cara beli Maxi Doge di sini.
Meskipun tergolong meme coin, namun investor besar mulai turun gunung dan membeli token ini. Dua whale dilaporkan membeli total $627.000 (masing-masing $314K & $313K) hanya dalam satu hari. Ini menunjukkan kepercayaan kuat terhadap potensi $MAXI sebagai “next big meme coin”.
Menurut prediksi harga Maxi Doge, token ini bisa mencapai $0.0024 pada akhir 2025 (+814%) dan $0.0058 pada akhir 2026 (+2.100%). Jika angka ini tercapai, tentu keuntungan yang sangat luar biasa bisa Anda dapatkan karena membeli token ini sekarang.
Namun momentum hanya berpihak pada yang cepat, harga presale saat ini termasuk yang terendah sepanjang fase peluncuran. Ingin memanfaatkan gelombang Doge berikutnya? Maxi Doge mungkin menjadi tiket awal menuju reli meme coin generasi baru. Kunjungi web resmi presale Maxi Doge sekarang juga!
Tidak mau ketinggalan info terbaru seputar crypto? Jangan lupa gabung dengan group Telegram kami, silakan klik tautan https://t.me/cryptonewsindonesiaofficial dan teruslah terinformasi dengan berita crypto terbaru setiap hari.
Disclaimer: Pendapat dan pandangan yang diungkapkan dalam postingan ini tidak selalu mencerminkan kebijakan atau posisi resmi Cryptonews. Informasi yang disediakan dalam postingan ini hanya untuk tujuan informasi dan tidak boleh dianggap sebagai nasihat keuangan, investasi, atau profesional. Cryptonews tidak mendukung produk, layanan, atau perusahaan tertentu yang disebutkan dalam postingan ini. Pembaca disarankan untuk melakukan riset mandiri dan berkonsultasi dengan profesional yang berkualifikasi sebelum mengambil keputusan keuangan apa pun. Jangan pernah menginvestasikan lebih dari yang Anda siap kehilangan.
The post Prediksi Dogecoin Usai Crash $19 Miliar: Grok AI Lihat Potensi 500%, Maxi Doge Raup $3,5 Juta appeared first on Cryptonews Indonesia.

ChatGPT, kecerdasan buatan (AI) terdepan dari OpenAI, membeberkan strategi investasi crypto yang dianggap paling efektif untuk membangun kekayaan melalui Bitcoin. Strategi ini dibangun di atas tiga pilar utama: konsistensi, perspektif jangka panjang, dan keamanan aset.
ChatGPT memulai analisanya dengan menekankan pentingnya konsistensi. Alih-alih mengejar keuntungan besar secara instan, AI ini menyarankan pendekatan Dollar Cost Averaging (DCA) sebagai strategi paling rasional untuk berinvestasi dalam Bitcoin.
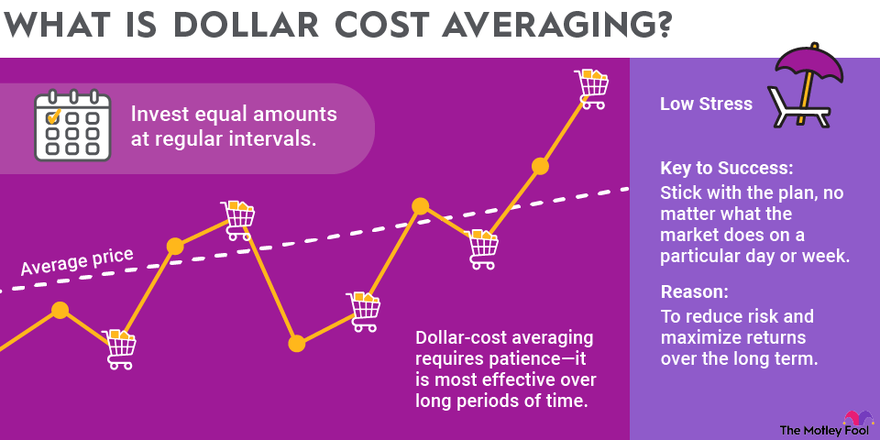
Menurut ChatGPT, “Menjadi miliarder melalui Bitcoin bukanlah soal keberuntungan. Itu adalah soal kedisiplinan dan kebiasaan.” DCA melibatkan pembelian Bitcoin dalam jumlah tetap secara rutin setiap bulan, tanpa mempedulikan fluktuasi harga pasar.
Dengan strategi ini, investor akan otomatis membeli lebih sedikit saat harga tinggi dan lebih banyak saat harga rendah. Pendekatan ini secara tidak langsung mengurangi pengaruh emosi dalam pengambilan keputusan dan memperkecil risiko investasi.
ChatGPT memberikan ilustrasi konkret: “Jika seseorang membeli Bitcoin sebesar Rp16.577.000 ($1.000) setiap bulan selama 10 tahun, maka dalam jangka panjang ia dapat mengakumulasi beberapa BTC tanpa tekanan besar.” Jumlah tersebut bisa menjadi aset bernilai sangat besar, tergantung pada performa harga Bitcoin di masa depan.
Strategi selanjutnya yang tak kalah penting menurut ChatGPT adalah membangun pola pikir jangka panjang.
Pasar crypto cenderung bergerak dalam siklus yang berlangsung dari beberapa bulan hingga beberapa tahun. Tidak mungkin menghasilkan kekayaan besar hanya dalam semalam. Investor sukses umumnya membeli saat pasar lesu dan menjual ketika pasar memanas.
ChatGPT menegaskan, “Memahami siklus Bitcoin dan mengadopsi pandangan jangka panjang adalah langkah penting.” Investor perlu mengabaikan kebisingan harian di pasar dan fokus pada tren besar yang terjadi dalam skala dekade. Pendekatan ini dianggap sebagai strategi paling realistis untuk mencapai kesuksesan.
Pilar ketiga dari strategi ChatGPT adalah keamanan aset. AI ini sangat merekomendasikan penggunaan cold wallet, yaitu dompet crypto yang tidak terhubung langsung ke internet, untuk menjaga Bitcoin tetap aman.
“Menjaga kepemilikan aset secara mandiri adalah inti dari investasi Bitcoin yang sesungguhnya,” ujar ChatGPT. Banyak investor telah kehilangan asetnya akibat kebocoran data, peretasan, atau bahkan kebangkrutan platform exchange. Karena itu, memiliki kendali penuh atas private key menjadi krusial.
Dalam sejarah crypto, banyak kasus di mana investor kehilangan dana hanya karena terlalu mempercayai pihak ketiga atau tidak cukup waspada dalam mengelola aset digital mereka.
ChatGPT juga membuka opsi lain bagi investor yang ingin memperluas portofolio. Selain Bitcoin, beberapa proyek baru dinilai layak dipertimbangkan sebagai pelengkap investasi jangka panjang.
Salah satu alternatif yang disebut adalah Bitcoin Hyper (HYPER), sebuah proyek Layer-2 berbasis Solana Virtual Machine (SVM) yang dirancang untuk mengatasi keterbatasan Bitcoin, terutama terkait kecepatan transaksi dan biaya gas yang tinggi.
Selama bertahun-tahun, Bitcoin memang dikenal sebagai aset paling terpercaya dalam dunia crypto. Namun, skalabilitas selalu menjadi tantangan utama. Bitcoin Hyper hadir sebagai solusi yang menggabungkan keamanan jaringan Bitcoin dengan efisiensi tinggi dalam transaksi. Proyek ini mampu menyelesaikan transaksi dalam hitungan detik dan memangkas biaya hingga ke level sen.
Bitcoin Hyper saat ini masih menjalankan program presale token HYPER. Total dana yang berhasil dikumpulkan telah mencapai $23,346,832.76 atau sekitar Rp387.118.647.739 (dengan kurs 13 Oktober 2025: Rp16.577/USD).
Moving at the speed of light!
— Bitcoin Hyper (@BTC_Hyper2) October 10, 2025
23M Raised!pic.twitter.com/5I9oDsHGag
Minat investor terhadap proyek ini sangat tinggi, terlihat dari pembelian wallet besar seperti 40.400 HYPER senilai Rp8.762.062 ($529.26), 11.200 HYPER senilai Rp2.440.824 ($147.21), serta transaksi lainnya dari wallet retail seperti 2.000 HYPER senilai Rp444.464 ($26.84).
Token $HYPER kini ditawarkan dengan harga $0.013105 atau sekitar Rp217,42 dan dapat dibeli melalui crypto wallet, kartu kredit, atau metode Web3Toolkit. Selain itu, Bitcoin Hyper menawarkan sistem staking dengan reward sebesar 199,77 $HYPER per blok ETH dan estimasi APY sebesar 50%.
Saat ini, total token yang telah distaking mencapai lebih dari 1.043.390.171 $HYPER, menjadikannya salah satu program staking paling aktif di sektor Layer-2 Bitcoin.
Proyek ini menargetkan integrasi Bitcoin dengan aplikasi Web3 seperti DeFi, NFT, dan game berbasis blockchain. Ekosistem Bitcoin Hyper juga terus dikembangkan, mencakup desain workflow developer, model sequencing rollup, dan riset layer eksekusi berbasis ZK-Proof.
Bitcoin Hyper bekerja dalam empat tahap: bridging BTC ke Layer-2, aktivitas transaksi instan dan terdesentralisasi di Layer-2, penyelesaian transaksi dengan keamanan Layer-1, dan kemampuan withdraw kembali ke Layer-1. Teknologi ini menjadikan Bitcoin Hyper sebagai solusi komprehensif untuk skalabilitas dan efisiensi jaringan BTC.
Investor yang ingin membangun kekayaan dari ekosistem Bitcoin disarankan memperhatikan perkembangan Bitcoin Hyper. Proyek ini diperkirakan akan menjadi tonggak penting dalam sejarah evolusi Bitcoin, dan mungkin menjadi crypto dengan potensi tertinggi untuk kuartal akhir 2025.
Kunjungi situs resmi Bitcoin Hyper untuk ikut presale atau mulai staking hari ini.
Sudah paham strategi ChatGPT, sekarang waktunya praktik langsung! Bitcoin Hyper membuka peluang emas dengan sistem pembelian token yang mudah. Investor cukup koneksikan wallet crypto, pilih jumlah token, dan lakukan pembayaran via Web3Toolkit atau kartu kredit. Untuk langkah lengkapnya, cek panduan Cara Beli Bitcoin Hyper yang telah kami siapkan. Panduan ini akan memandu Anda dari nol hingga selesai dalam hitungan menit. Jangan tunda, selangkah lagi Anda bisa menjadi bagian dari evolusi Bitcoin!
Anda pasti penasaran berapa potensi keuntungan dari HYPER ke depan. Berdasarkan adopsi teknologi, performa presale, dan sistem staking yang agresif, banyak analis memprediksi lonjakan besar. Bahkan bisa melampaui banyak Layer-2 lainnya dalam waktu dekat. Bagi investor yang berpikir panjang, penting untuk baca ulasan Prediksi Harga Bitcoin Hyper secara lengkap. Artikel ini akan membantu Anda memahami tren jangka pendek dan panjang. Jangan lewatkan jika Anda ingin cuan besar!
Dengan hype tinggi, wajar jika banyak investor bertanya soal kredibilitas Bitcoin Hyper. Apakah ini proyek asli atau sekadar pompa harga? Kami telah mengulasnya secara mendalam dari sisi teknologi, tim, transparansi, dan komunitas. Fakta-fakta yang ditemukan menunjukkan tren positif dan aktivitas developer yang aktif. Jika Anda ingin tahu lebih lanjut, baca ulasan Apakah Bitcoin Hyper Legit atau Scam yang akan membantu Anda menilai objektif. Jangan berinvestasi tanpa riset!
ChatGPT menekankan bahwa membangun kekayaan melalui Bitcoin bukan perkara spekulasi jangka pendek. Strategi seperti Dollar Cost Averaging (DCA) terbukti mampu menjaga emosi tetap stabil dan mengurangi risiko. Konsistensi dalam membeli Bitcoin setiap bulan akan mengakumulasi aset secara perlahan tapi pasti. Jika dilakukan dalam 10 tahun, hasilnya bisa sangat signifikan.
Harga Bitcoin bergerak dalam siklus yang tidak bisa ditebak dalam waktu dekat. ChatGPT mengingatkan pentingnya mengabaikan kebisingan harian pasar dan melihat tren dekade. Strategi ini menuntut kesabaran, tapi menjanjikan hasil lebih nyata. Investor sukses adalah mereka yang membeli di fase dingin dan menjual saat pasar panas.
Keamanan menjadi pilar penting dalam strategi investasi jangka panjang. Penggunaan cold wallet menjaga Bitcoin tetap aman dari risiko exchange dan peretasan. Investor harus memiliki kontrol penuh atas private key mereka. Ini menjadi fondasi penting dalam kepemilikan aset crypto.
ChatGPT juga menyebut Bitcoin Hyper sebagai pelengkap ideal untuk portofolio jangka panjang. Proyek ini menyempurnakan kekurangan Bitcoin dalam hal kecepatan dan biaya. Dengan performa presale yang melonjak dan teknologi Layer-2 berbasis SVM, proyek ini berpotensi besar dalam mendukung ekosistem Web3 Bitcoin. Momentum ini jangan sampai terlewatkan.
Dengan harga token saat ini Rp217,42 dan lebih dari 1 miliar token distaking, Bitcoin Hyper sedang jadi sorotan. Investor yang ingin membangun kekayaan dari Bitcoin sebaiknya mempertimbangkan berpartisipasi sekarang. Teknologi, ekosistem, dan APY 50% membuatnya unggul. Kunjungi situs resminya untuk membeli token atau mulai staking hari ini juga.
Biar tidak ketinggalan peluang dan update terbaru tentang Bitcoin, altcoin, dan presale kripto, gabung sekarang di komunitas resmi kami! Di grup Crypto News Indonesia Telegram, Anda bisa diskusi langsung dengan ribuan investor lainnya. Tim kami juga rutin membagikan insight pasar, tutorial cara beli token, dan peringatan dini proyek yang mencurigakan. Klik link https://t.me/cryptonewsindonesiaofficial untuk langsung masuk grup. Jangan berinvestasi sendirian – bangun strategi bersama komunitas yang aktif dan informatif!
Disclaimer: Pendapat dan pandangan yang diungkapkan dalam postingan ini tidak selalu mencerminkan kebijakan atau posisi resmi Cryptonews. Informasi yang disediakan dalam postingan ini hanya untuk tujuan informasi dan tidak boleh dianggap sebagai nasihat keuangan, investasi, atau profesional. Cryptonews tidak mendukung produk, layanan, atau perusahaan tertentu yang disebutkan dalam postingan ini. Pembaca disarankan untuk melakukan riset mandiri dan berkonsultasi dengan profesional yang berkualifikasi sebelum mengambil keputusan keuangan apa pun. Jangan pernah menginvestasikan lebih dari yang Anda siap kehilangan.
The post ChatGPT Ungkap Strategi Investasi Crypto untuk Kejar Mimpi Jadi Miliarder Bitcoin appeared first on Cryptonews Indonesia.
Hidup ini hanyalah rangkaian detik yang terus berjalan tanpa pernah kembali. Betapa sering kita menunda untuk berbuat baik dengan alasan, “Nanti saja kalau ada waktu, nanti kalau sudah siap, nanti kalau sudah sempat.” Namun, siapa yang bisa menjamin “nanti” itu akan datang? Bisa jadi kesempatan itu hilang, umur kita berakhir, atau hati kita berubah. Setiap […]
The post Tidak Menunda-Nunda Kebaikan: Hikmah dari Dua Ayat Terakhir Surah Al-Insyirah appeared first on Muslim.or.id.

Blender 5.0 free and open source 3D creation suite is now available for public beta testing with major new features and improvements. Here's what to expect!
The post Blender 5.0 Beta Officially Released with HDR and Wide Gamut Display Support appeared first on 9to5Linux - do not reproduce this article without permission. This RSS feed is intended for readers, not scrapers.

Firefox 144 open-source web browser is now available for download with various new features and improvements. Here's what's new!
The post Firefox 144 Is Now Available for Download, This Is What’s New appeared first on 9to5Linux - do not reproduce this article without permission. This RSS feed is intended for readers, not scrapers.

A quick and painless tutorial on how to upgrade your Linux Mint Debian Edition (LMDE) 6 installations to Linux Mint Debian Edition (LMDE) 7.
The post How to Upgrade LMDE 6 to LMDE 7 appeared first on 9to5Linux - do not reproduce this article without permission. This RSS feed is intended for readers, not scrapers.
Are you annoyed with Xiaomi phone performance or storage space? Your phone probably has at least a dozen or more unnecessary applications installed, eating away at precious resources that can also monitor your activities. Unnecessary apps, also referred to as “bloatware”, can substantially slow down your user experience by consuming battery, wasting storage, as well as compromising privacy. The good news is that most of these applications can be uninstalled safely to speed up your Xiaomi smartphone performance, extend battery, as well as recover storage space. The right method can turn your phone into a cleaner, speedier machine without affecting functionality.
Prior to deleting any applications, it’s crucial to know which applications can safely be deleted. We have a complete list of Xiaomi bloatware that can safely be uninstalled by most users.

Most of the Xiaomi devices have region-based financial apps, which users most likely don’t need.
Productivity applications or apps
The apps listed below have more efficient counterparts available in the Play Store
You can safely remove these if you don’t use Xiaomi’s translation functions
Most Xiaomi phones also have Google programs installed that you may not use:
You can safely remove these apps by referring to our complete How to Debloat Xiaomi HyperOS tutorial. The removal process needs either ADB (Android Debug Bridge) commands or specialized debloat software that doesn’t involve root access.
Important: Uninstall the default file explorer (com.mi.android.globalFileexplorer) only after you’ve got an alternate file manager to ensure that a gap in functionality does not arise.
For the most convenient method to handle system applications and access hidden capabilities, you can download our MemeOS Enhancer application from the Play Store. This tool not only assists in deleting bloatware but also allows access to hidden Xiaomi settings, system application updates, as well as screen update management.

The GNOME project has removed the 32-bit compatibility extension from its Flatpak Runtime with the release of GNOME 49, ending a long-running path for legacy 32-bit support. The org.gnome.Platform.i386.Compat extension is no longer published, leaving the runtime available only for x86_64 and AArch64. The dropped component provided a 32-bit environment used mainly by Wine and […]
The post GNOME 49 Officially Drops 32-bit Support from Flatpak Runtime appeared first on UbuntuPIT.
The latest Box64 0.3.8 release focuses squarely on performance and compatibility. The headline feature, DynaCache, introduces a disk-based cache for native code generation that dramatically cuts program load times and reduces runtime hiccups—especially noticeable in titles like Factorio on Linux. Version 0.3.8 marks a notable technical step for Box64’s dynamic recompilation engine. The newly added […]
The post Box64 0.3.8 Brings DynaCache and Faster Game Loading on Linux appeared first on UbuntuPIT.
Linus Torvalds has tagged and released Linux 6.18-rc1, the first test build of the upcoming kernel. After two weeks of merges, Torvalds described this cycle as an ordinary, smooth window with no serious issues. In his release note, Torvalds called the 6.18 merge window “one of the good merge windows,” saying he did not need […]
The post Linus Torvalds Announces Linux 6.18-rc1, Calls It “One of the Good Merge windows” appeared first on UbuntuPIT.
I think all of us are looking for very cool tools that can add modern dashboards to Proxmox and to help monitor what is going on with your Proxmox host,…
The post This Free Tool Gives Proxmox the Monitoring Dashboard It Always Needed appeared first on Virtualization Howto.

Imagine this: you’re a data engineer at a growing company that thrives on data-driven decisions. Every morning, dashboards must refresh with the latest numbers, reports need updating, and machine learning models retrain with new data.
At first, you write a few scripts, one to pull data from an API, another to clean it, and a third to load it into a warehouse. You schedule them with cron or run them manually when needed. It works fine, until it doesn’t.
As data volumes grow, scripts multiply, and dependencies become increasingly tangled. Failures start cascading, jobs run out of order, schedules break, and quick fixes pile up into fragile automation. Before long, you're maintaining a system held together by patchwork scripts and luck. That’s where data orchestration comes in.
Data orchestration coordinates multiple interdependent processes, ensuring each task runs in the correct order, at the right time, and under the right conditions. It’s the invisible conductor that keeps data pipelines flowing smoothly from extraction to transformation to loading, reliably and automatically. And among the most powerful and widely adopted orchestration tools is Apache Airflow.
In this tutorial, we’ll use Airflow as our case study to explore how workflow orchestration works in practice. You’ll learn what orchestration means, why it matters, and how Airflow’s architecture, with its DAGs, tasks, operators, scheduler, and new event-driven features- brings order to complex data systems.
By the end, you’ll understand not just how Airflow orchestrates workflows, but why orchestration itself is the cornerstone of every scalable, reliable, and automated data engineering ecosystem.
Modern data pipelines involve multiple interconnected stages, data extraction, transformation, loading, and often downstream analytics or machine learning. Each stage depends on the successful completion of the previous one, forming a chain that must execute in the correct order and at the right time.
Many data engineers start by managing these workflows with scripts or cron jobs. But as systems grow, dependencies multiply, and processes become more complex, this manual approach quickly breaks down:
Workflow orchestration solves these challenges by automating, coordinating, and monitoring interdependent tasks. It ensures each step runs in the right sequence, at the right time, and under the right conditions, bringing structure, reliability, and transparency to data operations.
With orchestration, a loose collection of scripts becomes a cohesive system that can be observed, retried, and scaled, freeing engineers to focus on building insights rather than fixing failures.
Apache Airflow uses these principles and extends them with modern capabilities such as:
While Airflow is not a real-time streaming engine, it excels at orchestrating batch and scheduled workflows with reliability, observability, and control. Trusted by organizations like Airbnb, Meta, and NASA, it remains the industry standard for automating and scaling complex data workflows.
Next, we’ll explore Airflow’s core concepts, DAGs, tasks, operators, and the scheduler, to see orchestration in action.
To understand how Airflow orchestrates workflows, let’s explore its foundational components, the DAG, tasks, scheduler, executor, triggerer, and metadata database.
Together, these components coordinate how data flows from extraction to transformation, model training, and loading results in a seamless, automated pipeline.
We’ll use a simple ETL (Extract → Transform → Load) data workflow as our running example. Each day, Airflow will:
This process will help us connect each concept to a real-world orchestration scenario.
A DAG is the blueprint of your workflow. It defines what tasks exist and in what order they should run.
Think of it as the pipeline skeleton that connects your data extraction, transformation, and loading steps:
collect_data → transform_data → upload_resultsDAGs can be triggered by time (e.g., daily schedules) or events, such as when a new dataset or asset becomes available.
from airflow.decorators import dag
from datetime import datetime

@dag(
    dag_id="daily_ml_pipeline",
    schedule="@daily",
    start_date=datetime(2025, 10, 7),
    catchup=False,
)
def pipeline():
    pass
The @dag line is a decorator, a Python feature that lets you add behavior or metadata to functions in a clean, readable way. In this case, it turns the pipeline() function into a fully functional Airflow DAG.
The DAG defines when and in what order your workflow runs, but the individual tasks define how each step actually happens.
If you want to learn more about Python decorators, check out our lesson on Buidling a Pipeline Class to see them in action.
A task is the smallest unit of work in Airflow, a single, well-defined action, like fetching data, cleaning it, or training a model.
If the DAG defines the structure, tasks define the actions that bring it to life.
Using the TaskFlow API, you can turn any Python function into a task with the @task decorator:
from airflow.decorators import task

@task
def collect_data():
    print("Collecting event data...")
    return "raw_events.csv"

@task
def transform_data(file):
    print(f"Transforming {file}")
    return "clean_data.csv"

@task
def upload_to_s3(file):
    print(f"Uploading {file} to S3...")
Tasks can be linked simply by calling them in sequence:
upload_to_s3(transform_data(collect_data()))Airflow automatically constructs the DAG relationships, ensuring that each step runs only after its dependency completes successfully.
In earlier Airflow versions, you defined each task using explicit operators, for example, a PythonOperator or BashOperator , to tell Airflow how to execute the logic.
Airflow simplifies this with the TaskFlow API, eliminating boilerplate while maintaining backward compatibility.
# Old style (Airflow 1 & 2)
from airflow.operators.python import PythonOperator

task_transform = PythonOperator(
    task_id="transform_data",
    python_callable=transform_data
)
With the TaskFlow API, you no longer need to create operators manually. Each @task function automatically becomes an operator-backed task.
# Airflow 3
@task
def transform_data():
    ...
Under the hood, Airflow still uses operators as the execution engine, but you no longer need to create them manually. The result is cleaner, more Pythonic workflows.
Modern data workflows often need to process multiple files, users, or datasets in parallel.
Dynamic task mapping allows Airflow to create task instances at runtime based on data inputs, perfect for scaling transformations.
@task
def get_files():
    return ["file1.csv", "file2.csv", "file3.csv"]

@task
def transform_file(file):
    print(f"Transforming {file}")

transform_file.expand(file=get_files())
Airflow will automatically create and run a separate transform_file task for each file, enabling efficient, parallel execution.
The scheduler decides when tasks run, either on a fixed schedule or in response to updates in data assets.
The triggerer, on the other hand, handles event-based execution behind the scenes, using asynchronous I/O to efficiently wait for external signals like file arrivals or API responses.
from airflow.assets import Asset
events_asset = Asset("s3://data/events.csv")

@dag(
    dag_id="event_driven_pipeline",
    schedule=[events_asset],  # Triggered automatically when this asset is updated
    start_date=datetime(2025, 10, 7),
    catchup=False,
)
def pipeline():
    ...
In this example, the scheduler monitors the asset and triggers the DAG when new data appears.
If the DAG included deferrable operators or sensors, the triggerer would take over waiting asynchronously, ensuring Airflow handles both time-based and event-driven workflows seamlessly.
Once a task is ready to run, the executor assigns it to available workers, the machines or processes that actually execute your code.
For example, your ETL pipeline might look like this:
collect_data → transform_data → upload_resultsAirflow decides where each of these tasks runs. It can execute everything on a single machine using the LocalExecutor, or scale horizontally across multiple nodes with the CeleryExecutor or KubernetesExecutor.
Deferrable tasks further improve efficiency by freeing up workers while waiting for long external operations like API responses or file uploads.
Every action in Airflow, task success, failure, duration, or retry, is stored in the metadata database, Airflow’s internal memory.
This makes workflows reproducible, auditable, and observable.
The API server provides visibility and control:
Together, they give you complete insight into orchestration, from individual task logs to system-wide performance.
Every orchestration platform needs a way to observe, manage, and interact with workflows, and in Apache Airflow, that interface is the Airflow Web UI.
The UI is served by the Airflow API Server, which exposes a rich dashboard for visualizing DAGs, checking system health, and monitoring workflow states. Even before running any tasks, it’s useful to understand the layout and purpose of this interface, since it’s where orchestration becomes visible.
Don’t worry if this section feels too conceptual; you’ll explore the Airflow UI in greater detail during the upcoming tutorial. You can also use our Setting up Apache Airflow with Docker Locally (Part I) guide if you’d like to try it right away.
In an orchestrated system, automation alone isn’t enough, engineers need visibility.
The UI bridges that gap. It provides an interactive window into your pipelines, showing:
This visibility is essential for diagnosing failures, verifying dependencies, and ensuring the orchestration system runs smoothly.
The Airflow UI opens to a dashboard like the one shown below:
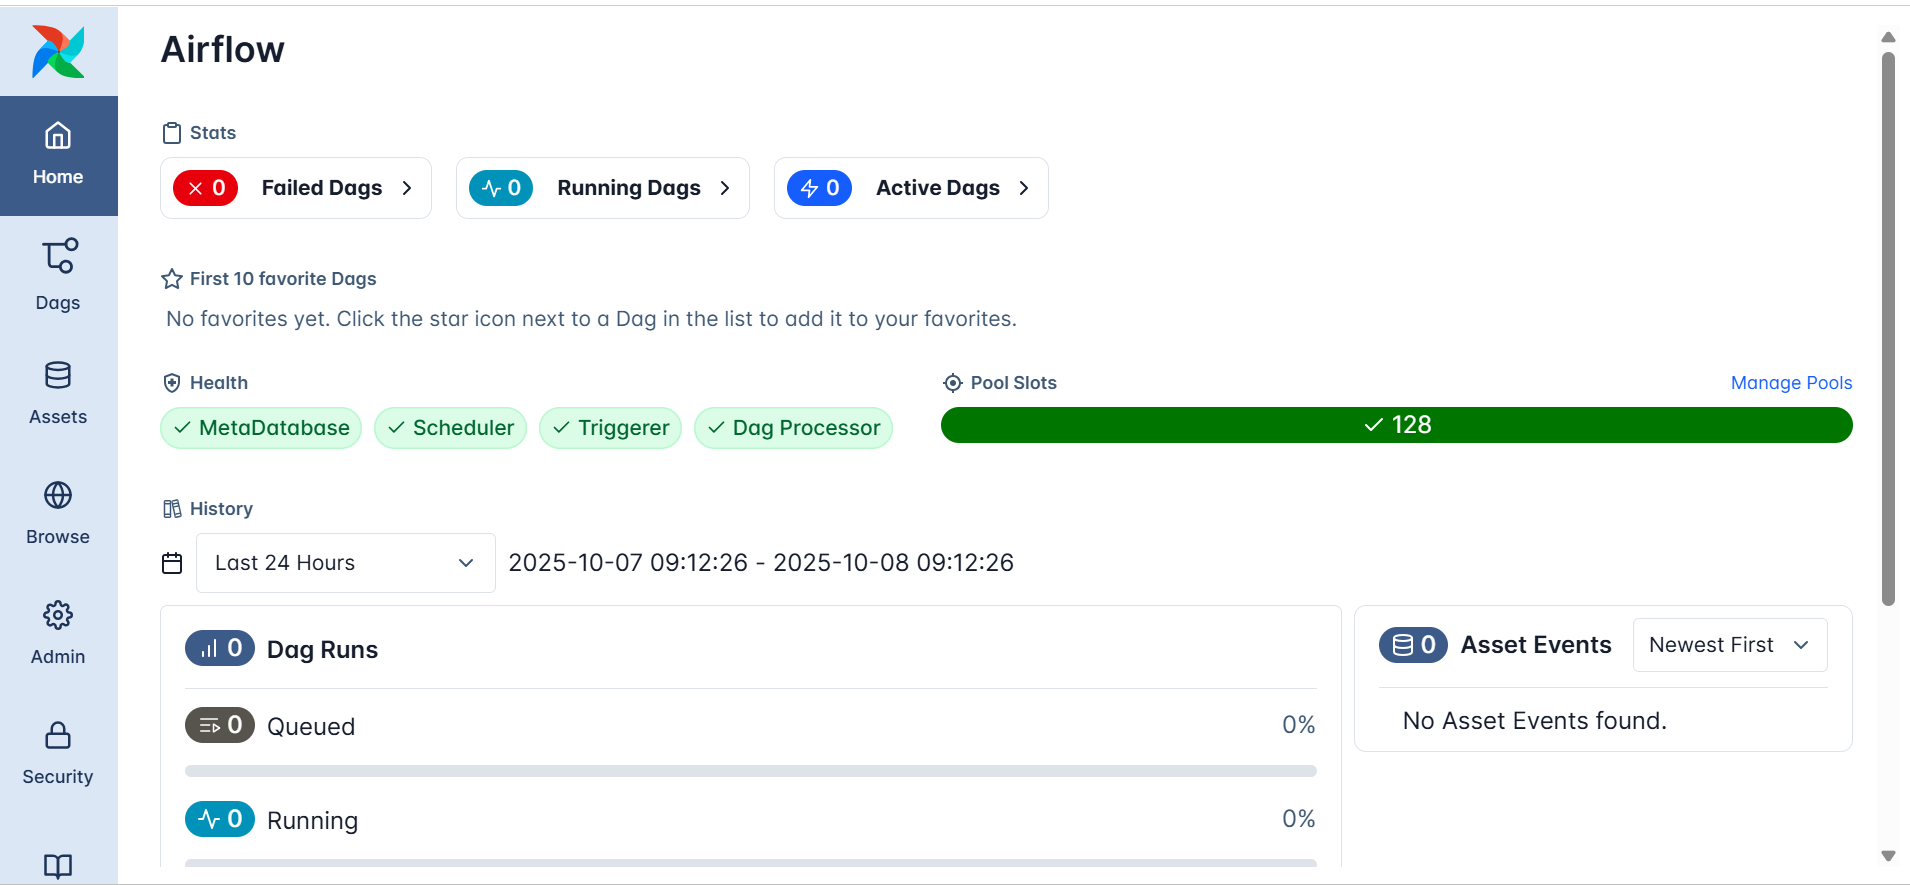
At a glance, you can see:
These checks reflect the orchestration backbone at work, even if no DAGs have been created yet.
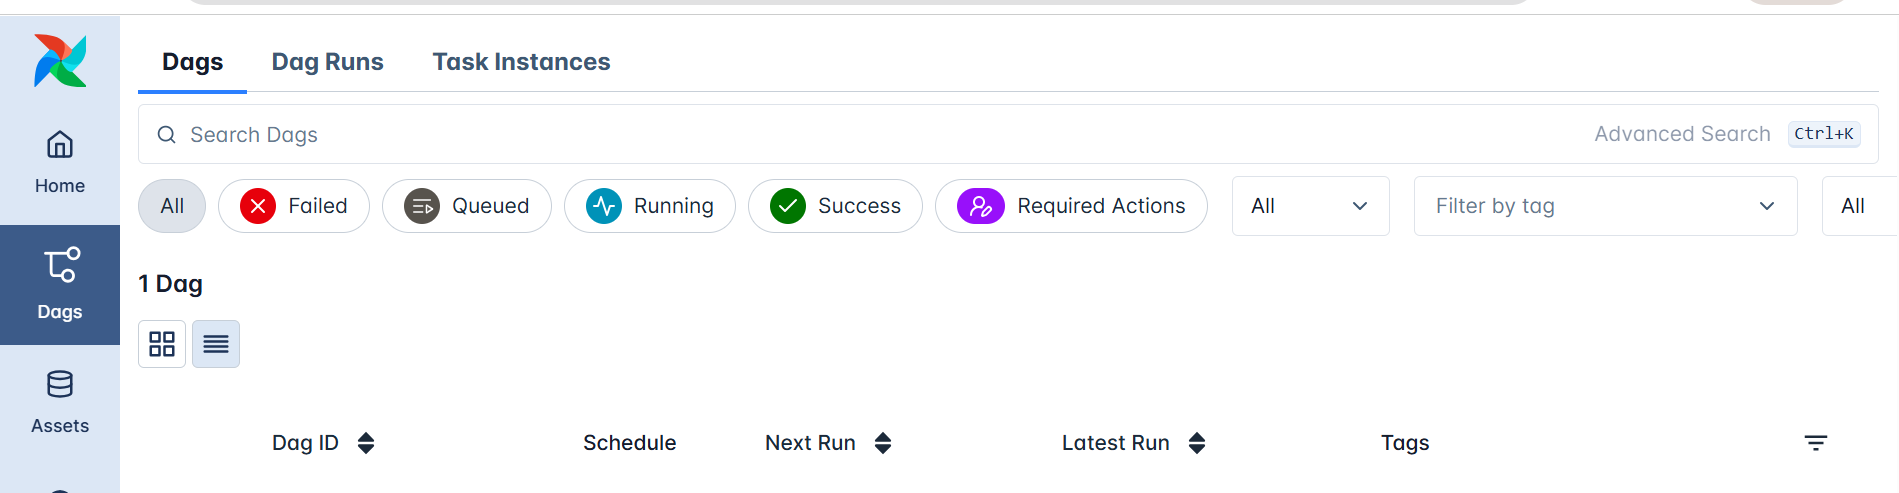
In the left sidebar, the DAGs section lists all workflow definitions known to Airflow.
This doesn’t require you to run anything; it’s simply where Airflow displays every DAG it has parsed from the dags/ directory.
Each DAG entry includes:
When workflows are defined, you’ll be able to explore their structure visually through:
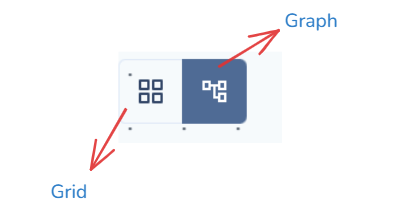
These views make orchestration transparent, every dependency, sequence, and outcome is visible at a glance.
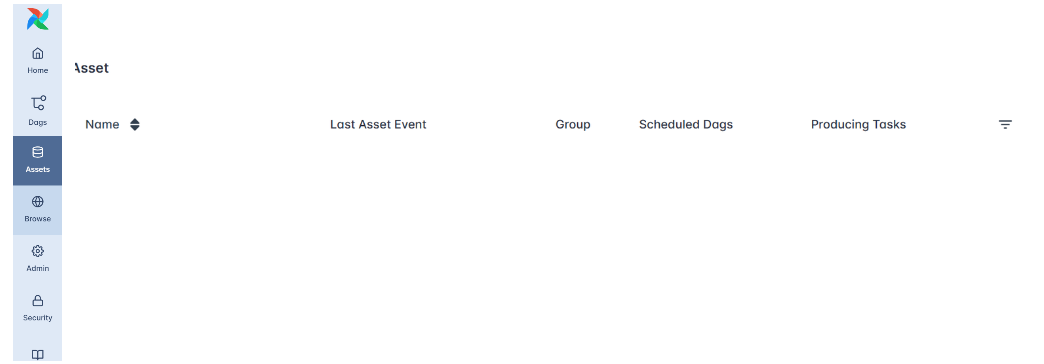
In the sidebar, the Assets and Browse sections provide tools for exploring the internal components of your orchestration environment.
Assets list all registered items, such as datasets, data tables, or connections that Airflow tracks or interacts with during workflow execution. It helps you see the resources your DAGs depend on. (Remember: in Airflow 3.x, “Datasets” were renamed to “Assets.”)
Browse allows you to inspect historical data within Airflow, including past DAG runs, task instances, logs, and job details. This section is useful for auditing and debugging since it reveals how workflows behaved over time.
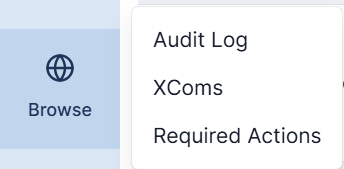
Together, these sections let you explore both data assets and orchestration history, offering transparency into what Airflow manages and how your workflows evolve.
The Admin section provides the configuration tools that control Airflow’s orchestration environment.
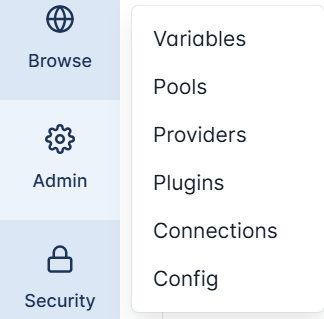
Here, administrators can manage the system’s internal settings and integrations:
This section essentially controls how Airflow connects, scales, and extends itself, making it central to managing orchestration behavior in both local and production setups.
The Security section governs authentication and authorization within Airflow’s web interface.
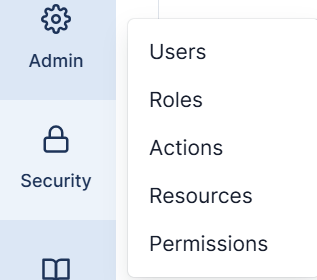
It allows administrators to manage users, assign roles, and define permissions that determine who can access or modify specific parts of the system.
Within this menu:
Strong security settings ensure that orchestration remains safe, auditable, and compliant, particularly in shared or enterprise environments.
At the bottom of the sidebar, Airflow provides quick links under the Documentation section.
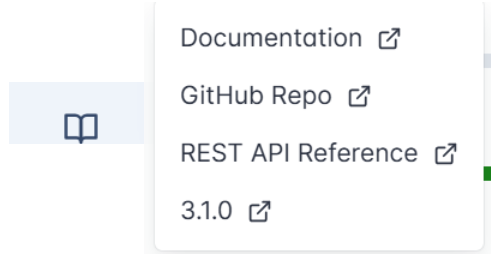
This includes direct access to:
These links make it easy for users to explore Airflow’s architecture, extend its features, or troubleshoot issues, right from within the interface.

Many data engineers start automation with cron, the classic Unix schedulersimple, reliable, and perfect for a single recurring script.
But as soon as workflows involve multiple dependent steps, data triggers, or retry, logic, cron’s simplicity turns into fragility.
Apache Airflow moves beyond time-based scheduling into workflow orchestration, managing dependencies, scaling dynamically, and responding to data-driven events, all through native Python.
Cron schedules jobs strictly by time:
# Run a data cleaning script every midnight
0 0 * * * /usr/local/bin/clean_data.sh
That works fine for one job, but it breaks down when you need to coordinate a chain like:
extract → transform → train → uploadCron can’t ensure that step two waits for step one, or that retries occur automatically if a task fails.
In Airflow, you express this entire logic natively in Python using the TaskFlow API:
from airflow.decorators import dag, task
from datetime import datetime

@dag(schedule="@daily", start_date=datetime(2025,10,7), catchup=False)
def etl_pipeline():
    @task def extract(): ...
    @task def transform(data): ...
    @task def load(data): ...
    load(transform(extract()))
Here, tasks are functions, dependencies are inferred from function calls, and Airflow handles execution, retries, and state tracking automatically.
It’s the difference between telling the system when to run and teaching it how your workflow fits together.
Where cron runs in the background, Airflow makes orchestration observable and intelligent.
Its Web UI and API provide transparency, showing task states, logs, dependencies, and retry attempts in real time.
Failures trigger automatic retries, and missed runs can be easily backfilled to maintain data continuity.
Airflow also introduces data-aware scheduling: workflows can now run automatically when a dataset or asset updates, not just on a clock.
from airflow.assets import Asset
sales_data = Asset("s3://data/sales.csv")

@dag(schedule=[sales_data], start_date=datetime(2025,10,7))
def refresh_dashboard():
    ...
This makes orchestration responsive, pipelines react to new data as it arrives, keeping dashboards and downstream models always fresh.
Cron is a timer.
Airflow is an orchestrator, coordinating complex, event-driven, and scalable data systems.
It brings structure, visibility, and resilience to automation, ensuring that each task runs in the right order, with the right data, and for the right reason.
That’s the leap from scheduling to orchestration, and why Airflow is much more than cron with an interface.
Workflow orchestration underpins nearly every data-driven system, from nightly ETL jobs to continuous model retraining.
Because Airflow couples time-based scheduling with dataset awareness and dynamic task mapping, it adapts easily to many workloads.
Below are the most common production-grade scenarios ,all achievable through the TaskFlow API and Airflow’s modular architecture.
ETL (Extract, Transform, Load) remains Airflow’s core use case.
Airflow lets you express a complete ETL pipeline declaratively, with each step defined as a Python @task.
from airflow.decorators import dag, task
from datetime import datetime

@dag(schedule="@daily", start_date=datetime(2025,10,7), catchup=False)
def daily_sales_etl():

    @task
    def extract_sales():
        print("Pulling daily sales from API…")
        return ["sales_us.csv", "sales_uk.csv"]

    @task
    def transform_file(file):
        print(f"Cleaning and aggregating {file}")
        return f"clean_{file}"

    @task
    def load_to_warehouse(files):
        print(f"Loading {len(files)} cleaned files to BigQuery")

    # Dynamic Task Mapping: one transform per file
    cleaned = transform_file.expand(file=extract_sales())
    load_to_warehouse(cleaned)

daily_sales_etl()
Because each transformation task is created dynamically at runtime, the pipeline scales automatically as data sources grow.
When paired with datasets or assets, ETL DAGs can trigger immediately when new data arrives, ensuring freshness without manual scheduling.
Airflow is ideal for orchestrating end-to-end ML lifecycles, data prep, training, evaluation, and deployment.
@dag(schedule="@weekly", start_date=datetime(2025,10,7))
def ml_training_pipeline():

    @task
    def prepare_data():
        return ["us_dataset.csv", "eu_dataset.csv"]

    @task
    def train_model(dataset):
        print(f"Training model on {dataset}")
        return f"model_{dataset}.pkl"

    @task
    def evaluate_models(models):
        print(f"Evaluating {len(models)} models and pushing metrics")

    # Fan-out training jobs
    models = train_model.expand(dataset=prepare_data())
    evaluate_models(models)

ml_training_pipeline()
Dynamic Task Mapping enables fan-out parallel training across datasets, regions, or hyper-parameters, a common pattern in large-scale ML systems.
Airflow’s deferrable sensors can pause training until external data or signals are ready, conserving compute resources.
Analytics teams rely on Airflow to refresh dashboards and reports automatically.
Airflow can combine time-based and dataset-triggered scheduling so that dashboards always use the latest processed data.
from airflow import Dataset

summary_dataset = Dataset("s3://data/summary_table.csv")

@dag(schedule=[summary_dataset], start_date=datetime(2025,10,7))
def analytics_refresh():

    @task
    def update_powerbi():
        print("Refreshing Power BI dashboard…")

    @task
    def send_report():
        print("Emailing daily analytics summary")

    update_powerbi() >> send_report()
Whenever the summary dataset updates, this DAG runs immediately; no need to wait for a timed window.
That ensures dashboards remain accurate and auditable.
Trusting your data is as important as moving it.
Airflow lets you automate quality checks and validations before promoting data downstream.
@task
def validate_row_counts():
    print("Comparing source and target row counts…")

@task
def check_schema():
    print("Ensuring schema consistency…")

validate_row_counts() >> check_schema()
These validations can be embedded directly into the main ETL DAG, creating self-monitoring pipelines that prevent bad data from spreading.
Beyond data, Airflow orchestrates operational workflows such as backups, migrations, or cluster scaling.
With the Task SDK and provider integrations, you can automate infrastructure the same way you orchestrate data:
@dag(schedule="@daily", start_date=datetime(2025,10,7))
def infra_maintenance():

    @task
    def backup_database():
        print("Triggering RDS snapshot…")

    @task
    def cleanup_old_files():
        print("Deleting expired objects from S3…")

    backup_database() >> cleanup_old_files()
Airflow turns these system processes into auditable, repeatable, and observable jobs, blending DevOps automation with data-engineering orchestration.
With Airflow, orchestration goes beyond timing, it becomes data-aware, event-driven, and infinitely scalable, empowering teams to automate everything from raw data ingestion to production-ready analytics.
In this tutorial, you explored the foundations of workflow orchestration and how Apache Airflow modernizes data automation through a modular, Pythonic, and data-aware architecture. You learned how Airflow structures workflows using DAGs and the TaskFlow API, scales effortlessly through Dynamic Task Mapping, and responds intelligently to data and events using deferrable tasks and the triggerer.
You also saw how its scheduler, executor, and web UI work together to ensure observability, resilience, and scalability far beyond what traditional schedulers like cron can offer.
In the next tutorial, you’ll bring these concepts to life by installing and running Airflow with Docker, setting up a complete environment where all core services, the apiserver, scheduler, metadata database, triggerer, and workers, operate in harmony.
From there, you’ll create and monitor your first DAG using the TaskFlow API, define dependencies and schedules, and securely manage connections and secrets.
Explore the official Airflow documentation to deepen your understanding of new features and APIs, and prepare your Docker environment for the next tutorial.
Then, apply what you’ve learned to start orchestrating real-world data workflows efficiently, reliably, and at scale.
![]()
Qt applications (e.g, qBittorrent, KeePassXC) look weird as they don’t have window border or shadow in Ubuntu since 24.04. Here’s how to configure to make them look native.
Applications in Ubuntu and other popular Linux distributions mostly use GTK or Qt tool-kits for rendering their user interfaces. Gnome is based on GTK. It uses “xcb” QPA plugin for Qt apps running on classic Xorg session.
Due to switch to Wayland, the “xcb” plugin is not in use by default, and Qt apps look weird as you see in the screenshot below in Ubuntu 24.04, Ubuntu 25.04 & 25.10.
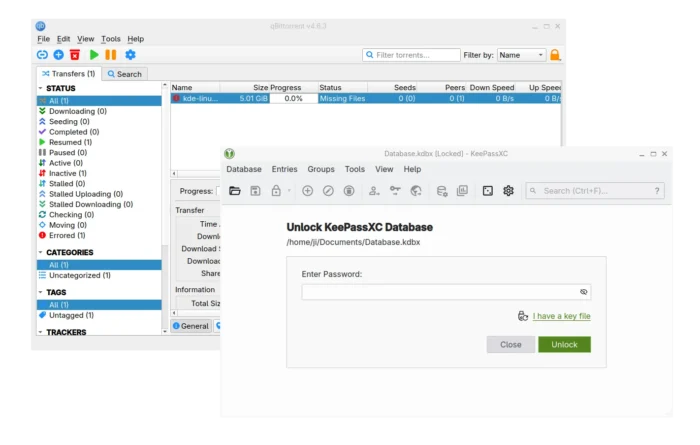
Qt apps look border-less in Ubuntu since 24.04
To “fix” the issue, I found few choices:
While there are also Qt5/6 configuration tool and Kvantum available for configuring Qt theme, icon, font, color, and more.
Most Qt applications (both Qt5 and Qt6) are still working good with “xcb” QPA plugin even in Wayland session.
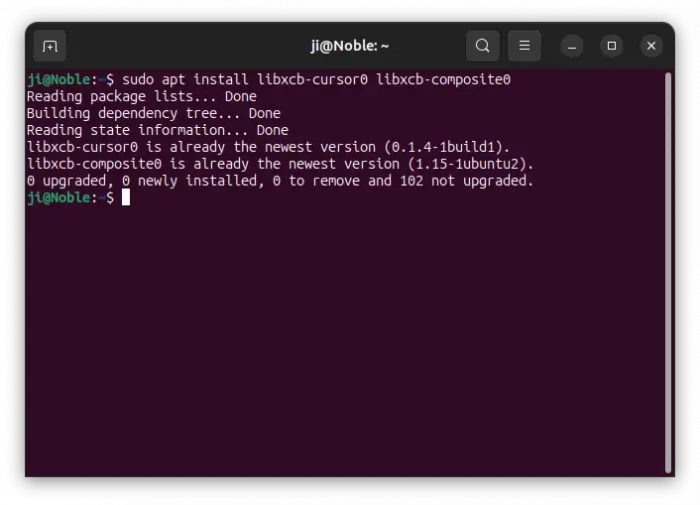
1. First, press Ctrl+Alt+T on keyboard to open window. When it opens, run command to install the required libraries:
sudo apt install libxcb-cursor0 libxcb-composite0
Run sudo apt update to refresh cache in case it’s unable to locate the packages.
2. After that, run the command below in terminal to set the environment variable:
export QT_QPA_PLATFORM=xcb
Then, all Qt apps start from that terminal window will try using “xcb” plugin. For example, run keepassxc to start the Qt-based password manager.
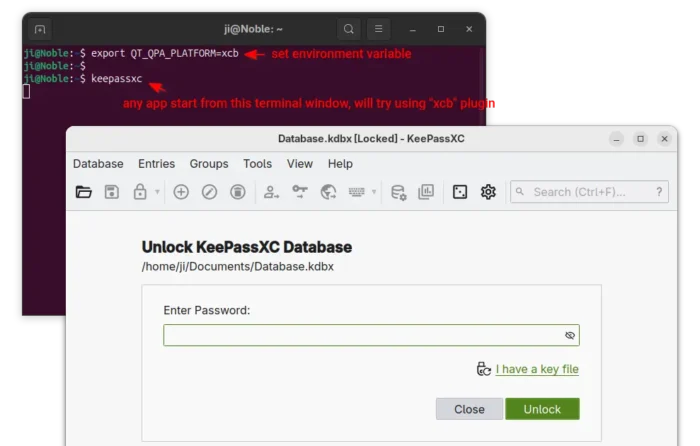
enable ‘xcb’ for apps start from this terminal only
3. If it works for you, then open Files (aka Nautilus), and press Ctrl+H to show all hidden files. Find out .profile file in home directory and click edit it.
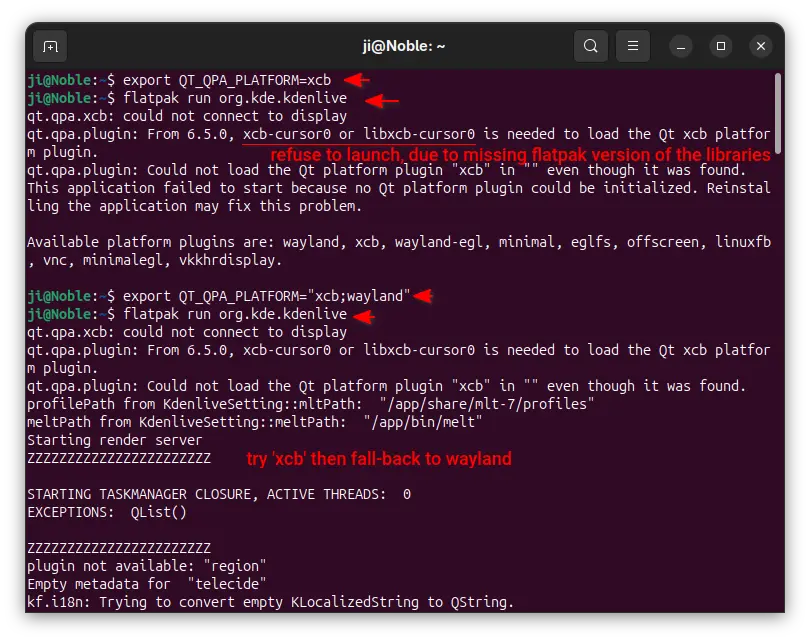
Finally, add export QT_QPA_PLATFORM=”xcb;wayland” in the end of file to make it work for all Qt applications permanently! And, log out and back in to apply.
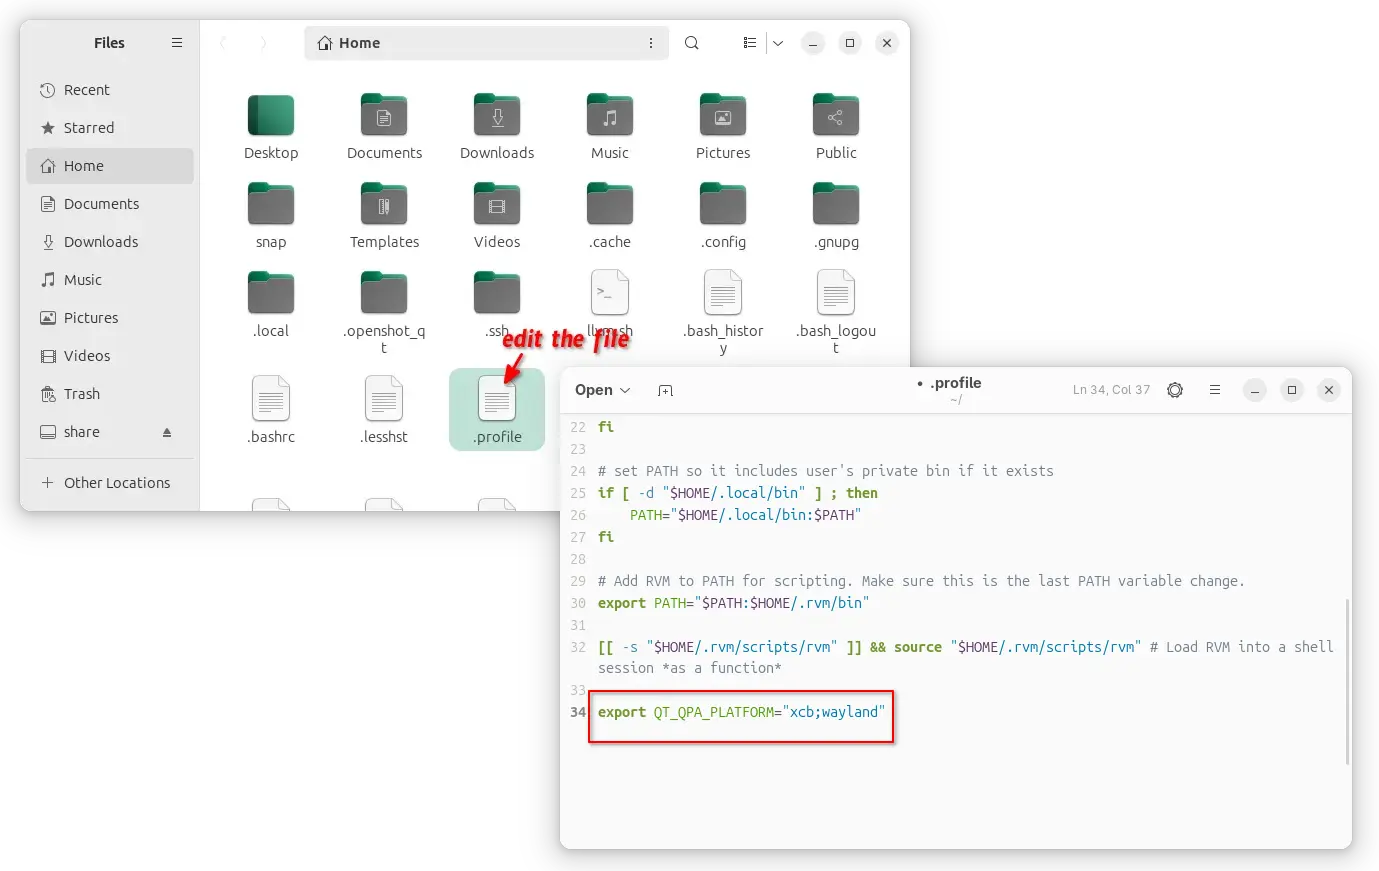
enable xcb for all Qt apps, though current user only
NOTE: It must be set to “xcb;wayland“, to allow fall-back to default wayland, when ‘xcb’ does not work. For example, Qt apps installed as Flatpak may not work with ‘xcb’ plugin and output the error below:
qt.qpa.xcb: could not connect to display
qt.qpa.plugin: From 6.5.0, xcb-cursor0 or libxcb-cursor0 is needed to load the Qt xcb platform plugin.
qt.qpa.plugin: Could not load the Qt platform plugin “xcb” in “” even though it was found.
While xcb is designed for Xorg, FedoraQt team has developed few Qt plugins for better integration in GNOME. They are “QGnomePlatform” theme, “adwaita-qt” style, and “QAdwaitaDecorations”.
Downsides: The Qt window title-bar made by QGnomePlatform looks NOT so good. FedoraQt has discontinued the project. And, Ubuntu 24.04 only includes Qt5 version of the package.
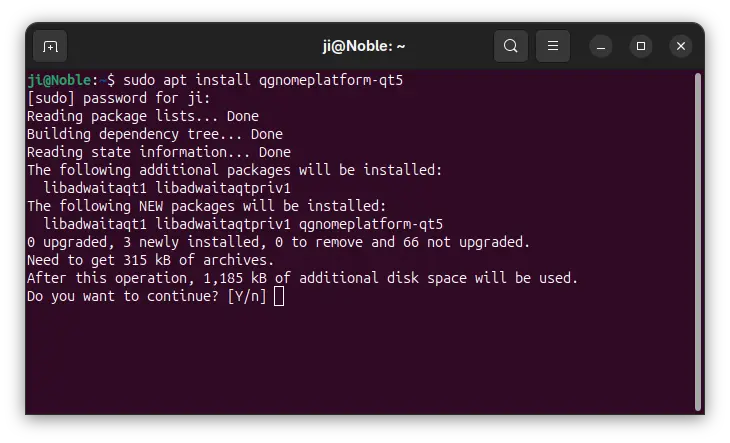
1. To install the Qt platform theme, open terminal (Ctrl+Alt+T) and run command:
sudo apt install qgnomeplatform-qt5
Ubuntu 25.04, 25.10 may also install qgnomeplatform-qt6 for Qt6 support.
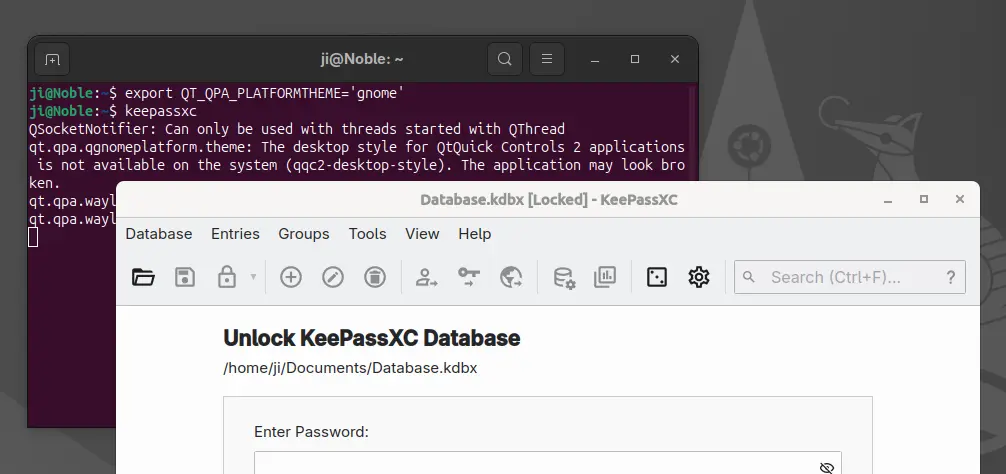
2. Next, either run the command below to set environment:
export QT_QPA_PLATFORMTHEME='gnome'
Then, start Qt apps from the same terminal window to use the Qt platform theme.
Or, edit .profile file in home directory and add export QT_QPA_PLATFORMTHEME='gnome' to make it work permanently for all Qt apps (Qt5 only for 24.04) at next login.

QGnomePlatform and adwaita-qt have been discontinued (though they still work). QAdwaitaDecorations, the project that implements Adwaita-like client-side decorations, is so far the only upstream project that’s still in development.
However, it’s NOT made into Debian/Ubuntu repositories so far. Meaning you need to build it by yourself. And, it does not support Qt6 app for Ubuntu 24.04, as it requires Qt6 >= 6.5.0 (24.04 has 6.4.2).
This option is good choice for Ubuntu 25.10, to enable Qt5 window decorations, while Qt6 decorations work out-of-the-box.
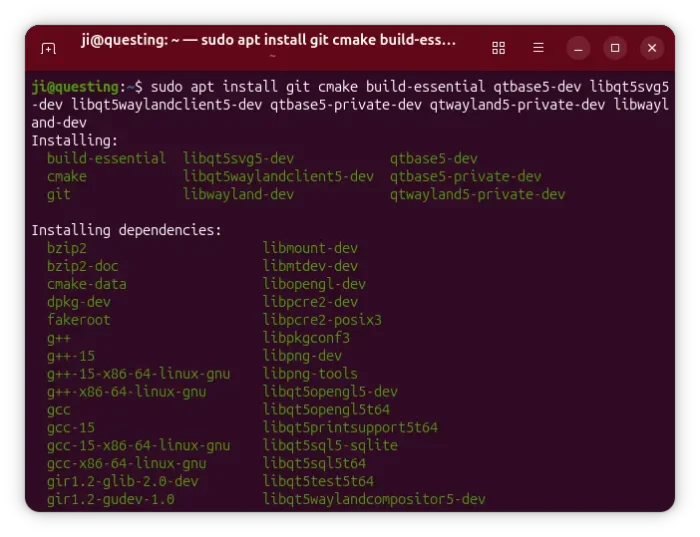
1. First, open terminal (Ctrl+Alt+T) and run command to install dependency libraries:
sudo apt install git cmake build-essential qtbase5-dev libqt5svg5-dev libqt5waylandclient5-dev qtbase5-private-dev qtwayland5-private-dev libwayland-dev
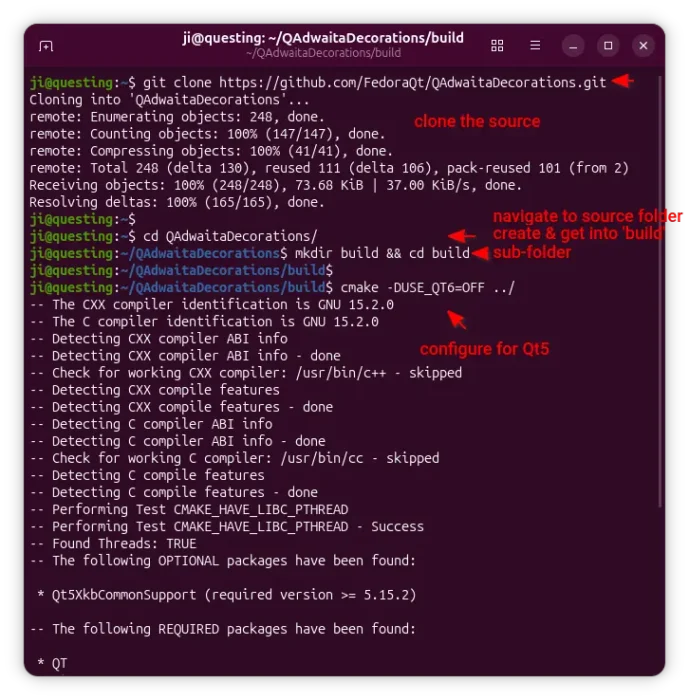
2. Then, run command to grab the source code:
git clone https://github.com/FedoraQt/QAdwaitaDecorations.git
After that, navigate to the source folder, create ‘build’ sub-folder and navigate into it:
cd QAdwaitaDecorations
mkdir build && cd build
Next, configure the source for Qt5:
cmake -DUSE_QT6=OFF ../
Ubuntu 24.04 does NOT meet Qt6 requirement, and Qt6 window decoration in 25.10 looks good out-of-the-box, so here I only build it for Qt5.
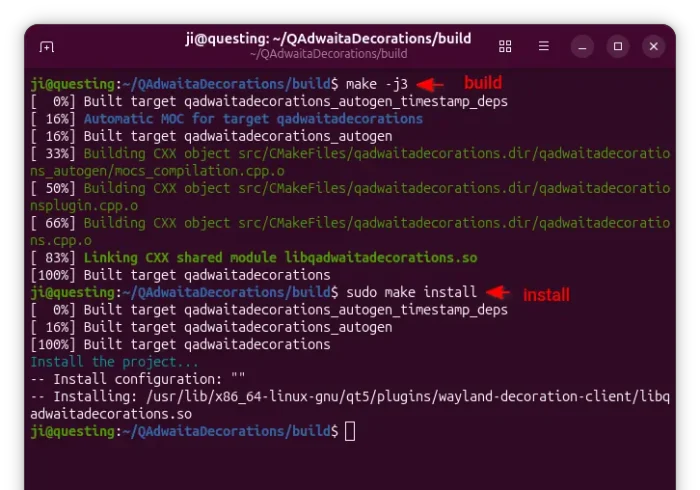
3. Finally, build & install the plugin by running the 2 commands below one by one:
make -j3
sudo make install
Here -j3 tells to start 3 threads in parallel. Depends on how many CPU cores you have, you may replace it with -j4, -j8, or j$(nproc) to use all CPU cores.
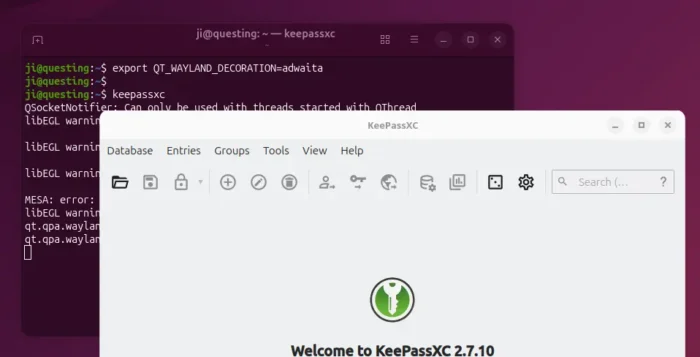
4. After successfully built the plugin, clean up by deleting the source folder. Then, either run the command below to set environment variable:
export QT_WAYLAND_DECORATION=adwaita
So it works for all Qt5 apps start from this terminal window.
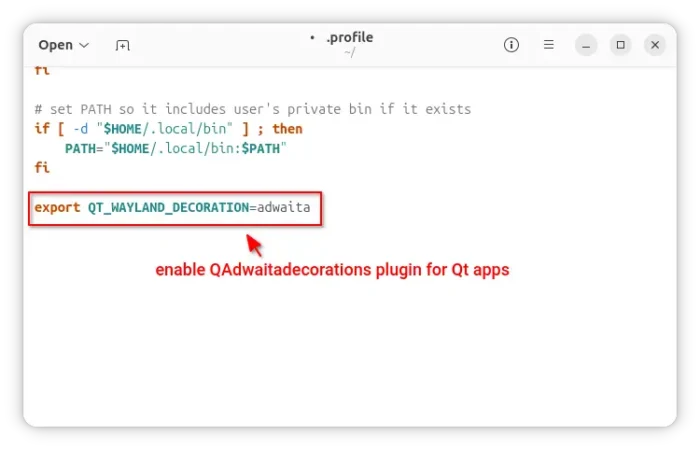
Or, edit .profile file in user home and add the line to make it work permanently for all Qt5 apps at next login.
Gnome/Adwaita style decorations is NOT enough? You may also configure the Qt apps themes, fonts, icons, and color scheme.
If you use “xcb” plugin for the decorations, then you may also use Kvantum (SVG-based theme engine) to change the Qt app themes.
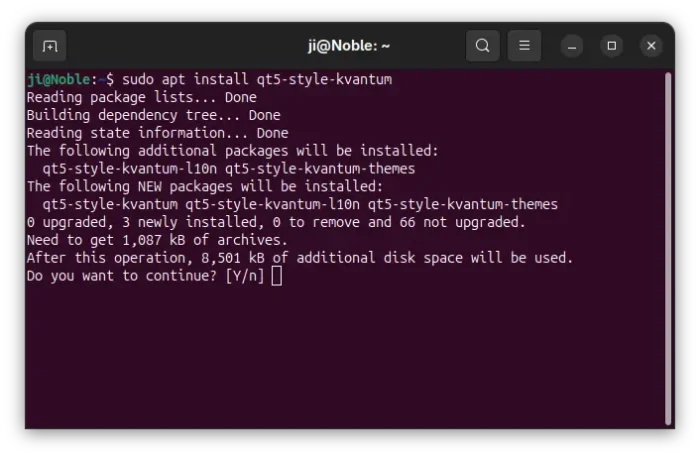
1. First, open terminal (Ctrl+Alt+T) and run command to install the package:
sudo apt install qt5-style-kvantum
Ubuntu 25.04, 25.10 users may also install qt6-style-kvantum for Qt6 apps support, however it’s NOT available in Ubuntu 24.04.
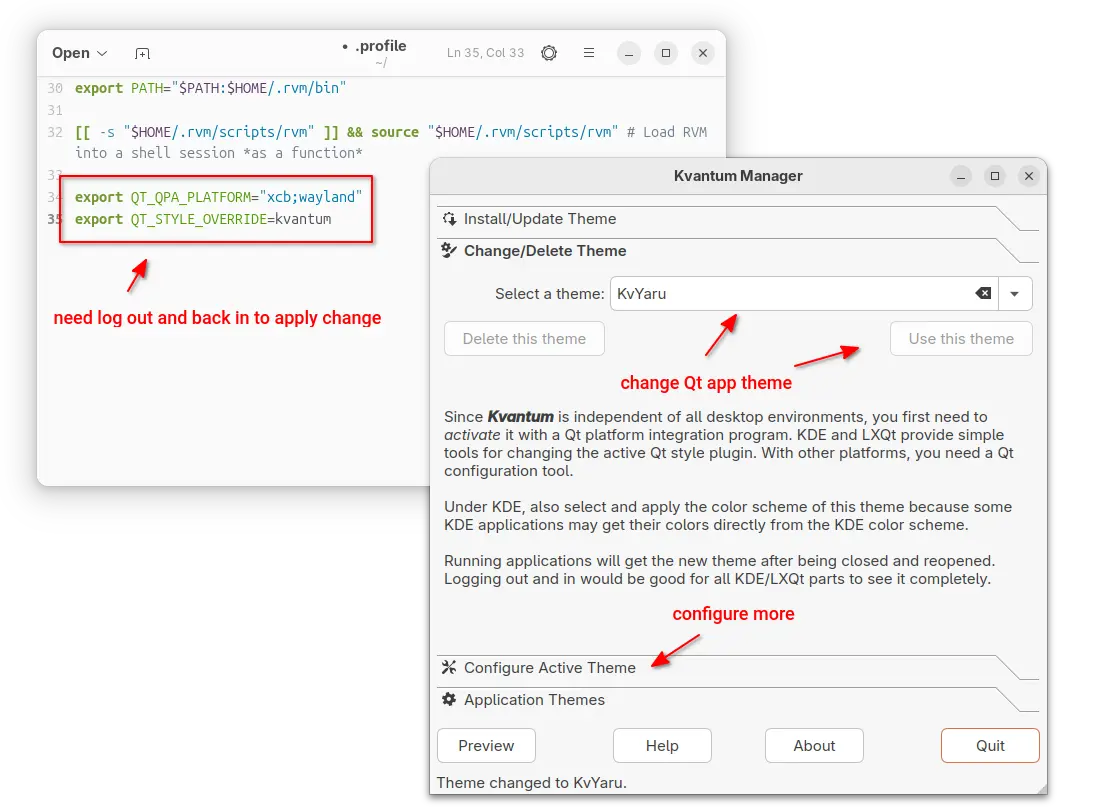
2. Next, set the following environment variables:
export QT_QPA_PLATFORM="xcb;wayland"
export QT_STYLE_OVERRIDE=kvantum
either in terminal for apps start from that terminal, or in .profile for all Qt apps (Qt5 only for 24.04).
3. Finally, launch “Kvantum Manager” to change Qt theme and configure active theme.
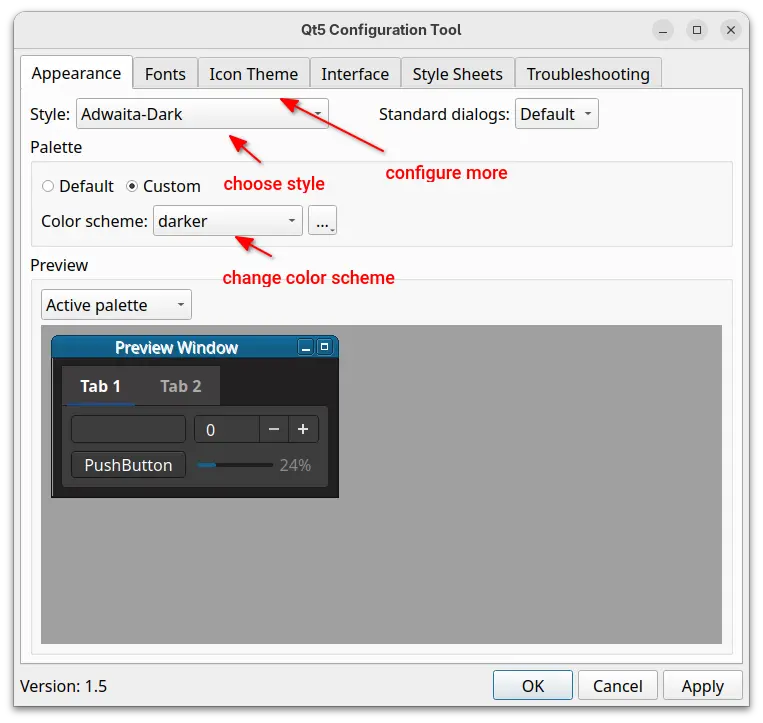
For choice, you may use Qt5 / Qt6 settings tools to configure the app window buttons, fonts, icons, and color scheme.
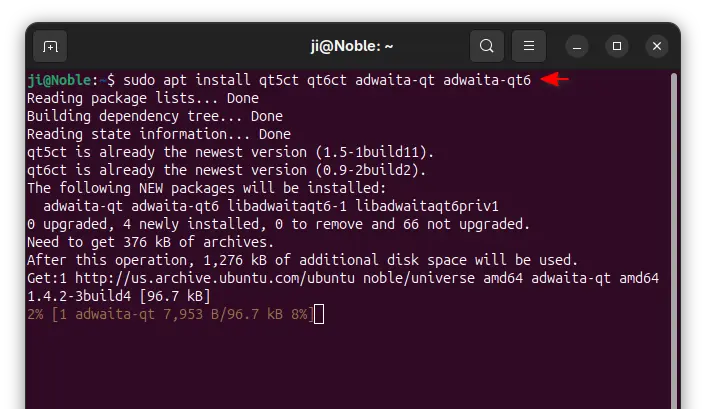
1. First, open terminal and install the settings tools, as well as adwaita-qt themes:
sudo apt install qt5ct qt6ct adwaita-qt adwaita-qt6
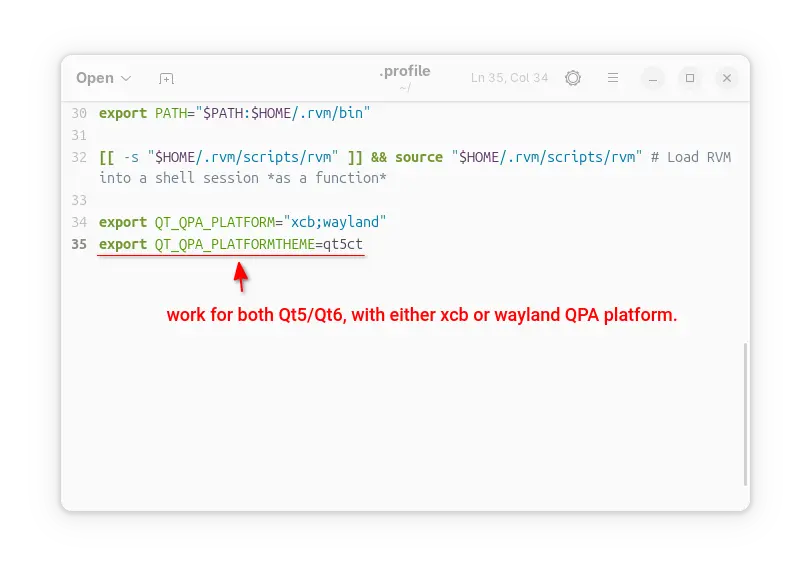
2. Next, set environment variable:
export QT_QPA_PLATFORMTHEME=qt5ct
It works for both Qt5 and Qt6 with either “xcb” or “wayland” QPA platform.
3. After set the environment (log out and back in if added to .profile), launch Qt5 Settings or Qt6 settings to configure the Qt appearances.
This tutorial shows how to “fix” border-less issue for Qt apps in Ubuntu 24.04 and higher with default GNOME, as well as change the theme, fonts, icons, and color scheme.
The “xcb” QPA platform plugin is still a good choice for 24.04 with both Qt5 and Q6 support. While, QAdwaitaDecorations is better (in my own opinion) for Qt5 in 25.10, as Qt6 decorations look good out-of-the-box.
