Normal view

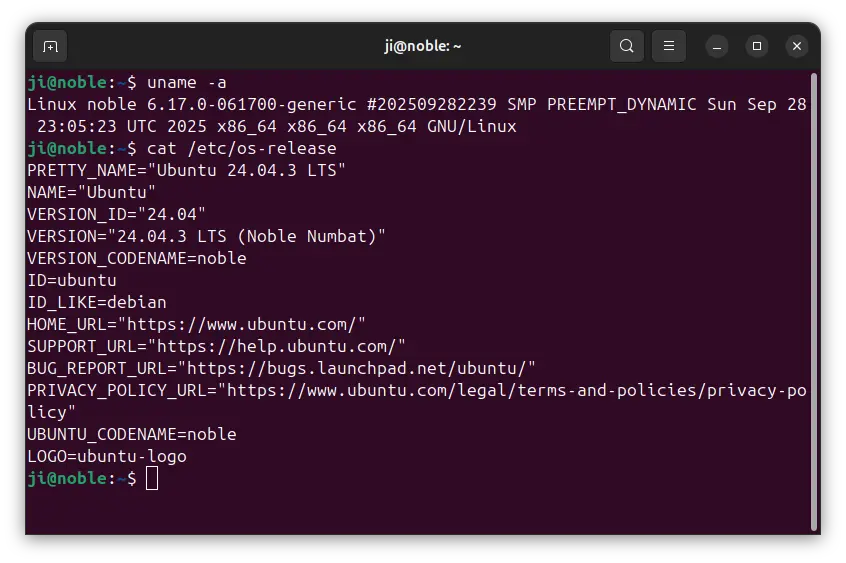
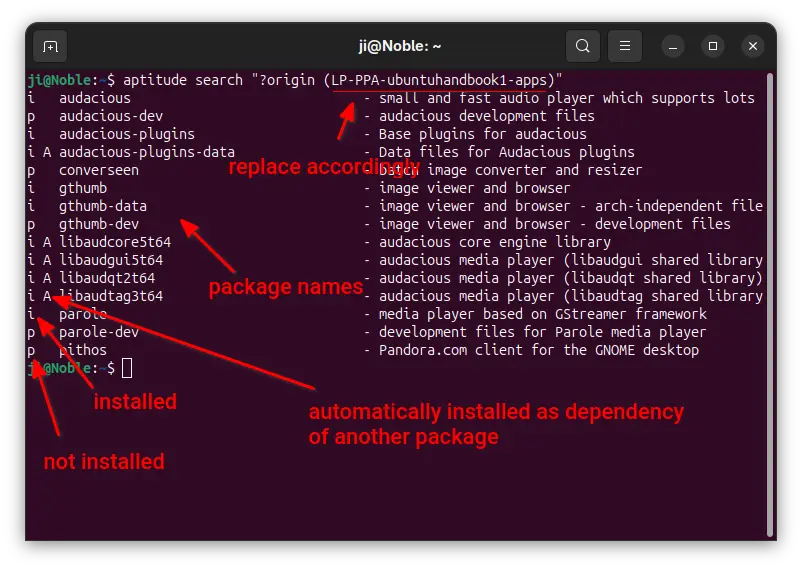
Fix Qt App Window Border & Title-bar in Ubuntu 24.04 | 25.10

By:Ji m
13 October 2025 at 16:25

Qt applications (e.g, qBittorrent, KeePassXC) look weird as they don’t have window border or shadow in Ubuntu since 24.04. Here’s how to configure to make them look native.

Applications in Ubuntu and other popular Linux distributions mostly use GTK or Qt tool-kits for rendering their user interfaces. Gnome is based on GTK. It uses “xcb” QPA plugin for Qt apps running on classic Xorg session.

Due to switch to Wayland, the “xcb” plugin is not in use by default, and Qt apps look weird as you see in the screenshot below in Ubuntu 24.04, Ubuntu 25.04 & 25.10.

Qt apps look border-less in Ubuntu since 24.04

To “fix” the issue, I found few choices:

  1. Re-use “xcb” QPA plugin.
  2. QGnomePlatform theme.
  3. QAdwaitaDecorations Qt decoration plugin.

While there are also Qt5/6 configuration tool and Kvantum available for configuring Qt theme, icon, font, color, and more.

1. “Fix” Qt window title-bar and window border

Option 1: use “xcb” QPA plugin

Most Qt applications (both Qt5 and Qt6) are still working good with “xcb” QPA plugin even in Wayland session.

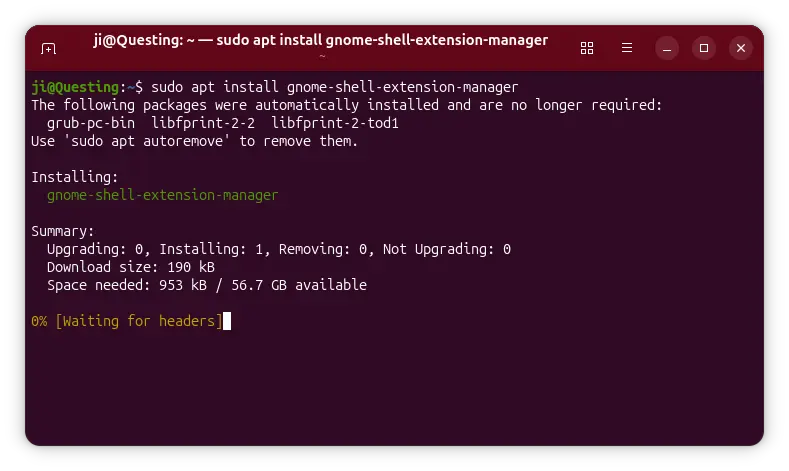
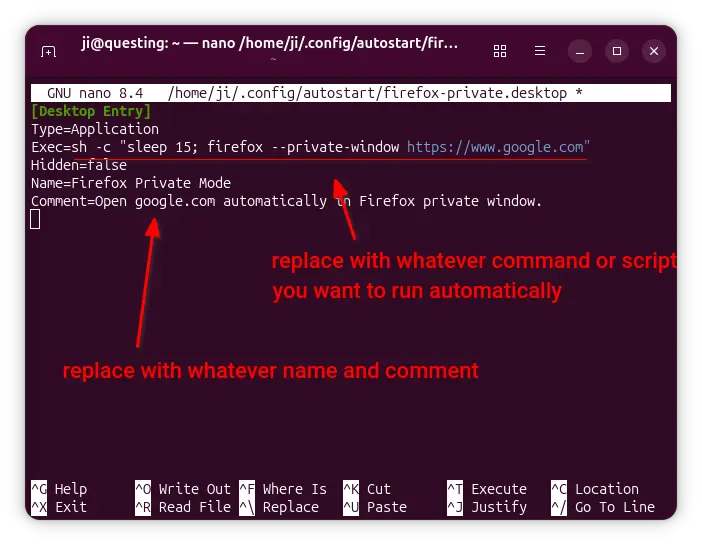
1. First, press Ctrl+Alt+T on keyboard to open window. When it opens, run command to install the required libraries:

sudo apt install libxcb-cursor0 libxcb-composite0

Run sudo apt update to refresh cache in case it’s unable to locate the packages.

2. After that, run the command below in terminal to set the environment variable:

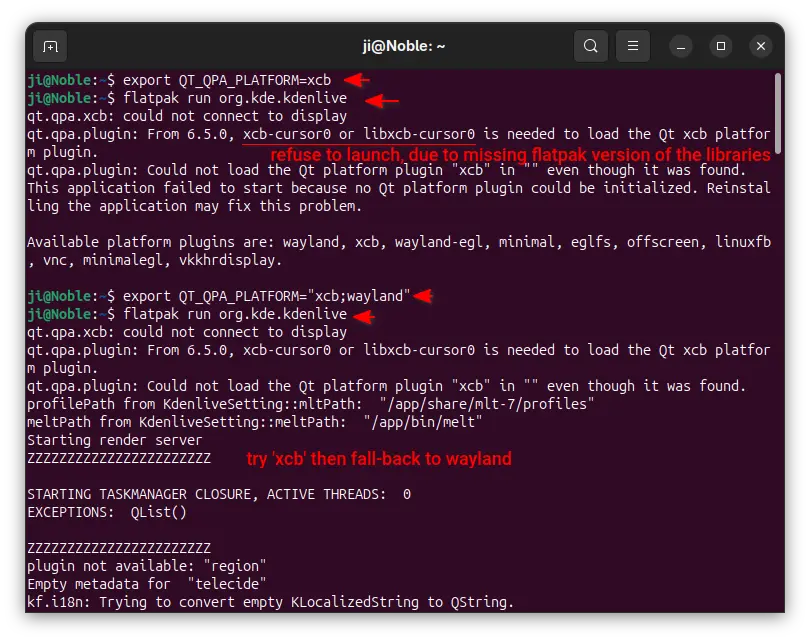
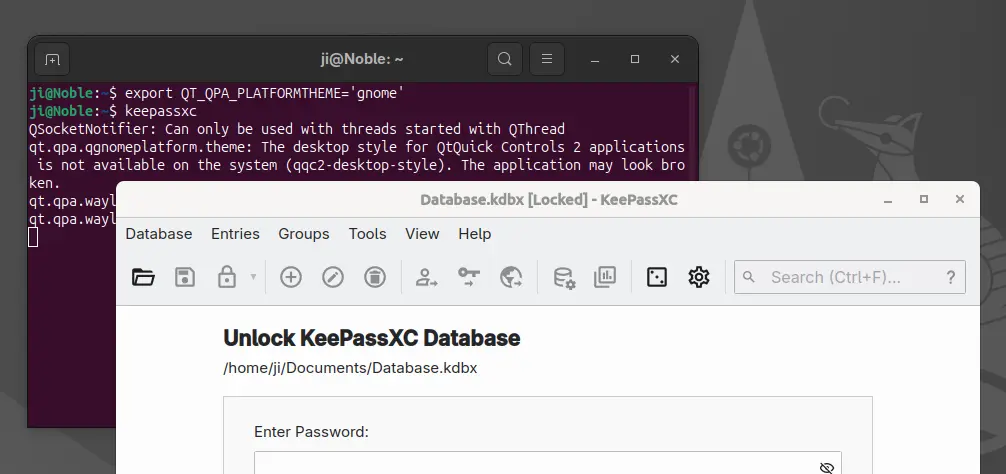
export QT_QPA_PLATFORM=xcb

Then, all Qt apps start from that terminal window will try using “xcb” plugin. For example, run keepassxc to start the Qt-based password manager.

enable ‘xcb’ for apps start from this terminal only

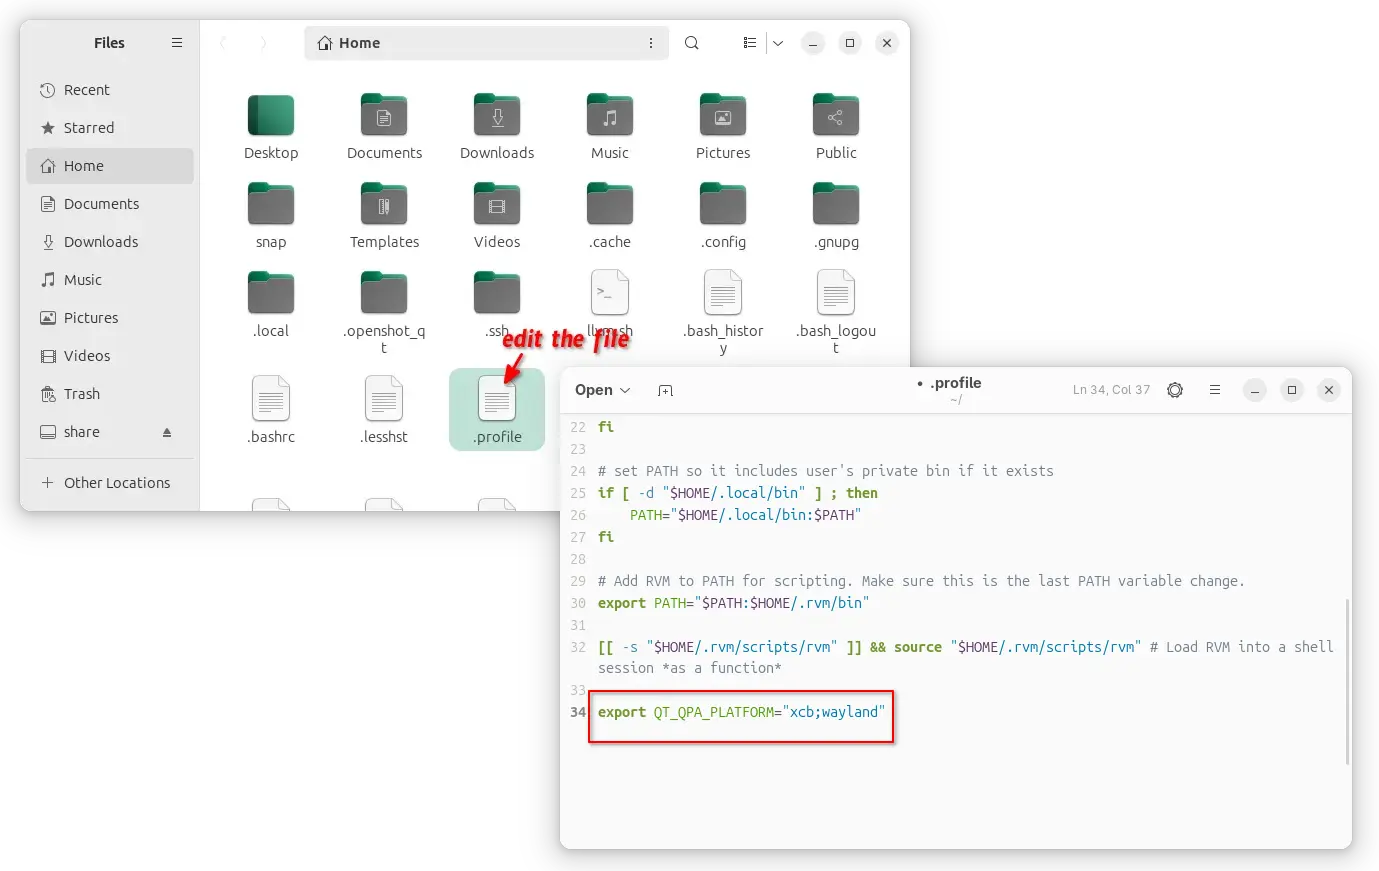
3. If it works for you, then open Files (aka Nautilus), and press Ctrl+H to show all hidden files. Find out .profile file in home directory and click edit it.

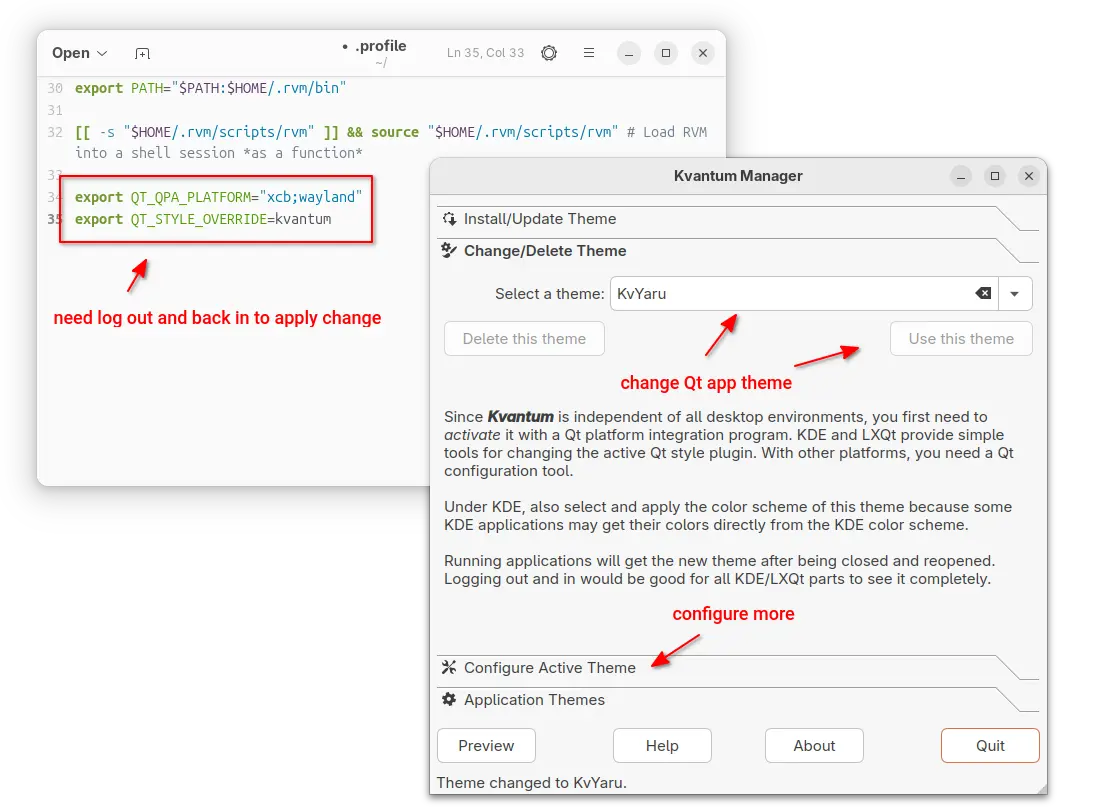
Finally, add export QT_QPA_PLATFORM=”xcb;wayland” in the end of file to make it work for all Qt applications permanently! And, log out and back in to apply.

enable xcb for all Qt apps, though current user only

NOTE: It must be set to “xcb;wayland“, to allow fall-back to default wayland, when ‘xcb’ does not work. For example, Qt apps installed as Flatpak may not work with ‘xcb’ plugin and output the error below:

qt.qpa.xcb: could not connect to display
qt.qpa.plugin: From 6.5.0, xcb-cursor0 or libxcb-cursor0 is needed to load the Qt xcb platform plugin.
qt.qpa.plugin: Could not load the Qt platform plugin “xcb” in “” even though it was found.

Option 2: Use QGnomePlatform theme

While xcb is designed for Xorg, FedoraQt team has developed few Qt plugins for better integration in GNOME. They are “QGnomePlatform” theme, “adwaita-qt” style, and “QAdwaitaDecorations”.

Downsides: The Qt window title-bar made by QGnomePlatform looks NOT so good. FedoraQt has discontinued the project. And, Ubuntu 24.04 only includes Qt5 version of the package.

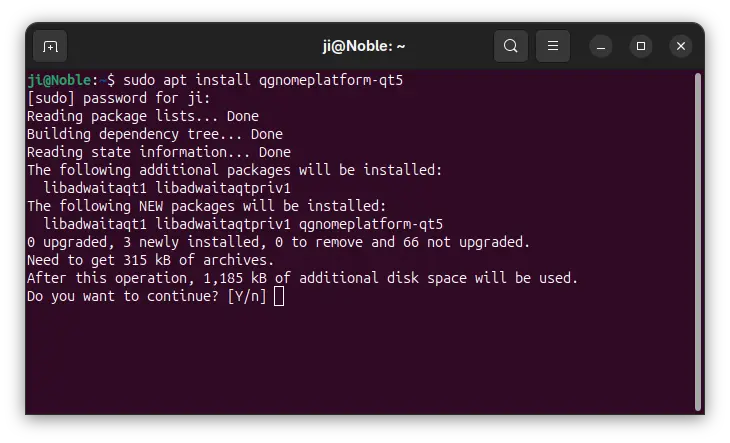
1. To install the Qt platform theme, open terminal (Ctrl+Alt+T) and run command:

sudo apt install qgnomeplatform-qt5

Ubuntu 25.04, 25.10 may also install qgnomeplatform-qt6 for Qt6 support.

2. Next, either run the command below to set environment:

export QT_QPA_PLATFORMTHEME='gnome'

Then, start Qt apps from the same terminal window to use the Qt platform theme.

Or, edit .profile file in home directory and add export QT_QPA_PLATFORMTHEME='gnome' to make it work permanently for all Qt apps (Qt5 only for 24.04) at next login.

Option 3: Use QAdwaitaDecorations

QGnomePlatform and adwaita-qt have been discontinued (though they still work). QAdwaitaDecorations, the project that implements Adwaita-like client-side decorations, is so far the only upstream project that’s still in development.

However, it’s NOT made into Debian/Ubuntu repositories so far. Meaning you need to build it by yourself. And, it does not support Qt6 app for Ubuntu 24.04, as it requires Qt6 >= 6.5.0 (24.04 has 6.4.2).

This option is good choice for Ubuntu 25.10, to enable Qt5 window decorations, while Qt6 decorations work out-of-the-box.

1. First, open terminal (Ctrl+Alt+T) and run command to install dependency libraries:

sudo apt install git cmake build-essential qtbase5-dev libqt5svg5-dev libqt5waylandclient5-dev qtbase5-private-dev qtwayland5-private-dev libwayland-dev

2. Then, run command to grab the source code:

git clone https://github.com/FedoraQt/QAdwaitaDecorations.git

After that, navigate to the source folder, create ‘build’ sub-folder and navigate into it:

cd QAdwaitaDecorations
mkdir build && cd build

Next, configure the source for Qt5:

cmake -DUSE_QT6=OFF ../

Ubuntu 24.04 does NOT meet Qt6 requirement, and Qt6 window decoration in 25.10 looks good out-of-the-box, so here I only build it for Qt5.

3. Finally, build & install the plugin by running the 2 commands below one by one:

make -j3
sudo make install

Here -j3 tells to start 3 threads in parallel. Depends on how many CPU cores you have, you may replace it with -j4, -j8, or j$(nproc) to use all CPU cores.

4. After successfully built the plugin, clean up by deleting the source folder. Then, either run the command below to set environment variable:

export QT_WAYLAND_DECORATION=adwaita

So it works for all Qt5 apps start from this terminal window.

Or, edit .profile file in user home and add the line to make it work permanently for all Qt5 apps at next login.

2. Change Qt Theme, or Configure Fonts, icon, and colors

Gnome/Adwaita style decorations is NOT enough? You may also configure the Qt apps themes, fonts, icons, and color scheme.

Option 1: Use Kvantum along with “xcb”

If you use “xcb” plugin for the decorations, then you may also use Kvantum (SVG-based theme engine) to change the Qt app themes.

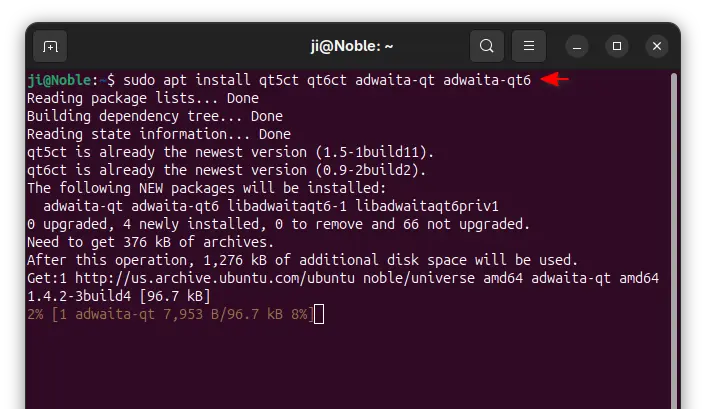
1. First, open terminal (Ctrl+Alt+T) and run command to install the package:

sudo apt install qt5-style-kvantum

Ubuntu 25.04, 25.10 users may also install qt6-style-kvantum for Qt6 apps support, however it’s NOT available in Ubuntu 24.04.

2. Next, set the following environment variables:

export QT_QPA_PLATFORM="xcb;wayland"
export QT_STYLE_OVERRIDE=kvantum

either in terminal for apps start from that terminal, or in .profile for all Qt apps (Qt5 only for 24.04).

3. Finally, launch “Kvantum Manager” to change Qt theme and configure active theme.
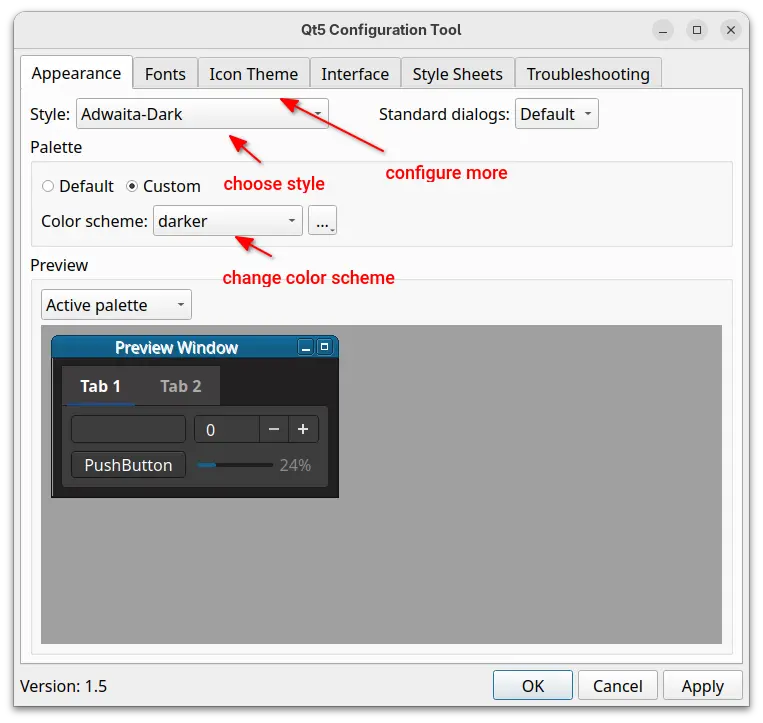
Use qt5ct / qt6ct

For choice, you may use Qt5 / Qt6 settings tools to configure the app window buttons, fonts, icons, and color scheme.

1. First, open terminal and install the settings tools, as well as adwaita-qt themes:

sudo apt install qt5ct qt6ct adwaita-qt adwaita-qt6

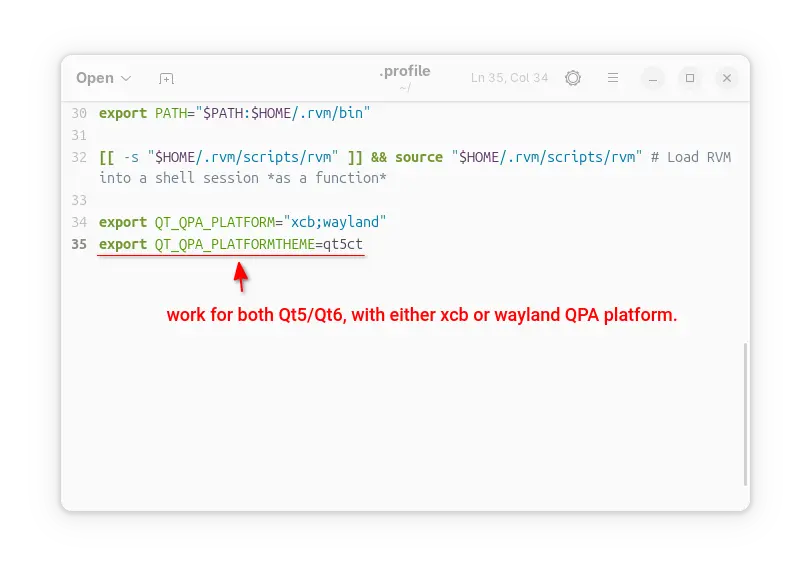
2. Next, set environment variable:

export QT_QPA_PLATFORMTHEME=qt5ct

It works for both Qt5 and Qt6 with either “xcb” or “wayland” QPA platform.

3. After set the environment (log out and back in if added to .profile), launch Qt5 Settings or Qt6 settings to configure the Qt appearances.

Summary:

This tutorial shows how to “fix” border-less issue for Qt apps in Ubuntu 24.04 and higher with default GNOME, as well as change the theme, fonts, icons, and color scheme.

The “xcb” QPA platform plugin is still a good choice for 24.04 with both Qt5 and Q6 support. While, QAdwaitaDecorations is better (in my own opinion) for Qt5 in 25.10, as Qt6 decorations look good out-of-the-box.

VS Code 1.105 added GPT-5-Codex & Apple Account Sign in/up

By:Ji m
12 October 2025 at 19:55

A new monthly version of Microsoft’s code editor, Visual Studio Code 1.105, was released few days ago.

The release added 2 new AI chat models, GPT-5-Codex and Claude Sonnet 4.5. In addition to Google and Github account, it now allows to sign in or sign up GitHub Copilot with an Apple account, along with

The AI chat now supports fully qualified tool names for prompt files and chat modes, which can help to avoid naming conflicts between built-in tools and tools provided by MCP servers or extensions.

Support for AGENTS.md at the root of workspace is now generally available and enabled by default. There’s as well experimental support for nested AGENTS.md files in sub-folders of your workspace.

The release also improved the OS notifications for chat sessions. It now shows a notification with preview when a chat response is received, and selecting it brings focus to the chat input.


Other AI chat changes include:

  • Chain of thought (Experimental).
  • Show recent local chat conversations (Experimental).
  • Ability to keep or undo changes to files during an agent loop.
  • New Ctrl+Alt+Up/Down shortcut keys to navigate through your chat messages.
  • Platform-specific terminal profiles.
  • Add ‘learning’ mechanism to select the optimal tool set for custom models.
  • Auto-reply to terminal prompts (Experimental).

Besides that, VS Code 1.105 introduced built-in MCP marketplace, which enables users to browse and install MCP servers directly from the Extensions view, though disabled by default.

The new or outdated MCP servers are now started automatically when you send a chat message. There are as well 2 new MCP specification updates SEP-973 and SEP-1034.

The new vs code release also improved the editor experience, by adding ability to override the default keyboard shortcuts for the Quick Input controls, and possibility to disallow next edit suggestions (NES) to propose whitespace-only changes such as code formatting.

The runTests tool in Chat now also reports test code coverage to the agent, and it now shows notification when long-running task completes while the VS Code window is not focused.

Other changes in the release include:

  • Shell integration for pwsh on Windows support for screen readers.
  • Add ability to resolve merge conflicts with AI.
  • New “Start Dictation in Terminal” action to use voice dictation to input text into the terminal.
  • Native broker support for Microsoft Authentication on ARM-series macOS devices.
  • PKCE (Proof Key for Code Exchange) support for GitHub Authentication.
  • Add Copy Test Id command to run gutter icon context menu.

Get Visual Studio Code 1.105

For more about the release, as well as download links for Windows, MacOS, and Linux, go to its website via the link below:

For Ubuntu, besides download & install the deb package from the link above, there’s also Snap package available to install in App Center (or Ubuntu Software).

While, a community maintained flatpak package is also available for choice. See this guide for how to install them.

Top Things to Do After installed Ubuntu 25.10 Questing Quokka

By:Ji m
9 October 2025 at 23:01

Ubuntu 25.10, code-name Questing Quokka was released! Here are some top things to do, after installed the new Ubuntu desktop release, to make it ready to use.

1. Enable “New Documents” Context Menu option

It’s been many years, GNOME still does NOT have a graphical option out-of-box to create new documents in file manager. Though, it’s easy to enable this feature by putting a file into user’s Template folder.

To do so, launch Text Editor and create a new empty document. Then, press Ctrl+Shift+S to open save file dialog. Finally, choose save it to Home -> Templates with whatever file-name you want to display as ‘New Document’ sub-menu option.

2. Configure Printer

The default “Printer” page in Settings is OK for basic use.

If you have a printer physically connected to the Ubuntu computer, then you may open terminal (Ctrl+Alt+T) and run command to install the graphical CUPS configuration tool:

sudo apt install system-config-printer

Tips: run sudo apt update to refresh cache if it says “Unable to locate package”.

Then, search & launch Printers app to get more controls, such as share printer, remote admin, policies, and default print options.

3. Configure the Left Panel

The left panel, aka Ubuntu Dock, is handled by an extension forked from dash-to-dock.


By going to Settings -> Ubuntu Desktop -> Dock, you may configure the left panel/dock with basic options, such as its position, icon size, auto-hide, shorten panel, show on primary or all displays, hide trash and volumes.

For more, install extension manager either by running the command below in terminal (Ctrl+Alt+T) or by using App Center (filter by Debian package):

sudo apt install gnome-shell-extension-manager

Then you may launch extension manager, and open preferences dialog for the Ubuntu Dock extension, which includes many more configure options for the left panel/dock:

  • Intelligent autohide, with dodge windows, animation duration, pressure threshold options.
  • Center icons in panel mode.
  • Show/hide, and move “Show Apps” (the Ubuntu Logo) icon.
  • Keyboard shortcuts.
  • Click action (e.g., click to minimize).
  • Appearance, e.g., background color, and opacity.

4. Install back default apps

If you chose the “Default Selection” option while installing Ubuntu 25.10, then you’ll see that many default applications are NOT pre-installed!

To install them back, simply launch App Center, then search and install the apps below one by one (mostly filtered by Debian package).

Or, open terminal (Ctrl+Alt+T) and run commands below instead (run sudo apt update to refresh cache first).

  • LibreOffice office suite.
    sudo apt install libreoffice
  • Archive Manager (aka file roller).
    sudo apt install file-roller
  • Shotwell photo manager.
    sudo apt install shotwell
  • Backups (Déjà Dup Backups).
    sudo apt install deja-dup
  • Gnome Camera, the new app replaces Cheese.
    sudo apt install gnome-snapshot
  • Showtime video player.
    sudo apt install showtime
  • Rhythmbox music player.
    sudo apt install rhythmbox
  • Thunderbird email. It’s now defaults to Snap, see how to revert back to Deb version.
  • Startup Disk Creator.
  • Remmina remote desktop client.
    sudo apt install remmina
  • Transmission torrent download app.
    sudo apt install transmission

5. Install Multimedia Codec

Due to legal reason, Ubuntu does not include some media codec for video/audio playback, Microsoft TTF fonts, and RAR archive supports.

To get them, press Ctrl+Alt+T to open up a terminal window, and run command:

sudo apt install ubuntu-restricted-extras

While downloading & installing the MS fonts, it will prompt to accept licence, use Tab key to highlight OK and hit Enter.

6. Enable Flatpak support

Flatpak is a popular package format runs in sandbox environment. Tons of applications support Linux through Flatpak package.

To enable Flatpak support in Ubuntu, simply open terminal (Ctrl+Alt+T) and run command:

sudo apt install flatpak

Next, you may install local flatpak files by running command:

flatpak install drag-and-drop-flatpak-file-here

Or, add the Flathub repository into system:

flatpak remote-add --if-not-exists flathub https://dl.flathub.org/repo/flathub.flatpakrepo

For choice, add --user flag for current user only. Then, use the command in a Flathub app page to install (click down arrow besides “Install” button).

Due to this bug, flatpak install may refuse to work. Try running it with sudo at beginning until it’s fixed.

NOTE: After enabled Flatpak support, you need a log out and back in to apply variable changes.

7. Enable AppImage support

AppImage is another popular way to run applications in Linux. It’s a portable, non-install package format, that can be run directly (after added executable permission) to launch application.

Since Ubuntu 22.04, user needs to press Ctrl+Alt+T to open terminal, and run command to install the required library for AppImage support:

sudo apt install libfuse2

8. Install Configuration Tools

Besides the default Settings (aka Gnome Control Center), they are few other graphical tools to help configure your Ubuntu desktop.

Gnome Tweaks

GNOME Tweaks is the popular alternative to Gnome Control Center (aka Settings), which offers graphics options to configure:

  • Fonts, scaling factor.
  • Cursor, icon, legacy apps, and sound themes.
  • Window buttons, and additional mouse & touchpad settings.

The app is available to install either from App Center (filter by Debian package) or by running command below in terminal:

sudo apt install gnome-tweaks

Extension Manager

Extension Manager is one of the must-have applications to install & manage extensions in GNOME desktop. It can be installed by running the command below in terminal:

sudo apt install gnome-shell-extension-manager

Grub Customizer

For dual-boot or multi-boot computers, and users who want to configure the boot menu, Grub-customizer is good choice to make things simple.

To install the app, open terminal and run commands below one by one to get from developer’s PPA:

sudo add-apt-repository ppa:danielrichter2007/grub-customizer
sudo apt-get update
sudo apt-get install grub-customizer

NOTE: The PPA does NOT support Ubuntu 25.10 at the moment of writing, check the PPA page for details.

GDM Settings

If you want to change the login screen background, then GDM settings is a good choice that also supports configuring fonts, top-bar, colors, etc for the login screen.

NOTE: GDM Settings has the potential to break your login screen. Use it at your own risk!

To install the app in Ubuntu 25.10, run the commands below one by one to get from PPA:

sudo add-apt-repository ppa:ubuntuhandbook1/gdm-settings
sudo apt update
sudo apt install gdm-settings

Dconf Editor

For advanced users, there’s also “Dconf Editor” that offers even more hidden configuration options.

To install the tool, run command:

sudo apt install dconf-editor

Just Perfection

If you want to hide or tweak the top-panel (e.g., size and position) and panel items (e.g., clock option), configure the desktop behaviors and animations, then Just Perfection extension provides many options that can do the job.

Simply, search and install the extension using “Extension Manager” app, then you can go back “Installed” tab and click open the Just Perfection setting page for the configuration options.

9. Install NVIDIA Driver

For NVIDIA graphics card, you may launch Additional drivers and select install the latest NVIDIA 580 driver for better gaming performance.

10. Add App Icon to Desktop

If you prefer launching applications by using desktop shortcuts, then install Extension Manager that’s mentioned above, and use it to search & install “Add to Desktop” extension.

After that, you may right-click on your favorite apps in either app grid or GNOME Overview search result to add them into desktop.

And More

There are even more things you can do to make Ubuntu desktop better for use. The things however differ depend on users. Please leave comment below, if you have any other good advice to tweak the Ubuntu Desktop.

Ubuntu 25.10 Officially Released with Kernel 6.17 & GNOME 49

By:Ji m
9 October 2025 at 22:54

Ubuntu 25.10, code-name Questing Quokka, was officially released today!

This is a new short term release with 9 months support until July 2026. New features include the latest Linux Kernel 6.17, GNOME Desktop 49, and more.

Thanks to Kernel 6.17, the new release features Attack Vector Controls, making easy to manage CPU vulnerability mitigations. It also added AMD SmartMux support for hybrid laptops, nested virtualization on Arm, and better support for AMD processors with mix of classic and dense cores.

Other Kernel changes include Raspberry Pi RP1 PCI device support, touch Bars support on x86 MacBook Pros, new drivers for Lenovo Legion Go S gaming handheld, and more. See more in kernelnewbies.

For Ubuntu Desktop, the installer improved TPM-Backed encryption with passphrase support and regeneration of the recovery key. And, Software Updater window will no longer pop up unprompted. Instead, it shows an icon in system tray, reminding that updates are available.

system tray icon reminding updates are available

Due to upstream (meaning GNOME 49), “Ubuntu on Xorg” session is no longer available, though the GDM login screen still supports loading other Xorg desktop sessions, e.g., XFCE, MATE, and Cinnamon.

Ubuntu 25.10 introduced 2 new default apps. It replaced Gnome Terminal with new default Ptyxis container-focused terminal emulator, and replaced Eye of Gnome (EOG) with touch-friendly Loupe image viewer which is written in Rust and powered by the Glycin library, which also handles the desktop wallpaper.

New default Ptyxis terminal emulator

Thanks to Gnome 49, it also added support changing the display brightness in the Quick Settings when HDR is enabled. And, these new HDR brightness controls support external displays, and allow multiple displays to be adjusted at the same time.

per-monitor brightness control

Other desktop changes include:

  • Improve Remote Desktop support with multi-touch and relative mouse input, and ability to have additional virtual monitors.
  • New Accessibility menu in login screen.
  • Audio playback and power control in lock screen.
  • Move “Do Not Disturb” to Quick Settings menu.
  • Add option to disable Super (Windows logo key) shortcut key.
  • Support relative dials on tablet pads.
  • Add configuration for pointing stick (aka TrackPoint).
  • Hardware accelerated video encoding for Camera app.
  • Enable suspend-resume support in the proprietary Nvidia driver.
  • Drop “Startup Applications” in favor of new Auto-start option in Settings -> Apps.
  • Use Dracut as its default initrd infrastructure (replacing initramfs-tools)

Besides new Kernel and Gnome 49, Ubuntu 25.10 now uses sudo-rs as the default sudo provider. It is a memory safe implementation of sudo and su, written in Rust. For end user, there’s no visual difference as it works just like before.

In addition, the release now use Rust based core utilities. This change however may cause potential issues. In my case, it caused issue (fixed now) discovering other multi-boot operating systems on my computer.

As well, there are updated toolchains, including GCC 15.2, binutils 2.45, glic 2.42, Python 3.13.7 (Python 3.14 also available), LLVM 20 (21 is available), Ruest 1.85 (1.88 is also available), Golang 1.24, OpenJDK 21 (25 and 26 EA are also available), Zig 0.14.1, and .NET 10 preview.

For more about Ubuntu 25.10, see the official announcement and release note.

Get Ubuntu 25.10

The official images for desktop, server, and WSL are available to download in Ubuntu website via the link below:

For choice, you may get Ubuntu 25.10 from this page, or choose a download mirror that near to you.

For Ubuntu 25.04 users, the upgrade channel is not ready at the moment of writing. Try installing all updates via Software Updater utility, then run update-manager -c to check if upgrade is available.

Python 3.14 Released with Free-threading & Template string literals

By:Ji m
9 October 2025 at 00:09

Python announced the new 3.14 version yesterday! See what’s new and how to install guide for Ubuntu users.

Python 3.14 is the latest stable release of the Python programming language, with 5 years support until 2030.

Since the release, the free-threaded build of Python is officially supported and no longer experimental. It’s so far optional, though will be make default in next phase.

In Python 3.14, the evaluation of annotations is now deferred. It introduced the new annotationlib module, providing tools for inspecting deferred annotations. And, annotations may be evaluated in the VALUE format, the FORWARDREF format, and the STRING format. See PEP 649 for more.

It added Template string literals (PEP 750), new mechanism for custom string processing. The new t-strings use the familiar syntax of f-strings, but return an object representing the static and interpolated parts of the string.

Python 3.14 finally added multiple interpreters in the standard library (PEP 734). With the new concurrent.interpreters module, it now supports running multiple copies of Python in the same process simultaneously without C-API.

It as well introduced new compression package contains compression.lzma, compression.bz2, compression.gzip, compression.zlib, as well as compression.zstd modules.

Besides compression and decompression for the Zstandard format (PEP 784), the support for reading and writing Zstandard compressed archives has been added to the tarfile, zipfile, and shutil modules.

The release also introduced a zero-overhead debugging interface for CPython, that allows debuggers and profilers to safely attach to running Python processes without stopping or restarting them.

A new command-line interface is added to inspect running Python processes using asynchronous tasks, available via python -m asyncio ps PID or python -m asyncio pstree PID.

And the pdb module now supports remote attaching to a running Python process using a new -p PID command-line option. For example, run python -m pdb -p 1234 will connect to the Python process with the given PID and allow you to debug it interactively.

Other changes include:

  • PEP 758: Allow except and except* expressions without brackets.
  • PEP 765: Disallow return/break/continue that exit a finally block.
  • PEP 741: Add a C API to configure the Python initialization without relying on C structures and the ability to make ABI-compatible changes in the future.
  • Syntax highlighting in PyREPL, and support for color in unittest, argparse, json and calendar CLIs.
  • UUID versions 6-8 are now supported by the uuid module, and generation of versions 3-5 are up to 40% faster.
  • Add a new type of interpreter to CPython, which provides significantly better performance for certain newer compilers.
  • Add a built-in implementation for HMAC (RFC 2104) using formally verified code from the HACL* project.
  • Improve error messages, and more.

For more details about Python 3.14, see the official docs.

Install Python 3.14

The source tarball for Python 3.14 is available to download via the link below:

Ubuntu has made Python 3.14 in system repository in 25.10. For Ubuntu 22.04 and Ubuntu 24.04, the popular Deadsnakes PPA has been updated with the package for the 2 LTS releases.

To add the PPA and install the package, run commands below one by one:

sudo add-apt-repository ppa:deadsnakes/ppa
sudo apt update
sudo apt install python3.14-full

For other Ubuntu releases, it’s not hard to build from source. And, I’ve written a step by step guide for all current Ubuntu releases.

GIMP 3.0.6 Fixed Printing Support for Flatpak & Snap [PPA updated]

By:Ji m
7 October 2025 at 00:35

GIMP 3.0.6, the third maintenance update for 3.0 release series, is out today!

The new GIMP release fixed various bugs and regressions, improved flatpak support, added security updates, and back-ported some changes from the 3.1.2 and 3.1.4 DEV releases.

new brush preview toggle button

Previously, the brush previews and font previews are always rendered with light background. In the new release, it added a new toggle button (back-ported from 3.1.2) allowing to optionally follow the color theme. Meaning, when the app is in dark mode, the brush previews can be set to well fit by using a darker background.

The new GIMP 3.0.6 improved palette import. It fixed Lab & CMYK ACB palette import, and added new select source from Palette file option. Meaning that you can easily find out what palette formats that currently supported through the file chooser dialog, and hide irrelevant files by choosing a specific file format.

import palette from file

For Flatpak and Snap packages that run the image editor in sandbox environment, the release also fixed the issue that the Print dialog previously did not show the “Image Settings” tab.

Other changes include:

  • Remove GIMP_ICONS_LIKE_A_BOSS environment variable.
  • Show Lock Content as an undo step.
  • Add alpha channel on filter merge (when necessary) and for certain transforms.
  • Ability to apply NDE filters to channels.
  • Make Seamless Clone tool work again (Experimental).
  • Improved Photoshop brush support.
  • Show frames again in animation playback process bar.
  • New gimp_prop_toggle_new() API function.
  • New GimpTRCType enum type.

There are as well many other fixes and changes, see the official release note for details.

Install GIMP 3.0.6

GIMP website provides official packages for Linux, Windows, macOS, which are available to download via the link below:

For Linux, either download Flatpak package, then install by running command below after enabled Flatpak support.

flatpak install drag-and-drop-flatpakref-file-here

If you’ve already installed the GIMP flatpak package, then simply run the command below to update it:

flatpak update org.gimp.GIMP

Or, select download the AppImage package, add executable permission from file properties, and run to launch the image editor.

For Ubuntu users, it’s also can be easily installed from App Center (or Ubuntu Software) via Snap package, though it’s community maintained.

For those who prefer the native .deb package, I’ve uploaded the new package into this unofficial PPA for Ubuntu 24.04, 25.04 and 25.10, while Ubuntu 22.04 package is on the way.

To add PPA and install GIMP, run commands below one by one:

sudo add-apt-repository ppa:ubuntuhandbook1/gimp-3
sudo apt update
sudo apt install gimp libgegl-0.4-0t64 -t "o=LP-PPA-ubuntuhandbook1-gimp-3"

Run Custom Command or Script in Ubuntu 25.10 Automatically at Login

By:Ji m
4 October 2025 at 00:38

Ubuntu 25.10 no longer includes the “Startup Applications” utility! Here’s a beginner guide shows how to run apps, custom scripts or commands automatically at login through alternative methods.

Ubuntu has a “Startup Applications” tool, allowing to easily add, remove, and edit items that run at user login. Due to upstream (meaning GNOME) changes, it has finally been dropped in 25.10.

Startup Applications tool no longer available in 25.10

The new way to auto start apps, is using GNOME Control Center (aka Settings) by navigating to ‘Apps’ setting page, choose an app, and turn on the “Autostart” toggle switch. While, Gnome Tweaks also provides similar function to do the job.

Autostart apps in Ubuntu 25.10 (GNOME 49)

But, what if you want to auto-start app with custom options, or auto-run custom commands/scripts at login?

Here are 2 alternatives to do the job:

  • Add startup app manually using .desktop configuration file.
  • Use a third-party graphical configuration tool.

Option 1: Use .desktop configuration file

As you may know, all the app icons you see in Gnome app grid, dock, or other app launchers in most popular Linux distributions are handled by .desktop files under /usr/share/applications, .local/share/applications, etc directories.

Similarly, auto-start apps are handled by the .desktop files under either /etc/xdg/autostart or .config/autostart directories.

And, when you turn on “Autostart” toggle switch for an application in Settings (Gnome Control Center), it will automatically create a file under .config/autostart linked to the .desktop file for that app icon.

If you want to auto-run custom commands or scripts at login, then just create .desktop files in that directory with following steps.

NOTE: for those hate Linux commands, open file manager and press Ctrl+H to show hidden files/folders, then do following steps accordingly.

1. Create the directory. The ~/.config/autostart directory does not exist out-of-the-box. You may either enable an auto-start app via Settings to auto-create it, or open terminal (Ctrl+Alt+T) and run command below to create:

mkdir -p ~/.config/autostart

2. Create & edit custom .desktop file. Next, run command to create a .desktop file, “firefox-private.desktop” for example, and edit via nano command line text editor:

nano ~/.config/autostart/firefox-private.desktop

When file opens, write following content and edit accordingly:

[Desktop Entry]
Type=Application
Exec=sh -c "sleep 30; firefox --private-window https://www.google.com"
Hidden=false
Name=Firefox Private Mode
Comment=Open google.com automatically in Firefox private window.

In the case, it will auto-launch Firefox in private mode and open Google.com automatically, with 30 seconds delay after login.

According what you want to run, you need to replace the command for “Exec“, and edit the ‘Name’ and ‘Comment’ as you want. For example, use:

  • Exec=/home/ji/Documents/myscript to run my script under user Documents directory.
  • Exec=sh -c "$HOME/Documents/myscript" to run the same script, but here “sh -c” command interpreter is required so it knows what is $HOME.
  • Exec=update-manager --install-all to auto-launch Software Updater and install all available updates.

Tips:

  • It’s better to first run the custom command or script in terminal to make sure it works.
  • The X-GNOME-Autostart-Delay parameter does not work in Wayland, use sleep in command to add time delay in seconds.
  • You may change Hidden=false to Hidden=true to disable that .desktop file, just like it’s deleted.
  • Add Terminal=true if the command need to run in a terminal.
  • For more about the desktop entry keys, see the doc in freedesktop.org.

After created and edited the file, press Ctrl+S to save and Ctrl+X to exit, and verify if it works by logging out and back in.

Option 2: Use a third-party graphical application

To make things simple, there are few third-party graphical tools can do the job managing startup apps and scripts.

As far as I know, the free open-source Ignition tool is a good choice which provides a simple and modern user interface to add, remove, and modify startup entries.

As you see in the screenshot, it provides a GTK4 and LibAdwaita interface, with ability to manage system startup entries (usually the .desktop files in /etc/xdg/autostart) that works for all users.

As well, it allows to add any installed apps (with custom options and time delay), custom command or script as auto-start items, by automatically creating .desktop files in user’s .config/autostart directory. Meaning they work for current user only.

Install Ignition

Besides building from the source, the app is available to install in most Linux through Flatpak package, which runs in sandbox environment.

For Debian, Ubuntu, and their based systems, run 2 commands below one by one to install the package:

  • First, open terminal (Ctrl+Alt+T) and enable Flatpak support by installing the daemon package:
    sudo apt install flatpak
  • Next, install the app package by running command:
    flatpak install https://dl.flathub.org/repo/appstream/io.github.flattool.Ignition.flatpakref

    Tips: You may run command as sudo (add sudo at beginning) to fix installing issue in Ubuntu 25.10.

After installed the package, either search for and launch it from Gnome Overview (log out and back in if app icon is not visible), or run command below to start from terminal:

flatpak run io.github.flattool.Ignition

Uninstall Ignition

If the app does not work good for you, run the command below to uninstall it:

flatpak uninstall --delete-data io.github.flattool.Ignition

Also run flatpak uninstall --unused to remove useless runtime libraries.

NOTE that uninstall the app won’t delete the auto-start entries created by it.

NVIDIA 580.95.05 added YCbCr 4:2:2 Support for Linux

By:Ji m
3 October 2025 at 00:15

For Linux users with NVIDIA graphics card, the new 580 production branch driver got a new update few days ago!

It’s NVIDIA 580.95.05, the third stable release in this driver series. Like the last one, it introduced only one but important new feature, and fixed few bugs.

The new driver version added YCbCr 4:2:2 display modes support. Like RGB and CMYK, it’s a family of color spaces designed for brandwidth reduction and efficient video and image compression.

YCbCr 4:2:2 uses chroma subsampling technique to save file size by capturing less color data. It’s useful to meet the bandwidth demands of high resolution (e.g, 4K) games or videos at high-frame-rate (e.g., 120Hz), though it causes image quality reduction, such as blurry or fuzzy text.

The feature requires Fixed Rate Link (FRL) signaling technology (meaning display connected with HDMI 2.1), and Blackwell or later GPU, such as RTX 50 series, B100, B200, B300 …

MSI SUPRIM, NVIDIA RTX 5090

Besides that, the new driver fixed interactive object outline rendering issue in Indiana Jones and the Great Circle game, and few other issues.

Compare to the previous NVIDIA 575 driver, there’re also Smooth Motion frame generation support for RTX 40 series GPU introduced by 580.82.07 for better gaming performance, and RMIntrLockingMode enabed by default that can help reduce stutter especially when using virtual reality (VR).

Other changes in NVIDIA 580 series driver include:

  • Add fifo-v1 protocol support when using Vulkan backend in Wayland, reducing visual inconsistencies and potential stuttering.
  • New MetaMode attribute to control the number of bits per color component transmitted via a display connector.
  • Bigscreen Beyond Head Mounted Displays compatibility.
  • Feature to reduce time spent in the interrupt top half for low latency display interrupts by deferring the work until later.

And, more. See HERE, HERE, and HERE for details.

How to Install NVIDIA 580.95.05 in Ubuntu

Ubuntu has already made the NVIDIA 580 driver into system repositories, which is however NVIDIA 580.65.06 so far for current two 22.04 and 24.04 LTS (check this page).

If you can wait for the official package from Ubuntu, then try adding either the “Canonical Kernel Team” team PPA or “Graphics Drivers” team PPA (long-standing PPA), then use Additional Drivers utility to install, both of which are maintained by Ubuntu members.

Linux Kernel 6.17 Released! Mainline PPA updated for Ubuntu 24.04 +

By:Ji m
30 September 2025 at 00:53

Linux 6.17 is out as the latest Kernel release! Linus Torvalds announced it yesterday afternoon in lkml.org:

No huge surprises this past week, so here we are, with kernel 6.17 pushed out and ready to go.

Below is the shortlog for just the last week – not the full 6.17 release – as usual. It’s not exciting, which is all good. I think the biggest patch in there is some locking fixes for some bluetooth races that could cause use-after-free situations. Whee – that’s about as exciting as it gets.

What’s New in Kernel 6.17

Linux 6.17 introduced Attack Vector Controls, which provides a simple method to manage CPU vulnerability mitigations. Which, so far supports 5 sets of attack-vector mitigations: User-to-Kernel, User-to-User, Guest-to-Host, Guest-to-Guest, and Cross-Tread. See the official documentation for more about it.

For Intel, the kernel added Intel IPU7 driver for web camera support on Lunar Lake and Panther Lake laptops. And, it added perf profiling support for Panther Lake, and EDAC (Error Detection and Correction) support for Granite Rapids D, Wildcat Lake, and Raptor Lake HX, and Core i5 14600, i7 14700 processors.

It as well added initial support for Wildcat Lake integrated graphics, enabled OpenGL and Vulkan support for Xe3 Panther Lake graphics by default, and added SR-IOV (Single Root I/O Virtualization) support for Battlemage GPUs but limit to Arc Pro graphics card.

There are as well DRM Panic support for the Intel i915 and Xe kernel drivers, Wildcat Lake “WCL” display enablement, and experimental flip queue support for Lunar Lake and Panther Lake hardware, and NPU accelerator support for Wildcat Lake.

image from Intel.com

On the AMD side, the kernel merged AMD’s Hardware Feedback Interface driver for dynamic core ranking, improved task scheduling, and better support for processors with mix of classic and dense cores.

It also added SmartMux support for hybrid laptops that dynamically switch the GPU being used. For example, when gaming, the system can be switch the active display to the discrete GPU for better performance.

Other AMD changes include CPUID faulting support, and fix for AMDGPU hibernation, which can save 50 minutes on large GPU servers.

Image by anirudhlv from Pixabay

Other changes in this Kernel release include:

  • Apple System Management Controller (SMC) driver for being able to reboot modern M1/M2 Macs
  • BRBE (Branch Record Buffer Extension) support for ARM64.
  • Drop non-SMP (Symmetric Multi-Processing), meaning for system with only one CPU core, there might be small performance regression.
  • Turbostat command-line utility can now display CPU L3 cache topology information.
  • Much faster CRC32C error detection on modern Intel and AMD AVX-512 processors.
  • Added “pm_async=off” parameter to disable async suspend/resume with the Linux kernel
  • Large folio support for Btrfs (experimental).
  • Multi-device filesystems like btrfs and bcachefs can handle certain device loss without the need to shutdown the whole filesystem.
  • New driver for powering on the T-HEAD TH1520 RISC-V SoC’s GPU.

There are as well many new and updated hardware support, including:

  • Raspberry Pi RP1 PCI device support
  • Marvell PXA1908 and the CIX P1 SoC
  • Andes Tech QiLai SoC and the Sophgo SG2000.
  • NVIDIA Tegra264.
  • Samsung Snapdragon X laptop support.
  • Add support for Touch Bars on x86 MacBook Pros.
  • BCM5325 switches.
  • Support 50 / 100 / 200 / 400 / 800 gigabit Ethernet cards.
  • Lenovo WMI Gaming Series Drivers for Lenovo Legion Go S gaming handheld.

For more changes about Linux Kernel 6.17, see either this page or kernelnewbies.

How to install Linux 6.17 in Ubuntu

Ubuntu 25.10 has already included Kernel 6.17 RC, while the stable release will be available soon in the final release.

For Ubuntu 24.04, it will probably have Kernel 6.17 in next 24.04.4 point release. If you can’t wait, try the mainline kernel PPA.

NOTE: The mainline Kernel is built for testing purpose! It’s NOT signed, so you need to disable secure boot for being able to boot the kernel. And, it may have compatibility issues with proprietary drivers.

For amd64, arm64, armhf, ppc64el, and s390x CPU architecture types, the Kernel PPA provides Linux Kernel 6.17 package at the link below:

If you don’t know your CPU type, run dpkg --print-architecture command to tell, then select download & install the proper packages for your system.

For modern Intel/AMD (amd64) platform, open terminal (Ctrl+Alt+T) and run the commands below one by one to download & install the kernel:

wget -c https://kernel.ubuntu.com/mainline/v6.17/amd64/linux-headers-6.17.0-061700-generic_6.17.0-061700.202509282239_amd64.deb

wget -c https://kernel.ubuntu.com/mainline/v6.17/amd64/linux-headers-6.17.0-061700_6.17.0-061700.202509282239_all.deb

wget -c https://kernel.ubuntu.com/mainline/v6.17/amd64/linux-image-unsigned-6.17.0-061700-generic_6.17.0-061700.202509282239_amd64.deb

wget -c https://kernel.ubuntu.com/mainline/v6.17/amd64/linux-modules-6.17.0-061700-generic_6.17.0-061700.202509282239_amd64.deb

sudo apt install ./linux-headers-6.17.0*.deb ./linux-image-unsigned-6.17.0*.deb ./linux-modules-6.17.0*.deb

After installed the kernel, restart and run uname -a to verify the new kernel.

Uninstall Kernel 6.17

To remove the kernel 6.17, reboot and select boot an old kernel entry from Grub boot-loader (usually under Advanced menu), then run the command below to uninstall:

sudo apt remove linux-modules-6.17.0-*-generic linux-headers-6.17.0-061700

Pop!_OS 24.04 is Available for Beta Testing!

By:Ji m
29 September 2025 at 00:47

Pop!_OS, the popular Linux Distribution powered by System76, announced the Beta release of 24.04 LTS few days ago.

As the version number says, it’s based on Ubuntu 24.04 LTS, but features Linux Kernel 6.16 and its own COSMIC desktop environment.

Pop!_OS is developed by System76, a American Linux computer manufacturer. It features COSMIC desktop, which was previously a customized GNOME desktop, but now a standalone desktop environment built from scratch.

Since version 18.04, Pop!_OS updated regularly with versions based on every Ubuntu releases. And, it was ranked as 12th popular Linux Distribution according to Google Trends Scores between Jan 2023 and Jan 2024.

The development however slows down since 22.04. There’s no Pop!_OS 22.10, 23,04, or 23.10.

The first Pop!_OS 24.04 development release (first alpha) was available in August of last year. Then, it got another few more alpha releases, and finally announced this Beta few days ago!

This is the first release that ships with new standalone COSMIC Desktop environment. It replaced Nautilus, Gnome Terminal, Gnome Text Editor, and Totem with its own COSMIC specific files, terminal, text editor, and video player apps.

Pop!_Shop is replaced by COSMIC Store, which prefers Flatpak when both Flatpak and Deb are available. And, the GDM display manager is replaced by new COSMIC Greeter with a redesigned login appearance.

Drag’n’dropping files from Wayland apps to X11 apps is not supported so far, though user may use the applications upload option as a work-around until the feature is added.

Other changes include new and redesigned settings app, as well as:

  • Single bottom panel layout.
  • Variable refresh rate (VRR) support.
  • NVIDIA driver 580.82.07.
  • Mesa 25.1.5-1
  • New fonts, themes, and more.

Get Pop!_OS 24.04 Beta

The official release note as well as the .iso images are available in system76 website via the link below:

For Pop!_OS 22.04 users who want to upgrade to the new beta release, it can be done by opening terminal and run command:

pop-upgrade release upgrade -f

Though, it’s highly recommended to make a backup first, as bugs are expected in beta that may break things!

Block Certain App Packages in Ubuntu 25.10 [New Apt Method]

By:Ji m
25 September 2025 at 21:53

This is a step by step guide shows how to block certain app packages from Ubuntu local repositories, PPAs, or other apt repositories in Ubuntu 25.10 and higher.

Previously, we can set package pin-priority to prevent from or prior to installing certain app packages. Now, in Debian/Ubuntu with apt 3.1+, a new method is available to include/exclude packages for specified apt sources (repositories).

Say you have a Ubuntu PPA or apt repository installed in Ubuntu. It contains many app packages, but you only need one or few of them. In the case, you may use the new method below to completely exclude all other packages from that repository, so they are not installable with any apt option or other graphical tool.

NOTE 1: This tutorial only works for classic .deb packages. Though, you may use the method to block snap and flatpak entirely.

NOTE 2: This tutorial needs apt 3.1+, meaning Debian Unstable/Testing or Ubuntu 25.10+.

Step 1: Find out what packages available in the repository

Before getting started, it might be helpful to first find out all the package names available in the target PPA or apt repository.

For Ubuntu desktop, you can simply install and launch Synaptic package manager. Then, choose “Origin” in left and select the target repository to show all the packages.

For server without GUI, you may view the package index files instead.

  • First, run the command below to update package index:
    sudo apt update
  • Next, print all the package index files under /var/lib/apt/lists directory:
    ls /var/lib/apt/lists/ |grep Packages

    The files contain the package names, their versions, origin, maintainers, sizes, and hash-code, etc information.

  • In last command output, find out the target file-name for your repository, then use the command below to filter and show only package names in it:
    grep ^Package /var/lib/apt/lists/ppa.launchpadcontent.net_ubuntuhandbook1_apps_ubuntu_dists_noble_main_binary-amd64_Packages

    Here you need to replace the long file-name with yours.

For choice, you may install aptitude, then use the command below instead to list all packages from target repository:

aptitude search "?origin (LP-PPA-ubuntuhandbook1-apps)"

Here replace LP-PPA-ubuntuhandbook1-apps accordingly, while ubuntuhandbook1 is PPA maintainer name, and apps is PPA name. For other repositories, run apt-cache policy |grep "o=" to list and get the target value of “o=”.

Step 2: Edit source files to block packages

For Ubuntu, all the apt sources are handled by .sources and .list files under /etc/apt/sources.list.d directory.

To block specific packages from Ubuntu official repositories, open terminal (Ctrl+Alt+T) and run command to edit the file below:

sudo nano /etc/apt/sources.list.d/ubuntu.sources

For next Ubuntu 26.04, there’ll be ubuntu-esm-apps.sources and ubuntu-esm-infra.sources in that directory for ESM packages if Ubuntu Pro is enabled.

When file opens, simply add Exclude: package1 package2 package3 ... in the end of the 2 sections.

In the screenshot above, it tells to block flatpak, snap, and snapd packages. After saved file (Ctrl+S, then Ctrl+X), run sudo apt update to apply changes.

To block certain PPA packages, simply launch “Software & Updates” utility and navigate to “Other Software tab”.

Then, highlight the PPA source and edit it. Finally, click Add an additional fields, and:

  • either set key Include and value package1 package2 package3, so to block all others.
  • or set key Exclude and value package1 package2 ... to block certain packages.

Also refresh cache via either sudo apt update or Software Updater after saving the changes.

NOTE: When using “Include” (leaving others blocked), don’t forget to also include the dependency packages (if any) in that repository!

For server without GUI, run commands below and finally refresh cache.

  • First, list and find out the target source file:
    ls /etc/apt/sources.list.d
  • Then, edit the file (replace file-name with yours):
    sudo nano /etc/apt/sources.list.d/ubuntuhandbook1-ubuntu-apps-questing.sources

    Finally, add new line with either Include: package1 package2 or Exclude: package accordingly

For apt repository installed in the classic .list file, edit it and add the include="package" or exclude="package" section between the brackets after ‘signed-by’ section.

And, finally run sudo apt update to apply changes.

elementary OS 8.0.2 Released with Kernel 6.14, based on Ubuntu 24.04

By:Ji m
24 September 2025 at 01:01

elementary OS, the Ubuntu based Linux Distribution that features Pantheon desktop environment, released new 8.0.2 version few days ago.

This is a second and last minor release for current 8.0 series, while, the developer team is busy working on the next major 8.1 version due to be released before year end.

elementary OS 8.0.2

elementary OS 8.0 is based on Ubuntu 24.04 LTS. The new 8.0.2 point release added the most recent Hardware Enablement stack from Ubuntu.

They include Linux Kernel 6.14 that features improved gaming performance, extended battery life, and more gamepads, wifi, microphones, etc hardware support, and, Mesa 25 with Vulkan 1.4 API and RDNA4, and new NVIDIA/Intel hardware support.

Besides the benefits from Ubuntu upstream, the new point release improved the top-right Quick Setting menu, with new “Prevent Sleep” toggle option. Which is useful when watching video or running other jobs that need to prevent system from going to sleep.

It also added new Gesture Controller, with ability to swipe up in Multitasking View to close windows. App titles in Multitasking View are now always shown, making them accessible for touch screen setups. And, screenshots taken with a keyboard shortcut will send a notification allowing to view it in Files.

For those who are blind or have low vision, the release improved screen reader support by adding password quality feedback in the installer and initial setup. Alt-Tab window switcher, and Notifications and Shortcut Overlay are also updated with screen reader support.

elementary OS 8.0.2 also improved the Screencast Portal an improved design for selecting which display or window should be captured, as well as respecting options for capturing the pointer.

And, the custom keyboard shortcut dialog now displays a list of installed apps and their actions, allowing to easily add keyboard shortcut for launching selected app or performing an app action.

Other changes include:

  • Fix the “Dark Mode” toggle so it won’t break timed or sunset-to-sunrise dark mode schedule.
  • Refresh the Locale settings layout.
  • Long press on dock app icon to open context menu.
  • Warn when pasting command into terminal that include options to skip confirmation like -y, --interactive=never, and --force.
  • Add ability to clone git repositories directly from inside “Code” text editor via the projects menu in the sidebar.
  • Terminal inside “Code” editor now follows Natural Copy/Paste settings from the Terminal app.
  • Add context menu to remove individual track in Music app.
  • Save and ability to restore the queue and last played track in Music.
  • Show album art in media controls in the panel and elsewhere.
  • Redesign Bluetooth Settings, with keyboard navigation and screen reader experience.
  • Add System Updates entries in the Dock context menu, Application Menu, and search.

There are also tons of other changes and improvements, see the official release note for details.

Get elementOS 8.0.2

The iso image for Intel/AMD platform is available to download in its website via the link below:

Tips: set custom value to 0 if you want to try it out before donate. And recommended hardware specs include 4 GB RAM, 32 GB disk space, and 1024×768 display.

OBS Studio 32.0.0 added New NVIDIA AI Effects & Apple Metal Renderer

By:Ji m
23 September 2025 at 17:48

OBS Studio, the popular free open-source live streaming and video recording software, released new 32.0.0 version today!

The new release is made available after 2 Beta and 1 RC testing releases. It features a new plugin manager, allowing to browser, install, update, and turn on/off plugins loading when OBS starts.

The feature is however at very early stage. There are only an UI dialog available via Tools -> Plugin Manager, but no plugin to install and manage in my case.

And probably due to new plugin manager, it will no longer load plugins built for a newer release of OBS to prevent future compatibility issues.

For users with NVIDIA RTX series graphics card, the new release added Voice Activity Detection (VAD) to audio effects. It’s a speech activity detection technique that can improve noise suppression for speech.

As well for NVIDIA RTX, the release added new AI-powered background removal option, allowing removal of chairs.

For modern mac computers with Apple Silicon processor, OBS Studio 32.0.0 added experimental Metal renderer support. It provides a low-level API to directly control the GPU of Apple devices, which will significantly improve the performance and efficiency.

OBS 32.0.0 also introduced new Hybrid MOV container, and set Hybrid MP4/MOV as the default containers. The new container format brings Apple ProRes codec support on macOS and a more widely supported HEVC/H.264 + PCM audio option to all platforms.

Other changes in the release include:

  • Add opt-in automatic crash log upload for Windows and macOS.
  • Add custom OBS widgets in preparation for larger UI updates.
  • Change default bit-rate from 2500 to 6000 Kbps.
  • Remove the --disable-shutdown-check launch flag.
  • Change crash sentinel file location to its own sub-directory.
  • Improve audio deduplication logic to cover more cases.
  • Various crashes and other bug-fixes.

Get OBS Studio 32.0.0

The official release note as well as the installers (under “Assets”) for Linux, Windows, and macOS are available in Github via the link below:

For Ubuntu, it only provides the .deb package for 24.04. User may choose this official PPA for other Ubuntu releases support.

While, there are also Snap package available in App Center (or Ubuntu Software), and Flatpak package which also support ARM64 processors. Though, you may need to wait for few days as all of them are not updated at the moment of writing.

gThumb 3.12.8 added Viewing GPS Position Support

By:Ji m
22 September 2025 at 17:31

gThumb, the Gnome image viewer, browser, and organizer application, released new 3.12.8 version in last week.

The new release of this application finally added support viewing the GPS metadata in your photo images. Meaning for photos taken by cameras or phones have location services enabled, the image viewer will show where they were taken with latitude and longitude location data.

And, by enabling the new “Open Map” extension in the Preferences dialog, it will display a “Map” section in image properties, allowing to click open the location using the OpenStreetMap free wiki world map service. So that you can see exactly where it is in world map.

Besides that, the release added an option in Preferences dialog, allowing to hide the white border (aka frame) of the image you’re viewing. Which, however does not work for thumbnails.

gThumb 3.12.8 also updated the video viewer to rotate videos respecting the orientation tag, added ability to sort images by creation time, and added support for the AdobeRGB profile.

It now applies the embedded ICC profile for TIFF, applies the color space specified in EXIF data for PNG, and saves the color profile as well for AVIF images.

Other changes include:

  • Lossless WEBP and TIFF rotation by setting EXIF orientation tag.
  • Transform the profile to sRGB before saving an image with a profile.
  • Fix broken thumbnail panic.
  • Fix thumbnails not updated after saving an image.
  • Fix date and tag selectors on Wayland.
  • Use a darker gray for the background in image viewer.
  • Translation updates and various other bug-fixes.

How to Install gThumb 3.12.8

gThumb does NOT provide official installer packages. Besides building it from the source code, you may install it through either Flatpak, Snap, or Ubuntu PPA.

1. Snap package

For modern Intel/AMD platform, there’s a snap package that can be easily from either Ubuntu Software or App Center, though it’s NOT updated to v3.12.8 at the moment of writing.

2. Flatpak package

Like Snap, The Flatpak runs in sandbox environment and works in most Linux distributions on both amd64 and arm64 platforms.

Ubuntu users may simply open terminal (Ctrl+Alt+T) and run the 2 commands one by one to install the package:

  • First enable flatpak support:
    sudo apt install flatpak
  • Then, install gThumb Flatpak package:
    flatpak install https://dl.flathub.org/repo/appstream/org.gnome.gThumb.flatpakref

If the app icon is not visible after installation, either log out and back in or run the command below to start it from terminal:

flatpak run org.gnome.gThumb

And, you may replace run with update in last command to check & install updates regularly.

3. Ubuntu PPA

For Ubuntu users who prefer the native .deb package, I’ve uploaded the package into this unofficial PPA for Ubuntu 20.04, 22.04, 24.04, 25.04, and 25.10 on amd64, arm64/armhf platforms.

To install it, open terminal (Ctrl+Alt+T) and run commands below one by one:

sudo add-apt-repository ppa:ubuntuhandbook1/apps
sudo apt update
sudo apt install gthumb

Uninstall:

To uninstall the Snap package, use Ubuntu Software or App Center.

To uninstall the Flatpak package, use command:

flatpak uninstall --delete-data org.gnome.gThumb

Optionally, you may run flatpak uninstall --unused to remove useless run-time libraries.

For the PPA package, uninstall it via command:

sudo apt remove gthumb gthumb-data

And, remove the Ubuntu PPA by using either “Software & Updates” under “Other Software” tab, or running command:

sudo add-apt-repository ppa:ubuntuhandbook1/apps

Also run sudo apt update to refresh cache afterward, though it should be done automatically.

Zorin OS 18 Beta is Available to Download, based on Ubuntu 24.04

By:Ji m
21 September 2025 at 00:09

Zorin OS, the popular beginner friendly Linux Distribution, announced the Beta release of version 18 yesterday!

Zorin OS is a Linux distribution designed for newcomers switching from Windows and macOS. It features Ubuntu package base, and customized GNOME desktop experience, while a lite version is available for choice with XFCE4 desktop.

Zorin OS 18 is based on Ubuntu 24.04 LTS. Thanks to the upstream, the new release upgraded from Kernel 6.8 to Kernel 6.14 with tons of new drivers, new and improved hardware support. See what’s new in Kernel 6.14 (replace 6.14 in URL link, e.g., 6.13, for changes other Kernel versions).

Thanks to GNOME upstream changes, it features GNOME 46 (customized) desktop with a “dot and pill” icon to trigger overview, and indicate which workspace you’re working in. There are as well new camera app, remote login with RDP protocol, and OneDrive support in online accounts.

Besides the upstream changes, Zorin OS 18 refined the default desktop appearance with floating panel and rounded corners. While, user may easily change the layout with a single mouse click by using the built-in Zorin Appearance utility.

Like Ubuntu 24.04, the release also introduced a tiling window extension. Simply drag a window to screen top, it will show you a list of tiling layout, allowing to easily move and resize window automatically into selected screen edge.

By going to Zorin Appearance -> Windows -> Advanced Window Tiling, you may enable the indicator icon for the extension, and configure more about it.

For users who need Office/365, Teams, Adobe Photoshop, etc apps, the release also introduced a WebApp Manager allowing to easily turn your favorite websites into apps, by using either the default Brave web-browser or any other browser (if installed) as you want.

Other changes in the release include:

  • Update built-in database to suggest alternatives to more Windows apps.
  • New Yellow and Brown theme colors.
  • 3 new panel layouts: Compact, Linux Mint like, and elementary OS like layouts (for Pro, paid version only).
  • Use Pipewire instead of PulseAudio as default sound server.
  • Improve Zorin Menu with multi-monitors support.
  • Center new windows at launch.
  • Global search in Files, and more!

Get Zorin OS 18 Beta

The official release note as well as the .iso image are available in its website via the link below:

NOTE that Zorin OS 18 is so far available for Beta testing, it’s not recommended to install it on production machine at the moment.

The minimum hardware requirements include 2 GB RAM, 15 GB disk space, and 1024 × 768 resolution display.

Linux Mint Released LMDE 7 Beta, based on Debian 13

By:Ji m
19 September 2025 at 23:40

For Linux Mint users who prefer Debian package base, LMDE 7 code-name “Gigi”, is available for beta testing!

LMDE stands for Linux Mint Debian Edition. As the name says, it’s a Linux Mint edition based on Debian, aims to continue to deliver the same user experience if Ubuntu was ever to disappear.

LMDE 7 is the next major release of this Linux Mint edition based on Debian 13 trixie, which was released a month ago. It features Kernel 6.12, Cinnamon desktop 6.4.12, and Debian 13 package base.

In my experience, Debian is more stable and reliable than Ubuntu. It’s perfect for server and advanced user use. And, LMDE makes it friendly for beginners.

However, it lacks major kernel version updates and most recent drivers (e.g., NVIDIA proprietary driver), unless upgrading the entire system to a new version (e.g., from LMDE 6 to LMDE7). If they are not big deal for you, then it’s a great choice!

Besides the difference between Kernel version and systems they’re based on, LMDE and normal Linux Mint edition deliver almost the same user experiences!

And, LMDE 7 Beta so far features Cinnamon only desktop, with following changes in Linux Mint 22.2:

  • New XApp Fingwit provides graphical interface to manage user fingerprints.
  • Improved Sticky Notes app with rounder corners and Wayland support.
  • Add “Theater Mode” and “Borderless Mode” mode for Hypnotix IPTV player.
  • Display user avatar in the login screen.
  • Add blur effect to the panel and user selection dialog box in login screen for better appearance.
  • Patch LibAdwaita with theme support, including Mint-Y, Mint-X and Mint-L themes.
  • Add accent colors support for LibAdwaita Flatpak apps.
  • New xapp-aiff-thumbnailer thumbnailer for cover art in .aiff audio files
  • Add iOS app for Warpinator file sharing utility.
  • Configurable EDID-based color correction (disabled by default) in XViewer.
  • Support editing description field in WebApp Manager.
  • Support leading zeros when renaming multiple files and using enumerations
  • Add description in Software Manager to tell the difference between Flatpak and system packages.

Download LMDE 7 Beta

The official announcement as well as the download link for LMDE 7 Beta is available in Linux Mint website via the link below:

For choice, you may download it from a mirror from this page. Though, as Beta it’s usually available in “testing” directory.

Hardware Requirements include: 2 GB RAM (though 4 GB recommended for smoother experience), 20 GB disk space, and 1024×768 resolution display.

Ubuntu 25.10 Beta Release is Available to Download

By:Ji m
19 September 2025 at 17:03

Ubuntu 25.10, code-name Questing Quokka, is now available for Beta testing!

The developer team announced the release last night for Ubuntu Desktop, Server, WSL, Cloud products, and official flavors.


Ubuntu 25.10 is a new short-term release with 9-month support until July 2026. It features GNOME 49, Kernel 6.17, and various other toolkit and packages updates.

The new Kernel is still in RC release stage at the moment. Compare to Kernel 6.14 in current 24.04 and 25.10, it features many new and improved hardware support, drivers, and performance improvements. For detailed changes, go HERE and HERE.

The Ubuntu Desktop so far has GNOME 49 RC, though the stable release of this desktop environment was just released 2 days ago, which features:

  • New Showtime video player (not pre-installed in Ubuntu with default mode, though available in App Center).
  • New Papers document viewer.
  • Remove ‘GNOME on Xorg’ (Ubuntu on Xorg) session, meaning Wayland only.
  • Music playback control from lock screen.
  • Improve remote desktop with multi-touch, relative mouse input, and additional virtual desktop.
  • Add configuration for pointing stick (aka TrackPoint).
  • Support relative dials on tablet pads.
  • Brightness in the Quick Settings when HDR is enabled, with external monitors support.
  • And more. See the official release note.

As you know, Ubuntu features a customized GNOME desktop experience. The 25.10 release replaced the default terminal with Ptyxis, which features first-class container integration.

And, it finally added Loupe as default image viewer, which was introduced in GNOME since v45. The image viewer features sandboxed image loading by using Glycin library, which also handles the background image loading in Gnome 49.

New default Ptyxis terminal emulator

Other changes in the Beta include screen reader support in new desktop installer, TPM-backed Full Disk Encryption recovery key management, and tryboot’s A/B booting support on Raspberry Pi.

There are as well toolkit updates, including systemd 257, gcc 15.2, binutils 2.45, glic 2.42, python 3.13.7, LLVM 20, Rust 1.85, Golang 1.24, openJDK 25, Mysql 8.4, Ruby 3.3, and more.

The final release of Ubuntu 25.10 is planned for October 9. For more about it, see the official release note.

Get Ubuntu 25.10 Beta

NOTE: Ubuntu 25.10 so far has a bug that prevents it from loading other dual-/multi-boot OSes. Configure apparmor didn’t work in my case, and I end up disabling Apparmor to get back Ubuntu 24.04.

For Ubuntu 25.04, it’s now able to upgrade to this 25.10 Beta, by firstly installing all available updates, then launch “Update Manager” via the command below:

update-manager -d

And if everything goes well, you’ll be able to upgrade from Beta to 25.10 final by installing updates regularly through “Software Updater”.

NOTE: It’s IMPORTANT to backup your data before upgrading, as it may have bug that breaks your system.

For choice, the iso images of the Beta are available to download at the link below:

Don’t know why, but it misses amd64 iso image at the moment of writing. To workaround the issue, you may choose a download mirror instead to get the ISO.

And for non-GNOME users, there are also 10 official flavors features different desktop environments, which can be download from either their websites or this page.

GNOME 49 Officially Released with New Video Player & Document Viewer

By:Ji m
18 September 2025 at 17:30

GNOME developer team finally announced the 49 release of this popular Linux Desktop environment!

If everything goes well, GNOME 49 will be the default desktop for Ubuntu 25.10, Fedora Workstation 43, and optional for Arch, Manjaro, etc Linux distributions.

The new desktop release introduced Showtime to replace Totem as the default video player, and Papers to replace Evince as the default document viewer.

Both use the GTK4 plus LibAdwaita libraries for the modern user interfaces with native look and touch friendly experience in today’s GNOME desktop.

Showtime video player

Gnome on Xorg (or Ubuntu on Xorg) is finally removed in the release, meaning there’s no longer Xorg/X11 session but only Wayland for GNOME. Though, the GDM login screen still can load other Xorg sessions, e.g., XFCE and Cinnamon.

It as well features new accessibility menu in login screen, with Quick Settings style buttons to toggle access to screen keyboard, screen reader, etc tools.

And, user can now control music playback and power-off/restart (though not enabled by default) from the lock screen.

GNOME 49 also improved Remote Desktop support, by adding multi-touch input support for client device with touch-screen, relative mouse input for better 3D app or gaming experience, and ability to have additional virtual monitors even when there aren’t additional displays physically present.

The image loading and the background wallpaper now are handled by the Glycin library, which is sandboxed to help prevent security exploits.

And, the release now supports changing the display brightness in the Quick Settings when HDR is enabled. While, these new HDR brightness controls support external displays, and allow multiple displays to be adjusted at the same time.

There are also many improvements to the Gnome Weather, Gnome Maps, Gnome Calendar apps, as well as following changes:

  • Move “Do Not Distrub” to Quick Settings.
  • Indicate when Preserve Battery Health enabled.
  • New wallpapers for HDR displays.
  • Improved Flatpak app data parsing for GNOME Software.
  • New option to disable “Super” shortcut key.
  • Support relative dials on tablet pads.
  • Hardware accelerated video encoding for Camera app.
  • Add ‘Donate’ button in About page.
  • Add configuration for pointing stick (aka TrackPoint)

For more about GNOME 49, see the official release note.

Get GNOME 49

As mentioned above, GNOME 49 will be available in Ubuntu 25.10, Fedora Workstation 43, etc Linux Distributions. And, Arch has already made the new release into GNOME Unstable repository.

For choice, there’s GNOME OS Nightly available for trying it out in either virtual machine (only support Gnome Boxes) or real hardware.

Dolphin Emulator 2509 now Emulates Cars 2 & Disney Infinity Smoothly

By:Ji m
18 September 2025 at 01:15

Dolphin, the free open-source GameCube and Wii game emulator, released new 2509 version today after another 3 months of development.

The new release of this game emulator revamped the settings UI, added some new features, and, it can finally emulate Toy Story 3, Cars 2, and Disney Infinity on powerful hardware at full speed.

It seems that Avalanche Software, the team behind the 3 games, don’t like Dolphin Emulator.

However, we’re going to go out on a limb and say that Avalanche Software, the team behind the Trio of Destruction™, weren’t so fond of us. Not only did they leave crude messages hidden in game data for “hackers” to find, but we also suspect that someone on their team was actively monitoring us.

While Toy Story 3 took a few years to get working, the writing was on the wall for quite some time that eventually it would be solved. So, for Avalanche’s next two games, we believe that they left a trap specifically designed to defeat Dolphin: the dcache suicide pill.

As the announcement said, the team added a trap in the games designed to stop Dolphin from running them in PC or mobile phone. But with the 2509 release, it finally fixed the issue by adding a patch allowing to run the Trio of Destruction™ fluidly on powerful hardware.

Besides that, the release revamped the settings UI, and introduced new “Map and Calibrate” button, allows to simply map and calibrate joystick at the same time.

It also added “Correct Time Drift” option under Advanced setting page. It pursues accurate overall elapsed time by running fast after stutters, which is useful for internet play.

Dolphin-emu 2509 also improved the general performance for Bluetooth Passthrough. It added the ability to load Realtek firmware, when trying to use a Realtek adapter with the feature for the first time.

Meaning now the Bluetooth Passthrough now supports modern Bluetooth adapters, such as TP-Link Bluetooth 5.3 Nano and Asus USB-BT500.

Other changes include:

  • Disable Dual Code mode by default for desktop, as it’s unstable and modern desktop PCs are overpowered for Dolphin. Though, there’s an option to turn it back.
  • Fix DSP-LLE Recompiler exception that could cause games not booting.
  • Add resource manager, which tracks the requests per frame for better performance loading textures, and tracks memory usage to prevent out of memory.
  • Load custom texture multi-threaded.

In addition, the Nintendo Switch 2 NSO GameCube Controller is not supported yet in the release, as it’s not fully implemented by the upstream SDL (Simple DirectMedia Layer).

Install Dolphin Emulater 2509

The software website provides official installer packages for Windows, macOS, Linux, and Android, which are available to download via the link below:

For Linux, it’s Flatpak package that runs in sandbox environment. Download either X86_64 for Intel/AMD or aarch64 for ARM64 platform, then install via command:

flatpak install /path/to/flatpak-file

NOTE: Ubuntu does NOT support Flatpak out-of-the-box, run the command below to install the daemon first:

sudo apt install flatpak

For Ubuntu users who prefer the native .deb package, I’ve made the packages into this unofficial PPA for Ubuntu 22.04, Ubuntu 24.04, and Ubuntu 25.04 on amd64 (Intel/AMD) and arm64 (e.g., Raspi, Snapdragon processors) platforms.

Simply open terminal (Ctrl+Alt+T) and run 3 commands below one by one to add PPA, refresh cache, and install the emulator:

sudo add-apt-repository ppa:ubuntuhandbook1/dolphin-emu
sudo apt update
sudo apt install dolphin-emu

VLC 3.0.22 Adds Qt6 & AMD AI Frame Interpolation Support [Ubuntu PPA]

By:Ji m
16 September 2025 at 19:27

VLC, the popular free open-source media player, rolled out the new 3.0.22 version few days ago.

This is the twenty-third release of VLC 3.0 branch, code-name “Vetinari”, with the work of more than a year of development.

VLC qt dark interface

For Windows user, the release added official ARM64 build (for e.g., snapdragon processors), though it needs at least Windows 10 RS5 17763 / 1809.

It fixed the support for Windows XP SP3, though restricted the SystemParametersInfo calls. And, now it allows to rename, move, or delete the playing files on Windows.

The UI now can be build with Qt6, while Qt5 is still supported. And, it introduced a dark palette for the Qt interface.

For user with AMD graphics card, VLC 3.0.22 added AMD Fluid Motion Frames (AFMF) support. It’s a video enhancement technology that use AI to generate and interpolate frames between existing frames in a video, resulting more fluid and high frame rate video.

It also added dav1d-all-layers option for the dav1d decoder, to control whether or not to display all spatial layers. The feature is disabled by default, but you may enable it to make the decoder output every available spatial layer in the video higher-quality playback experience.

Other changes include A_ATRAC/AT1 (Sony ATRAC1 Codec) support in matroska, handle pictures in FLAC, as well as:

  • Assume subpictures are in SDR by default
  • Fix Opus channel mapping
  • Fix hardware decoding with VideoToolbox of XVID MPEG-4 video
  • Fix DVD CEA-608 captions parsing
  • Fix ProRes 4:4:4:4
  • Disable decoding using libdca, libmpeg2 and liba52 by default in favor of libavcodec
  • Handle mkv-use-chapter-codec option
  • Prevent FLAC seeking logic get stuck
  • Fix VOB/AOB LPCM/MLP detection failing occasionally
  • Cut QNap title on first invalid character
  • Fix display of certain JPEG files
  • Fix playback of very short ASF files (duration less than 1s)
  • Fix crashes in multiple demuxers
  • Fix SFTP seeking for large files on 32-bit OS
  • UPnP: remove SAT>IP channel list fallback
  • Use a better stretch mode in wingdi
  • Fetch missing device information when running in UWP

Install VLC 3.0.22

VLC 3.0.22 is not officially announced yet, though the source code now is available to download via the link below:

For Debian, the Deb Multimedia repository has made the package for Debian Unstable. And I’ve uploaded the new release package into this unofficial PPA for Ubuntu 22.04, Ubuntu 24.04 and 25.04.

To add the PPA and install VLC 3.0.22 in Ubuntu, open terminal (Ctrl+Alt+T) and run commands below one by one:

sudo add-apt-repository ppa:ubuntuhandbook1/vlc
sudo apt update
sudo apt install vlc -t "o=LP-PPA-ubuntuhandbook1-vlc"
❌