Normal view

Received — 6 September 2025 Linux News & Update

GNOME 49 RC Released! Re-enable X11 Support in GDM

By:Ji m
5 September 2025 at 21:17

The release candidate (RC) of GNOME Desktop 49 is out for testing purpose!

This is the final development release for GNOME 49, while the stable release is planned for September 17th. It added some new features, various bug-fixes, and improvements.

As you may know, GNOME 49 removed the ‘Gnome on Xorg’ session since the alpha release, which as well disabled X11 sessions in GDM.

In this RC release, it re-enabled X11 by default in GDM, meaning there’s NO “Gnome on Xorg”, but it still can load other X11 based desktop sessions, e.g., XFCE, MATE, and Cinnamon, from the login screen.

GDM 49 re-enabled ability to load other X11 desktop sessions.

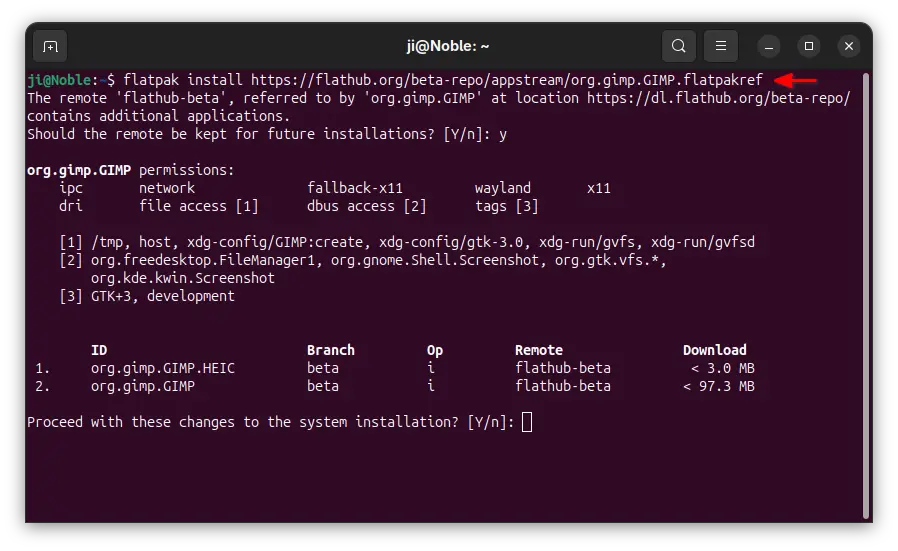
Glycin, the image loading library, now has experimental JPEG 2000 loading support, though it’s disabled by default. And, since this RC, the GNOME background images are now loading by this library.

For GNOME Remote Desktop, the release added support for relative mouse motion events, which is commonly used in 3D apps, e.g., video games or design software, to control a virtual camera or object orientation.

The gnome-remote-desktop also added support for extending the desktop with a virtual monitor. I’m not sure how it differs to the virtual monitor functionality introduced since GNOME 42, but it should make mouse movement with embedded cursors more performant. See the merge request for details.

Other changes include:

  • Add button in Accessibility to launch Orca preferences
  • Disable the org.freedesktop.ScreenSaver proxy service on the login screen
  • Indicate “Battery Health” (battery charge limit) status.
  • F5 and Ctrl+R keyboard shortcuts to refresh Gnome Weather.
  • Insert ~/ instead of ~ in Nautilus path-bar when pressing ~.
  • Add Advertise Broadcast RGB support, and more.

And, below are the big changes introduced in last Beta & Alpha releases:

  • Added Showtime video player and Papers document viewer
  • Use glycin as backend for decoding and saving images for gdk-pixbuf and image viewer.
  • Move “Do Not Distrub” to top-right Quick Settings menu.
  • Added configuration for pointing stick (aka TrackPoint)
  • Support relative dials on tablet pads.
  • Option to disable “Super” (Windows key) shortcut key.
  • Add music playback control in lock screen.
  • Option to show “Restart” and “Power-Off” menu options to the lock screen.
  • Per-monitor brightness control in Quick Settings.
  • Hardware accelerated video encoding for Camera app.
  • Add ‘Donate’ button in About page.

How to Get GNOME 49 RC

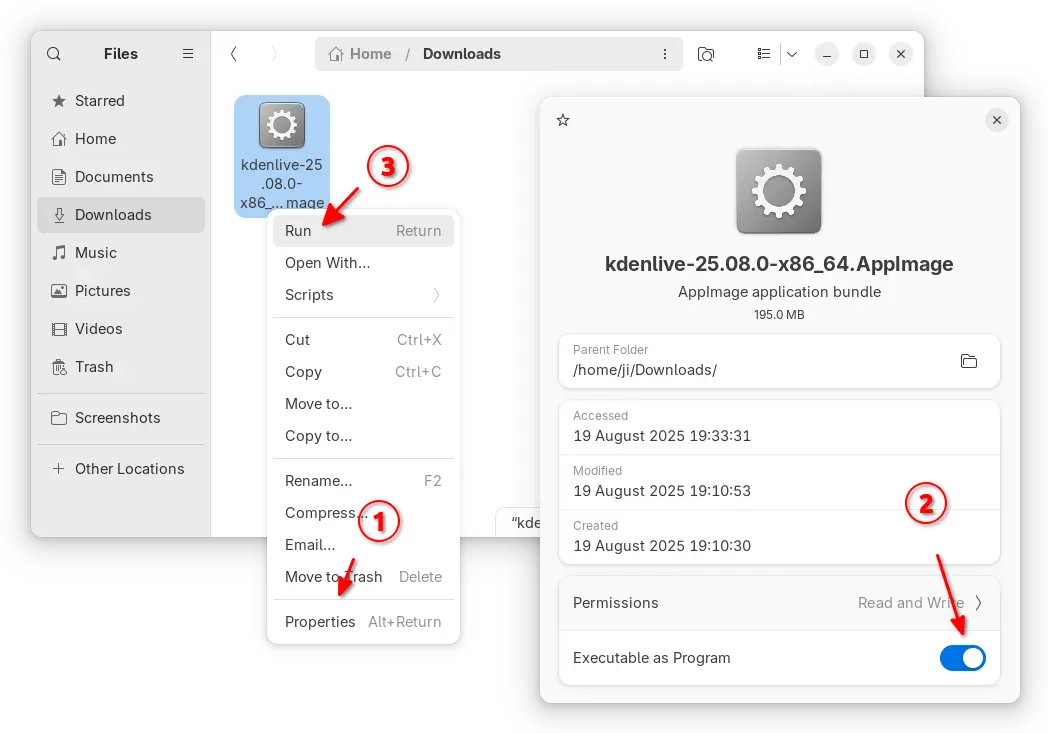
GNOME provides an installer image for testing and porting extensions. Along with the announcement, they are available via the link below:

For Ubuntu, GNOME 49 RC has been added for Ubuntu 25.10 Deb build, just launch “Software Updater” and install all available updates to get it. For Arch Linux, it has been added into the GNOME Unstable repository.

Received — 5 September 2025 Linux News & Update

Linux Mint 22.2 Released with New Fingerprint Manager App

By:Ji m
4 September 2025 at 19:15

Linux Mint, the popular Ubuntu LTS based Linux Distro, announced new 22.2 point release today.

Linux Mint 22.2, code-name “Zara”, is the second update for the 22 release series that’s based on Ubuntu 24.04 with support until 2029.

The release introduced new XApp called Fingwit, which provides a graphical interface to record and manage your fingerprints, and configure to enable fingerprint authentication for login screen (screensaver), sudo commands, and admin apps.

The app uses system default libfprint daemon to detect if your computer has a supported fingerprint reader. Meaning it won’t work (e.g., ThinkPad T480s in my case) for those using third-party libraries.

Besides new XApp, there are many improvements to other apps. The Sticky app now has rounded corners (top 2 corners), supports running in Wayland session, and a new d-bus method has been added to reload the notes.

The Hypnotix IPTV player app now has 2 new “Theater Mode” and “Borderless Mode”, allowing to toggle the app window to hide all the controls and menus, and even window borders. And, it’s now faster on startup and searching with large playlists.

Linux Mint 22.2 also improved its login screen (handled by LightDM display manager). It now displays user avatars, and applies blur effect to the panel and user selection dialog box for better appearance.

image from linuxmint.com

Linux Mint supports Flatpak out-of-the-box. As so many great applications use LibAdwaita for their modern user interface, the release patched LibAdwaita with theme support, and added it support for Mint-Y, Mint-X and Mint-L themes.

Some apps, e.g., gnome-calendar, baobab (Disk Usage Analyzer), and simple-scan (Document Scanner), have been updated with the new LibAwaita library, so they follow the themes mentioned above.

Other changes in the release include:

  • Add accent colors support for LibAdwaita Flatpak apps.
  • Fork LibAdwaita with libadapta with theme and extra features support.
  • New xapp-aiff-thumbnailer thumbnailer for cover art in .aiff audio files
  • Add iOS app for Warpinator file sharing utility.
  • Configurable EDID-based color correction (disabled by default) in XViewer.
  • Description field is now editable in WebApp Manager.
  • Add possibility to use leading zeros when renaming multiple files and using enumerations
  • Add description in Software Manager to tell the difference between Flatpak and system packages.
  • Improve search accuracy in MATE application menu.

For more, see the official release note.

Download or Upgrade to Linux Mint 22.2

The official Mint 22.2 .iso images for Cinnamon, MATE, and XFCE desktops, are available to download via the link below:

For Linux Mint 22.1, simply launch Update Manager, refresh and install new version of mintupdate or mint-upgrade-info. Finally, go to Edit -> Upgrade to “Linux Mint 22.2 Zara” to start the upgrading process.

Received — 4 September 2025 Linux News & Update

GIMP 3.1.4 Released! Link Layers, Vector Layers & MyPaint Brushes 2

By:Ji m
4 September 2025 at 00:08

GIMP 3.1.4, the second development release for next major 3.2, was released few days ago!

The new release of this popular image editor introduced some exciting new features, including link layers, vector layers, MyPaint brushes version 2, and more.

First, by using File -> Open as Link Layer... or press Ctrl+Alt+Shift+O on keyboard, user can now open an image as link layer.

In the case, you may make changes to the image file via any other image editors (e.g., Krita, Inkscape), and see it instantly updated inside GIMP!

You can also non-destructively scale and rotate the link layer without impacting the quality of the original image. And, use “Discard Link Information” context menu option to convert it to a normal raster layer.

GIMP 3.1.4 also implemented the vector layer feature. After drawing a path (via Paths tool), user can now click “Create New Vector Layer” button to generate a vector layer associated with that path, then set the fill and stroke colors and other properties.

You can continue to edit the path, as the vector layer will automatically update. It as well has a “Discard Vector Information” context menu option to convert it to a regular raster layer.

The release also updated MyPaint Brushes to version 2, along with 20 new brushes from the Dieterle set. They include the long requested arrow brush and Posterizer brush.

For Ubuntu users, GIMP is going to make official SNAP package, which can be installed directly from Ubuntu Software or App Center, and also be installed in other Linux.

The current GIMP Snap package is maintained by the snapcrafters developers. The GIMP developers are talking to them to pass over the ownership, so they can maintain it as official package.

GIMP Snap package in APP Center. GIMP to take over this community maintained package

Other changes in GIMP 3.1.4 include:

  • New GEGL Filter Browser.
  • New Gain slider in MyPaint Brush tool, to adjust strength of input pressure.
  • Add boldd, italicize, underline keyboard shortcuts for Text tool.
  • Live preview outline color for text tool.
  • Add import support for HRZ, signed JPEG 2000, non-DXT PAA textures, Seattle Filmworks (SFW93A, SFW94A).
  • Support loading TIFF layer visibility, blending modes, and color tags
  • Support System Colors theme for macOS.
  • New API to change the paintbrush fade length and repeat settings.
  • New public API for creating vector layers.
  • Add ARM64 build of nightly Flatpak pacakge.

Compare to current GIMP 3.0 stable, there are as well many changes introduced since 3.1.2:

  • Add system color scheme support for Linux (Flatpak package) and Windows.
  • New brush preview toggle.
  • New overwrite paint mode.
  • New Outline Direction option for text tool
  • Import support for Photoshop RGB and grayscale patterns, APNG animations, multi-layer OpenEXR images, Over-the-Air Bitmap format, Jeff’s Image Format (.jif).
  • Export Krita .kpl, PSB Photoshop Large format, JPEG 2000, HEJ2.
  • Support Photoshop .acv and .alv presets in GIMP Curves and Levels filters.

For more about GIMP 3.1.4, see the official release note.

How to Install GIMP 3.1.4

The official GIMP packages for Windows, Linux, and macOS are available to download at the link below:

Linux user may choose the non-install AppImage package, which can be run directly to launch the image editor, after adding executable permission.

NOTE: Ubuntu since 22.04 needs to run command in terminal (Ctrl+Alt+T) to install required library first:

sudo apt install libfuse2

Or, run the command below to install the Flatpak package instead which runs in sandbox environment.

flatpak install https://flathub.org/beta-repo/appstream/org.gimp.GIMP.flatpakref

If you already have GIMP 3.1.2 installed as Flatpak, then try the command below to update it:

flatpak update org.gimp.GIMP//beta

If you have both the Devel and Stable versions of GIMP installed as Flatpak, and don’t know which icon to use, then use the command below to start the GIMP 3.1.4 from terminal:

flatpak run org.gimp.GIMP//beta

NVIDIA 580.82.07 Added Smooth Motion for RTX 40 Series GPUs

By:Ji m
3 September 2025 at 19:48

For NVIDIA users with GeForce RTX 40 Series GPUs (e.g., 4060, 4090), it finally supports Smooth Motion frame generation for better gaming performance in Linux.

NVIDIA Smooth Motion is a feature designed for games without native DLSS support. It uses AI to generate additional frames between two rendered frames for overall smoothness of game-play.

The feature was initially added for Linux via NVIDIA 575 driver series, but only for RTX 50 series GPUs. Now with NVIDIA 580.82.07, the feature also works for RTX 40 GPUs. While, Windows users will probably get it in 590 driver series.

As the latest production branch driver, NVIDIA 580 also added fifo-v1 protocol support to reduce visual inconsistencies and potential stuttering for apps/games running in Wayland with Vulkan backend.

It as well enabled RMIntrLockingMode feature by default, which can help reduce stutter especially when using virtual reality (VR).

There are as well new “OutputBitsPerComponent” MetaMode attribute, allowing to control the number of bits per color component transmitted via a display connector in Xorg with multiple displays.

Other changes in NVIDIA 580 so far include:

  • Feature to reduce time spent in the interrupt top half for low latency display interrupts by deferring the work until later.
  • Update GPU clock value reporting in nvidia-settings, NVML, and nvidia-smi to show clocks before thermal and idle slowdowns.
  • Fix Bigscreen Beyond Head Mounted Displays compatibility.
  • And various bug-fixes.

How to Install NVIDIA 580.82.07

The official package and release note for NVIDIA 580.82.07 is available at the link below:

For Ubuntu, it’s HIGHLY recommended to wait the Ubuntu’s official package, though it’s still in proposed testing stage at the moment.

Or, use either the popular “Graphics Drivers” team PPA which now contains NVIDIA 580.82.07 for Ubuntu from 18.04 to 25.04, or “Canonical Kernel Team” team PPA for 22.04 and higher.

To add the Canonical Kernel Team PPA, open terminal (Ctrl+Alt+T) and run command:

sudo add-apt-repository ppa:canonical-kernel-team/nvidia-graphics2

Then, you may either use “Additional Drivers” (graphical tool) to install nvidia-580 for desktop, or nvidia-580-server for server computing use.

Or run one of the commands below instead in terminal to install the driver:

sudo ubuntu-drivers install nvidia:580
sudo ubuntu-drivers install --gpgpu nvidia:580-server
Received — 3 September 2025 Linux News & Update

Compile FFmpeg 8.0 in Ubuntu with NVIDIA GPU Acceleration

By:Ji m
2 September 2025 at 21:44

This is a step by step guide shows how to manually compile & install FFmpeg 8.0 from source with NVIDIA GPU acceleration support through cuda-nvcc and enable-libnpp in Ubuntu 24.04 & 22.04.

FFmpeg 8.0 so far is the latest version of this popular multi-media library, that features APV and ProRes RAW decoders, hardware accelerated VP9 and VVC encoding, and new Vulkan compute-based codecs support for FFv1 (encoding and decoding).

This tutorial is tested in Ubuntu 24.04 & 22.04, though it should also works in Debian, Linux Mint

Before Getting Started

FFmpeg now supports hardware accelerated NVENC encoding (AV1, H.264, HEVC) and NVDEC decoding (H.264, HEVC, MJPEG, MPEG-1/2/4, VP8/VP9, VC-1, AV1) through ffncodec, and scale_cuda filters to replace scale_npp.

They are usually enabled by default in FFmpeg packages from Ubuntu system repository or PPAs (e.g., my PPA and Rob Savoury’s PPA).

Meaning, you don’t need to build FFmpeg by yourself, just install it from one the previous sources, then you have the basic NVIDIA GPU acceleration support.

FFmpeg in Ubuntu & PPA repositories has nvenc & nvdec out-of-the-box

You ONLY need to follow this tutorial, when you need specific or more advanced CUDA-dependent features and/or scale_npp only filters.

And, you need:

  • a NVIDIA GPU that support NVENC/NVDEC (see the support list).
  • Install NVIDIA proprietary driver, though either Additional Drivers utility or ubuntu-drivers CLI tool. See the official guide.

Step 1: Install Nvidia Codec SDK headers

nv-codec-headers, the FFmpeg version of Nvidia Codec SDK headers, is available in Ubuntu repositories, but a bit old.

For the most recent version, press Ctrl+Alt+T on keyboard to clone the source code:

git clone https://git.videolan.org/git/ffmpeg/nv-codec-headers.git

Run sudo apt install git to install git first, if you don’t have it.

Then, run the command below to navigate to the source folder, and install it:

cd nv-codec-headers && sudo make install

Step 2: Install Build Dependencies

To build the source, we need some dependency libraries.

First, run command in terminal (Ctrl+Alt+T) to install the essential dependency packages:

sudo apt install build-essential nasm cmake libtool libc6 libc6-dev unzip wget libnuma1 libnuma-dev nvidia-cuda-toolkit pkg-config

For choice, you may install more via sudo apt install package-name (replace package-name) for more features, e.g.,

  • libvulkan-dev, for Vulkan compute-based hardware acceleration (the package in 22.04 is outdated).
  • libjxl-dev, for JPEG-XL support (the package is not available in 22.04).
  • libgme-dev, for Game Music Emu.
  • libvpx-dev, for VP8, VP9 decoding and encoding.

And, below are the packages I use for building FFmpeg into PPA:

libmp3lame-dev zlib1g-dev libvorbis-dev libsdl2-dev libxvidcore-dev liblzo2-dev texinfo libgcrypt-dev libx264-dev libtheora-dev libgsm1-dev libsnappy-dev libdc1394-dev libbs2b-dev libspeex-dev libopencore-amrwb-dev libfreetype-dev libopenmpt-dev nasm libopenjp2-7-dev libharfbuzz-dev libvdpau-dev libtesseract-dev libopencore-amrnb-dev libxfixes-dev libgl-dev libbz2-dev libssl-dev libass-dev libasound2-dev libva-dev libjack-jackd2-dev libvpx-dev frei0r-plugins-dev libvo-amrwbenc-dev libsctp-dev libopus-dev gnutls-dev frei0r-plugins-dev libsoxr-dev linux-libc-dev ladspa-sdk libaom-dev libfontconfig-dev libfdk-aac-dev libpulse-dev libzvbi-dev libiec61883-dev libavc1394-dev libleptonica-dev liblzma-dev libx265-dev libxext-dev libcaca-dev libopenh264-dev librubberband-dev libwebp-dev libgme-dev glslang-dev opencl-c-headers libshine-dev libfribidi-dev libxcb1-dev libxcb-shm0-dev libxcb-xfixes0-dev libcdio-paranoia-dev libcodec2-dev ocl-icd-opencl-dev libzimg-dev libmysofa-dev libbluray-dev libzmq3-dev libaribb24-dev liblensfun-dev liblilv-dev flite1-dev librsvg2-dev libtwolame-dev libopenal-dev librabbitmq-dev libvulkan-dev libxavs2-dev libsrt-gnutls-dev libdavs2-dev libomxil-bellagio-dev libxml2-utils libsmbclient-dev libchromaprint-dev libunwind-dev libdvdnav-dev libdvdread-dev

Step 3: Compile & install FFmpeg 8.0

1. Download & extract the source

Now download FFmpeg 8.0 source tarball from its website, decompress, then right-click on extracted folder and choose “Open in Terminal” to open terminal with source folder as working directory.

open FFmpeg source folder in terminal

For Ubuntu server without GUI, run the command below to download the source:

wget https://ffmpeg.org/releases/ffmpeg-8.0.tar.xz

Then, decompress and navigate to the source folder:

tar -Jxf ffmpeg-8.0.tar.xz && cd ffmpeg-8.0

2. Configure the source

Now, configure the source by running command:

./configure --enable-nonfree --enable-cuda-nvcc --enable-libnpp --extra-cflags=-I/usr/local/cuda/include --extra-ldflags=-L/usr/local/cuda/lib64 --disable-static --enable-shared

Here, you may add more configure options, e.g.,:

  • --enable-libvpx, need ‘libvpx-dev’ to be installed.
  • --enable-vulkan, need ‘libvulkan-dev’ to be installed.
  • --enable-libjxl, need ‘libjxl-dev’ to be installed.

And even more. See either configure file, or run ./configure --help to list more choices.

Configure the source

3. build & install FFmpeg

If configure is done without error, you may then run the command below to build it:

make -j4

Here j4 means to start 4 threads in parallel. You may replace it with j8, or even j16 depends on your CPU, or use -j$(nproc) to use all CPU cores.

build with ‘make’ command

If everything goes well, finally install FFmpeg by running command:

sudo make install

install ffmpeg via ‘make install’

Step 4: Verify

After installed FFmpeg, run the command below to print its version and configuration.

ffmpeg

If it said error while loading shared libraries, then run command to add /usr/local/lib as LD_LIBRARY_PATH environment variable, which works for current terminal session.

export LD_LIBRARY_PATH="/usr/local/lib:$LD_LIBRARY_PATH"

Or, write the command into end of .profile or .bashrc file in user home to make it permanent for current user.

Finally, try to transcode with GPU acceleration via command (replace input.mp4 with path to an existing media file):

ffmpeg -hwaccel cuda -i input.mp4 -vf scale_npp=-1:720 -c:v h264_nvenc -preset slow output.mkv

Uninstall:

To uninstall, open the source folder again in terminal and run command:

sudo make uninstall

If you’ve already deleted that folder, then manually remove the executable files from /usr/local/bin and libraries from /usr/local/lib:

Received — 1 September 2025 Linux News & Update

Gnome UI Tweak Tool “Just Perfection” Added Gnome 49 Support

By:Ji m
1 September 2025 at 21:02

Just Perfection, the popular tool to configure Gnome Shell behavior and UI elements, release new 35.0 version few days ago.

In case you don’t know about it, it’s an extension for GNOME desktop that provides a graphical interface to toggle visibility of the desktop elements, and change the common desktop behavior.

The extension provides pre-defined profiles to one click switch between default, minimal, and super minimal desktop appearance.

While, user may customize by hiding the top-panel, panel in overview, dash (dock), on-screen display (OSD), panel items (e.g., clock, indicators), menu items (e.g., calendar and events in clock menu), items in overview and more.

It as well can adjust the panel size (height), position, padding, clock position, OSD position, alt-tab preview size. And, it allows to disable or change animation speed, choose login to blank desktop or overview, maximize new window, disable Super (window logo) key, and more.

In the past few releases, it keeps adding new features, such as ability to hide quick settings buttons (e.g., Dark Mode, Night Light, Airplane), and use accent color for top panel icons though it requires GNOME 47+ and not work for Ubuntu.

Accent Color for icons

The new Just Perfection version 35 added support for GNOME 49, which is default in Ubuntu 25.10 and Fedora 43, though they are all in development stage at the moment of writing.

And, it added ability to toggle visibility (show or hide) of window menu. It’s the menu that pops-up when you right-clicking on header of an app window, which contains options to take screenshot, set always on top, move, resize, or close window.

The Window Menu when your right-click on header of an app window

There are as well fixes for startup freeze in NixOS, and the page icon issue in preferences window for GNOME Shell 48.

How to Install Just Perfection:

The new Just Perfection releases supports GNOME from version 45 to 49. User may install it by visiting the EGO page via web browser:

Then use the ON/OFF toggle to install. Though you need to first install browser extension (if it asks) and refresh. And, Debian/Ubuntu needs to run command (Ctrl+Alt+T) to install the agent package first:

sudo apt install chrome-gnome-shell

For Ubuntu since 22.04, user may also install Extension Manager first from App Center (filter by Debian package), then use it to search & install Just Perfection.

Finally, use either GNOME Extensions or Extension Manager to open Just Perfection preferences page to tweak your desktop.

Install & Set Ptyxis as Default Terminal in Ubuntu 24.04 | 22.04

By:Ji m
31 August 2025 at 15:07

Like the new Ptyxis terminal emulator introduced in Ubuntu 25.10, here’s how to install and set it as default in current Ubuntu 24.04 and 22.04 LTS.

Ptyxis is a modern terminal emulator designed for GNOME with first-class container integration, such as auto-discovery and option to launch a container in new tab, preferences profiles with container integration for Podman, Toolbox, Distrobox, and JHBuild.

The terminal uses GTK4 + LibAdwaita for its modern user interface well integrated into GNOME. And, it supports configurable keyboard shortcuts, user-installable color palettes, GPU acceleration, integrated developer tool, and more.

Ubuntu 25.10 since snapshot 4 has added this terminal app as a replacement of GNOME Terminal. For current 2 Ubuntu LTS releases, it’s easy to install through Flatpak via the steps below.

1. Install Ptyxis

The latest Ptyxis (48.5 so far) won’t build in current Ubuntu 24.04 or 22.04 due to outdated GTK4 and libadwaita libraries. User may choose to install it as Flatpak package, which runs in sandbox environment.

NOTE: This step works only on X86_64 (modern Intel/AMD) and ARM64 platforms.

First, press Ctrl+Alt+T on keyboard to open terminal. When it opens, run the command below to install the flatpak daemon:

sudo apt install flatpak

You may run sudo apt update to refresh your system package cache, if the last command failed.

Then, install the terminal emulator by running command:

flatpak install https://dl.flathub.org/repo/appstream/app.devsuite.Ptyxis.flatpakref

This will install the app system wide, so all users can access it. For choice, you may add --user flag in command to install it for current user only.

Finally, either launch the terminal from menu (log out and back in if app icon not visible) or run flatpak run app.devsuite.Ptyxis to start from terminal.

And for future updates, run the command below to check & install:

flatpak update app.devsuite.Ptyxis

Step 2: Set Ptyxis as default terminal

If you would like to make your terminal apps use Ptyxis as default, and Ctrl+Alt+T launch this terminal instead of Gnome-Terminal, then run following commands one by one.

NOTE 1: Ptyxis has an option in its preferences dialog to set as default, though NOT work in my case.

NOTE 2: This step no longer works for Ubuntu 25.04 and later due to policy change.

Ubuntu until 25.04 uses /etc/alternatives/x-terminal-emulator symbolic link to determine the default terminal app. To configure it, use update-alternatives command to add alternatives and set which to use as default.

1. First, create a wrapper for Ptyxis executable by running command:

sudo nano /usr/bin/ptyxis.wrapper

This command will create a script ptyxis.wrapper under /usr/bin with nano command line text editor.

When it opens, paste the line below, so it will launch Ptyxis with --new-window flag.

#!/bin/sh
flatpak run app.devsuite.Ptyxis --new-window

Finally, press Ctrl+S to save and Ctrl+X to exit. And, run command below to add executable permission:

sudo chmod a+x /usr/bin/ptyxis.wrapper

You may skip creating the wrapper, and use /var/lib/flatpak/exports/bin/app.devsuite.Ptyxis in next commands. Which however only allows to open a single Ptyxis window when pressing Ctrl+Alt+T keyboard shortcut for multiple times.

2. Next, run command to install Ptyxis as an alternative:

sudo update-alternatives --install /usr/bin/x-terminal-emulator x-terminal-emulator /usr/bin/ptyxis.wrapper 10

Here you may replace /usr/bin/ptyxis.wrapper with one of the PATH to Ptyxis executable file below. As mentioned, it however allows only one Ptyxis window, unless passing --new-window flag.

  • /var/lib/flatpak/exports/bin/app.devsuite.Ptyxis for default system-wide installation.
  • $HOME/.local/share/flatpak/exports/bin/app.devsuite.Ptyxis if installed the terminal with --user flag.

Then, run the command below to choose default terminal:

sudo update-alternatives --configure x-terminal-emulator

In my case (see the screenshot), type 4 and hit Enter to select Ptyxis.

Step 3: Add “Open in Terminal” Context Menu option for Ptyxis

If you would like to add “Open in Terminal” look-like context menu to open selected folder in Ptyxis, the popular nautilus-open-any-terminal extension can do the job for Nautilus (aka GNOME Files).

1. First, run command in terminal to install dependency libraries:

sudo apt install python3-pip python3-nautilus gir1.2-gtk-4.0

2. Then, install the extension through pip:

python3 -m pip install --user nautilus-open-any-terminal --break-system-packages

The --break-system-packages flag is required in 24.04 due to PEP 668, though not for 22.04.

3. After installed the Nautilus extension, run the command below to generate dconf configuration:

glib-compile-schemas ~/.local/share/glib-2.0/schemas/

Then quit Nautilus to apply changes:

nautilus -q

4. Finally, launch Dconf Editor which can be installed from either Ubuntu Software or App Center (filter by Debian package).

Then, navigate to “com/github/stunkymonkey/nautilus-open-any-terminal”, and disable default values and set:

  • flatpak to ‘system’ (or ‘user’ if you used --user flag when installing Ptyxis).
  • terminal to ‘ptyxis’.

Finally, right-click on any folder or blank area in file manager to see the new option.

And, remove nautilus-extension-gnome-terminal package to get rid of the default ‘Open in Terminal’ option.

Received — 29 August 2025 Linux News & Update

The Fourth Snapshot Release of Ubuntu 25.10 is Out!

By:Ji m
29 August 2025 at 11:03

Ubuntu 25.10 snapshot 4, the new monthly snapshot release of the next Ubuntu release, is available to download.

This is the final snapshot release for 25.10, as next will be the Beta release planned for September 18, while Ubuntu 25.10 stable release will be available on October 9.

Ubuntu 25.10, code-name Questing Quokka, is the next short term release with 9-month support until July 2026. The official announcement for the snapshot is HERE.

According to the on-going release note page, Ubuntu 25.10 is expected to have GNOME Desktop 49, Linux Kernel 6.17.

In the new snapshot, it added the new default wallpaper, Ptyrix terminal emulator, and Loupe image viewer. In the “apps” settings page, it now provide option to enable auto-start on per-app basis, through it seems only working for those running in sandbox.

New Terminal App

Other changes are mostly already available since the last release. They include removed GNOME on Xorg session, added RVA23S64 ISA profile for RISC-V, TPM-backed Full Disk Encryption recovery key management, and reduced desktop images for Raspberry Pi.

They are as well following changes expected:

  • Full VRR support in Mutter for users with compatible monitors.
  • Better Wayland experience on Nvidia GPUs.
  • Fully functional desktop session on RISC-V CPU architecture.
  • And more.

Download Ubuntu 25.10 Snapshot 4

The snapshot 4 provides desktop images for amd64 and arm64/aarch64, server images for amd64/arm64/aarch64, PowerPC, RISC-V, and IBM Z, as well as WSL images, Network install, and pre-installed desktop and server images, which are available to download via the link below:

For non-GNOME users, there are also 10 official flavors features different desktop environments, including:

[Quick Fix] Firefox Cannot Download or Open Files in Ubuntu 24.04

By:Ji m
28 August 2025 at 21:43

The default Firefox browser (Snap version) in Ubuntu 24.04 is always failing to download or open files! Here’s why and how you can fix it.

Not only for Firefox, the issue also happens when read or write user files with other SNAP apps in both Ubuntu 22.04 and 24.04 LTSs.

Firefox cannot download or open files in Ubuntu 24.04

Why?

I first heard of the issue was that some of my readers reported they cannot download HPLIP installers when following my tutorial.

I thought it was something to do with the download server until I see the snap warnings below in screenshot:

snap warns AppArmor enabled by no prompting client present

The warning told me that AppArmor (the kernel security module) is enabled, but no prompting client present. So for all snap apps, it auto-denies all the requests when trying to read or write files in user directories.

Meaning NOT only Firefox, all the applications installed as snap packages in Ubuntu 22.04 and 24.04 have the issue, while Ubuntu 25.04 excluded as it has the prompting client installed out-of-the-box.

In short, Ubuntu now has AppArmor enabled by default! And, Ubuntu 22.04 & 24.04 auto-deny snap apps’ permission requests due to lack of prompting client to manage the requests!

How to Fix the issue

To fix the issue, you may choose one of the options below:

  • install prompting client to manage snap app permission requests.
  • disable AppArmor (NOT RECOMMEND).
  • use non-snap apps.

Option 1: Install Prompting Client in Ubuntu 24.04 | 22.04

I’ve written about how to install the prompting client as well as security center in Ubuntu.

Prompting client is the official client for snap apparmor prompting. And, the desktop Security Center provides an easy-to-access interface to manage all snap apps permissions you added.

The Desktop Security Center

Both the packages are snap and pre-installed in Ubuntu 25.04, while the current 2 Ubuntu LTS releases may install them by doing the steps below:

  • either press Ctrl+Alt+T to open terminal, and run the commands below one by one to install the packages:
    sudo snap install desktop-security-center
    sudo snap install prompting-client

  • or, launch App Center (or Ubuntu Software) then search & install both (filter by snap package) packages:

    install prompting client via AppCenter

After successfully install the client, you may now launch a Snap app (e.g., Firefox) then try downloading or opening a file. It will pop-up a dialog asking to grant permission, either once or always.

Prompting client asks to grant permission when reading/writing files via Snap

Once you clicked “Allow”, then the snap (Firefox in the case) can open or the download the file. And, you may then launch “Security Center” to manage the permissions you set.

Option 2: Disable AppArmor (NOT RECOMMEND)

AppArmor is a Linux Kernel security module to restrict app capabilities and permissions with profiles. Due to security reason, it’s NOT recommended to disable this feature.

But if you insist, do the following steps to disable it in Ubuntu (and most other Linux) which is using the default Grub bootloader.

1. First, press Ctrl+Alt+T to open terminal, and, run command to edit Grub configuration file:

sudo nano /etc/default/grub

2. When file opens in terminal, add apparmor=0 as value to either ‘GRUB_CMDLINE_LINUX_DEFAULT’ or ‘GRUB_CMDLINE_LINUX’ section.

3. After edited the file, press Ctrl+S to save and Ctrl+X to exit. Finally, run command below to update Grub:

sudo update-grub

And, the change will apply in next boot. To check AppArmor status, run command sudo aa-status in terminal.

Tips: For choice, user may install the graphical Grub-Customer tool, and use the tool to add apparmor=0 as kernel parameter under “General” tab.

Disable AppArmor via Grub Customizer

That’s all. Enjoy!

CopyQ 11.0.0 Adds Borderless Mode, New Class for HTTP Requests

By:Ji m
26 August 2025 at 21:42

CopyQ, the free open-source clipboard manager, released new 11.0.0 version few days ago.

The new release of this Qt-based advanced clipboard manager added some new features and improved scripting support with new class and other changes.

CopyQ window without title-bar and border

First, the release introduced new frameless_window option, allowing to show or hide the header/title-bar and window borders.

Simply, launch the action dialog (go to ‘Item -> Action’ or press F5 key) and run the command below will hide them, making CopyQ window borderless (Ubuntu may use Super + drag to move window in this mode).

copyq config frameless_window true

While, Linux user may also run the command from terminal to do the same job. And, replace true with false in the command to un-hide the header and border.

For advanced users who use the scripting API for network request, CopyQ 11.0.0 introduced new NetworkRequest class, allowing to make HTTP request with custom headers, HTTP method, number of allowed redirects and timeout.

Here’s an example from the official Docs:

let req = NetworkRequest();

# allow redirects
req.maxRedirects = 5;

# set request headers
req.headers = {
   'User-Agent': req.headers['User-Agent'],
   'Accept': 'application/json',
};

# create JSON data
const data = JSON.stringify({text: 'Hello, **world**!'});

# send POST request
const reply = req.request(
    'POST', 'https://api.github.com/markdown', data)

# the request is synchronous and may not be finished
# until a property is called (like reply.data or reply.status)
if (!reply.finished) { serverLog('Processing...'); }
print(reply.data);

CopyQ added Emacs navigation key-bindings support in last 10.0.0, the new release improved it by enabled Vi/Emacs navigation in menus, and Ctrl+[ in Vi and Ctrl+G in Emacs to work in many other places as Esc key (e.g., to hide menus, dialogs).

It as well added support localizing command names in the command INI files, e.g.,:

[Command]
Name = ...
Name_cs = ...
Name_fr = ...
Name_pt_BR = ...
Name_pt = ...

Other changes include:

  • Automatically switch light / dark header (title-bar) to match system color scheme.
  • Support showing preview for more images: webp and ico.
  • Prevent backspace from closing the main window.
  • Selections and current items/rows/data in scripts now only relate to the tab selected with tab(...) in scripts
  • Various bug-fixes and translation updates.

How to Install CopyQ Clipboard Manager 11.0.0

For more changes, and installer packages for Windows, macOS, Debian, openSUSE, and Raspbian, go to the project releases page:

For Ubuntu 22.04, Ubuntu 24.04, and 25.04, the official PPA has updated with the new package for modern Intel/AMD platform.

Simply press Ctrl+Alt+T on keyboard to open terminal and run commands below one by one to add PPA & install the clipboard manager:

sudo add-apt-repository ppa:hluk/copyq
sudo apt update
sudo apt install copyq

CopyQ can be also installed in most Linux on Intel/AMD and ARM platforms through Flatpak package, which runs in sandbox environment.

  • Install flatpak daemon. For other Linux, see this setup guide:
    sudo apt install flatpak
  • Install the clipboard manager:
    flatpak install https://dl.flathub.org/repo/appstream/com.github.hluk.copyq.flatpakref

Uninstall CopyQ

Depends on which package you installed, you may remove CopyQ (.deb) by running command:

sudo apt remove copyq

Then remove the Ubuntu PPA from your system via:

sudo add-apt-repository ppa:hluk/copyq

Also run sudo apt update to refresh cache if it didn’t do it automatically.

To uninstall the Flatpak package, use command:

flatpak uninstall --delete-data com.github.hluk.copyq

Skip --delete-data if you want to keep personal configurations, and run flatpak uninstall --unused to remove useless run-times.

FFmpeg 8.0 Released with APV & ProRes RAW Decoder (Ubuntu PPA)

By:Ji m
23 August 2025 at 20:51

FFmpeg, the popular free open-source multimedia library, released new major 8.0 version almost a year since the last 7.1.

The new FFmpeg 8.0, codename “Huffman”, added native decoding support for Samsung’s Advanced Professional Video (APV) codec, Apple’s ProRes RAW, Sanyo LD-ADPCM, RealVideo 6.0, G.728, and ADPCM IMA Xbox.

It also added encoding support for APV (via libopenapv wrapper), libx265 alpha layer, and animated JPEG XL images (through libjxl).

FFmpeg 8.0 also introduced new decoders and encoders based on pure Vulkan compute implementation. It’s a cross-platform, open standard APIs, allowing programs to use GPU hardware accelerated rendering, calculating, and decoding, which can provide very significant speedups on some hardware.

So far, the Vulkan compute-based codecs only supports FFv1 (encoding and decoding) and ProRes RAW (decode only), while ProRes (encode + decode) and VC-2 (encode + decode) will be available in next minor release.

The release as well improved some codecs support by introducing hardware accelerated decoding support for VP9 (Vulkan), VVC (VAAPI), and hardware accelerated encoding support for AV1 (Vulkan). And, both decoding and encoding (hardware accelerated) for the OpenHarmony H264/5 video codecs.

Other changes include improved VVC (aka H.266) support via all content of SCC (Screen Content Coding), including IBC (Inter Block Copy), Palette Mode and ACT (Adaptive Color Transform), and following more:

  • New filters: colordetect, pad_cuda, scale_d3d11, Whisper, and others.
  • APV parser
  • APV in MP4/ISOBMFF muxing and demuxing
  • VVC in Matroska,
  • CENC AV1 support in MP4 muxer.
  • Enhanced FLV v2: Multitrack audio/video, modern codec support.
  • set default prediction method to PAETH for pngenc.

In addition, FFmpeg 8.0 also dropped OpenSSL < 1.1.0, removed yasm support (users need to use nasm), and deprecated OpenMAX encoders. For more, see the official release note.

Get FFmpeg 8.0

FFmpeg only provides the source tarball which is available to download at its website via the link below:

For Linux, besides waiting for your Distro to update the FFmpeg package, Deb Multimedia repository has built the 8.0 release for Debian experimental.

UPDATE: For Ubuntu 22.04, Ubuntu 24.04, and Ubuntu 25.04, FFmpeg 8.0 is available via this unofficial PPA.

NOTE: The PPA contains many updated libraries that may break dependencies! And, the packages are NOT well tested. Use at your own risk!

To add the PPA and install FFmpeg 8.0, run command:

sudo add-apt-repository ppa:ubuntuhandbook1/ffmpeg8
sudo apt update
sudo apt install -t "o=LP-PPA-ubuntuhandbook1-ffmpeg8" ffmpeg

Change the Color Scheme of GNOME Adwaita Apps & Shell

By:Ji m
22 August 2025 at 23:59

Modern GNOME apps do NOT support traditional themes, but you may change the look with custom color schemes!

As you know, GNOME has moved to use GTK4 + LibAdwaita for its applications and desktop components. And, so many apps use the LibAwaita library for their modern UI, which however do not support theming (see this thread).

GNOME with custom color scheme

To make libadwaita apps look consistent on non-GNOME desktops, Linux Mint has a soft fork called libadapta, and programmers can inject their custom CSS code.

What if you have no coding skill, but want a fresh look of the GNOME apps? Here’s a stupid simple app that can do the job by changing the color schemes!

There used to be an app called Gradience to set custom colors for Adwaita apps, which is however discontinued due to lack of maintenance. Just a month ago, a new app was born for GNOME users boring with the default look.

It’s Rewaita, a free open-source app written in CSS and Python, which provides a simple user interface, with few dozen of color scheme presets (for light and dark mode) and few window controls (min, max, close) layout.

Rewaita app window

Just choose one from the list, then Adwaita apps (may need a re-launch), Gnome top-bar, and menus’ colors change automatically according to the color scheme.

GNOME Dark mode with a custom color scheme

For choice, user may switch to “Custom” tab for options to set custom background and text colors for buttons, main window, widgets, warning, etc components.

As well, you may change the named colors, e.g., Blue, Teal, Green, Orange, Yellow accent colors. So, when you select an accent color in Appearance settings page, it won’t display the named color but the custom color you set.

The custom colors can be saved as preset for either light or dark mode, then apply at any time from the “Theming” tab.

How to Install Rewaita:

NOTE: Rewaita so far does NOT work in Ubuntu 24.04 and works partially IN MY CASE in Ubuntu 25.04, probably because Ubuntu does not feature vanilla Gnome environment.

Rewaita is available to install in most Linux on amd64 and arm64 platforms as Flatpak package, which runs in sandbox environment.

Fedora workstation (with 3rd party repository enabled) may search & install it from GNOME Software.

While, other Linux may do the steps below one by one to get it:

  • First, follow the official setup guide to enable Flatpak support. For Debian/Ubuntu, simply open terminal (Ctrl+Alt+T) and run command:
    sudo apt install flatpak

  • Next, install the Rewaita package by running command:
    flatpak install https://dl.flathub.org/repo/appstream/io.github.swordpuffin.rewaita.flatpakref

    There’ll be also lots of downloads for GNOME and FreeBSD run-times if you don’t have them.

After installed the app package, launch either from GNOME Overview (log out and back in if app icon not visible) or by running command in terminal:

flatpak run io.github.swordpuffin.rewaita

And, replace run with update in last command to check & install updates.

In addition, to make custom colors work for Flatpak apps, you need to run one more command to grant read & write permission to the gtk-4.0 configuration directory for Flatpak.

sudo flatpak override --filesystem=xdg-config/gtk-4.0:rw

And for GNOME Top-bar and menus, you need to set Gnome Shell theme to Rewaita (via Gnome Tweaks).

Set Gnome Shell theme to Rewaita

Tips: if “Shell” theme option is grayed out, then you need to install User Themes extension:

  • either visit the last link and use the ON/OFF toggle to install. Though you need to install browser extension if prompted, and Debian/Ubuntu needs to install the agent package first:
    sudo apt install chrome-gnome-shell
  • or install “Extension Manager” from Gnome Software, App Center (debian package), or your system package manager, and use it to search & install Gnome Shell extensions.
  • finally, re-launch Gnome Tweaks.

Uninstall Rewaita

To uninstall the app, first reset to default color schemes (use the ⟳ icon) for both light, dark, and window controls.

Then, run the command below to remove the flatpak package:

flatpak uninstall --delete-data io.github.swordpuffin.rewaita

Fooyin Music Player 0.9.0 Added Autoplaylists & Synced Lyrics

By:Ji m
21 August 2025 at 21:27

Fooyin, the free open-source Foobar2000 inspired music player, released new 0.9.0 (and 0.9.1 with quick fixes) version few days ago.

In case you didn’t know Fooyin, it’s a music player features Foobar2000 look like appearance and Qt6-based user interface designed for KDE desktop.

Fooyin Music Player

It uses FFmpeg library as backend for local music playback, and supports VGM (Video Game Music), ReplayGain, tag editing, and gapless playback. And, it supports editing mode to customize the app layout, and it’s highly extensible with a plugin system and scripting language.

Fooyin is less than 2 years old. It keeps updating with new features. And, the new 0.9.0 version is the most recent one that introduced some new features.

Since the release, it supports searching and downloading album artwork from LastFM, Discogs, and/or MusicBrainz (Cover Art Archive).

Just right-click on current cover art, then you may either select “Quicksearch for artwork” to automatically download and set new artwork. Or, choose “Search for artwork” to open the finder dialog to search more and fetch the one that your favorite.

The downloaded cover arts by default are embedded into the music files (as metadata tags), though you may choose to save them separately in your music folder.

Besides that, Fooyin 0.9 added searching lyrics from either local files or remote sources, including LRCLIB, NetEase Cloud Music, QQ Music, and DarkLyrics.

You can enable/disable lyrics sources, drag’n’drop re-arranging the order in which they are queried, save lyrics (either manually or automatically) into either metadata tags or separate files, and view and edit lyrics using the lyrics editor dialog.

The release also introduced initial autoplaylist support. You can create an autoplaylist from “Files” menu, then load from ‘Most Played’, ‘Recently Added’, ‘Last Played’, ‘Has Lyrics’, or use query by using script editor.

Autoplaylists are playlists generated from a query. They are automatically populated, which means their tracks cannot be edited. They will also regenerate whenever the music library changes i.e. tracks added, deleted or changed.

Other changes in Fooyin 0.9.0 include:

  • Add button to clear artwork cache.
  • VBR (Variable Bitrate) track update interval configurable.
  • Add support audio/x-flac mime type.
  • Option to control playback after queued song.
  • Add libre.fm service
  • New script functions..

For more, see the release note in Github page.

Install Fooyin Music Player

Fooyin so far provides only Linux installer packages which are available to download at the Github page via the link below:

They are .pkg for FreeBSD, .rpm for Fedora, and .deb for Debian and Ubuntu. While, Arch Linux may get it from AUR repository.

For choice, it also runs in sandbox for most Linux through the Flatpak package.

LibreOffice 25.8 Released! PDF 2.0 Export & Many New Calc Functions

By:Ji m
21 August 2025 at 01:00

LibreOffice, the popular free open-source office suite, release new 25.8 version today!

LibreOffice 25.8 is a new major release that features user interface improvements, many new spreadsheet functions, faster file loading, and many other new features.

First, the new release added support for exporting PDF 2.0 (ISO 32000-2). The PDF export dialog now offers a drop-down box to choose PDF 2.0 or PDF/A-4 that’s using PDF 2.0 as the base. And, it implemented modern AES-256 encryption that is mandatory with PDF 2.0.

For those who would like to use LibreOffice as a document viewer, the release introduced application-wide viewer mode that all files will be open as read-only mode with all editing tools disabled.

And the option is controlled by ViewerAppMode option in the Advanced -> Expert Configuration dialog.

Enable Application Wide Viewer (read-only) Mode.

The Calc app in the release introduced many new functions. They include CHOOSECOLS, CHOOSEROWS, DROP, EXPAND, HSTACK, TAKE, TEXTAFTER, TEXTBEFORE, TEXTSPLIT, TOCOL, TOROW, VSTACK, WRAPCOLS, and WRAPROWS functions.

It as well added “Clear AutoFilter” option to Calc cells context menu, and ability to customize conditional formatting operators in icon sets.

The Writer app introduced new Move line hyphenation rule to choose whether to hyphenate the last line words of the pages and move the whole lines to the next pages instead.

It added paragraph, column, page and spread end zones, command to insert a paragraph break before a table, command to convert fields into plain text, and dialog for copy content of a field from read-only document.

There are also per-window track changes recording, reinstate for tracked changes, option to redact images (remove sensitive data), and ability to set the language of certain punctuation characters.

Redact Images

LibreOffice 25.8 also has significantly performance improvements. Writer and Calc open files up to 30% faster in benchmark tests.

For Writer, it’s now much faster for deleting very large tables, faster loading tables with bookmarks, and faster to open large right-to-left documents in. For Calc, it greatly improved loading XLSX files with lots of conditional formatting, graphical objects, customFormat attributes, or formulas.

Other changes in the release include:

  • Accessibility check for links and references in writer header/footer.
  • Support Embedded fonts in PPTX files.
  • Master Slides in Impress and Master Pages in Draw can now be copied.
  • Show boundaries for page margins in Draw.
  • Signed PDF output now compatible with Adobe Reader.
  • Background image in document now visible as a bitmap thumbnail.
  • BASIC IDE code completion and auxiliary resources (experimental).
  • New Macro Manager dialog (experimental)
  • ODF Wholesome Encryption (experimental)

LibreOffice 25.8 also removed Windows 7 and 8/8.1 support, deprecated 32-bit Windows build. And, it’s the last version that runs on macOS 10.15. For more, see the official release note.

Get LibreOffice 25.8

LibreOffice 25.8 is available to download for Linux, Windows, and macOS via the link below:

For Ubuntu users, there are 5 choices, though some of them are not updated at the moment of writing.

  • AppImage package – run to launch the office suite without installation required. Ubuntu since 22.04 needs to install libfuse2 package first.

    LibreOffice AppImage

  • Flatpak package – runs in sandbox environment. Ubuntu users may run the 2 commands below one by one to install:
    sudo apt install flatpak
    flatpak install https://dl.flathub.org/repo/appstream/org.libreoffice.LibreOffice.flatpakref
  • Snap package – available in App Center (Ubuntu Software), which also runs in sandbox environment.
  • Ubuntu PPA – recommend for users who prefer native .deb package. Though the LibreOffice Fresh PPA usually has a few weeks (even months) delay for the new major releases.To add PPA and upgrade pre-installed libreoffice to the latest, run commands below one by one:
    sudo add-apt-repository ppa:libreoffice/ppa
    sudo apt update
    sudo apt install libreoffice
  • Official Deb packages – the download page also provide native .deb packages for Ubuntu and Debian users.After downloaded the tarball, extract, and navigate to the sub-folder that contains all the .deb packages. Right blank area and select “Open in Terminal”, finally run command to install them all:
    sudo apt install ./*.deb

Uninstall LibreOffice

As there are so many ways to install the office suite, it’s easy to get it installed multiple times, resulting duplicated app icons.

Make backup of your important data before uninstalling the application.

To uninstall the Snap package, either use App Center (or Ubuntu Software) or run command:

snap remove --purge libreoffice

For Flatpak package, use the command below to uninstall:

flatpak uninstall --delete-data org.libreoffice.LibreOffice

To uninstall the Deb packages downloaded from LibreOffice website, use command:

sudo apt remove libobasis25.8* libreoffice25.8*

Or, remove the Ubuntu PPA package by running command:

sudo apt remove --autoremove libreoffice-common

NOTE: Remove the PPA package will also get rid of the pre-installed LibreOffice (if Ubuntu was installed in “Extended selection” mode). You may choose to purge PPA which will downgrade LibreOffice to the stock version:

sudo apt install ppa-purge
sudo ppa-purge ppa:libreoffice/ppa

Kdenlive 25.08.0 Released with NVIDIA 10 bit x265 Encoding

By:Ji m
19 August 2025 at 23:19

Kdenlive, the popular KDE video editing software, released new 25.08.0 version yesterday.

The new 25.08.0 is a new feature release that added 10 bit x265 encoding for NVIDIA, and 10 bit export profiles in the render dialog, though it will be converted to 8 bit when using compositing or non-avfilter effects.

It as well replaced AV1 profile with the faster SVT-AV1, along with preset options to control the quality and speed, and, added power management option to disable sleep while rendering and playing.

Audio mixer in the release has been redesigned with clearer level visuals and thresholds. And, it fixed some issues for better HiDPI displays support with fractional scaling.

new audio mixer

Kdenlive 25.08.0 also improved SVG and image support for its titler. It’s now has ability to move and resize items, and shift-drag item border to center resize.

It renamed the Pattern tab to Templates and moved the templates dropdown to it. As well, it added timecode widget with ability to drag to seek in the Titler.

The subtitle edit widget in the new release now is resizable to adapt to lower resolution displays. And, it now requires shift + drag of a subtitle clip to create a new layer.

It as well added a new handle allowing to rotate an item in the preview using the Transform effect. And it improved monitor snapping by adding back snapping when resizing for non-rotated frames, snapping when moving a rotated frame, and added snapping support for all edges.

Other changes include:

  • Improve Scope styling by using system palettes.
  • Ability to create guides and markers from project notes.
  • New option to show thumbnails in the markers list dialog.
  • New ‘Show markers for all clips in the project’ toggle option.
  • Add Enable Hardware Decoding option in welcome dialog.
  • Add SVT-AV1 to codecs which use CRF option.
  • Option to open log file in render dialog.
  • Warn when exiting Kdenlive with running job.

For more about Kdenlive 25.08.0, see the official release note.

How to Install Kdenlive 25.08.0

The official installers for Linux, Windows, and macOS are available to download in its website via the link below:

As a KDE project, you may alternatively download it from KDE website via this page.

Linux user may choose download the AppImage, then click Run to launch the video editor after granted executable permission. Though, Ubuntu since 22.04 needs to install libfuse2 library first in terminal (Ctrl+Alt+T):

sudo apt install libfuse2

While AppImage is so far only for modern Intel/AMD (x86_64) platform, user may choose the Flatpak package that supports both X86_64 and ARM64 platforms, though it runs in sandbox environment.

Linux Mint and Fedora can search & install the Flatpak package from either Software Manager or GNOME Software.

Kdenlive Flatpak package in Linux Mint Software Manager

While Debian/Ubuntu, may run the 2 commands below one by one to install the package:

  • Enable flatpak support:
    sudo apt install flatpak
  • Install Kdenlive flatpak package:
    flatpak install https://dl.flathub.org/repo/appstream/org.kde.kdenlive.flatpakref

For Ubuntu, there’s also official snap package available in App Center (or Ubuntu Software).

Kdenlive Snap package in Ubuntu App Center

And, if you want to build Kdenlive from source, here’s a step by step guide shows how to do the job in Ubuntu 25.04.

Firefox 142.0 Available with More Flexible ETP Strict Exceptions

By:Ji m
19 August 2025 at 18:01

Firefox 142.0, the August release of the free open-source web browser, is available to download.

The official release note for the new version is not ready at the moment of writing, though the source tarball and installers for Windows, Linux, and macOS are out!

According to the Github releases page, Firefox 142.0 added new ETP stick mode options to automatically apply required exceptions to avoid website breakage. Exceptions are split into baseline (core functionality) and convenience (extra features). And, it’s also available when working in ETP Custom mode.

The AI-powered link preview feature that was introduced as experimental since version 139.0, now is generally available for en-US, en-CA, en-GB, en-AU users.

The feature allows to long press (or right-click and choose “Preview Link”) a link to preview the page that can optionally include AI-generated key points. The AI content are processed on user’s local device, though it recommends more than 3 GB of available RAM.

And, this features is gradually rolling out and so far only enabled for users mentioned above. While, others can get it in Firefox Labs setting page.

For users in United States, Firefox now groups article recommendations on New Tab page into topic sections, like Sports, Food, and Entertainment. And, you can block ones that you’re not interested in.

On Windows, clicking a persistent notification when Firefox is closed / restarted will now properly open the browser with the relevant web-page, instead of opening the main page of the website.

In Firefox 142, when you click collapse a tab group, the active tab in that group is still visible. This can keep your header tidier when working with many tabs open in active tab group.

Other changes in the release include:

  • Add Remove from Sidebar option to side-bar extension icon.
  • Improve search results from browsing history via the address bar.
  • Improve drag-and-drop support for blob images.
  • Various security fixes.

There are as well new features and improvements for developers. They include wllama API for extensions support, allowing developers to integrate local language model (LLM) into add-ons, and:

  • Prioritized Task Scheduling API, to assign and manage task priorities.
  • Selection.getComposedRanges() API, to accurately get selected text ranges across shadow DOM boundaries.
  • URLPattern API, to match and parse URLs using a standardized pattern syntax.
  • Display Request Headers/Cookies/Params in the Network panel even request isn’t finished yet.

Get Firefox 142.0

For more changes and the download link, go to its website via the link below:

As mentioned, the release note is not ready at the moment of writing. If you can’t wait to try it out, download it from this FTP page.

Default Wallpapers for Ubuntu 25.10 Questing Quokka Revealed

By:Ji m
17 August 2025 at 17:32

Ubuntu 25.10, code-name Questing Quokka, is coming soon in next few months. Now, the default wallpapers are out!

As usual, the default wallpaper is made up of the mascot (quokka) in center, a type of wallaby from southwestern Australia, and a gradient background.

As you see via the image below, this time it looks like a quokka that’s hopping and bounding to Ubuntu (the small logo) on the earth.

Ubuntu 25.10 Default Wallpaper (optimized for loading fast)

The file-name is always “warty-final-ubuntu.png“, and it features 4K (3840×2160) resolution.

As well, there are few variants for different purpose, e.g., dark mode for dark desktop style, dimmed and light versions. See the previews below:

Ubuntu 25.10 wallpaper Dark variant (ubuntu-wallpaper-d.png)

Ubuntu 25.10 wallpaper dimmed variant

Ubuntu 25.10 wallpaper light variant

In addition, the Ubuntu 25.10 default wallpaper also has a full-color version along with its light, dark, and dimmed variants. They are:

  • Questing_Quokka_Full_Color.png,
  • Questing_Quokka_Full_Dark.png,
  • Questing_Quokka_Full_Dimmed.png,
  • and Questing_Quokka_Full_Light.png.

25.10 full color wallpaper

25.10 full dimmed wallpaper

25.10 Full Dark wallpaper

25.10 full light wallpaper

Download Ubuntu 25.10 Wallpapers

The new wallpapers will be soon made into the Ubuntu 25.10 system repository. For current 25.10 snapshot users, just keep the system up-to-date, then you’ll get the wallpapers in next few days.

For other operating systems, you may download the wallpapers from the source page via the link below:

Then, click the “plain” links at the end of the desired images to download:

  • warty-final-ubuntu.png – default wallpaper (it will be 26.04 wallpaper around 6 months later).
  • ubuntu-wallpaper-d.png – dark variant.
  • Questing_Quokka_Full_Color_3840x2160.png – other variants.
  • Questing_Quokka_Full_Dark_3840x2160.png – other variants.
  • Questing_Quokka_Full_Dimmed_3840x2160.png – other variants.
  • Questing_Quokka_Full_Light_3840x2160.png – other variants.
  • Questing_Quokka_Wallpaper_Dimmed_3840x2160.png – other variants.
  • Questing_Quokka_Wallpaper_Light_3840x2160.png – other variants.

NOTE: Firefox (default Snap) does NOT download files in my case. Try Firefox Deb or other web browsers.

And, please leave comment below if you know a better place to download the wallpaper images, as Ubuntu may change the source page (it did) in future!

Ubuntu 25.10 Optional Wallpapers

In addition, there will be some optional wallpapers shipped by default in Ubuntu 25.10. They are the wallpaper contest winners that will be out in next few days.

You can vote your favorite wallpapers HERE until August 18th. And, I’ll post the winner images below once available.

❌