Reading view

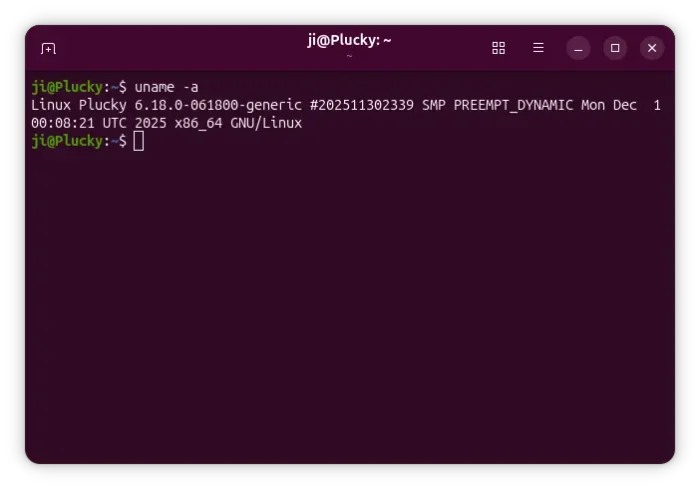
NVIDIA 590.44.01 Beta Released! Removed GeForce 10 Series & Earlier Support

NVIDIA 590, the next new feature branch driver for Linux, is available for beta testing.

This beta driver is NVIDIA 590.44.01, which however does not introduce any new features, but raised the minimum system library requirements and fixed some bugs.

The new driver now requires wayland >= 1.20 for the modern Wayland session, xserver 1.17 or higher for classic Xorg session, and glibc library >= 2.27. For Ubuntu, 22.04 and higher match the Wayland requirement, while 18.04 and 20.04 with Xorg are still supported.

Besides the minimum requirements update, the release also removed support for GeForce 700, GeForce 800M, GeForce 900/900M, GeForce 10 series, as well as GeForce MX100, MX200, MX300 series notebooks.

And, it improved the performance of recreating Vulkan swap chains. The swap chain is essentially a queue of images waiting to be presented to the screen. By improving the performance of swap chains recreation, it can help prevent stuttering when resizing Vulkan application windows.

Others are mostly bug-fixes. They include:

  • Fix that “PowerMizer” preferred mode drop-down menu in the nvidia-settings control panel didn’t not function correctly on Wayland.
  • Fix that the Dots Per Inch (DPI) to be incorrectly reported for some monitors, such as Samsung Odyssey Neo G9.
  • Fix Vulkan applications not working in VMs using Venus VirtIO virtual GPU.
  • Fix system freezes on PREEMPT_RT real-time kernels

For more about NVIDIA 590.44.01 as well as the official .run installers for x86_64 processors, see this nvidia webpage. Or, go to this page for aarch64 processor, FreeBSD, and Solaris.

How to Install NVIDIA 590.44.01 in Ubuntu

If nothing goes wrong, Ubuntu will add the official NVIDIA 590 driver package for next Ubuntu 26.04, and perhaps backport it for current Ubuntu 25.10 and 24.04/22.04 LTS releases. Though, the process can take few months. Keep an eye on this page for the official NVIDIA 590 package by Ubuntu.

For choice, you may add the long standing Graphics Driver Team PPA, which usually adds the new driver package earlier that the official package mentioned above.

For those who can’t wait, the Ubuntu developer Jacob Martin has made NVIDIA 590.44.01 into this personal PPA for Ubuntu 22.04, Ubuntu 24.04, and Ubuntu 25.10 for testing purpose!

NOTE: the PPA package is for testing only purpose. Don’t try it on production machine!!! It breaks my wi-fi in my case when trying to restore NVIDIA 580.

To add the PPA, open terminal (Ctrl+Alt+T) and run command:

sudo add-apt-repository ppa:jacobmartin/nv-graphics-2

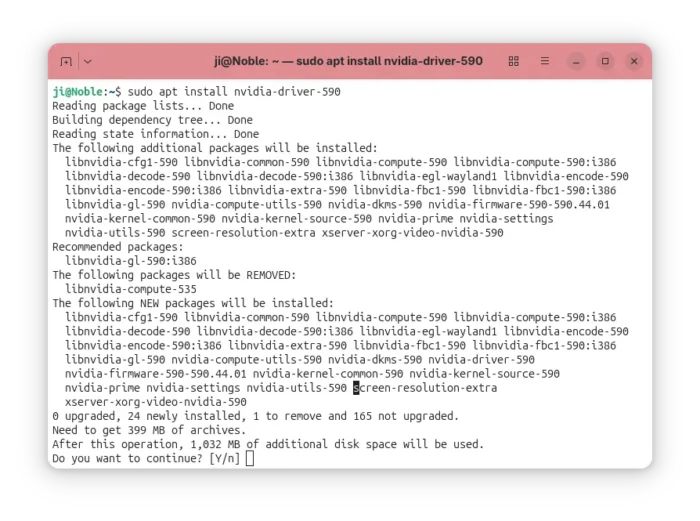
Then, try launching “Additional Drivers” utility to install the driver. Or run the command below instead in terminal:

sudo ubuntu-drivers install nvidia:590

When done, reboot computer.

If the driver does not work properly for you, then try running the command below to uninstall:

sudo apt --purge remove '*nvidia*590*'
  •  

OnlyOffice Desktop Editors 9.2 added AI Agent & Macro Recording

OnlyOffice desktop editors, the free open-source office suite for Linux, Windows, and macOS, released new 9.2 version yesterday.

The new release added AI agent support, customizable keyboard shortcut, macro recording for repetitive actions, and Windows on ARM support.

In the bottom left of the app window, an “AI agent” option is added, allowing to connect to either Anthropic, OpenAI, TogetherAI, or OpenRouter AI models through API key, or Ollama local hosted AI model.

After that, you may chat with AI to ask questions, find and open files on your computer, create new documents, presentations, or PDFs, generate text or HTML from files without open them, fill forms, and do more actions.

Besides that, the Document, Spreadsheet, Presentation, and PDF editors have AI toolbar options, allowing to do AI-powered translations, summarization, grammar correction and spell-checking. Though, they all need an AI model connected as mentioned above.

For those who often perform repetitive actions with OnlyOffice, the new version added View -> Record macro menu option, allowing to automate your actions by recording them as macros.

The new version also added support changing the keyboard shortcuts. Simply go to File -> Advanced Settings -> Keyboard Shortcuts, then click on “Customize” button. In pop-up dialog, find out your desired shortcut and either double-click or click ‘edit’ icon to change it.

Though, many shortcuts are locked as unchangeable, and a “Restore All to Defaults” option is available to reset them all.

Moreover, the new version added official support for Windows on ARM64 computers, such as Surface Laptop 7, Galaxy Book4 Edge, etc laptops with Snapdragon X series processors. And, ARM64 support for Linux is coming in future releases.

Other changes in OnlyOffice Desktop Editor 9.2 include:

  • Custom color support for the Redact feature in PDF editor.
  • Ability to add descriptive text labels to checkboxes and radio buttons.
  • Assign specific roles to new fields when inserting them into form.
  • For more, see the official release note.

Get OnlyOffice Desktop Editor 9.2

For Ubuntu, the office suite can be installed easily through the App Center (or Ubuntu Software for 22.04). It’s the official Snap package that runs in sandbox environment. Though, at the moment of writing, it’s still at version 9.1.

For choice you may download the app package for Windows, Linux, and macOS from its website. Where, Ubuntu user may choose download:

  • native DEB package, then click open with App Center or Ubuntu Software to install.
  • non-install AppImage, that can launch the office after adding executable permission.
  • or Flatpak package which runs in sandbox environment.
  •  

TLP 1.9.0 Released! “Added back” Graphical Power Mode Settings

TLP, the popular battery power saving tool for Linux laptop, released new 1.9.0 version yesterday!

The new release of this free open-source software introduced its own power profile daemon called tlp-pd, which in certain respects added back the GNOME/KDE/Cinnamon’s built-in power mode settings.

TLP 1.9.0 added its own power profiles daemon

As you may know, TLP conflicts with power-profiles-daemon, the background service for common Linux providing ability to switch between Performance, Balanced, and Power Saver power profiles. Thus, installing TLP will remove the built-in power mode options in GNOME, Cinnamon, and KDE desktop environments.

Now with TLP 1.9.0, tlp-pd is introduced to replace power-profiles-daemon by implementing the same D-Bus API that GNOME, KDE, Cinnamon use. So, the power mode options in your desktop seem just like they are never gone.

tlp-td power profile daemon

Besides that, it added new tlpctl command. Without sudo permission, it allows you to switch power profile from command line, query current power profile, or run custom command using a specific power profile.

Meaning that you may start your games or certain apps in performance mode, while leaving all others running in balanced or power saver.

For example, the command below will start the SuperTuxKart game in performance mode, no matter what power profile you set system wide.

tlpctl launch -p performance /usr/games/supertuxkart

tlpctl command to switch profile, or run command using a specific power profile

Moreover, it updated the /etc/tlp.conf configuration file. Now, all parameters end with _AC will work when Performance profile is active, parameters end with _BAT will work for Balanced profile, and parameters end with _SAV will work for Power Saver profile. While, all other parameters work for all profiles.

And, it added new TLP_AUTO_SWITCH option in configuration file, that controls the automatic switching of the power profile. It can be set to:

  • 0, never switch power profile, and use the value of TLP_DEFAULT_MODE if set.
  • 1, auto switch to performance when AC connected, or balanced when running on battery.
  • 2, retain the manually selected profile (e.g., via your desktop’s built-in option) even when the power source changes.

Other changes in TLP 1.9.0 include:

  • Add Battery Care (battery charge start/stop threshold) support for Tuxedo/Clevo laptops.
  • Add TLP_DISABLE_DEFAULTS to deactivate all intrinsic defaults of TLP, so only parameters activated in config file applied.
  • Fix tlp discharge to a target percentage for Chromebooks, Framework laptops.
  • Fix Thinkpad X201, X220 discharge.

For more, see the changelog in Github.

How to Install TLP 1.9.0

TLP has an official PPA that supports Ubuntu 22.04, Ubuntu 24.04, Ubuntu 25.04/25.10, and their based Distros, e.g., Linux Mint 21/22, Zorin OS 17/18.

To add the PPA and install TLP 1.9.0, press Ctrl+Alt+T on keyboard to open terminal and run the commands below one by one:

sudo add-apt-repository ppa:linrunner/tlp
sudo apt update
sudo apt install tlp tlp-pd tlp-rdw

After installed the software, you may just forget it, as the default settings are already optimized for battery life. Though, you may follow the official documentation to install it on other Linux Distributions, or configure it to fit your need.

Uninstall:

To uninstall tlp in Ubuntu or Linux Mint, open terminal and run command:

sudo apt remove tlp tlp-pd tlp-rdw

Also run the command below to remove the PPA:

sudo add-apt-repository --remove ppa:linrunner/tlp

And, install back the system built-in power profiles daemon package:

sudo apt install power-profiles-daemon
  •  

Linux Kernel 6.18 Released! How to Install it in Ubuntu

Linux Kernel 6.18 was released yesterday! According to the version history, it will be probably the next Long Term Support (LTS) kernel release.

Linus Torvalds announced this kernel release on this lkml.org page:

So I’ll have to admit that I’d have been happier with slightly less bugfixing noise in this last week of the release, but while there’s a few more fixes than I would hope for, there was nothing that made me feel like this needs more time to cook. So 6.18 is tagged and pushed out.

What’s New in Linux Kernel 6.18

On CPU side, the new kernel updated Intel Trust Domain Extensions (TDX) to work with Kexec for being able to load and boot into a new kernel from another currently running kernel. It updated FRED with patch for the late breaking incompatible change. And, it added a workaround for Xeon 6 to avoid performance issue.

For AMD, it updated Error Detection And Correction “EDAC” driver with next Zen 6 “Venice” server processors support. And, added patch for the old Bulldozer processors with X86_NATIVE_CPU option support for maximizing performance.

Image by Marcello Rabozzi from Pixabay

The Kernel also added support for Sheaves, a new opt-in, per-CPU and array-based caching layer, updated IOMMU driver with ACPI and MIPS vendor extensions support for RISC-V, and introduced Loongson Security Engine support for handling offloaded RNG, TPM2, and various crypto acceleration on LoongArch processors.

It as well added patch to reliably handle 255+ vCores on AMD EPYC servers, enabled Wildcat Lake graphics support, introduced new Rocket accelerator driver for the NPU found on newer Rockchip SoCs, and added Google’s PSP encryption for TCP connections.

The Bcachefs code is removed from Kernel 6.18, users should now use DKMS kernel modules instead. And, exFAT file-system driver has been optimized leads to 16.5x speedup for loading time.

The new Kernel also added many new hardware support. They include:

  • Haptic touchpad support.
  • New sensor driver for GPD handheld gaming devices.
  • Awinic AW86927 haptic driver for Fairphone 5 smartphone.
  • Hynitron CST816x touchscreen control.
  • New EC driver for Lenovo ThinkPad T14s Gen6 With Snapdragon X Elite SoC.
  • AI button and Fn keys support for on Xiaomi Redmibook laptops.
  • Red and green status LEDs support on QNAP NAS devices.
  • Sensor monitoring support for Dell OptiPlex 7040, ROG STRIX X670E-E, X870-I/X870E-E GAMING WIFI, etc motherboards.
  • Apple M2 Pro, M2 Max, and M2 Ultra.
  • Qualcomm Snapdragon X1 laptops of the Dell Thena, HP OmniBook X14, Dell Inspiron 14 Plus, Dell Latitude 7455, HP Omnibook X14, and Lenovo ThinkBook T16.

For more about Linux Kernel 6.18, see either kernelnewbies.org or phoronix.com pages.

How to Install Kernel 6.18 in Ubuntu 24.04+

The Mainline Kernel PPA has built the new kernel as .deb packages, which are available to download through the link below:

Depends on your CPU architecture type (run uname -a or dpkg --print-architecture command to tell), select download either amd64 for Intel/AMD, armhf/arm64 for 32-bit/64-bit ARM, or ppc64el for IBM POWER, s390x for IBMz or LinuxONE.

NOTE: the Mainline Kernel packages are NOT signed! You need to disable secure-boot to boot the kernel. And it may be not work properly with NVIDIA proprietary driver.

For Intel/AMD platform, you may open terminal or connect to the server console, then run the commands below one by one to download & install the Kernel:

cd /tmp

wget -c https://kernel.ubuntu.com/mainline/v6.18/amd64/linux-headers-6.18.0-061800-generic_6.18.0-061800.202511302339_amd64.deb

wget -c https://kernel.ubuntu.com/mainline/v6.18/amd64/linux-headers-6.18.0-061800_6.18.0-061800.202511302339_all.deb

wget -c https://kernel.ubuntu.com/mainline/v6.18/amd64/linux-image-unsigned-6.18.0-061800-generic_6.18.0-061800.202511302339_amd64.deb

wget -c https://kernel.ubuntu.com/mainline/v6.18/amd64/linux-modules-6.18.0-061800-generic_6.18.0-061800.202511302339_amd64.deb

sudo apt install ./linux*-6.18.0*.deb

After installed the packages, restart your computer or server and run uname -a to verify.

Uninstall Kernel 6.18

For any reason, you may remove this Kernel by firstly rebooting into the old Kernel (usually under Grub -> Advanced options of Ubuntu)., then run command:

sudo apt remove --autoremove linux-headers-6.18.0* linux-modules-6.18.0-*-generic
  •  

VLC 3.0.22 is Available with AMD Frame Rate Doubler & .mus Support

After almost a year and a half of development, VLC 3.0.22 is finally available to download! PPA updated for Ubuntu 20.04, Ubuntu 22.04, Ubuntu 24.04, 25.04 and 25.10.

After two RC releases, VLC 3.0.22 is finally made available with some new features, UI changes, bug-fixes, and many security fixes.

First, it backported the DMXMUS plugin from VLC 4.0, adding ability to play .mus music files from the 1990’s DMX sound library such as Doom, Doom II and Heretic.

The RC1 release said that it supports compiling against Qt6, which is in fact NOT possible, meaning the UI is still only build with QT5, though it updated with newer versions of Qt5 libraries support.

In Advanced Preferences -> Interface -> Main Interfaces -> Qt, a new toggle option “Enable Dark Mode” is added. With it enabled, the tool-bar and menus go dark. However, buttons are not updated to well fit this dark interface.

For user with AMD GPU, VLC 3.0.22 added new Frame Rate Doubler video filter, allowing to use AMD Fluid Motion Frames (AFMF) technology to generate and interpolate new frames in video playback to increase the frame rate. This feature however requires Direct3D11 API, meaning Windows only. And, I don’t have an AMD GPU to try it out.

Also for Windows, the version finally added official ARM64 architecture type support, which was in nightly testing for almost a year. Meaning VLC now works on Microsoft Surface Laptop, ASUS Vivobook S 15, etc machines with Qualcomm Snapdragon X processors. Though, it requires Windows 10 RS5 17763/1809 or later.

As well, it fixed Windows XP SP3 support and added support renaming, moving, or deleting of playing file on Windows.

For dav1d decoder, the release added dav1d-all-layers option, allowing to control whether or not to display all spatial layers. The feature is disabled by default, but you may enable it to make the decoder output every available spatial layer in the video which is useful for debugging purpose.

It also added A_ATRAC/AT1 support in matroska container. Meaning it can now play the Sony’s proprietary audio compression format, originally used in MiniDisc players in the 1990s, without transcoding.

Other changes in VLC 3.0.22 include:

  • Decoding with FFmpeg libavcodec instead of libdca, libmpeg2 and liba52.
  • Support mkv-use-chapter-codec option.
  • Handle pictures in FLAC.
  • Assume subpictures are in SDR by default.
  • Fix scrolling on volume slider.
  • Fix crash for macOS when drag’n drop items in the playlist.
  • Improve visualization of low frequencies in spectrogram
  • Fix hardware decoding with VideoToolbox of XVID MPEG-4 video
  • Security fixes and various other fixes. See NEWS page for more.

How to Install VLC 3.0.22

The new release is not officially announced at the moment of writing, but you may download the source code, as well as macOS and Windows installers from the link below:

Or, you may keep an eye on its main page.

For Ubuntu from 20.04 LTS to 25.10, I’ve made the new release package (backported from Debian Multimedia) into this unofficial PPA for amd64, arm64/armhf and i386 platforms.

To add the PPA and install VLC 3.0.22 in Ubuntu or Linux Mint, open terminal (Ctrl+Alt+T) and run 3 commands below one by one:

sudo add-apt-repository ppa:ubuntuhandbook1/vlc
sudo apt update
sudo apt install vlc -t "o=LP-PPA-ubuntuhandbook1-vlc"

NOTE: due to mistake, I previously built VLC 3.0.22 RC1 as the latest stable version. You need to update the package, and identify by running vlc --version command in terminal.

For choice, there’s also community maintained VLC Flatpak package that works in most Linux and runs in sandbox environment. Though it’s NOT updated to the latest at the moment of writing.

Uninstall VLC

If the PPA package is somehow not working good for you, then either run the command below to install ‘ppa-purge’ tool, and use it to purge the PPA and downgrade VLC to the stock version:

sudo apt install ppa-purge && sudo ppa-purge ppa:ubuntuhandbook1/vlc

Or, use the commands below to remove PPA and uninstall VLC as well as its dependency libraries:

sudo add-apt-repository --remove ppa:ubuntuhandbook1/vlc
sudo apt remove --autoremove vlc-data vlc-bin libvlccore9

Keep an eye on terminal output before you confirm to uninstall the packages, as it may also uninstall other apps that depends on VLC library.

  •  

The First Snapshot of Ubuntu 26.04 LTS Released!

The first monthly snapshot release for Ubuntu 26.04 LTS was released yesterday morning (UTC time).

Ubuntu development team announced this development snapshot:

Hello everyone, I’d like to announce the first successful publication of the monthly snapshot – Resolute Snapshot 1. You can find the images on cdimage.ubuntu.com …

As you may know, Ubuntu 26.04 is the next Long Term Support (LTS) release with 5 years standard support until 2031, plus Expanded Security Maintenance (ESM) support until 2036, and security coverage (for paid customers) until 2041.

Ubuntu 26.04 will use GNOME 50 as default desktop environment. According to Linux Kernel history release date, it will perhaps be powered by Kernel 6.20 (or 7.0).

According to the road map, the 26.04 release will also introduced 2 new default applications. It will replace Totem with Gnome core Showtime video player, and replace Gnome System Monitor with Resources system monitor and task manager.

And, it will continue improving the performance and stability for Wayland on NVIDIA, unify the package management experience, and update Security Center with ability to re-encrypt a disk and manage Ubuntu Pro features.

At the moment, the 26.04 Snapshot 1 still has GNOME 49, Kernel 6.17, and most features are not completed yet. You may keep an eye on this on-going release note page for the recent changes.

Get Ubuntu 26.04 Snapshot 1

NOTE: This snapshot is a development release that’s NOT ready for production use!

The .iso images for Desktop and Server, as well as Netboot tarball and WSL image are available to download via the link below:

Don’t know why, but this snapshot does not provide the Desktop and Server image for amd64 (Intel/AMD platform) at the moment of writing.

Thanks to @Rodolfo, the iso images for amd64 (AMD/Intel platform) is available via the link below:

For non-GNOME users, the 26.04 snapshot 1 also includes the .iso images for all the 10 official flavors, which are available to download via the link below:

For current Ubuntu 25.10, it easy to upgrade to the new 26.04 Development release by first installing all updates:

sudo apt update && sudo apt full-upgrade

Restart if required, then run:

do-release-upgrade -d

For future releases, see the table below or the official release schedule.

December 18, 2025 Snapshot 2
January 29, 2026 Snapshot 3
February 26, 2026 Snapshot 4
March 26, 2026 Beta (mandatory)
April 16, 2026 Final Freeze, Release Candidate
April 23, 2026 Final Release
  •  

Ubuntu 26.04 to Have Showtime Video Player & Resources System Monitor as Default

The Ubuntu Desktop team announced the road-map for Ubuntu 26.04 LTS today, introducing two new default applications!

As you may know, Ubuntu introduced some new default apps in recent releases, e.g., Security Center to manage snap app permissions, the container-focused Ptyxis terminal emulator, Papers document viewer, and Loupe image viewer.

According to the road-map, 2 new default applications will be made into the next Ubuntu 26.04 Long Term Support (LTS) release along with GNOME 50.

They are:

  • Showtime video player to replace the old Totem.
  • Resources system monitor and task manager to replace Gnome System Monitor.

Showtime Video Player

Showtime is the core video player for GNOME since version 49, meaning it’s also default in Fedora 43, Debian Forky, Arch etc Linux Distribution with vanilla Gnome Desktop environment.

As you see via the screenshot above, it features a distraction-free viewing experience with minimal interface clutter. Controls (e.g., play/pause, seek-bar, and title-buttons) fade away automatically during playback so the screen is clean.

And, it supports essential features such as volume and playback speed control, rotate video, take screenshot, and multiple audio and subtitle tracks.

The player has been made into Ubuntu system repository since Ubuntu 25.04, while Ubuntu 24.04 and earlier may install it through Flatpak package which runs in sandbox environment.

To install Showtime flatpak package, simply open terminal (Ctrl+Alt+T) and run the 2 commands below one by one.

  • Install flatpak daemon:
    sudo apt install flatpak
  • Install showtime package:
    flatpak install https://dl.flathub.org/repo/appstream/org.gnome.Showtime.flatpakref

Tip: If this is the first time you install a flatpak package, then you may need a log out and back in to make app icon visible.

Resources system monitor and task manager

Resources is a free open-source Rust written application that uses GTK4 + LibAdwaita to provide a modern UI for monitoring system processes and resources.

As you see, it supports monitoring running apps and processes, with CPU, GPU, Memory usage and Drive read/write data on per app/process basis, and actions to end, kill, halt, or continue app/process.

And, it monitors the real-time usage of your system resources, such as CPU, GPU, Memory, Drive, and Network, in graphs along with basic info of your hardware properties.

As well, it shows the percentage of battery and its health, design capacity, charge circles, manufacturer, and the module name, etc information. For more about Resources, go to its project page.

Same to Showtime, all current Ubuntu releases can install Resources through Flatpak package, by running the 2 commands below one by one.

sudo apt install flatpak
flatpak install https://dl.flathub.org/repo/appstream/net.nokyan.Resources.flatpakref

Besides new default applications, Ubuntu 26.04 will also improve the performance and stability for Wayland on NVIDIA, add more controls for the disk encryption, such as ability add/remove PIN/passphrase after installation, and graphical option to re-encrypt a disk.

It’s also going to unify the package management experience by making App Center the single place to handle all applications, deprecate Software Properties (Software & Updates), and more. See the discourse page for details.

  •  

FFmpeg 8.0.1 Released with Numerous Improvements (PPA Updated)

FFmpeg, the popular multimedia library released new version 8.0.1 in last week. Here’s the PPA contains the .deb packages for all current Ubuntu users.

As a maintenance update, the release includes only minor new features, some improvements, and bug-fixes. And, the FFmpeg website does not even provide an official release note for it.

The new release updated the RealVideo 6.0 decoder that was introduced in last 8.0 release, with upper bound check for qp (Quantization Parameter) which is useful to prevent excessive quality loss, and avoid artifacts like blocking, banding, or blurring.

For mac and iOS, it updated the VideoToolbox encoder with global_quality support without qscale (quantizer scale), low latency RC with HEVC (H.265) video codec, which is perfect for live, interactive, or RC video applications, and fix for precision loss when calculating quality.

It also updated the MPEG‑5 LCEVC decoding with support for LCEVCdec version 4, which features new CPU pipeline with multithreading updates, new default and recommended pipeline, and new Vulkan pipeline with experimental GPU support for decoding. For more about LCEVCdec v4, see its github releases page.

For the libavfilter library, the release fixed some issues for af_whisper, the built-in Whisper audio filter for speech-to-text transcription. They include fixes for srt index, int64 printf format, srt file format, and broken output for multibyte character. And, it updated the drawtext video filter with explanation for bbox text separator, fix for incorrect text length and call GET_UTF8 with invalid argument.

As well, it updated the libavformat with rtp_ctx->streams access fix for WebRTC-HTTP Ingestion Protocol, and ability to handle IPv6 Zone ID in hostname with built-in HTTP protocol handler.

For the libutil utility library, it re-introduced the block offset state for aes_ctr, the implementation of AES encryption in Counter mode, and added support casting GET_BYTE/GET_16BIT returned value.

Other changes in FFmpeg 8.0.1 include:

  • Fix 32bit sample overflow for the output stream queue.
  • Ensure the display_rotation option is honored for ffmpeg_demux module.
  • Use tile dimensions in pxr24 UINT case for OpenEXR image format decoder.
  • Fix memory leak with D3D11 input surfaces for Media Foundation encoder wrapper
  • Fix incorrect ebur128 peak calculation.
  • And various other changes. For details, see the CHANGELOG.

Install FFmpeg 8.0.1

The source tarball for the new release and optional installer packages are available to download in FFmpeg website via the link below:

For Ubuntu 22.04, Ubuntu 24.04 and 25.04, I’ve uploaded v8.0.1 packages into this unofficial PPA for Intel/AMD and ARM platforms.

NOTE: FFmpeg is an important library that many apps and even graphics drivers depend on it. Upgrade FFmpeg may break compatibility! Install it at your own risk.

To add the PPA and install FFmpeg 8.0.1, run commands below one by one in terminal (Ctrl+Alt+T):

sudo add-apt-repository ppa:ubuntuhandbook1/ffmpeg8
sudo apt update
sudo apt install ffmpeg -t "o=LP-PPA-ubuntuhandbook1-ffmpeg8"
  •  

KeePassXC 2.7.11 added Group Sync & Password Auto-Generation

KeePassXC password manager released new 2.7.11 version today! See what’s new and how to install instruction for Ubuntu & Linux Mint.

The new release of this free open-source cross-platform password manager finally added the long requested feature: auto-generate a password for new entries.

By enabling the option in Settings -> General -> Basic Settings -> Entry Management, it will automatically generate a password when you adding a new entry.

However, it seems like the feature does not follow user password generation preferences, as it always create a 32 length password with only uppercase and lowercase letters and numbers in my test.

For those who use KeeShare feature to share specific group of passwords with separate and synchronized database file. The feature has been updated with ability to sync group structure.

To use KeeShare, simply go to Settings -> KeeShare and enable ‘Allow Import’ and ‘Allow Export’, then in group edit or create page, go to KeeShare -> Export to export the group to a separate database file.

Then, open another database, create a group and go to KeeShare page to import that separate database. After that, you have the group synchronized between the 2 databases.

Previously, KeeShare only sync the password entries, since v2.7.11, all the sub-groups are now synchronized. And, according to the pull request, it will perhaps sync root group icon if possible, and add option to disable group sync in future.

KeeShare now sync sub-groups

The release also improved the inline attachment viewer with ability to preview image, HTML, and Markdown, as well as text editing support along with preview.

Attachment now support image, HTML, and markdown preview, as well as text editing

It as well enhanced the search function. It by default provides real-time search suggestions as user type. Now, a new “Press Enter to search” option is added, in which case it won’t start searching function until you press Enter in search box.

And, it added has:totp support in search-box as well as “Searches and Tags” section, allowing to search only TOTP (Time-based One Time Password) entries. And, it should also support !has:totp to exclude TOTP, while the pull request page uses is:totp and !is:totp as the search queries.

Other changes include:

  • Add database merge confirmation dialog
  • Add {UUID} placeholder for use in references
  • New keyboard shortcut to “Jump to Group” from search results.
  • Add confirmation when closing database via ESC key
  • Add support for escaping placeholder expressions
  • Lock database after 900 seconds of inactivity.
  • Allow to change double-click action for URL.
  • More granular control over the Auto-Type confirmation popup.
  • Add URL auto-type and copy options to auto-type selection popup and menus.

How to Install KeePassXC 2.7.11

The official release note, as well as the download links are available in its website via the link below:

For Ubuntu user, the official PPA has been updated with the native .deb packages for Ubuntu 22.04, Ubuntu 24.04, 25.04 and 25.10 on amd64, arm64, armhf, and riscv64 platforms.

To add the PPA and install KeePassXC 2.7.11, open terminal (Ctrl+Alt+T) and run the commands below one by one:

sudo add-apt-repository ppa:phoerious/keepassxc
sudo apt update
sudo apt install keepassxc

Optionally, you may run the commands below at anytime if need to remove the .deb package as well as the PPA:

sudo apt remove keepassxc
sudo add-apt-repository --remove ppa:phoerious/keepassxc
  •  

Waydroid 1.6.0 added Forwarding Android Notifications to Linux Desktop Support

Waydroid, the software for running Android OS and Android apps on Linux Desktop, released new 1.6.0 version few days ago.

As you may know, Waydroid is a free open-source Python written application that uses a container-based approach to boot a full Android system (LineageOS by default) on regular Linux system.

The new Waydroid release now hide the system apps (e.g., Files, Contacts, Calculator, Music, and Camera) by default, as your Linux desktop may have apps with same names, to avoid duplicate app names in your Linux Desktop’s application launcher.

However, the manually installed Android apps are still visible, and user may edit the corresponding .desktop files under .local/share/applications directory and add NoDisplay=true option to hide them.

And, for those who want to hide all Android app icons from Desktop’s app launcher, then run the command below will do the trick for all current apps.

for file in $HOME/.local/share/applications/waydroid.*.desktop; do desktop-file-edit --set-key=NoDisplay --set-value=true $file; done

According to the release note, Waydroid 1.6.0 now will always show the main launcher after enabling multi-windows mode. And, it shows “Stop Waydroid” and “Initialize Waydroid” options when you right-clicking on main app icon, which can be useful to restart session or switch Android OS type to either minimal or with Google Services/Gapps.

Since the release, ADB will no longer auto-connect on session start. To install apps from Linux host, transfer files, debugging, or run shell commands, user needs to first run waydroid adb connect command manually to connect ADB, and provide authorization on the Android side.

This version also introduced new notification manager, allowing to forward Android notifications to DBUS.

It however requires updating the Android system image to a compatible version, and needs python-gbinder >= 1.3.0 or it will crash when receiving a notification with a picture. And, in my test with default LineageOS image, the feature seems not working!

The release also include new waydroid bugreport command to gather logs. It’s useful for reporting bugs, as you may reproduce your problem while running the command and send the log as bug report.

Other changes include

  • Rotate and trim waydroid.log file at 5MB.
  • Add new waydroid command with no arguments, as alias for waydroid show-full-ui.
  • And other miscellaneous improvements.

How to Install Waydroid

Waydroid has been made into Fedora and Arch etc Linux repositories. And, it provides an official apt repository contains native .deb packages for Ubuntu 22.04, 24.04, 25.10, Debian 12, 13 and Unstable.

And, I’ve written about how to install and setup Waydroid in Ubuntu, though it’s still at the last v1.5.4 at the moment of writing.

  •  

RustDesk 1.4.4 Released with Edge Scrolling Support

RustDesk, the free open-source remote desktop application, release new 1.4.4 version few days ago.

The new release of this Teamviewer or AnyDesk alternative app introduced edge scrolling support, when your app window is smaller than the remote screen size.

Previously, it scrolls automatically when you move cursor around the screen. While, the “Scrollbar” mode is available for choice when you want to manually move the bottom or right scrollbar to move around.

In the new release, a new “ScrollEdge” mode is added. With it enabled, you may move cursor to the window edge to move the screen. And, a scroll-bar is available to adjust the edge thickness.

For Linux with Wayland (e.g., Ubuntu 22.04+ and Fedora Workstation), it added support sharing multiple monitor screens since last 1.4.3. In the new release, it improved this feature by supporting multiple scaled monitors with Gnome or KDE Wayland.

RustDesk 1.4.4 also introduced new “Ask for note at the end of connection” option in the General settings page.

With it enabled, it will display a popup dialog where user can enter a note, when disconnects either actively or passively. See this page for more about the feature.

The new version also improve Apple devices support. It now shows proxy settings on iOS, and allows to manage transferred files through Files or iTunes app. And, it updated hwcodec that fixed H265 encoding support on Intel chip Mac computers.

Other changes in the 1.4.4 release include:

  • Allow flipping sort order in mobile app’s file transfer
  • File transfer auto start on reconnect
  • Load custom installed CA root on mobile
  • UI costomization for Sciter version
  • Insecure TLS option
  • Fix cursor icon capture for the Linux Flatpak package.
  • Better TLS compatibility on all platforms

Get RustDesk 1.4.4

The official release note, as well as the installer packages for Windows, Linux, macOS, iOS, and Android, are available in its Github releases via the link below:

For Linux, the “Assets” section provides more packages, e.g., pkg.tar.zst for Arch, .rpm for Fedora/SUSE/RHEL, non-install .appimage, and .flatpak for most Linux that runs in sandbox environment.

If you don’t know which OS type (X86_64, aarch64, or archv7) to choose, open terminal and run uname -m or dpkg --print-architecture command to tell.

And for those who are new to this application, simply install it in both remote and local machines, then type the remote ID to connect, though remember to start the service first in hamburger menu.

It by default uses the public server to initialize the connection, then send data peer-to-peer after connection is established. While, you may see the official docs for setting up self-hosting server.

  •  

HPLIP 3.25.8 Released with Few Dozen More Printers Support

HPLIP, the free open-source Linux driver for HP inkjet and laser based printers, released new 3.25.8 version few days ago.

This is the third release in 2025, which features a few dozen new printer devices support but NO installer update for the most recent Linux Distributions support.

According to the official release note, HPLIP 3.25.8 added following printers support:

  • HP LaserJet Enterprise Flow MFP 8601z
  • HP LaserJet Enterprise 5501
  • HP LaserJet Enterprise MFP 5601dn
  • HP LaserJet Enterprise 6500dn
  • HP LaserJet Enterprise 5501n
  • HP LaserJet Enterprise MFP 5601
  • HP LaserJet Enterprise 6500
  • HP LaserJet Enterprise 5502dn
  • HP LaserJet Enterprise MFP 5602dn
  • HP LaserJet Enterprise 6500n
  • HP LaserJet Enterprise 5502
  • HP LaserJet Enterprise MFP 5602f
  • HP LaserJet Enterprise 6501dn
  • HP LaserJet Enterprise X50452dn
  • HP LaserJet Enterprise Flow MFP 5602zfw
  • HP LaserJet Enterprise 6501
  • HP LaserJet Enterprise X50452
  • HP LaserJet Enterprise MFP 5602
  • HP LaserJet Enterprise X60257dn
  • HP LaserJet Enterprise MFP X53052dn
  • HP LaserJet Enterprise Flow MFP X530
  • HP LaserJet Enterprise X60257
  • HP LaserJet Enterprise MFP X53052
  • HP LaserJet Enterprise X60357dn
  • HP LaserJet Enterprise X60357
  • HP LaserJet Enterprise MFP 6600dn
  • HP LaserJet Enterprise Flow MFP 6600zfw
  • HP LaserJet Enterprise MFP 6600
  • HP LaserJet Enterprise Flow MFP 6600zfsw
  • HP LaserJet Enterprise MFP X62757dn
  • HP LaserJet Enterprise Flow MFP X62757zs
  • HP LaserJet Enterprise MFP X62757
  • DEX D50452dn
  • DEX MFP D53052dn

Sadly, the official installer so far supports Distros up to following versions:

  • Ubuntu24.04
  • Fedora 40
  • Debian 12
  • RHEL 9.1
  • Linux Mint 22
  • SUSE Linux 15.5
  • Zorin 17.1
  • and more.

Meaning for Ubuntu 25.04, 25.10, Debian 13, Fedora 43 etc, you need to manually build the driver from source.

How to Install HPLIP 3.25.8

The official installer “hplip-3.25.8.run” is available to download in sourceforge.net via the link below:

After downloaded the installer, open the Downloads folder in terminal, and finally run the 2 commands below one by one:

  • Add executable permission:
    chmod u+x ./hplip-3.25.8.run
  • Start the installer and follow terminal output to install HPLIP:
    ./hplip-3.25.8.run

For non-supported Linux Distributions, either grab the source form the link above, or, open the extracted folder (the command above automatically generate the source folder) in terminal, then compile by yourself.

  •  

GDM Settings adding Toggles for Light Mode & Fingerprint Authentication

GDM Settings, the graphical configuration tool for GNOME Login Screen, updated recently with new toggle options!

As you know, GDM Settings is a free open-source Python written settings app for GNOME’s Login/Display Manager.

With it, you may change the login screen background image, set the fonts and themes, tweak top-bar colors, disable user list, show welcome message, and configure more about the login screen.

GNOME Login Screen with custom background

The latest of the app is so far at version 5.0 which was release one year ago. The development slows down however after that release.

In the past 12 months, only few features were added. One is the “Light Mode” toggle option under Appearance tab, which works for GNOME 48 and above.

It works by setting the org/gnome/desktop/interface/color-scheme key to ‘prefer-light‘ for GDM. Though, in vanilla Gnome both top-bar and menus are dark in either mode. And, I didn’t see anything goes light after enabled the option in my test in Ubuntu 25.10.

Another is a new Enable Fingerprint Authentication toggle option added to ‘Login Screen’ page. It can be useful when you want to use fingerprint authentication for your GNOME desktop environment except the login screen, as you know log-in without password will cause unlock keyring pop-up when launching Chrome etc application though it can be skipped.

And, the function is done by setting org/gnome/login-screen/enable-fingerprint-authentication key for GDM silently in the background.

Besides that, it also updated to GNOME 49 platform for the Flatpak package. For more about the development of GDM Settings, see the commits page.

Install GDM Settings

The changes mentioned above are still in development stage. Meaning you need to manually build it from source code.

NOTE: GDM Settings has the potential to break your login screen. Don’t use it on production machine!

For the 5.0 version, it’s available to install in most Linux Distributions through Flatpak package.

Just enable Flatpak support, then run the command below to install it:

flatpak install flathub io.github.realmazharhussain.GdmSettings

While, Fedora Workstation may simply search for and install it from GNOME Software, if you have 3rd party repository enabled.

GDM Settings flatpak package in Fedora GNOME Software

For choice, there’s also non-install AppImage available to download in the Github releases page under Assets section.

As both AppImage and Flatpak were built with most recent GNOME runtime, they may be NOT working good in old GNOME Desktops.

So, I built the app package into this unofficial PPA for Ubuntu 22.04, Ubuntu 24.04, 25.04 and 25.10.

To add the PPA and install GDM Settings, open terminal (Ctrl+Alt+T) and run commands below one by one:

sudo add-apt-repository ppa:ubuntuhandbook1/gdm-settings
sudo apt update
sudo apt install gdm-settings

Optionally, you may remove the PPA package and remove the PPA at any time by running commands:

sudo apt remove gdm-settings
sudo add-apt-repository --remove ppa:ubuntuhandbook1/gdm-settings
  •  

Blender 5.0 Released with HDR Color Space, Much Faster Material Compilation

Blender, the popular 3D computer graphics software, released new major 5.0 version yesterday.

The new 5.0 release overhauled the color management pipeline with native wide-gamut and HDR color spaces support.

It can now display and export HDR and wide-gamut colors for both images and video. And, it added new ACES 1.3 and 2.0 views as alternative to AgX and Filmic, AgX HDR view, and Rec.2100-PQ and Rec.2100-HLG displays.

It’s now possible to use a wider gamut of colors for materials, lights and compositing, and to follow common ACES workflows, set a custom Working Space per file and Sequencer, and use the Convert Colorspace node in the Compositor.

The Sky Texture node now supports multiple scattering, while the old “Nishita” model is still available as “Single Scattering”. It can now generate a sunset scene instantly by animating only one parameter.

And it introduced new Radial Tiling node building block for creating shapes and tilings, including rounded corners. While, baking from meshes has been greatly improved with n-gon faces, baking Vector Displacement, as well as bake only to selected and active images etc features.

For circles, the release also introduced new unbiased null-scattering volume rendering algorithm and set it as default. There are as well a more accurate random walk subsurface scattering algorithm with multiple bounces, and the physically-based iridescense effects supported by metals.

Adaptive Subdivision is now considered stable, and, it features a new Object Space option to set edge length in object space instead of pixel size.

Other circles updates include new Linear 3D Curves, new Portal Depth light pass, new Render Time pass, better OptiX denoiser quality, new driver and hardware requirements, and more!

Material compilation is now much faster compare to the last 4.5 version though either OpenGL or Vulkan backend. Meaning that it has a faster startup and overall experience.

The Compositor in Blender 5.0 features a new asset shelf, filled with built-in effects to get from nothing to stunning in no time.

Grease Pencil objects now support motion blur, and, the number of motion blur steps can be adjusted for better quality.

Grease Pencil strokes can now have different corner types set per point: Flat, Sharp, and Round (default). And, Cyclical strokes now correctly connect start and end segments without gaps or overlaps.

Other changes in the release include:

  • New modifier: Array, Scatter on Surface, Instance on Elements, Randomize Instances, Curve to Tube, and Geometry Input
  • Overhauled UV Sync feature and enable it by default.
  • Nodes from compositor now available in the Video Sequencer.
  • Shading nodes now support Repeat Zones, just like Geometry Nodes.
  • New and updated MatCaps that include optional specular light.
  • And tons more other changes. See official release note for details.

Get Blender 5.0

The installer packages for Linux, Windows, macOS, as well as the source code are available to download at the link below:

For Ubuntu, the official snap package is available to install through either App Center or Ubuntu Software, though v5.0.0 is still in Beta channel at the moment of writing.

While Linux user may also choose the portable tarball (from download link above), decompress, then run the executable to launch the software. And, a community maintained Flatpak package. For beginners, see this step by step how to install guide.

  •  

GIMP 3.2 RC1 Released with SVG Export and New Keyboard Shortcuts

GIMP, the popular image editing software, announced the first release candidate for the next major 3.2 version yesterday.

This is the third development release for GIMP 3.2. It introduced some new keyboard shortcuts, new and improved image formats support, API changes and UI/UX improvements.

The on-canvas editor for the Text Tool now is movable. It now includes a move cursor icon in left side, allowing to drag on it to move the on-canvas editor. While, a circle arrow icon is also available to reset its position.

Besides that, this RC release added new Shift + Ctrl + V keyboard shortcut to paste unformatted text in the on-canvas editor, and new Shift+X shortcut to switch between current and last used tools, while, user has choice to change the shortcut by Edit -> Keyboard Shortcuts dialog.

The release also added support exporting SVG as actual vectors. While, the export dialog offers options to optionally embed raster layers as either PNGs or JPEG.

The PDF plug-in now exports vector layers as actual vectors, meaning that those layers can be further edited in other vector graphics software.

As well, it supports importing PowerVR (PVR) texture files, which is most commonly used for SEGA Dreamcast games and mods, and supports loading any supported image that’s compressed by GIMP standard compression algorithms.

GIMP 3.2 RC1 also improved its UI/UX experience by allowing to drag and drop image files on-to tab bar to open multiple images, drag and drop color swatches from the Color History, and hide GIMP from macOS App Menu.

It as well updated the API with new GimpImage and GimpItem widgets added to GimpProcedureDialog, and many additional public API commands for text, vector, and link layers.

Other changes include:

  • Simulate adjustment layers with layer groups.
  • Document History dockable is now multi-selection aware.
  • Update Windows Installer with automatic Dark Mode support.
  • Update color immediately after typing hex colors without hitting Enter.
  • Fixes and improvements to the link layer and vector layer features introduced in last 3.1.4.
  • various security fixes.

For more about this RC release, see the official announcement.

How to Install GIMP 3.2 RC1

GIMP provides official installer packages for Linux, Windows, and macOS, which are available to download via the link below:

For Linux, they include Snap package which can be directly installed from Ubuntu Software or App Center.

While, user may also choose non-install AppImage that can be launched directly after adding executable permission.

Or install the Flatpak package in sandbox environment for most Linux by running command after enabled flatpak support:

flatpak install --user https://flathub.org/beta-repo/appstream/org.gimp.GIMP.flatpakref

And, launch the Flatpak package via the command below in case you also has the stable version installed as Flatpak.

flatpak run org.gimp.GIMP//beta

Uninstall GIMP 3.2 Devel version

For the AppImage and Snap package, either delete the file or uninstall via App Center (or Ubuntu Software).

For the Flatpak package, use the command below to uninstall:

flatpak uninstall --delete-data org.gimp.GIMP//beta

You may then even delete the flathub-beta repository afterward by running command:

flatpak remote-delete flathub-beta

NOTE: the command will list and uninstall all apps and runtimes installed from the Beta repository. Answer NO if you want to keep any of them.

  •  

Hugin 2025.0.0 Released with New GUI Tool (Ubuntu PPA Updated)

Hugin, the free open-source panorama photo stitching and HDR merging program, release new 2025.0.0 version few days ago.

The new version of this yearly release software, introduced new GUI tool called Hugin Toolbox, which provides a graphical user interface for enfuse and simple perspective correction.

Like the “Batch Processor” and “Lens calibration”, the new GUI can be launched either from start menu (e,g., search from GNOME Overview) or by running hugin_toolbox command from terminal.

Besides new GUI tool, the release now uses vector SVG instead of PNG for the tool-bar and button icons, improving the app appearance on HiDPI displays.

And for Windows user, the app window color scheme will now change automatically when you switching between light or dark desktop appearance.

For users who would like to build Hugin 2025.0.0 from source code, the new release now requires wxWidgets >= 3.2 and c++17 compiler. Meaning Linux user needs to pass -std=gnu++17 flag when building with c++.

And, due to c++17 compiler requirement, old Ubuntu 20.04 needs to either upgrade “libvigraimpex” library or edit separableconvolution.hxx (line 1412) and stdconvolution.hxx (line 792) files under /usr/include/vigra/, by changing:

#ifndef _MSC_VER
            throw(PreconditionViolation)
#elif _MSC_VER >= 1900
            noexcept(false)
#endif

to:

#if _MSC_VER >= 1900 || __cplusplus >= 201103L
            noexcept(false)
#else
            throw(PreconditionViolation)
#endif

Or, it will output “error: ISO C++17 does not allow dynamic exception specifications” error as c++17 has removed the throw exception specification.

Other changes in Hugin 2025.0.0 according to the commit log:

  • Better handling of unknown language by automatically switching back to default language at launch.
  • Add one more variant for Hugins image types JPEG/TIFF/PNG alone.
  • Ask for overwrite when using the secure hugin_stitch_project.
  • Allow scaling with control + mouse wheel for masks and crop operations.
  • Use luminance for masking of images instead of separate red/green/blue channel comparison.
  • Ask for overwrite when using the secure hugin_stitch_project.
  • Add function to print total time at end for ExternalCmdExecDialog.
  • Add one more operator for TDiff2D and fix a const expression
  • Allow also creating line cp cover several images (cpfind).
  • Translation updates, bugfixes, and other small improvements.

Install Hugin 2025.0.0

The official packages for Windows and source tarball are available to download in this Sourceforge page.

For Linux, a community maintained Flatpak package is available for most distributions on amd64 and arm64 platforms.

Linux Mint and Fedora (with 3rd party repository enabled) may search & install the Flatpak package by using system software app. While, Debian/Ubuntu users may run the 2 commands below one by one to install it:

sudo apt install flatpak
flatpak install https://dl.flathub.org/repo/appstream/net.sourceforge.Hugin.flatpakref

For Ubuntu users who prefer classic .deb packages, I’ve built the package into this unofficial PPA for Ubuntu 20.04, Ubuntu 22.04, Ubuntu 24.04, 25.04 and 25.10.

For Ubuntu 18.04, the system libraries are outdated for Hugin 2025.0.0. I’ll no longer build it for this old LTS due to lack of time.

To add the PPA & install Hugin, run commands below one by one:

sudo add-apt-repository ppa:ubuntuhandbook1/hugin
sudo apt update
sudo apt install hugin

(Optionally) Remove the PPA and Hugin (.deb) package by running command:

sudo apt remove hugin hugin-data hugin-tools
sudo add-apt-repository --remove ppa:ubuntuhandbook1/hugin
  •  

Canonical Extended Ubuntu LTS Support to 15 Years

For Ubuntu LTS releases, starting from Ubuntu 14.04 Trusty Tahr, the official support has been extended to 15 years.

Canonical, the company behind Ubuntu, announced the expansion of the Legacy add-on for Ubuntu Pro few days ago. Along with the Standard and Expanded Security Maintenance (ESM) support, the total coverage is expanded to 15 years.

Ubuntu 14.04 Desktop

Ubuntu LTS Support History

Ubuntu LTS, the releases published every even-numbered years in April (e.g., Ubuntu 14.04, 16.04, 18.04, 20.04, 22.04 and 24.04), initially has 5 years of standard support.

Start in January 2023, Canonical announced the general availability of Ubuntu Pro, expanded Ubuntu LTS support circle with additional 5 years for subscribed users through Expanded Security Maintenance.

Then, the Legacy add-on for Ubuntu Pro was announced in last year expanded the security and support with 2 more years.

Due to the positive reception and growing interest in longer life-cycle coverage (according to the announcement), the legacy add-on was extended to 5 years, thus the total support Ubuntu LTS releases has updated to 15 years.

Current Ubuntu Releases Support Circle

Ubuntu website has updated the life-circle page for all releases that are still in coverage. And, here’s a table for them.

Ubuntu Releases Release Date End of Standard Support End of Ubuntu Pro Support End of Legacy Addon Coverage
25.10 (Questing Quokka) Oct 2025 Jul 2026
25.04 (Plucky Puffin) Apr 2025 Jan 2026
24.04 LTS (Noble Numbat) Apr 2024 Apr 2029 Apr 2034 Apr 2039
22.04 LTS (Jammy Jellyfish) Apr 2022 Apr 2027 Apr 2032 Apr 2037
20.04 LTS (Focal Fossa) Apr 2020 Apr 2025 Apr 2030 Apr 2035
18.04 LTS (Bionic Beaver) Apr 2018 Apr 2023 Apr 2028 Apr 2033
16.04 LTS (Xenial Xerus) Apr 2016 Apr 2021 Apr 2026 Apr 2031
14.04 LTS (Trusty Tahr) Apr 2014 Apr 2019 Apr 2024 Apr 2029

As you see in the table, the support for LTS releases include 5 years of standard support for free, including security updates for packages in Canonical-supported Main repository, Hardware enablement (HWE) with major Kernel version updates and graphics stacks, some popular app updates (e.g., Firefox), and bug fixes and maintenance updates to ensure stability.

For user with Ubuntu Pro subscription (see how to enable Ubuntu Pro), there’ll be another 5 years of security updates for packages in Main and Universe repositories, and bug-fixes to ensure stability.

Ubuntu Pro is free for personal users on up to 5 machines, and on up to 50 machines for active Ubuntu Community members, while, enterprise customers and others need to pay for support. See Ubuntu Pro pricing.

The Legacy add-on for Ubuntu Pro provides 5 years more security coverage and support. However, it’s only available for Ubuntu Pro paying customers who pay extra.

image from Ubuntu website

In short, Ubuntu LTS now has 5 years of standard support for free, another 5 years of support through Ubuntu Pro that’s free for personal users, and 5 years more security coverage for paying customers pay extra.

  •  

How to Disable All the AI Features in Firefox Web Browser

Firefox introduced AI chatbot, AI powered link preview, and search images with Google Lens etc AI powered features in the past releases.

According to the Firefox Privacy Notice, it does NOT have access to the AI conversations or what user input, but do collect technical and interaction data, such as how often a chatbot provider or suggested prompts are used, and the length of selected text.

AI chatbot in Firefox sidebar

If you don’t like the AI chatbot feature, you can hide them from side-bar settings page, or remove the shortcut from the context menu of a text selection.

Hide AI chatbot

While, in this tutorial I’m going to show you how to disable them so that they will disappear along with the settings option, link preview, and image search with Google Lens.

No AI chatbot, no configure options, and no Google Lens image search

NOTE: This tutorial is tested in Ubuntu 24.04 with Firefox 145. As time go on, Firefox will release new versions and may add, remove, or change the AI related preference keys.

Option 1: Disable AI LLM through about:config

For current profile only, type about:config in address bar and hit Enter, then click the blue “Accept the Risk and Continue” button to access the advanced configuration page.

Next, search following preference names and set them to “false” one by one:

  • browser.ml.enable
  • browser.ml.chat.enabled
  • browser.ml.chat.menu
  • browser.ml.chat.page
  • browser.ml.chat.page.footerBadge
  • browser.ml.chat.page.menuBadge
  • browser.ml.linkPreview.enabled
  • browser.ml.pageAssist.enabled
  • browser.tabs.groups.smart.enabled
  • browser.tabs.groups.smart.userEnabled
  • extensions.ml.enabled
  • browser.search.visualSearch.featureGate

And, it should apply the changes immediately after you set them all to false.

Option 2: Add configuration file to disable AI features

If you have multiple user profiles for Firefox, and you want to disable AI for them all, then it’s better to add user.js config file instead of configuring the preference keys one by one.

First, type about:profiles in address bar and hit Enter to access the profile management page.

Then, click “Open Directory” button to open the Root Directory of the target user profile.

In the opened folder, create user.js file if it does not exist. Finally, edit the file and write following content into it.

user_pref("browser.ml.enable", false);
user_pref("browser.ml.chat.enabled", false);
user_pref("browser.ml.chat.menu", false);
user_pref("browser.ml.chat.page", false);
user_pref("browser.ml.chat.page.footerBadge", false);
user_pref("browser.ml.chat.page.menuBadge", false);
user_pref("browser.ml.linkPreview.enabled", false);
user_pref("browser.ml.pageAssist.enabled", false);
user_pref("browser.tabs.groups.smart.enabled", false);
user_pref("browser.tabs.groups.smart.userEnabled", false);
user_pref("extensions.ml.enabled", false);
user_pref("browser.search.visualSearch.featureGate", false);

After that, you may click “Launch profile in new browser” button to open Firefox window with that profile and see if it works. And, copy the user.js file to root directories for other profiles if need.

  •  

NetBeans 28 added Java SE 26 and Multiple LSP Servers Support

Apache NetBeans, the free open-source IDE for Java, C/C++, PHP, and HTML5, released new version 28 few days ago.

The new IDE release updated UI with a tool widget to execute common text encoding in the IDE: Base64, URL and Hex encoding/decoding.

It added delete button for the SSH Connection Dialog, updated Add Language Description panel layout to be properly resizable, and brought a couple of smaller improvements relating to keyboard shortcuts in various platform components.

NetBeans 28 added Java SE 26 support for Tomcat, TomEE, and GlassFish, though it’s still in early access development stage. It also added support for the latest stable GlassFish 7.0.25, and GlassFish 8.0.0-M12 pre-release.

The LSP client now permits multiple LSP servers for each file/mime type. And, LSP Protocol provides the language clients to send messages to the language server to shutdown and exit.

For the editor, it added markdown file template, moved CheckRegex action to IDE Tools menu, improved the goto/jumpto dialog, and added tooltips to Projects, Files and Favorites tabs.

For Java, it updated net.java.html library to version 1.8.2, added opentest4j-1.3.0.jar to JUnit5, switched CI to JDK 25 GA, and added enhanced switch support to ThrowableNotThrown.

PHP features an auto-completion for the use keyword in the body of a class, trait, and enum. And, it fixed the coloring for Twig 3.15 inline comments.

Other changes in NetBeans 28 include:

  • Honor the JAVA_HOME environment variable in nbexec script.
  • Add missing CSS properties : margin-block, pading-block, scroll-behavior, conic-gradient, filter-effects.
  • Add extra file extensions support for Groovy.
  • More defensive guards against invalid code points in Ant Preferences.
  • Add copy button to Maven action customizer.
  • Add java/gradle.test to Gradle CI.
  • Support jakarta.persistence in the JPQL query executor.
  • Support nested and toplevel non-public tests and stabiize result extraction for Gradle.
  • Indicate support for Gradle’s incremental annotation processing.
  • Improve maven goal re-run property handling and UI.
  • Add context menu entries in Git Repository Browser for Add a remote and remove a remote.

For more details and source tarball, go to this Github release page.

Get NetBeans 28

Apache provides official binary package for NetBeans 28, which is available to download at the link below:

The platform independent binary package contains executable files and runtime libraries. Simply decompress it and run the executable file for your OS will launch it.

For Ubuntu on AMD/Intel or ARM64 platforms, there’s also an official Snap package that runs in sandbox environment. User may simply launch App Center (or Ubuntu Software for 22.04-) to search & install the package.

  •  

Easy Effects 8.0.0 Switched from GTK4 to Qt & KDE Framework

Easy Effects, the free open-source audio equalizer and effects application for Pipewire, released new major 8.0.0 version few days ago.

The new app release switched its UI backend from GTK4 plus LibAdwaita to Qt6, QML and Kirigami. The Flatpak package is now based on KDE runtime platform instead of GNOME.

Easy Effects now based on Qt and KDE framework

Due to moving to Qt from GTK, the dependencies changed. Distribution or third-party package maintainers are suggested to look at the Arch Linux PKGBUILD page to see everything required to build it from source.

The global shortcuts are working well on KDE, but not so much on GNOME. And, the presets, impulse response, rnnoise and autoload profile files are now saved in ~/.local/share/easyeffects while only database files kept inside ~/.config/easyeffects.

The 8.0.0 release also introduced new system tray indicator applet, which, provides menu options to show input/output presets, turn on/off audio effects, open shortcuts dialog and manual, and quit app.

Instead of presets menu, it now has a new presets dialog that contains three tabs, allowing to load local presets, get presets from community (it’s empty somehow in my case), and set auto-load presets.

And, it supports renaming and exporting presets, and setting fallback preset, that is applied automatically for any soundcard or microphone that does not have an autoloading preset.

New Presets dialog

The app window is now more friendly to small screens and tiling window managers. It added new global shortcuts (experimental) for the global effects on/off and the microphone monitor, and new configuration allows the microphone monitor output to be sent to the output effects pipeline input.

Other changes include:

  • Remembers last used plugin or tab.
  • Add “Pink noise” to test signal.
  • Replace global bypass button with a tradition on/off button.
  • Add dry and wet controls for the convolver and pitch plugins.
  • Add ‘reset history’ button for pitch plugin.
  • Draw spectrum by Qt Graphs, and only Qt color presets are allowed so far.
  • Add adaptive intensity mode to crystalizer plugin.
  • Echo Canceller plugin is now based on the webrtc library.
  • New Autogain parameter to force output level to zero.
  • Improve compatibility with the latest Linux Studio Plugins.
  • Add ability to show Calf Studio Plugins native window.

For more about Easy Effects 8.0.0, either see the CHANGELOG in source tarball or go to Flatpak package page via the link below.

How to Install Easy Effects 8.0.0

The app provides official installer packages through Flatpak, which runs in sandbox environment for most Linux on either amd64 or arm64 platforms.

Linux Mint and Fedora Workstation (with third-party repository enabled) can search & install the package from either Software Manager or GNOME Software.

While Debian/Ubuntu and other Linux may do the steps below one by one to get it:

  • First, open terminal (Ctrl+Alt+T) and run command to install the Flatpak daemon:
    sudo apt install flatpak

    For other Linux, follow the official setup guide to enable Flatpak support.

  • Next, run the command below to install the flatpak package, as well as the dependency runtimes.
    flatpak install https://dl.flathub.org/repo/appstream/com.github.wwmm.easyeffects.flatpakref

If you already have the package installed, then you may run the command below instead to check & install updates:

flatpak update com.github.wwmm.easyeffects

And, you may replace update with run in last command to start the app from terminal, which is useful for debugging purpose.

Uninstall Easy Effects

To uninstall the Flatpak app package, run command in terminal:

flatpak uninstall --delete-data com.github.wwmm.easyeffects

Skip --delete-data option if you want to keep the personal app data, and run flatpak uninstall --unused to remove the useless runtime libraries.

  •  
❌