Reading view

SuperTuxKart 1.5 Released! New Skins, Egg Hunts, & Supersampling

After almost three years of development, SuperTuxKart kart racing game finally released new major 1.5 version few days ago.

The new release of this game introduced Supersampling Anti-Aliasing (SSAA) support. Meaning that it can render game resolution higher than current screen size (even over maximum display resolution). It greatly improved the graphics quality, which is however extremely heavy that may lower frame rate.

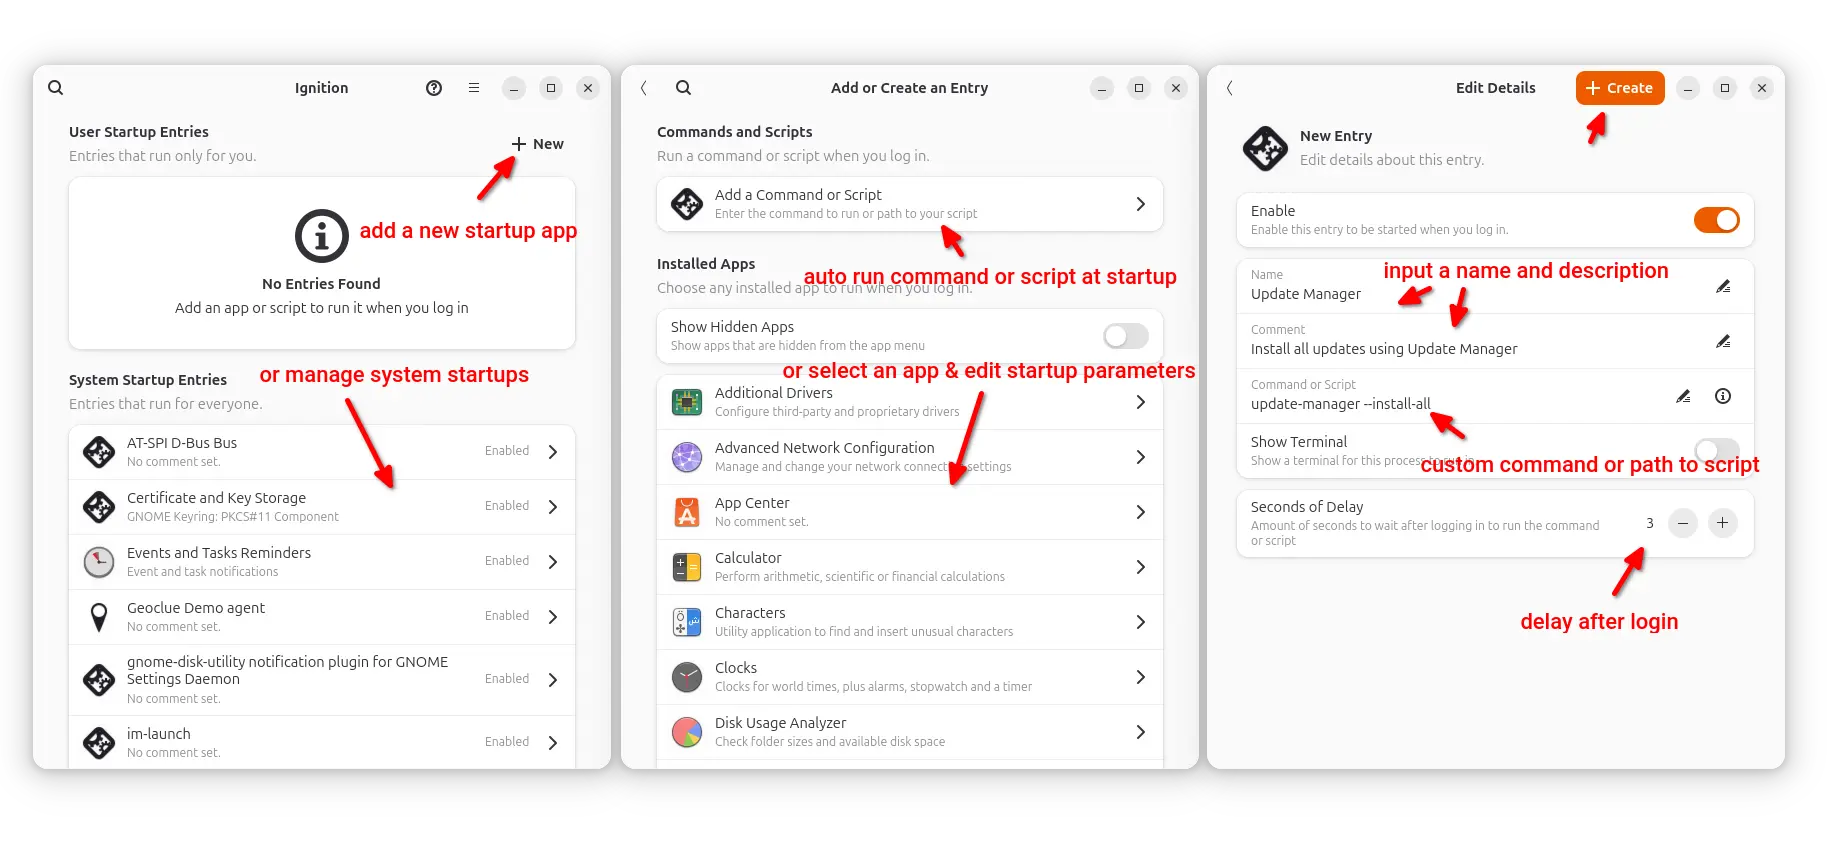
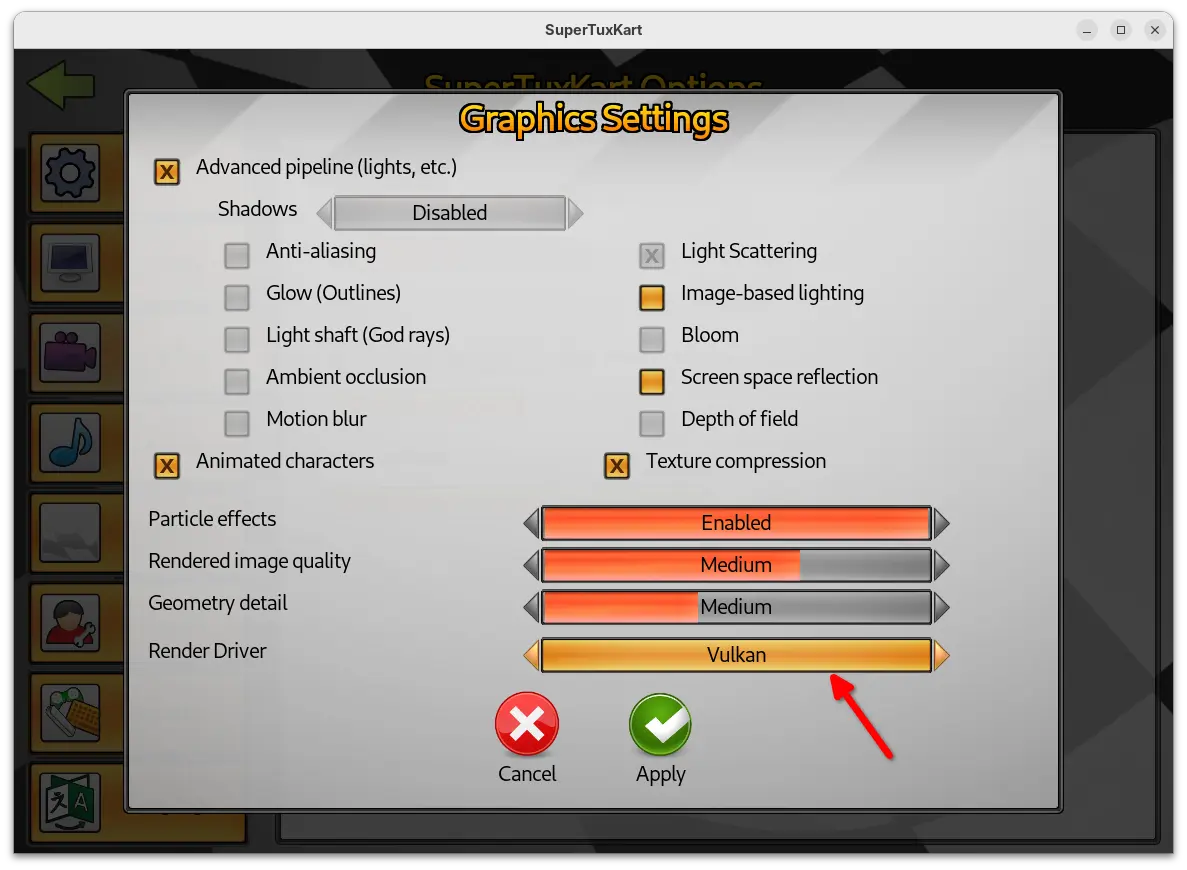
You may enable this feature by going to “Graphics” setting page and set render resolution higher than 100%.

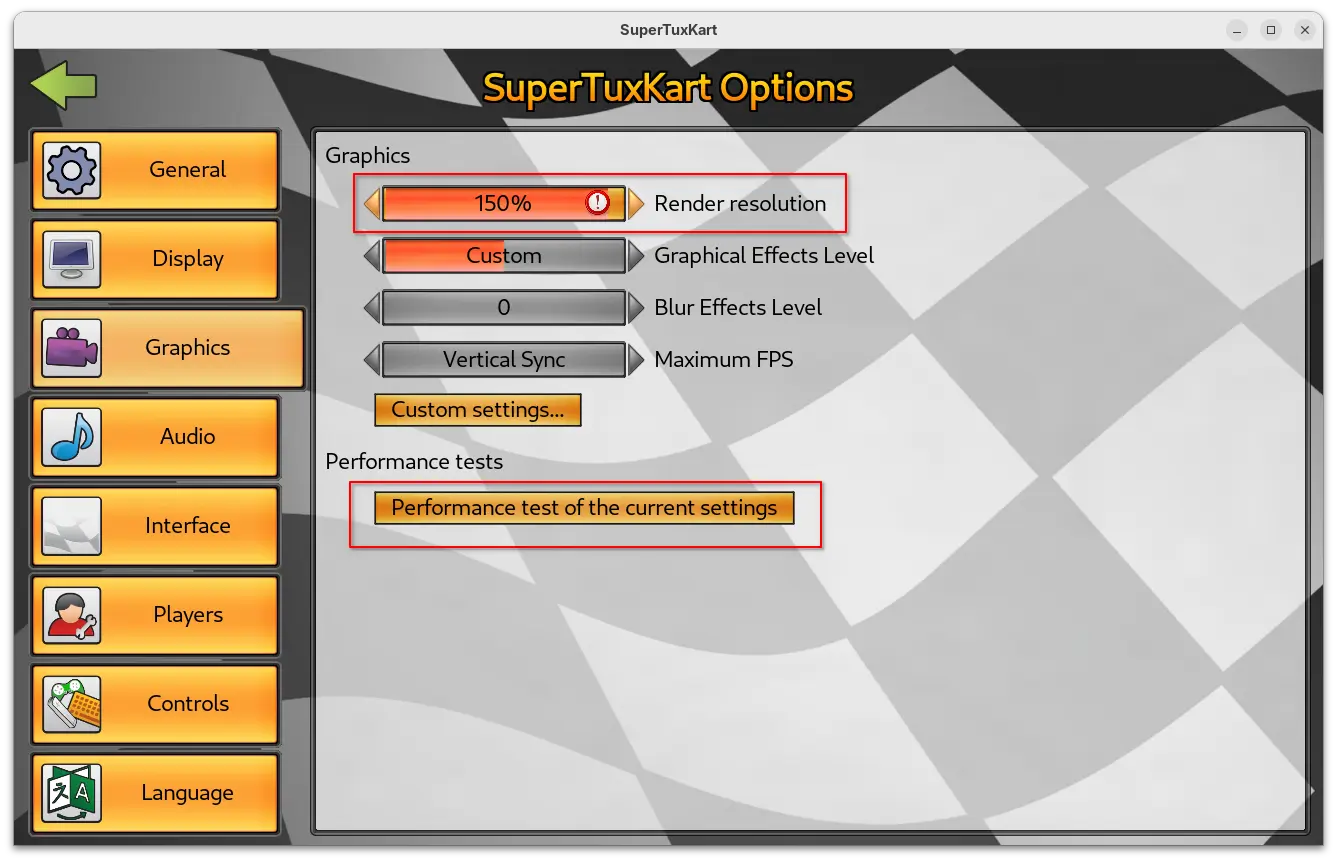
As you can see in the screenshot above, the setting page also added new “Performance test of the current settings” benchmark button. By clicking on the option, it starts a self-driving game with single loop track, and prints the performance test results, such as FPS, duration, and your current settings when it ends.

Besides that, the Vulkan support now goes stable. It added spotlight support and significant updates to the Vulkan renderer. And, user can now go to “Custom settings…” under Graphics to easily switch the render driver to Vulkan.

SuperTuxKart 1.5 as well improved level of details (LoD) and shadow mapping logic, which significantly reduce the occurrence of the sudden or abrupt appearance of game elements. And, it improved sound scale allowing headphone users to easily pick the ideal sound level.

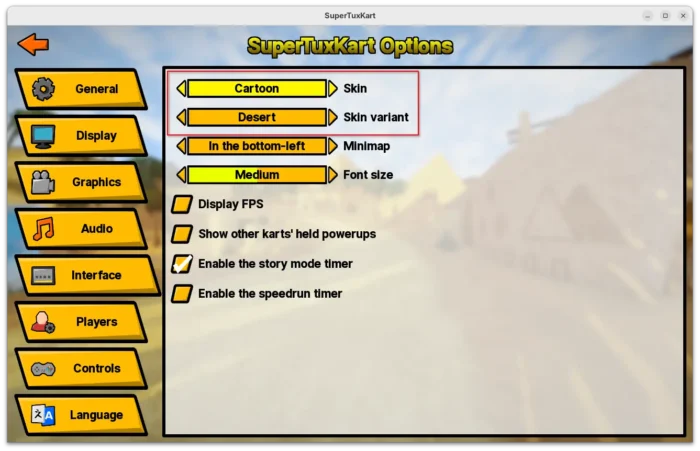
For the UI, the release added 6 new skins. The previous skins are now grouped as Classic with 5 variants, while a new Desert variant is added in this release. Cartoon theme now has five new variants, and each of them come with a background picture showing a scene from one of STK’s tracks.

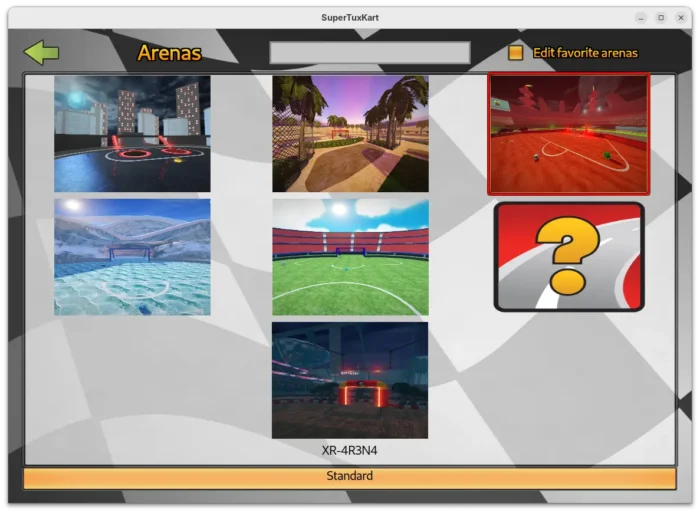
Other changes in the release include three new egg hunts in Black Forest, Gran Paradisio Island and The Old Mine, and three new official fields in soccer mode. They are Oasis and XR-4R3N4 by CrystalDaEevee, and Hole Drop by CrystalDaEevee & Sven Andreas Belting.

There are as well following changes in the release:

  • Move full-screen toogle, resoluation, and camera options into new Display setting page.
  • Add “Screen space reflection” setting option.
  • Redesign the game mode and track selection page, reducing the need for scrolling.
  • Add ability to mark tracks and karts as favorites.
  • Add new nicer spawn animation for Parachute and Bubblegums.
  • New spotlight lighting effect for karts in night tracks.
  • New music for Las Dunas Arena and Las Dunas Soccer.

For more about the release, see the official announcement.

How to Install SuperTuxKart 1.5 in Ubuntu

The new release packages as well as the source code are available to download via the link below:

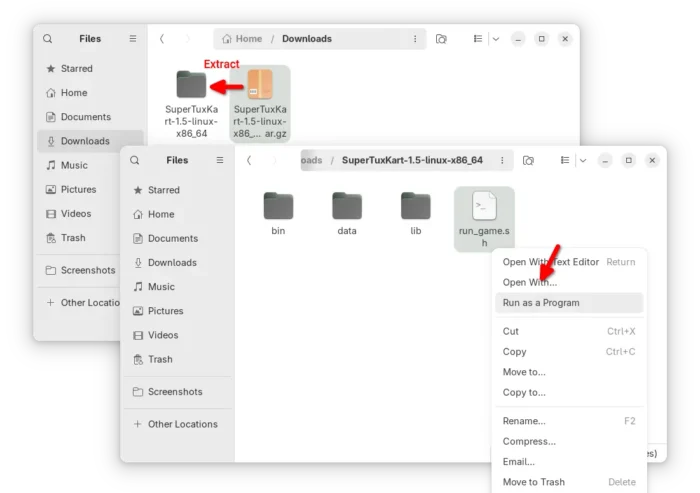
For Linux, it’s a portable tarball. Download and decompress it, then run the “run_game.sh” script to start the game.

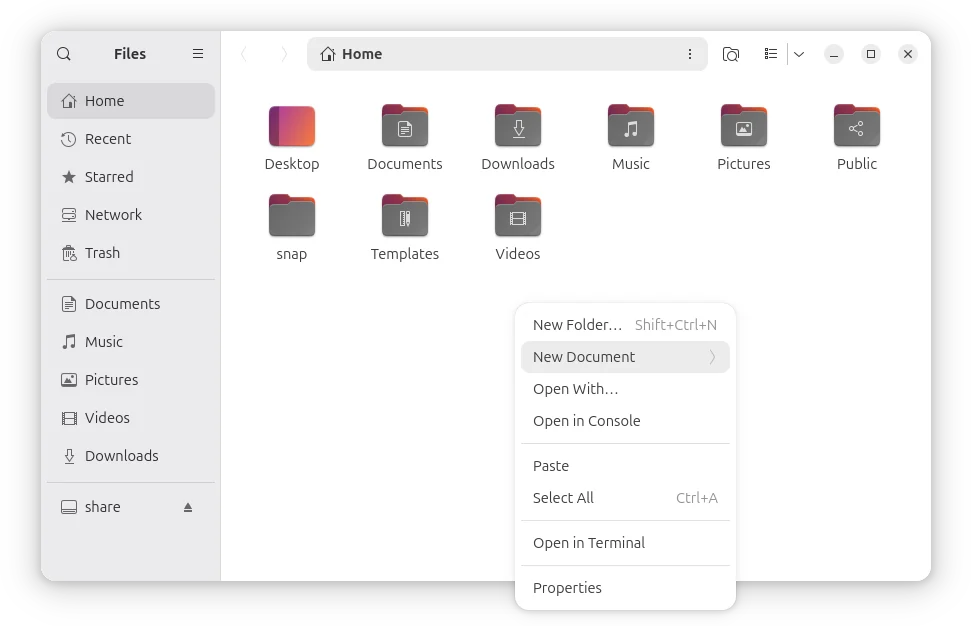
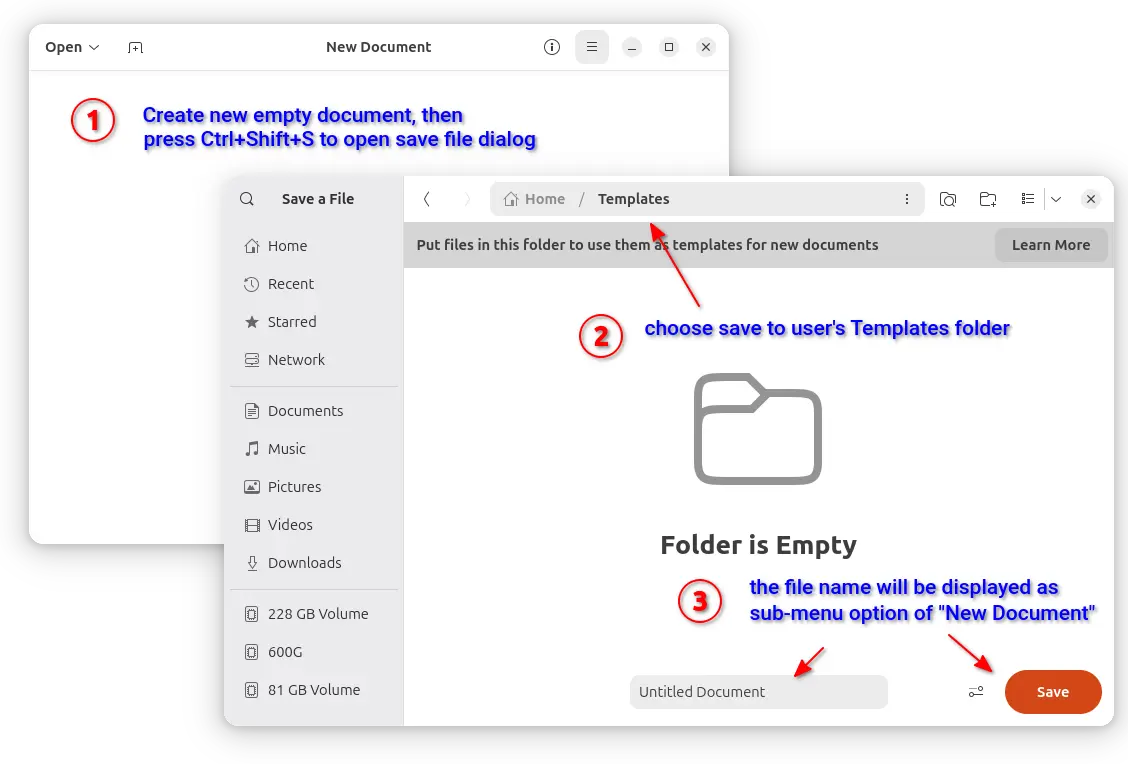
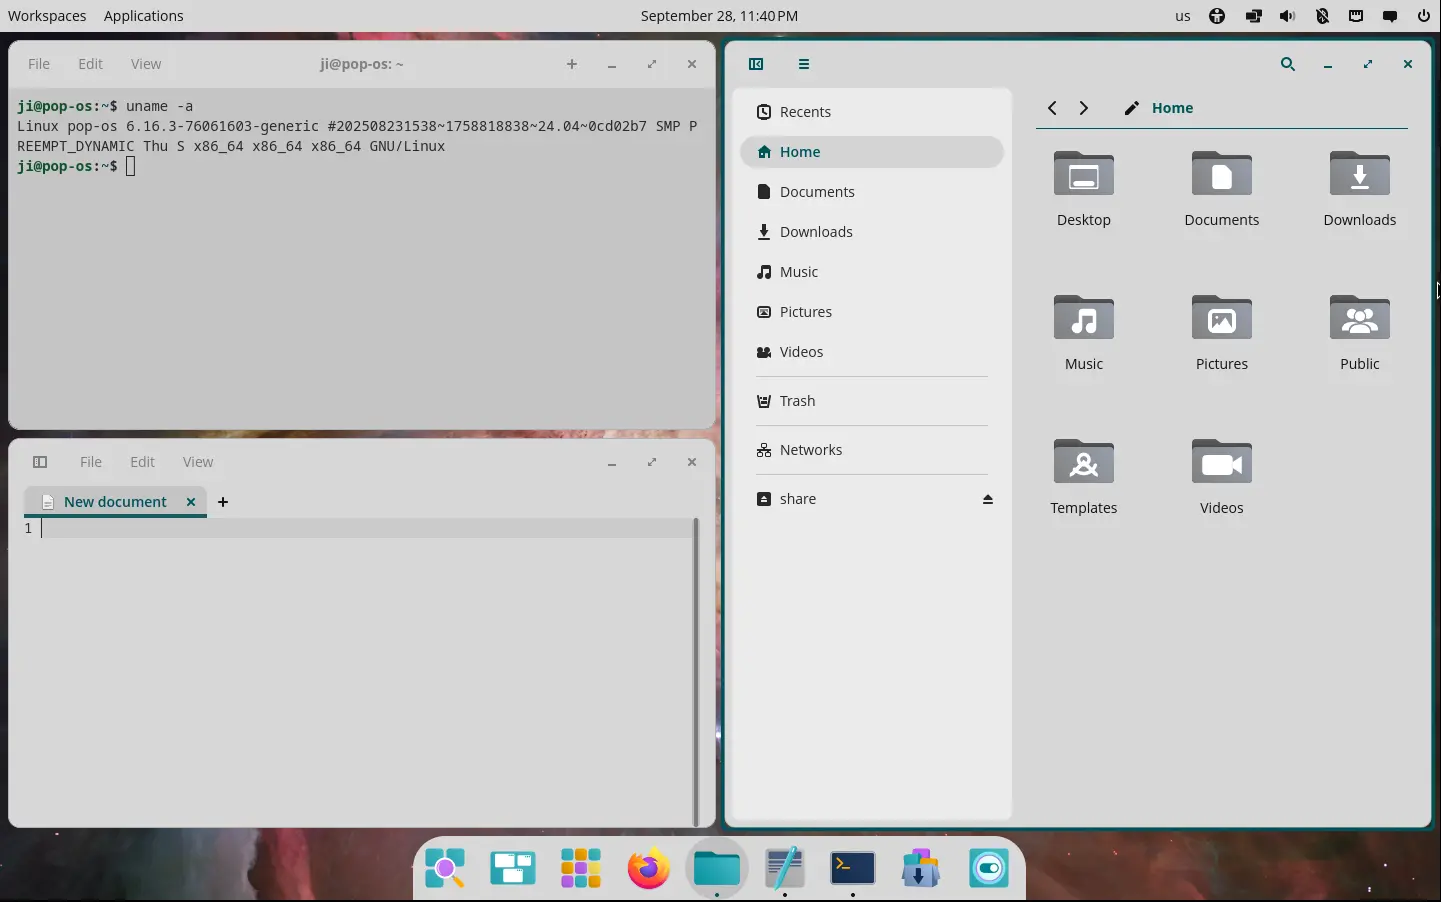
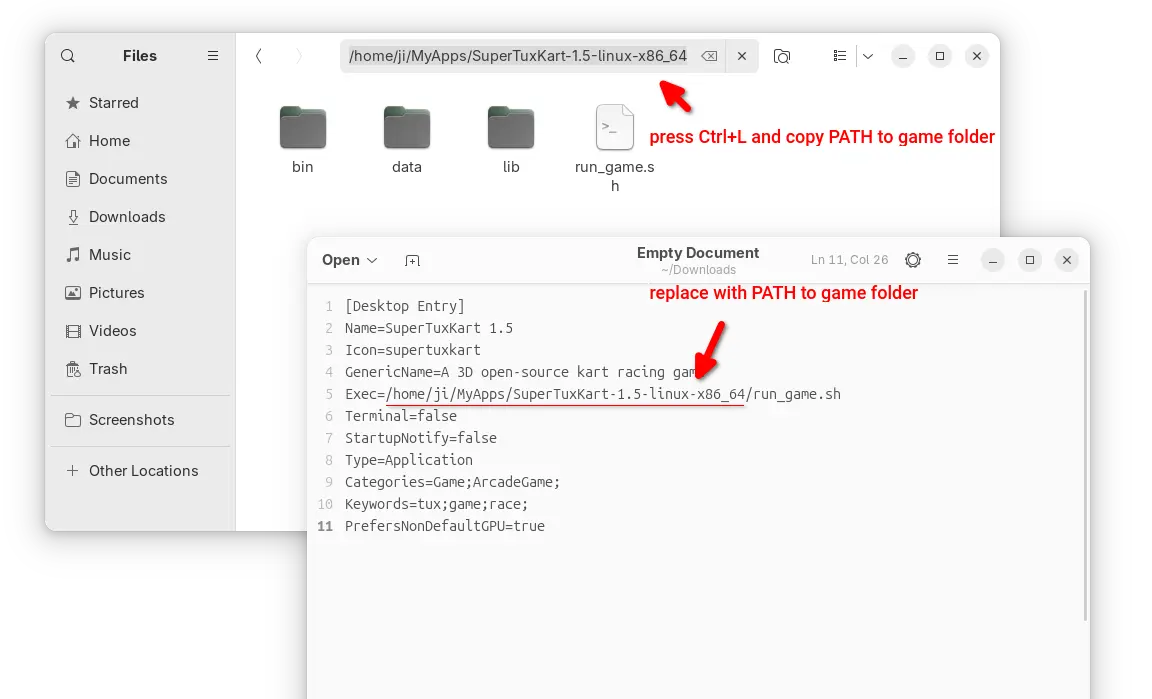
If you want to launch the game from app launcher (e.g., Gnome App Grid, overview search), then open Text Editor, create an empty document, then paste the following lines:

[Desktop Entry]
Name=SuperTuxKart 1.5
Icon=supertuxkart
GenericName=A 3D open-source kart racing game
Exec=/home/ji/MyApps/SuperTuxKart-1.5-linux-x86_64/run_game.sh
Terminal=false
StartupNotify=false
Type=Application
Categories=Game;ArcadeGame;
Keywords=tux;game;race;
PrefersNonDefaultGPU=true

Here you need to replace the game PATH that’s in bold, according to where you saved the folder to.

In my case, I created “MyApps” folder in user home, and put all portable apps/games folders into there.

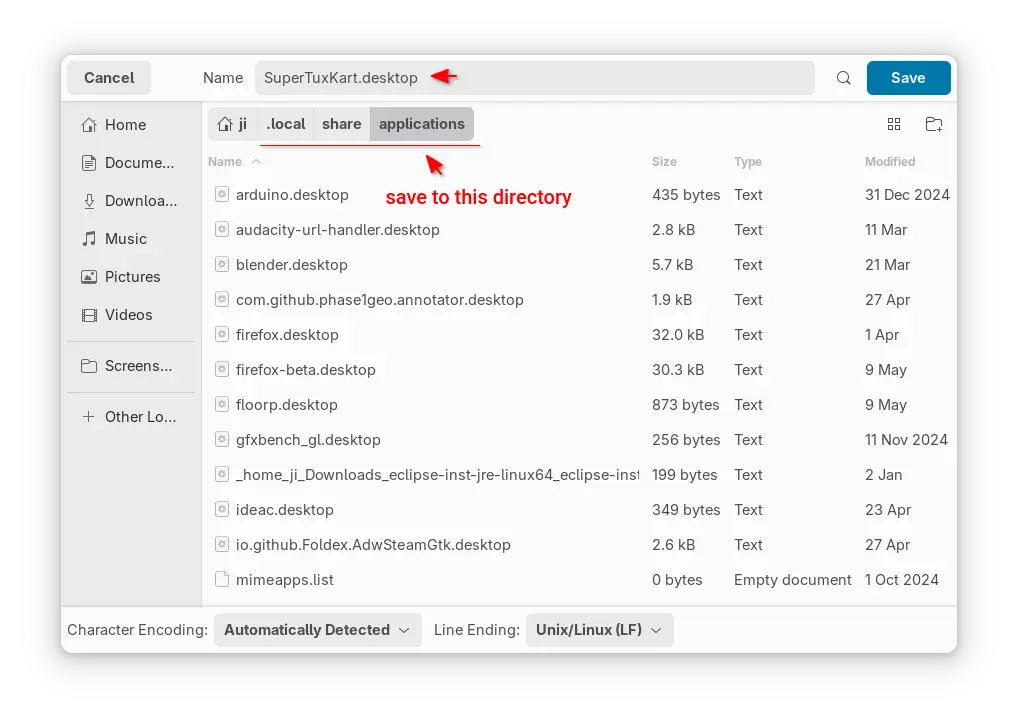
After that, save the file as “supertuxkart.desktop” into .local/share/applications directory. NOTE: .local is hidden by default, press Ctrl+H in file chooser dialog to view/hide it.

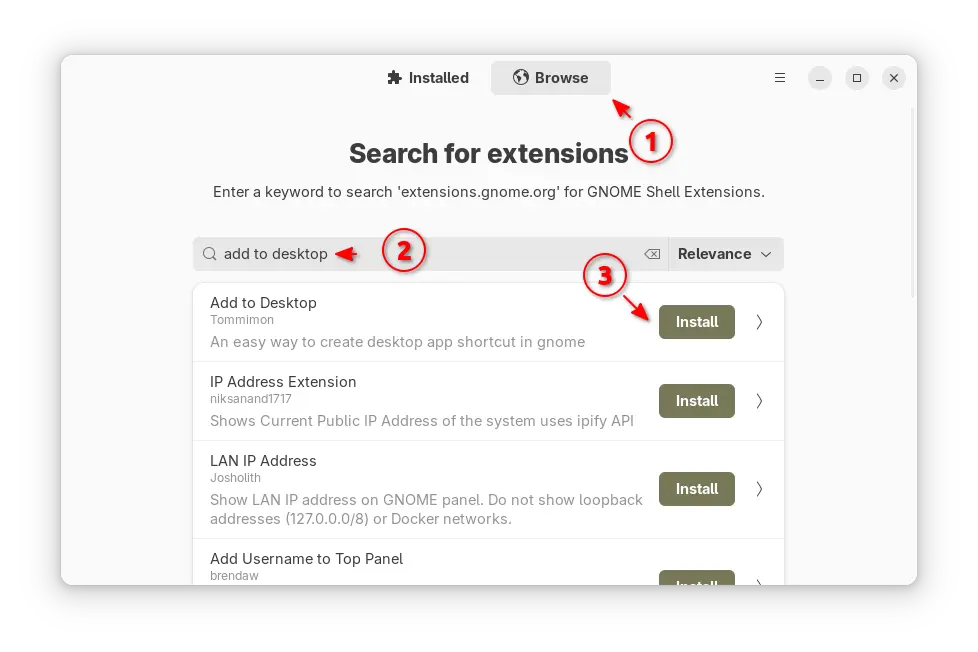
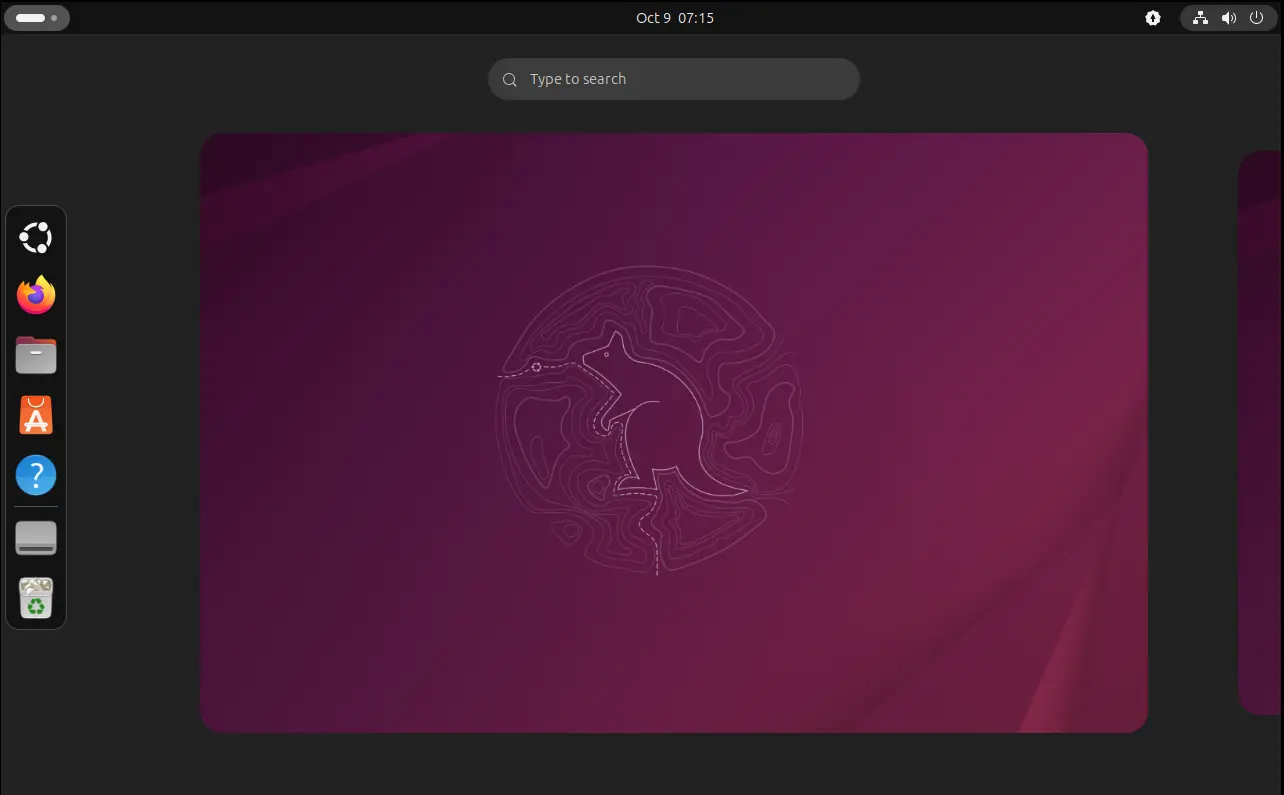
If everything goes well, you’ll be able to launch the game from start menu (or Gnome overview) few moments later.

Note for missing app icon, just grab one from the web, name it as supertuxkart (.PNG or .SVG), finally put it into .local/share/icons directory.

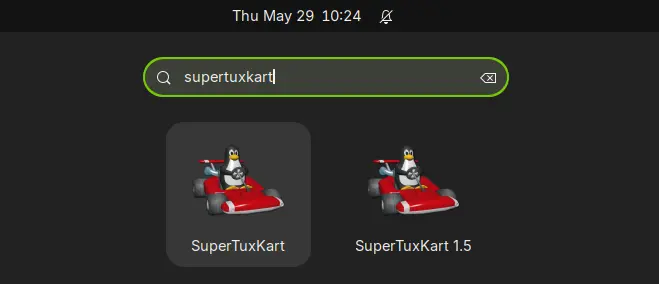
In my case, I have both SuperTuxKart 1.4 installed from system repository, and v1.5 via the Linux tarball. So, I have 2 game icons in launcher, but with different names.

Uninstall:

To uninstall the kart racing game installed via the steps above, simply delete the game folder using file manager.

Then, also delete the supertuxkart.desktop file from .local/share/applications, and delete the icons (if any) from .local/share/icons directory.

  •  

KDE Plasma 6.5 Released! How to Install it in KUbuntu 25.10

KDE announced the Plasma desktop 6.5 yesterday. See what’s new and how to install guide for (K)Ubuntu 25.10.

Plasma 6.5 introduced an Automatic theme selection in settings, allowing to automatically switch between light and dark themes according to the time of day.

In the Automatic mode, it uses the light theme for panels, menus, app windows, and wallpaper during the day, and automatically switch them to dark at night. While, user has the choice to set which light or dark theme, and which wallpapers to use.

The new desktop release updated its software app (aka Discover) with support for flatpak+https:// URLs. Meaning that, it allows to click “Install” button in Flathub.org page to automatically open Discover. And, it now can show you hardware drivers available for installation on operating systems supporting this feature.

KRunner, the app launcher, unit converter, calculator, that can be triggered by Alt+F2 or Alt+Space, now supports Fuzzy Search. Meaning even when you misspell an app’s name, it will probably still find it for you.

KRunner Fuzzy Search

The built-in Remote Desktop Protocol (RDP) server in the release now has the ability to share the clipboard. And, it no longer requires to manually create separate remote desktop accounts, as system’s existing user accounts now work as expected.

Zoom & Magnifier effect now has new “Enable text caret tracking” option. With it enabled, it will automatically jump to the position of the text insertion point, when you moving around the screen.

Other changes in Plasma 6.5 include:

  • Rounded window corners (include bottom corners) for default Breeze themes.
  • Add “Pinned clipboard items” feature.
  • Hibernate system from the login screen.
  • Inform when printer’s ink or toner running low or empty.
  • Ability to see missed notifications while you were in Do Not Disturb mode.
  • “Mute Microphone” key or Meta+Mute shortcut mutes all microphones rather than just the active one.
  • Configure rotary dials and touch rings on your drawing tablet in System Settings -> Drawing Tablet
  • Add general Application Permissions page to manage app (include Flatpak apps) permissions.
  • Add more info about game controllers in System Settings’ Game Controller page.
  • Orca screen reader now reads out changes to the Caps Lock state.
  • Show a system notification when plug in a device.
  • Ability to re-order virtual desktops from the Pager widget (Wayland only).
  • Experimental support for Wayland picture-in-picture protocol.
  • Add “overlay planes” support for compatible GPU.

For more about it, see the official release note in this page.

Install Plasma 6.5 in (K)Ubuntu 25.10

Arch Linux has made the Plasma 6.5 into its Extra-Testing repository.

For KUbuntu 25.10, the official Kubuntu Backports PPA has been updated with Plasma Desktop 6.5 along with most recent KDE Gear 25.08.2.

To get them, simply launch terminal (Konsole) and run the commands below one by one:

  • First, run command to add the Backports PPA:
    sudo add-apt-repository ppa:kubuntu-ppa/backports

    It should automatically update caches after adding PPA. Just in case, you may run sudo apt update to manually refresh cache.

  • Then, install all available updates to upgrade your desktop to Plasma 6.5:
    sudo apt full-upgrade

Ubuntu 25.10 and other flavors without KDE Plasma may also install the desktop environment by running the command below after added the PPA:

sudo apt install kubuntu-desktop

Though this is not a good idea as it might mess your current desktop appearance.

Finally, restart your computer to apply changes.

Uninstall KDE Plasma 6.5:

If you installed the 6.5 version of this desktop environment in KUbuntu 25.10 from PPA, simply open terminal (Konsole) and run command below to uninstall:

sudo apt install ppa-purge && sudo ppa-purge ppa:kubuntu-ppa/backports

This command will install ppa-purge command line tool, and use it to purge the PPA, which also downgrade all the packages installed from it. Also, you need to restart computer to apply changes.

  •  

VirtualBox 7.2.4 Released with Initial 6.18 Kernel Support

VirtualBox, the free open-source hypervisor software by Oracle, released new 7.2.4 version yesterday.

This is the second maintenance update for the latest 7.2 release series, features only include some bug-fixes, translation updates and minor new features.

First, the new release added initial support for Linux Kernel 6.18, which is still in RC development stage. Meaning it now works for Linux with this mainline kernel, either running as host OS or guest in virtual machine.

The release fixed Linux Guest Additions compile issue for RHEL 9.6 / 9.7 and their derivatives, such as Alma Linux 9. It also fixed Guest Additions installation issue on Windows XP SP2.

It as well fixed the VirtualBox VM Manager crash issue when the Windows host OS was resuming from sleep, and, fixed NAT networking breaks when adding additional port forwarding rule.

Other changes include translation updates with support for Traditional Chinese, Greek, Swedish, Hungarian and Indonesian. For more, see the official ChangeLog page.

Get VirtualBox 7.2.4

The official packages for Linux, Windows, macOS, and Solaris hosts are available to download in its website via the link below:

NOTE: the new release so far does NOT support Ubuntu 25.10 host OS, even the package for 25.04 does not install on it due to dependency issue.

  •  

RustDesk Released 1.4.3 with Multi-Monitor for Wayland & Virtual Mouse

RustDesk, the popular free open-source remote desktop software, released version 1.4.3 few days ago.

RustDesk is yet another remote desktop solution written in Rust, which works in Linux, Windows, macOS, Android, iOS, and web browser. It features peer-to-peer encrypted connection and self-hosting server support.

RustDesk client in Ubuntu

Like TeamViewer or AnyDesk, simply install the app in both sides of your devices, then you may input the ID to connect to each other. By default, it uses the public server to initialize the connection, but data is typically sent peer-to-peer after the connection is established. While, user may set its own server for faster and more reliable connections.

RustDesk supports VP8, VP9, AV1, and hardware accelerated (if your GPU support it) H264/H265 video codecs, as well as IPv6 p2p connection, UDP hole punching, and more.

The latest 1.4.3 version added virtual mouse along with virtual joystick support when accessing remote desktop from mobile devices. It allows user to control mouse movement by touching and dragging a virtual joystick on screen, and scroll up or down through virtual scroll-buttons.

RustDesk on iPhone, accessing remote Ubuntu desktop with virtual mouse

For Linux Wayland (e.g., Ubuntu 24.04 & higher with default session), it now supports sharing multiple monitor screens (if any). When accessing with remote machine, there’ll be a toggle to switch between the monitors, view all monitor screens in single view, or have multiple RustDesk windows (one monitor screen per window).

In addition to show remote desktop with the original screen size, adaptive to fit app window size, the release added scale custom option with a slider bar, allowing to scale the remote desktop screen by percentage value. It’s useful to scale remote screen to fit app window, while keeping the ratio to prevent distortion.

Other changes in the release include:

  • IPv6 prefix-based rate limiting on login failures.
  • Move touch mode option from peer option to local option.
  • More assign from cli and devices.py.
  • Address book api res/ab.py, and audit api res/audits.py.
  • Fix high CPU usage on Arch with Wayland.

How to Install RustDesk 1.4.3

The software offers official packages for Windows, Linux, macOS, iOS, and Android, available to download at its Github releases:

Go to “Assets” sections for more packages, and select download X86_64 for Intel/AMD, AArch64 (ARM64) for RasPi, Snapdragon, or Apple Silicon.

For Linux, run uname -m command to tell if you don’t even know your CPU architecture type. And, see the official docs for setting up self-hosting server.

  •  

digiKam 8.8.0 Released with UI Translation for 61 Languages

digiKam, the popular Qt-based photo management software, released new 8.8.0 version after 4 months of development.

This is probably the last release in 2025, as the developer team plans to add Qt 6.10 bundle and AI-power tools for image enhancement and management in next version for 2026.

The new release finally updated its UI with translations support. By going to Settings -> Configure Language, user can now switch the application graphical interface between 61 different languages. And, the online documentation has been updated with Brazilian Portuguese translations support.

digiKam 8.8.0 has been fully ported with Qt 6.10.0 support, though the official installers for Linux, Windows, and macOS are still have Qt 6.9.1 in bundle.

The tag manager in the release now include 2 new options, allowing to import or export tag hierarchies to and from text files, supporting the Controlled Vocabulary Keyword Catalogue (CVKC) format.

The Preview module has been updated with focus point visualization support for FujiFilm and Olympus/OM Systems cameras, providing photographers with precise information about focus accuracy and composition.

And, the Image Editor new includes a new enhancement tool, Background Blur, allowing to progressively blur the background of a subject in a photo, enabling creative depth-of-field effects.

New background blur enhance tool

Other changes include G’MIC-Qt plugin 3.6.0, long file paths (when enabled) support in Windows, as well as:

  • Use the monitor color profile set under Windows, macOS, and Linux Wayland.
  • Use native desktop notifications in Progress Manage.
  • Update QtAVPlayer video module to 20250913.
  • Update Libraw RAW decoder to 20250727.
  • Improved stability for Linux Wayland.
  • And over 100 bug-fixes.

For more about digiKam 8.8.0, see the official release note.

Install digiKam 8.8.0

The software offers official packages for Linux, Windows, and macOS, which are available to download at the link below:

For Linux, it’s an AppImage for modern Intel/AMD platforms. Just grab the package, add executable permission from its Properties dialog, finally run to launch the software.

NOTE: Ubuntu since 22.04 does NOT support AppImage out-of-the-box, you need to open terminal (Ctrl+Alt+T) and run command to install libfuse2 package first:

sudo apt install libfuse2

For choice, Ubuntu user (and its official flavors) may search & install digiKam from either App Center (Ubuntu Software) or desktop specific software app. It’s official Snap package that runs in sandbox, though not updated at the moment of writing.

digiKam snap package in KUbuntu software app

For Linux Mint, Fedora, etc Linux Distributions that prefer Flatpak, or Linux users on ARM64 platform, it’s also available to install as Flatpak package.

While Debian & Ubuntu users may run 2 commands below one by one to get it:

  • Install Flatpak daemon:
    sudo apt install flatpak
  • Install digiKam flatpak package:
    flatpak install https://dl.flathub.org/repo/appstream/org.kde.digikam.flatpakref

NOTE: If this is the first Flatpak app you installed on your system, then you may need a log out and back in to make app icon visible. Or, you may start it from terminal by running terminal:

flatpak run org.kde.digikam

And, you may replace run in last command with update to check updates, or with uninstall to remove the package.

  •  

Lenspect – New Malware Scanner App for Linux Desktop

Want to scan your files for security threats? Here a new app can do the job for Linux Desktop.

It’s Lenspect, a free open-source Python written application that features a lightweight user interface designed for GNOME. And, it uses VirusTotal as backend for scanning.

As you may know, there’s a ClamAV AntiVirus software that supports Linux. It has a graphical front-end ClamTk (available in App Center or Ubuntu Software), that provides simple interface to scan your files or directories for malware.

ClamTk

ClamAV is great for basic use, but if you want to check for viruses that ClamAV may have missed or verify against any false positives, then VirusTotal is a good alternative and Lenspect is a graphical front-end for it working on Linux.

Lendspect

VirusTotal is an online service created by the Spanish security company Hispasec Sistemas. The company now belongs to Google Security Operations, a subsidiary of Google.

It’s a free service that aggregates over 70 antivirus engines and URL/domain blocklisting services called Contributors. They include Arcabit, Avast, BitDefender, ClamAV, McAfee, and more. See this page for all the scanning engines.

With it, you may scan files, IPs, and URLs to detect malware with multiple anti-malware or antivirus engines concurrently. Though as an online service, you need to upload file through either its web page, browser extension, or API.

Lenspect uses VirusTotal API to upload you files, then show you a scan summary, while you may click open in VirusTotal website for a more detailed information, including analysis from different antivirus products, file details, and more.

View scan details in virustotal.com

The standard API is free but has limitations. They include 4 lookups per min, 500 lookups per day, 15.5 K lookups per month, and non-business use.

Install Lenspect

NOTE that the app will send your file to VirusTotal, DON’T use it for scanning sensitive data.

Lenspect is available to install in most Linux through Flatpak package, which runs in sandbox environment.

Linux Mint and Fedora Workstation may simply search & install the application from either Software Manager or GNOME Software.

While Ubuntu and other Linux can do the steps below one by one to get it:

  • First, open terminal (Ctrl+Alt+T) and run command to install Flatpak daemon package:
    sudo apt install flatpak

    For non-debian/ubuntu based distributions, follow the official setup guide to enable Flatpak support.

  • Next, install the app package by running command:
    flatpak install https://dl.flathub.org/repo/appstream/io.github.vmkspv.lenspect.flatpakref

After installation, log out and back in if you don’t see the app icon, or run the command below to start it from terminal:

flatpak run io.github.vmkspv.lenspect

While you may replace run with update in last command to check updates.

Uninstall:

To uninstall the app, simply open terminal (Ctrl+Alt+T) and run command:

flatpak uninstall --delete-data io.github.vmkspv.lenspect

Also run flatpak uninstall --unused to remove useless runtimes to free up disk space.

  •  

OnlyOffice Desktop Editors 9.1 Released with New PDF Editing Tools

OnlyOffice Desktop Editor, the free open-source offline use office suite, release new 9.1 version yesterday.

The new release updated the PDF editing support with new tools, and improved formulas in sheets. It now automatically recover unsaved documents due to app crashes.

First, in PDF editing mode, it introduced new Redact feature, allowing to hide sensitive or confidential information.

The Redact tab includes “Mark for Redaction”, “Redact Pages”, and “Find & Redact” options, allowing user to select rectangle area in PDF content, choose PDF pages, or find all matched keywords, then use “Apply Redactions” option to hide them.

In “Comment” tab, there are new annotation tools added, allowing to draw rectangle, circle, arrow, and connected lines on your PDF, with custom color and size.

And in “Insert” tab, it added new SmartArt and Chart option, allowing to insert many new objects into your PDF.

The Spreadsheet editor now provides updated LOOKUP, VLOOKUP, HLOOKUP and XLOOKUP formulas that now deliver up to 4x faster exact and linear searches.

It also added support for date filters in pivot tables, dedicated “Table Design” tab with formatted table settings, and added Left-to-Right and Right-to-Left options in Home tab to easily switch text direction in cells.

The release also improved the Templates support. It now includes many templates in local computer as well as tons of templates in cloud.

Clicking on a cloud template no longer open it directly in editor, instead it shows a popup with bigger preview with description as well as file type and size, making clearer whether it’s what you want before downloading it.

For Windows 10 and higher, it now displays the notifications about file associations and updates via system toast notifications instead of modal windows.

For macOS, it finally added the new options to insert audio and video files in Presentation, as well as built-in media player to play videos in your slides.

Other changes in the release include:

  • Add HEIF images and HWPML documents support.
  • Support direct PDF to TXT and PPTX to TXT conversion.
  • Full-featured chart editor in documents and presentations.
  • Add Spelling language detection toggle for macOS.
  • Add explosion support for 2D pie and doughnut charts;

For more about OnlyOffice Desktop Editors 9.1, see the official announcement.

Get OnlyOffice Desktop Editors 9.1

For Ubuntu user, the office suite is easy to install by using App Center (or Snap Store). It’s Snap package that runs in sandbox environment. And, at the moment of writing, it’s still at version 9.0.x.

OnlyOffice in App Center

For choice you may download the app package for Windows, Linux, and macOS from its website. Where Ubuntu user may choose Download DEB, then click open with App Center to install.

  •  

Zorin OS 18 officially Released! Based on Ubuntu 24.04 LTS

Zorin OS finally announced new major version 18 for beginners switching from Windows or macOS!

Zorin OS is a beginner friendly Linux Distribution. It’s based on Ubuntu LTS and features a customized GNOME desktop experience, while a lite version is available for choice with XFCE4 desktop.

Zorin OS 18 is based on Ubuntu 24.04 LTS. Thanks to the Ubuntu upstream, the new release upgraded from Kernel 6.8 to Kernel 6.14 with tons of new drivers, new and improved hardware support. See what’s new in Kernel 6.14 (replace 6.14 in URL link, e.g., 6.13, for changes other Kernel versions).

Thanks to GNOME upstream changes, it updated the desktop experience with a “dot and pill” icon to trigger overview, and indicate which workspace you’re working in. There are as well new camera app, remote login with RDP protocol, and OneDrive support in online accounts.

Besides the upstream changes, Zorin OS 18 refined the default desktop appearance with floating panel and rounded corners. While, user may easily change the layout with a single mouse click by using the built-in Zorin Appearance utility.

Like Ubuntu 24.04, the release also introduced a tiling window extension. Simply drag a window to screen top, it will show you a list of tiling layout, allowing to easily move and resize window automatically into selected screen edge.

By going to Zorin Appearance -> Windows -> Advanced Window Tiling, you may enable the indicator icon for the extension, and configure more about it.

For users who need Office/365, Teams, Adobe Photoshop, etc apps, the release also introduced a WebApp Manager allowing to easily turn your favorite websites into apps, by using either the default Brave web-browser or any other browser (if installed) as you want.

In addition, the release added some new apps! They include:

  • Deskflow – to share keyboard and mouse across computers (Pro only).
  • Warp – file transfer (Pro only).
  • Valot – time tracking app (Pro only).
  • Easy Effects – audio manipulation tool for Pipewire (Pro only).
  • Gradebook to keep track of your grades (for Education).
  • Spedread GTK speed reading software (for Education).
  • TurboWarp, a tool for learning programming (for Education).

They are either for Pro or Education editions, though they all can be freely installed from Flathub.org via Flatpak package.

Other changes in the release include:

  • Update built-in database to suggest alternatives to more Windows apps.
  • New Yellow and Brown theme colors.
  • 3 new panel layouts: Compact, Linux Mint like, and elementary OS like layouts (for Pro, paid version only).
  • Use Pipewire instead of PulseAudio as default sound server.
  • Improve Zorin Menu with multi-monitors support.
  • Center new windows at launch.
  • Global search in Files, and more!

For more, see the official release note.

Get Zorin OS 18

The official .iso images are available in its website via the link below:

They include Pro edition that needs to play $47.99, while other editions are free:

  • Core edition for basic use.
  • Education with educational software for schools and students.
  • And, Lite edition (not ready at the moment of writing) for low end computers.

The minimum hardware requirements include 2 GB RAM, 15 GB disk space, and 1024 × 768 resolution display.

  •  

Linux Mint Officially Released LMDE 7 based on Debian 13

For Linux Mint users who prefer Debian package base, LMDE 7 code-name “Gigi”, is officially released!

LMDE stands for Linux Mint Debian Edition. As the name says, it’s a Linux Mint edition based on Debian, aims to continue to deliver the same user experience if Ubuntu was ever to disappear.

After less than a month of Beta testing, LMDE7, the new major release of this Linux Mint edition based on Debian 13 trixie, is now available to download. It features Kernel 6.12, Cinnamon desktop 6.4.12, and Debian 13 package base.

In my experience, Debian is a bit more stable and reliable than Ubuntu. It’s perfect for server and advanced user use. While, LMDE is a fork makes it friendly for beginners.

However, LMDE lacks major kernel version updates and most recent drivers (e.g., NVIDIA proprietary driver), unless upgrading the entire system to a new version (e.g., from LMDE 6 to LMDE7). If they are not big deal for you, then it’s a great choice!

Besides the difference between Kernel version and systems they’re based on, LMDE and normal Linux Mint edition deliver almost the same user experiences!

And, LMDE 7 so far features Cinnamon only desktop, with following changes in Linux Mint 22.2:

  • New XApp Fingwit provides graphical interface to manage user fingerprints.
  • Improved Sticky Notes app with rounder corners and Wayland support.
  • Add “Theater Mode” and “Borderless Mode” mode for Hypnotix IPTV player.
  • Display user avatar in the login screen.
  • Add blur effect to the panel and user selection dialog box in login screen for better appearance.
  • Patch LibAdwaita with theme support, including Mint-Y, Mint-X and Mint-L themes.
  • Add accent colors support for LibAdwaita Flatpak apps.
  • New xapp-aiff-thumbnailer thumbnailer for cover art in .aiff audio files
  • Add iOS app for Warpinator file sharing utility.
  • Configurable EDID-based color correction (disabled by default) in XViewer.
  • Support editing description field in WebApp Manager.
  • Support leading zeros when renaming multiple files and using enumerations
  • Add description in Software Manager to tell the difference between Flatpak and system packages.

Download LMDE 7

The .iso image for LMDE 7 (torrent) is available to download via the link below:

For choice, you may download it from a mirror that near to you. See this page for the download mirrors all over the world.

Hardware Requirements include: 2 GB RAM (though 4 GB recommended for smoother experience), 20 GB disk space, and 1024×768 resolution display.

For LMDE 6, it easy to upgrade to LMDE 7 by running the commands below one by one:

NOTE: LMDE 7 has no i386 support! Backup important data first, and connect to power supply for laptop.

  • Refresh cache and install mint-upgrade tool:
    sudo apt update
    sudo apt install mintupgrade
  • Start the upgrade tool, and follow on screen intructions:
    sudo mintupgrade
  • When done successfully, remove the tool and reboot your computer:
    sudo apt remove mintupgrade
    sudo reboot

For more, see the official guide in Linux Mint website.

  •  

Firefox 144.0 is out! Perplexity AI Search & AES-256-CBC Encryption

Firefox 144.0, the October release of Mozilla’s web browser, is available to download today!

The new browser release continues improving the tab group feature support. It now supports dragging a tab into a collapsed tab group without automatically expanding it.

The profile management is now available to all users globally. You can now name profiles and customize them with avatars and color themes, then quickly switch between them while keeping bookmarks, tabs, and browsing history completely separate.

The picture-in-picture (aka pop-out video) now supports Shift + Click on the close button or use Shift + Esc shortcut key to exit (meaning merge back browser window) while keeping playback uninterrupted.

video playback in Picture-in-picture mode

Firefox 144.0 now includes Perplexity AI search for desktop users, allowing to get AI-powered conversational answers directly from the address bar via the unified search button.

The AI search engine seems to be disabled by default, at least in my case, as I can’t find the option and the about:config page shows the “browser.urlbar.perplexity.hasBeeninSearchMode” key set to false.

Besides that, it added new “Search Image with Google Lens” option when you right-clicking on any image in browser. Which, allows to quickly find similar products, places, or objects, copy, translate, or search text from images. Though, you need to set Google as default search engine for being able to use the feature.

image from mozilla.org

For security reason, the passwords stored in Firefox are now encrypted on disk using AES-256-CBC algorithm, while logins synced through Firefox Sync already use AES-256-GCM. The new encryption algorithm is much faster and secure than the older 3DES-CBC, which is deprecated.

Other changes in Firefox 144.0 include:

  • New Azerbaijani, Bangla, and Icelandic translations.
  • Only use or open window in current virtual desktop, when open link from another application in Windows.
  • And various security fixes.

They are as well many changes for web developers:

  • Support the Element.moveBefore API.
  • Add support math-shift compact.
  • Support PerformanceEventTiming.interactionId, allowing to group related input events.
  • Support the command and commandfor attributes.
  • Add support the View Transitions API Level 1.
  • Disable dithering when linear-gradient, conic-gradient, and radial-gradient are rendered using hardware WebRender.
  • Add support upsert proposal.
  • Support the lock() and unlock() methods of ScreenOrientation interface on Windows tablets and Android devices.
  • Support worker transfer for RTCDataChannel.
  • Add support the resizeMode getUserMedia constraint, allowing to crop and downscale video captured from a camera.
  • Add support the WebGPU GPUDevice.importExternalTexture API on Windows.
  • WebCodecs on Windows now has a batch-encoding path for VideoEncoder.
  • Rename Gecko-specific CSS2Properties to CSSStyleProperties.
  • Jump to a CSS custom property’s definition from within the var() function in style rules.

Get Firefox 144.0

The official release note as well as the download link will be soon available in Firefox website via the link below:

While the source code, and installers for Linux, Windows, and macOS are available to download at this page.

  •  

Fix Qt App Window Border & Title-bar in Ubuntu 24.04 | 25.10

Qt applications (e.g, qBittorrent, KeePassXC) look weird as they don’t have window border or shadow in Ubuntu since 24.04. Here’s how to configure to make them look native.

Applications in Ubuntu and other popular Linux distributions mostly use GTK or Qt tool-kits for rendering their user interfaces. Gnome is based on GTK. It uses “xcb” QPA plugin for Qt apps running on classic Xorg session.

Due to switch to Wayland, the “xcb” plugin is not in use by default, and Qt apps look weird as you see in the screenshot below in Ubuntu 24.04, Ubuntu 25.04 & 25.10.

Qt apps look border-less in Ubuntu since 24.04

To “fix” the issue, I found few choices:

  1. Re-use “xcb” QPA plugin.
  2. QGnomePlatform theme.
  3. QAdwaitaDecorations Qt decoration plugin.

While there are also Qt5/6 configuration tool and Kvantum available for configuring Qt theme, icon, font, color, and more.

1. “Fix” Qt window title-bar and window border

Option 1: use “xcb” QPA plugin

Most Qt applications (both Qt5 and Qt6) are still working good with “xcb” QPA plugin even in Wayland session.

1. First, press Ctrl+Alt+T on keyboard to open window. When it opens, run command to install the required libraries:

sudo apt install libxcb-cursor0 libxcb-composite0

Run sudo apt update to refresh cache in case it’s unable to locate the packages.

2. After that, run the command below in terminal to set the environment variable:

export QT_QPA_PLATFORM=xcb

Then, all Qt apps start from that terminal window will try using “xcb” plugin. For example, run keepassxc to start the Qt-based password manager.

enable ‘xcb’ for apps start from this terminal only

3. If it works for you, then open Files (aka Nautilus), and press Ctrl+H to show all hidden files. Find out .profile file in home directory and click edit it.

Finally, add export QT_QPA_PLATFORM=”xcb;wayland” in the end of file to make it work for all Qt applications permanently! And, log out and back in to apply.

enable xcb for all Qt apps, though current user only

NOTE: It must be set to “xcb;wayland“, to allow fall-back to default wayland, when ‘xcb’ does not work. For example, Qt apps installed as Flatpak may not work with ‘xcb’ plugin and output the error below:

qt.qpa.xcb: could not connect to display
qt.qpa.plugin: From 6.5.0, xcb-cursor0 or libxcb-cursor0 is needed to load the Qt xcb platform plugin.
qt.qpa.plugin: Could not load the Qt platform plugin “xcb” in “” even though it was found.

Option 2: Use QGnomePlatform theme

While xcb is designed for Xorg, FedoraQt team has developed few Qt plugins for better integration in GNOME. They are “QGnomePlatform” theme, “adwaita-qt” style, and “QAdwaitaDecorations”.

Downsides: The Qt window title-bar made by QGnomePlatform looks NOT so good. FedoraQt has discontinued the project. And, Ubuntu 24.04 only includes Qt5 version of the package.

1. To install the Qt platform theme, open terminal (Ctrl+Alt+T) and run command:

sudo apt install qgnomeplatform-qt5

Ubuntu 25.04, 25.10 may also install qgnomeplatform-qt6 for Qt6 support.

2. Next, either run the command below to set environment:

export QT_QPA_PLATFORMTHEME='gnome'

Then, start Qt apps from the same terminal window to use the Qt platform theme.

Or, edit .profile file in home directory and add export QT_QPA_PLATFORMTHEME='gnome' to make it work permanently for all Qt apps (Qt5 only for 24.04) at next login.

Option 3: Use QAdwaitaDecorations

QGnomePlatform and adwaita-qt have been discontinued (though they still work). QAdwaitaDecorations, the project that implements Adwaita-like client-side decorations, is so far the only upstream project that’s still in development.

However, it’s NOT made into Debian/Ubuntu repositories so far. Meaning you need to build it by yourself. And, it does not support Qt6 app for Ubuntu 24.04, as it requires Qt6 >= 6.5.0 (24.04 has 6.4.2).

This option is good choice for Ubuntu 25.10, to enable Qt5 window decorations, while Qt6 decorations work out-of-the-box.

1. First, open terminal (Ctrl+Alt+T) and run command to install dependency libraries:

sudo apt install git cmake build-essential qtbase5-dev libqt5svg5-dev libqt5waylandclient5-dev qtbase5-private-dev qtwayland5-private-dev libwayland-dev

2. Then, run command to grab the source code:

git clone https://github.com/FedoraQt/QAdwaitaDecorations.git

After that, navigate to the source folder, create ‘build’ sub-folder and navigate into it:

cd QAdwaitaDecorations
mkdir build && cd build

Next, configure the source for Qt5:

cmake -DUSE_QT6=OFF ../

Ubuntu 24.04 does NOT meet Qt6 requirement, and Qt6 window decoration in 25.10 looks good out-of-the-box, so here I only build it for Qt5.

3. Finally, build & install the plugin by running the 2 commands below one by one:

make -j3
sudo make install

Here -j3 tells to start 3 threads in parallel. Depends on how many CPU cores you have, you may replace it with -j4, -j8, or j$(nproc) to use all CPU cores.

4. After successfully built the plugin, clean up by deleting the source folder. Then, either run the command below to set environment variable:

export QT_WAYLAND_DECORATION=adwaita

So it works for all Qt5 apps start from this terminal window.

Or, edit .profile file in user home and add the line to make it work permanently for all Qt5 apps at next login.

2. Change Qt Theme, or Configure Fonts, icon, and colors

Gnome/Adwaita style decorations is NOT enough? You may also configure the Qt apps themes, fonts, icons, and color scheme.

Option 1: Use Kvantum along with “xcb”

If you use “xcb” plugin for the decorations, then you may also use Kvantum (SVG-based theme engine) to change the Qt app themes.

1. First, open terminal (Ctrl+Alt+T) and run command to install the package:

sudo apt install qt5-style-kvantum

Ubuntu 25.04, 25.10 users may also install qt6-style-kvantum for Qt6 apps support, however it’s NOT available in Ubuntu 24.04.

2. Next, set the following environment variables:

export QT_QPA_PLATFORM="xcb;wayland"
export QT_STYLE_OVERRIDE=kvantum

either in terminal for apps start from that terminal, or in .profile for all Qt apps (Qt5 only for 24.04).

3. Finally, launch “Kvantum Manager” to change Qt theme and configure active theme.

Use qt5ct / qt6ct

For choice, you may use Qt5 / Qt6 settings tools to configure the app window buttons, fonts, icons, and color scheme.

1. First, open terminal and install the settings tools, as well as adwaita-qt themes:

sudo apt install qt5ct qt6ct adwaita-qt adwaita-qt6

2. Next, set environment variable:

export QT_QPA_PLATFORMTHEME=qt5ct

It works for both Qt5 and Qt6 with either “xcb” or “wayland” QPA platform.

3. After set the environment (log out and back in if added to .profile), launch Qt5 Settings or Qt6 settings to configure the Qt appearances.

Summary:

This tutorial shows how to “fix” border-less issue for Qt apps in Ubuntu 24.04 and higher with default GNOME, as well as change the theme, fonts, icons, and color scheme.

The “xcb” QPA platform plugin is still a good choice for 24.04 with both Qt5 and Q6 support. While, QAdwaitaDecorations is better (in my own opinion) for Qt5 in 25.10, as Qt6 decorations look good out-of-the-box.

  •  

VS Code 1.105 added GPT-5-Codex & Apple Account Sign in/up

A new monthly version of Microsoft’s code editor, Visual Studio Code 1.105, was released few days ago.

The release added 2 new AI chat models, GPT-5-Codex and Claude Sonnet 4.5. In addition to Google and Github account, it now allows to sign in or sign up GitHub Copilot with an Apple account, along with

The AI chat now supports fully qualified tool names for prompt files and chat modes, which can help to avoid naming conflicts between built-in tools and tools provided by MCP servers or extensions.

Support for AGENTS.md at the root of workspace is now generally available and enabled by default. There’s as well experimental support for nested AGENTS.md files in sub-folders of your workspace.

The release also improved the OS notifications for chat sessions. It now shows a notification with preview when a chat response is received, and selecting it brings focus to the chat input.


Other AI chat changes include:

  • Chain of thought (Experimental).
  • Show recent local chat conversations (Experimental).
  • Ability to keep or undo changes to files during an agent loop.
  • New Ctrl+Alt+Up/Down shortcut keys to navigate through your chat messages.
  • Platform-specific terminal profiles.
  • Add ‘learning’ mechanism to select the optimal tool set for custom models.
  • Auto-reply to terminal prompts (Experimental).

Besides that, VS Code 1.105 introduced built-in MCP marketplace, which enables users to browse and install MCP servers directly from the Extensions view, though disabled by default.

The new or outdated MCP servers are now started automatically when you send a chat message. There are as well 2 new MCP specification updates SEP-973 and SEP-1034.

The new vs code release also improved the editor experience, by adding ability to override the default keyboard shortcuts for the Quick Input controls, and possibility to disallow next edit suggestions (NES) to propose whitespace-only changes such as code formatting.

The runTests tool in Chat now also reports test code coverage to the agent, and it now shows notification when long-running task completes while the VS Code window is not focused.

Other changes in the release include:

  • Shell integration for pwsh on Windows support for screen readers.
  • Add ability to resolve merge conflicts with AI.
  • New “Start Dictation in Terminal” action to use voice dictation to input text into the terminal.
  • Native broker support for Microsoft Authentication on ARM-series macOS devices.
  • PKCE (Proof Key for Code Exchange) support for GitHub Authentication.
  • Add Copy Test Id command to run gutter icon context menu.

Get Visual Studio Code 1.105

For more about the release, as well as download links for Windows, MacOS, and Linux, go to its website via the link below:

For Ubuntu, besides download & install the deb package from the link above, there’s also Snap package available to install in App Center (or Ubuntu Software).

While, a community maintained flatpak package is also available for choice. See this guide for how to install them.

  •  

Top Things to Do After installed Ubuntu 25.10 Questing Quokka

Ubuntu 25.10, code-name Questing Quokka was released! Here are some top things to do, after installed the new Ubuntu desktop release, to make it ready to use.

1. Enable “New Documents” Context Menu option

It’s been many years, GNOME still does NOT have a graphical option out-of-box to create new documents in file manager. Though, it’s easy to enable this feature by putting a file into user’s Template folder.

To do so, launch Text Editor and create a new empty document. Then, press Ctrl+Shift+S to open save file dialog. Finally, choose save it to Home -> Templates with whatever file-name you want to display as ‘New Document’ sub-menu option.

2. Configure Printer

The default “Printer” page in Settings is OK for basic use.

If you have a printer physically connected to the Ubuntu computer, then you may open terminal (Ctrl+Alt+T) and run command to install the graphical CUPS configuration tool:

sudo apt install system-config-printer

Tips: run sudo apt update to refresh cache if it says “Unable to locate package”.

Then, search & launch Printers app to get more controls, such as share printer, remote admin, policies, and default print options.

3. Configure the Left Panel

The left panel, aka Ubuntu Dock, is handled by an extension forked from dash-to-dock.


By going to Settings -> Ubuntu Desktop -> Dock, you may configure the left panel/dock with basic options, such as its position, icon size, auto-hide, shorten panel, show on primary or all displays, hide trash and volumes.

For more, install extension manager either by running the command below in terminal (Ctrl+Alt+T) or by using App Center (filter by Debian package):

sudo apt install gnome-shell-extension-manager

Then you may launch extension manager, and open preferences dialog for the Ubuntu Dock extension, which includes many more configure options for the left panel/dock:

  • Intelligent autohide, with dodge windows, animation duration, pressure threshold options.
  • Center icons in panel mode.
  • Show/hide, and move “Show Apps” (the Ubuntu Logo) icon.
  • Keyboard shortcuts.
  • Click action (e.g., click to minimize).
  • Appearance, e.g., background color, and opacity.

4. Install back default apps

If you chose the “Default Selection” option while installing Ubuntu 25.10, then you’ll see that many default applications are NOT pre-installed!

To install them back, simply launch App Center, then search and install the apps below one by one (mostly filtered by Debian package).

Or, open terminal (Ctrl+Alt+T) and run commands below instead (run sudo apt update to refresh cache first).

  • LibreOffice office suite.
    sudo apt install libreoffice
  • Archive Manager (aka file roller).
    sudo apt install file-roller
  • Shotwell photo manager.
    sudo apt install shotwell
  • Backups (Déjà Dup Backups).
    sudo apt install deja-dup
  • Gnome Camera, the new app replaces Cheese.
    sudo apt install gnome-snapshot
  • Showtime video player.
    sudo apt install showtime
  • Rhythmbox music player.
    sudo apt install rhythmbox
  • Thunderbird email. It’s now defaults to Snap, see how to revert back to Deb version.
  • Startup Disk Creator.
  • Remmina remote desktop client.
    sudo apt install remmina
  • Transmission torrent download app.
    sudo apt install transmission

5. Install Multimedia Codec

Due to legal reason, Ubuntu does not include some media codec for video/audio playback, Microsoft TTF fonts, and RAR archive supports.

To get them, press Ctrl+Alt+T to open up a terminal window, and run command:

sudo apt install ubuntu-restricted-extras

While downloading & installing the MS fonts, it will prompt to accept licence, use Tab key to highlight OK and hit Enter.

6. Enable Flatpak support

Flatpak is a popular package format runs in sandbox environment. Tons of applications support Linux through Flatpak package.

To enable Flatpak support in Ubuntu, simply open terminal (Ctrl+Alt+T) and run command:

sudo apt install flatpak

Next, you may install local flatpak files by running command:

flatpak install drag-and-drop-flatpak-file-here

Or, add the Flathub repository into system:

flatpak remote-add --if-not-exists flathub https://dl.flathub.org/repo/flathub.flatpakrepo

For choice, add --user flag for current user only. Then, use the command in a Flathub app page to install (click down arrow besides “Install” button).

Due to this bug, flatpak install may refuse to work. Try running it with sudo at beginning until it’s fixed.

NOTE: After enabled Flatpak support, you need a log out and back in to apply variable changes.

7. Enable AppImage support

AppImage is another popular way to run applications in Linux. It’s a portable, non-install package format, that can be run directly (after added executable permission) to launch application.

Since Ubuntu 22.04, user needs to press Ctrl+Alt+T to open terminal, and run command to install the required library for AppImage support:

sudo apt install libfuse2

8. Install Configuration Tools

Besides the default Settings (aka Gnome Control Center), they are few other graphical tools to help configure your Ubuntu desktop.

Gnome Tweaks

GNOME Tweaks is the popular alternative to Gnome Control Center (aka Settings), which offers graphics options to configure:

  • Fonts, scaling factor.
  • Cursor, icon, legacy apps, and sound themes.
  • Window buttons, and additional mouse & touchpad settings.

The app is available to install either from App Center (filter by Debian package) or by running command below in terminal:

sudo apt install gnome-tweaks

Extension Manager

Extension Manager is one of the must-have applications to install & manage extensions in GNOME desktop. It can be installed by running the command below in terminal:

sudo apt install gnome-shell-extension-manager

Grub Customizer

For dual-boot or multi-boot computers, and users who want to configure the boot menu, Grub-customizer is good choice to make things simple.

To install the app, open terminal and run commands below one by one to get from developer’s PPA:

sudo add-apt-repository ppa:danielrichter2007/grub-customizer
sudo apt-get update
sudo apt-get install grub-customizer

NOTE: The PPA does NOT support Ubuntu 25.10 at the moment of writing, check the PPA page for details.

GDM Settings

If you want to change the login screen background, then GDM settings is a good choice that also supports configuring fonts, top-bar, colors, etc for the login screen.

NOTE: GDM Settings has the potential to break your login screen. Use it at your own risk!

To install the app in Ubuntu 25.10, run the commands below one by one to get from PPA:

sudo add-apt-repository ppa:ubuntuhandbook1/gdm-settings
sudo apt update
sudo apt install gdm-settings

Dconf Editor

For advanced users, there’s also “Dconf Editor” that offers even more hidden configuration options.

To install the tool, run command:

sudo apt install dconf-editor

Just Perfection

If you want to hide or tweak the top-panel (e.g., size and position) and panel items (e.g., clock option), configure the desktop behaviors and animations, then Just Perfection extension provides many options that can do the job.

Simply, search and install the extension using “Extension Manager” app, then you can go back “Installed” tab and click open the Just Perfection setting page for the configuration options.

9. Install NVIDIA Driver

For NVIDIA graphics card, you may launch Additional drivers and select install the latest NVIDIA 580 driver for better gaming performance.

10. Add App Icon to Desktop

If you prefer launching applications by using desktop shortcuts, then install Extension Manager that’s mentioned above, and use it to search & install “Add to Desktop” extension.

After that, you may right-click on your favorite apps in either app grid or GNOME Overview search result to add them into desktop.

And More

There are even more things you can do to make Ubuntu desktop better for use. The things however differ depend on users. Please leave comment below, if you have any other good advice to tweak the Ubuntu Desktop.

  •  

Ubuntu 25.10 Officially Released with Kernel 6.17 & GNOME 49

Ubuntu 25.10, code-name Questing Quokka, was officially released today!

This is a new short term release with 9 months support until July 2026. New features include the latest Linux Kernel 6.17, GNOME Desktop 49, and more.

Thanks to Kernel 6.17, the new release features Attack Vector Controls, making easy to manage CPU vulnerability mitigations. It also added AMD SmartMux support for hybrid laptops, nested virtualization on Arm, and better support for AMD processors with mix of classic and dense cores.

Other Kernel changes include Raspberry Pi RP1 PCI device support, touch Bars support on x86 MacBook Pros, new drivers for Lenovo Legion Go S gaming handheld, and more. See more in kernelnewbies.

For Ubuntu Desktop, the installer improved TPM-Backed encryption with passphrase support and regeneration of the recovery key. And, Software Updater window will no longer pop up unprompted. Instead, it shows an icon in system tray, reminding that updates are available.

system tray icon reminding updates are available

Due to upstream (meaning GNOME 49), “Ubuntu on Xorg” session is no longer available, though the GDM login screen still supports loading other Xorg desktop sessions, e.g., XFCE, MATE, and Cinnamon.

Ubuntu 25.10 introduced 2 new default apps. It replaced Gnome Terminal with new default Ptyxis container-focused terminal emulator, and replaced Eye of Gnome (EOG) with touch-friendly Loupe image viewer which is written in Rust and powered by the Glycin library, which also handles the desktop wallpaper.

New default Ptyxis terminal emulator

Thanks to Gnome 49, it also added support changing the display brightness in the Quick Settings when HDR is enabled. And, these new HDR brightness controls support external displays, and allow multiple displays to be adjusted at the same time.

per-monitor brightness control

Other desktop changes include:

  • Improve Remote Desktop support with multi-touch and relative mouse input, and ability to have additional virtual monitors.
  • New Accessibility menu in login screen.
  • Audio playback and power control in lock screen.
  • Move “Do Not Disturb” to Quick Settings menu.
  • Add option to disable Super (Windows logo key) shortcut key.
  • Support relative dials on tablet pads.
  • Add configuration for pointing stick (aka TrackPoint).
  • Hardware accelerated video encoding for Camera app.
  • Enable suspend-resume support in the proprietary Nvidia driver.
  • Drop “Startup Applications” in favor of new Auto-start option in Settings -> Apps.
  • Use Dracut as its default initrd infrastructure (replacing initramfs-tools)

Besides new Kernel and Gnome 49, Ubuntu 25.10 now uses sudo-rs as the default sudo provider. It is a memory safe implementation of sudo and su, written in Rust. For end user, there’s no visual difference as it works just like before.

In addition, the release now use Rust based core utilities. This change however may cause potential issues. In my case, it caused issue (fixed now) discovering other multi-boot operating systems on my computer.

As well, there are updated toolchains, including GCC 15.2, binutils 2.45, glic 2.42, Python 3.13.7 (Python 3.14 also available), LLVM 20 (21 is available), Ruest 1.85 (1.88 is also available), Golang 1.24, OpenJDK 21 (25 and 26 EA are also available), Zig 0.14.1, and .NET 10 preview.

For more about Ubuntu 25.10, see the official announcement and release note.

Get Ubuntu 25.10

The official images for desktop, server, and WSL are available to download in Ubuntu website via the link below:

For choice, you may get Ubuntu 25.10 from this page, or choose a download mirror that near to you.

For Ubuntu 25.04 users, the upgrade channel is not ready at the moment of writing. Try installing all updates via Software Updater utility, then run update-manager -c to check if upgrade is available.

  •  

Python 3.14 Released with Free-threading & Template string literals

Python announced the new 3.14 version yesterday! See what’s new and how to install guide for Ubuntu users.

Python 3.14 is the latest stable release of the Python programming language, with 5 years support until 2030.

Since the release, the free-threaded build of Python is officially supported and no longer experimental. It’s so far optional, though will be make default in next phase.

In Python 3.14, the evaluation of annotations is now deferred. It introduced the new annotationlib module, providing tools for inspecting deferred annotations. And, annotations may be evaluated in the VALUE format, the FORWARDREF format, and the STRING format. See PEP 649 for more.

It added Template string literals (PEP 750), new mechanism for custom string processing. The new t-strings use the familiar syntax of f-strings, but return an object representing the static and interpolated parts of the string.

Python 3.14 finally added multiple interpreters in the standard library (PEP 734). With the new concurrent.interpreters module, it now supports running multiple copies of Python in the same process simultaneously without C-API.

It as well introduced new compression package contains compression.lzma, compression.bz2, compression.gzip, compression.zlib, as well as compression.zstd modules.

Besides compression and decompression for the Zstandard format (PEP 784), the support for reading and writing Zstandard compressed archives has been added to the tarfile, zipfile, and shutil modules.

The release also introduced a zero-overhead debugging interface for CPython, that allows debuggers and profilers to safely attach to running Python processes without stopping or restarting them.

A new command-line interface is added to inspect running Python processes using asynchronous tasks, available via python -m asyncio ps PID or python -m asyncio pstree PID.

And the pdb module now supports remote attaching to a running Python process using a new -p PID command-line option. For example, run python -m pdb -p 1234 will connect to the Python process with the given PID and allow you to debug it interactively.

Other changes include:

  • PEP 758: Allow except and except* expressions without brackets.
  • PEP 765: Disallow return/break/continue that exit a finally block.
  • PEP 741: Add a C API to configure the Python initialization without relying on C structures and the ability to make ABI-compatible changes in the future.
  • Syntax highlighting in PyREPL, and support for color in unittest, argparse, json and calendar CLIs.
  • UUID versions 6-8 are now supported by the uuid module, and generation of versions 3-5 are up to 40% faster.
  • Add a new type of interpreter to CPython, which provides significantly better performance for certain newer compilers.
  • Add a built-in implementation for HMAC (RFC 2104) using formally verified code from the HACL* project.
  • Improve error messages, and more.

For more details about Python 3.14, see the official docs.

Install Python 3.14

The source tarball for Python 3.14 is available to download via the link below:

Ubuntu has made Python 3.14 in system repository in 25.10. For Ubuntu 22.04 and Ubuntu 24.04, the popular Deadsnakes PPA has been updated with the package for the 2 LTS releases.

To add the PPA and install the package, run commands below one by one:

sudo add-apt-repository ppa:deadsnakes/ppa
sudo apt update
sudo apt install python3.14-full

For other Ubuntu releases, it’s not hard to build from source. And, I’ve written a step by step guide for all current Ubuntu releases.

  •  

GIMP 3.0.6 Fixed Printing Support for Flatpak & Snap [PPA updated]

GIMP 3.0.6, the third maintenance update for 3.0 release series, is out today!

The new GIMP release fixed various bugs and regressions, improved flatpak support, added security updates, and back-ported some changes from the 3.1.2 and 3.1.4 DEV releases.

new brush preview toggle button

Previously, the brush previews and font previews are always rendered with light background. In the new release, it added a new toggle button (back-ported from 3.1.2) allowing to optionally follow the color theme. Meaning, when the app is in dark mode, the brush previews can be set to well fit by using a darker background.

The new GIMP 3.0.6 improved palette import. It fixed Lab & CMYK ACB palette import, and added new select source from Palette file option. Meaning that you can easily find out what palette formats that currently supported through the file chooser dialog, and hide irrelevant files by choosing a specific file format.

import palette from file

For Flatpak and Snap packages that run the image editor in sandbox environment, the release also fixed the issue that the Print dialog previously did not show the “Image Settings” tab.

Other changes include:

  • Remove GIMP_ICONS_LIKE_A_BOSS environment variable.
  • Show Lock Content as an undo step.
  • Add alpha channel on filter merge (when necessary) and for certain transforms.
  • Ability to apply NDE filters to channels.
  • Make Seamless Clone tool work again (Experimental).
  • Improved Photoshop brush support.
  • Show frames again in animation playback process bar.
  • New gimp_prop_toggle_new() API function.
  • New GimpTRCType enum type.

There are as well many other fixes and changes, see the official release note for details.

Install GIMP 3.0.6

GIMP website provides official packages for Linux, Windows, macOS, which are available to download via the link below:

For Linux, either download Flatpak package, then install by running command below after enabled Flatpak support.

flatpak install drag-and-drop-flatpakref-file-here

If you’ve already installed the GIMP flatpak package, then simply run the command below to update it:

flatpak update org.gimp.GIMP

Or, select download the AppImage package, add executable permission from file properties, and run to launch the image editor.

For Ubuntu users, it’s also can be easily installed from App Center (or Ubuntu Software) via Snap package, though it’s community maintained.

For those who prefer the native .deb package, I’ve uploaded the new package into this unofficial PPA for Ubuntu 24.04, 25.04 and 25.10, while Ubuntu 22.04 package is on the way.

To add PPA and install GIMP, run commands below one by one:

sudo add-apt-repository ppa:ubuntuhandbook1/gimp-3
sudo apt update
sudo apt install gimp libgegl-0.4-0t64 -t "o=LP-PPA-ubuntuhandbook1-gimp-3"
  •  

Run Custom Command or Script in Ubuntu 25.10 Automatically at Login

Ubuntu 25.10 no longer includes the “Startup Applications” utility! Here’s a beginner guide shows how to run apps, custom scripts or commands automatically at login through alternative methods.

Ubuntu has a “Startup Applications” tool, allowing to easily add, remove, and edit items that run at user login. Due to upstream (meaning GNOME) changes, it has finally been dropped in 25.10.

Startup Applications tool no longer available in 25.10

The new way to auto start apps, is using GNOME Control Center (aka Settings) by navigating to ‘Apps’ setting page, choose an app, and turn on the “Autostart” toggle switch. While, Gnome Tweaks also provides similar function to do the job.

Autostart apps in Ubuntu 25.10 (GNOME 49)

But, what if you want to auto-start app with custom options, or auto-run custom commands/scripts at login?

Here are 2 alternatives to do the job:

  • Add startup app manually using .desktop configuration file.
  • Use a third-party graphical configuration tool.

Option 1: Use .desktop configuration file

As you may know, all the app icons you see in Gnome app grid, dock, or other app launchers in most popular Linux distributions are handled by .desktop files under /usr/share/applications, .local/share/applications, etc directories.

Similarly, auto-start apps are handled by the .desktop files under either /etc/xdg/autostart or .config/autostart directories.

And, when you turn on “Autostart” toggle switch for an application in Settings (Gnome Control Center), it will automatically create a file under .config/autostart linked to the .desktop file for that app icon.

If you want to auto-run custom commands or scripts at login, then just create .desktop files in that directory with following steps.

NOTE: for those hate Linux commands, open file manager and press Ctrl+H to show hidden files/folders, then do following steps accordingly.

1. Create the directory. The ~/.config/autostart directory does not exist out-of-the-box. You may either enable an auto-start app via Settings to auto-create it, or open terminal (Ctrl+Alt+T) and run command below to create:

mkdir -p ~/.config/autostart

2. Create & edit custom .desktop file. Next, run command to create a .desktop file, “firefox-private.desktop” for example, and edit via nano command line text editor:

nano ~/.config/autostart/firefox-private.desktop

When file opens, write following content and edit accordingly:

[Desktop Entry]
Type=Application
Exec=sh -c "sleep 30; firefox --private-window https://www.google.com"
Hidden=false
Name=Firefox Private Mode
Comment=Open google.com automatically in Firefox private window.

In the case, it will auto-launch Firefox in private mode and open Google.com automatically, with 30 seconds delay after login.

According what you want to run, you need to replace the command for “Exec“, and edit the ‘Name’ and ‘Comment’ as you want. For example, use:

  • Exec=/home/ji/Documents/myscript to run my script under user Documents directory.
  • Exec=sh -c "$HOME/Documents/myscript" to run the same script, but here “sh -c” command interpreter is required so it knows what is $HOME.
  • Exec=update-manager --install-all to auto-launch Software Updater and install all available updates.

Tips:

  • It’s better to first run the custom command or script in terminal to make sure it works.
  • The X-GNOME-Autostart-Delay parameter does not work in Wayland, use sleep in command to add time delay in seconds.
  • You may change Hidden=false to Hidden=true to disable that .desktop file, just like it’s deleted.
  • Add Terminal=true if the command need to run in a terminal.
  • For more about the desktop entry keys, see the doc in freedesktop.org.

After created and edited the file, press Ctrl+S to save and Ctrl+X to exit, and verify if it works by logging out and back in.

Option 2: Use a third-party graphical application

To make things simple, there are few third-party graphical tools can do the job managing startup apps and scripts.

As far as I know, the free open-source Ignition tool is a good choice which provides a simple and modern user interface to add, remove, and modify startup entries.

As you see in the screenshot, it provides a GTK4 and LibAdwaita interface, with ability to manage system startup entries (usually the .desktop files in /etc/xdg/autostart) that works for all users.

As well, it allows to add any installed apps (with custom options and time delay), custom command or script as auto-start items, by automatically creating .desktop files in user’s .config/autostart directory. Meaning they work for current user only.

Install Ignition

Besides building from the source, the app is available to install in most Linux through Flatpak package, which runs in sandbox environment.

For Debian, Ubuntu, and their based systems, run 2 commands below one by one to install the package:

  • First, open terminal (Ctrl+Alt+T) and enable Flatpak support by installing the daemon package:
    sudo apt install flatpak
  • Next, install the app package by running command:
    flatpak install https://dl.flathub.org/repo/appstream/io.github.flattool.Ignition.flatpakref

    Tips: You may run command as sudo (add sudo at beginning) to fix installing issue in Ubuntu 25.10.

After installed the package, either search for and launch it from Gnome Overview (log out and back in if app icon is not visible), or run command below to start from terminal:

flatpak run io.github.flattool.Ignition

Uninstall Ignition

If the app does not work good for you, run the command below to uninstall it:

flatpak uninstall --delete-data io.github.flattool.Ignition

Also run flatpak uninstall --unused to remove useless runtime libraries.

NOTE that uninstall the app won’t delete the auto-start entries created by it.

  •  

NVIDIA 580.95.05 added YCbCr 4:2:2 Support for Linux

For Linux users with NVIDIA graphics card, the new 580 production branch driver got a new update few days ago!

It’s NVIDIA 580.95.05, the third stable release in this driver series. Like the last one, it introduced only one but important new feature, and fixed few bugs.

The new driver version added YCbCr 4:2:2 display modes support. Like RGB and CMYK, it’s a family of color spaces designed for brandwidth reduction and efficient video and image compression.

YCbCr 4:2:2 uses chroma subsampling technique to save file size by capturing less color data. It’s useful to meet the bandwidth demands of high resolution (e.g, 4K) games or videos at high-frame-rate (e.g., 120Hz), though it causes image quality reduction, such as blurry or fuzzy text.

The feature requires Fixed Rate Link (FRL) signaling technology (meaning display connected with HDMI 2.1), and Blackwell or later GPU, such as RTX 50 series, B100, B200, B300 …

MSI SUPRIM, NVIDIA RTX 5090

Besides that, the new driver fixed interactive object outline rendering issue in Indiana Jones and the Great Circle game, and few other issues.

Compare to the previous NVIDIA 575 driver, there’re also Smooth Motion frame generation support for RTX 40 series GPU introduced by 580.82.07 for better gaming performance, and RMIntrLockingMode enabed by default that can help reduce stutter especially when using virtual reality (VR).

Other changes in NVIDIA 580 series driver include:

  • Add fifo-v1 protocol support when using Vulkan backend in Wayland, reducing visual inconsistencies and potential stuttering.
  • New MetaMode attribute to control the number of bits per color component transmitted via a display connector.
  • Bigscreen Beyond Head Mounted Displays compatibility.
  • Feature to reduce time spent in the interrupt top half for low latency display interrupts by deferring the work until later.

And, more. See HERE, HERE, and HERE for details.

How to Install NVIDIA 580.95.05 in Ubuntu

Ubuntu has already made the NVIDIA 580 driver into system repositories, which is however NVIDIA 580.65.06 so far for current two 22.04 and 24.04 LTS (check this page).

If you can wait for the official package from Ubuntu, then try adding either the “Canonical Kernel Team” team PPA or “Graphics Drivers” team PPA (long-standing PPA), then use Additional Drivers utility to install, both of which are maintained by Ubuntu members.

  •  

Linux Kernel 6.17 Released! Mainline PPA updated for Ubuntu 24.04 +

Linux 6.17 is out as the latest Kernel release! Linus Torvalds announced it yesterday afternoon in lkml.org:

No huge surprises this past week, so here we are, with kernel 6.17 pushed out and ready to go.

Below is the shortlog for just the last week – not the full 6.17 release – as usual. It’s not exciting, which is all good. I think the biggest patch in there is some locking fixes for some bluetooth races that could cause use-after-free situations. Whee – that’s about as exciting as it gets.

What’s New in Kernel 6.17

Linux 6.17 introduced Attack Vector Controls, which provides a simple method to manage CPU vulnerability mitigations. Which, so far supports 5 sets of attack-vector mitigations: User-to-Kernel, User-to-User, Guest-to-Host, Guest-to-Guest, and Cross-Tread. See the official documentation for more about it.

For Intel, the kernel added Intel IPU7 driver for web camera support on Lunar Lake and Panther Lake laptops. And, it added perf profiling support for Panther Lake, and EDAC (Error Detection and Correction) support for Granite Rapids D, Wildcat Lake, and Raptor Lake HX, and Core i5 14600, i7 14700 processors.

It as well added initial support for Wildcat Lake integrated graphics, enabled OpenGL and Vulkan support for Xe3 Panther Lake graphics by default, and added SR-IOV (Single Root I/O Virtualization) support for Battlemage GPUs but limit to Arc Pro graphics card.

There are as well DRM Panic support for the Intel i915 and Xe kernel drivers, Wildcat Lake “WCL” display enablement, and experimental flip queue support for Lunar Lake and Panther Lake hardware, and NPU accelerator support for Wildcat Lake.

image from Intel.com

On the AMD side, the kernel merged AMD’s Hardware Feedback Interface driver for dynamic core ranking, improved task scheduling, and better support for processors with mix of classic and dense cores.

It also added SmartMux support for hybrid laptops that dynamically switch the GPU being used. For example, when gaming, the system can be switch the active display to the discrete GPU for better performance.

Other AMD changes include CPUID faulting support, and fix for AMDGPU hibernation, which can save 50 minutes on large GPU servers.

Image by anirudhlv from Pixabay

Other changes in this Kernel release include:

  • Apple System Management Controller (SMC) driver for being able to reboot modern M1/M2 Macs
  • BRBE (Branch Record Buffer Extension) support for ARM64.
  • Drop non-SMP (Symmetric Multi-Processing), meaning for system with only one CPU core, there might be small performance regression.
  • Turbostat command-line utility can now display CPU L3 cache topology information.
  • Much faster CRC32C error detection on modern Intel and AMD AVX-512 processors.
  • Added “pm_async=off” parameter to disable async suspend/resume with the Linux kernel
  • Large folio support for Btrfs (experimental).
  • Multi-device filesystems like btrfs and bcachefs can handle certain device loss without the need to shutdown the whole filesystem.
  • New driver for powering on the T-HEAD TH1520 RISC-V SoC’s GPU.

There are as well many new and updated hardware support, including:

  • Raspberry Pi RP1 PCI device support
  • Marvell PXA1908 and the CIX P1 SoC
  • Andes Tech QiLai SoC and the Sophgo SG2000.
  • NVIDIA Tegra264.
  • Samsung Snapdragon X laptop support.
  • Add support for Touch Bars on x86 MacBook Pros.
  • BCM5325 switches.
  • Support 50 / 100 / 200 / 400 / 800 gigabit Ethernet cards.
  • Lenovo WMI Gaming Series Drivers for Lenovo Legion Go S gaming handheld.

For more changes about Linux Kernel 6.17, see either this page or kernelnewbies.

How to install Linux 6.17 in Ubuntu

Ubuntu 25.10 has already included Kernel 6.17 RC, while the stable release will be available soon in the final release.

For Ubuntu 24.04, it will probably have Kernel 6.17 in next 24.04.4 point release. If you can’t wait, try the mainline kernel PPA.

NOTE: The mainline Kernel is built for testing purpose! It’s NOT signed, so you need to disable secure boot for being able to boot the kernel. And, it may have compatibility issues with proprietary drivers.

For amd64, arm64, armhf, ppc64el, and s390x CPU architecture types, the Kernel PPA provides Linux Kernel 6.17 package at the link below:

If you don’t know your CPU type, run dpkg --print-architecture command to tell, then select download & install the proper packages for your system.

For modern Intel/AMD (amd64) platform, open terminal (Ctrl+Alt+T) and run the commands below one by one to download & install the kernel:

wget -c https://kernel.ubuntu.com/mainline/v6.17/amd64/linux-headers-6.17.0-061700-generic_6.17.0-061700.202509282239_amd64.deb

wget -c https://kernel.ubuntu.com/mainline/v6.17/amd64/linux-headers-6.17.0-061700_6.17.0-061700.202509282239_all.deb

wget -c https://kernel.ubuntu.com/mainline/v6.17/amd64/linux-image-unsigned-6.17.0-061700-generic_6.17.0-061700.202509282239_amd64.deb

wget -c https://kernel.ubuntu.com/mainline/v6.17/amd64/linux-modules-6.17.0-061700-generic_6.17.0-061700.202509282239_amd64.deb

sudo apt install ./linux-headers-6.17.0*.deb ./linux-image-unsigned-6.17.0*.deb ./linux-modules-6.17.0*.deb

After installed the kernel, restart and run uname -a to verify the new kernel.

Uninstall Kernel 6.17

To remove the kernel 6.17, reboot and select boot an old kernel entry from Grub boot-loader (usually under Advanced menu), then run the command below to uninstall:

sudo apt remove linux-modules-6.17.0-*-generic linux-headers-6.17.0-061700
  •  

Pop!_OS 24.04 is Available for Beta Testing!

Pop!_OS, the popular Linux Distribution powered by System76, announced the Beta release of 24.04 LTS few days ago.

As the version number says, it’s based on Ubuntu 24.04 LTS, but features Linux Kernel 6.16 and its own COSMIC desktop environment.

Pop!_OS is developed by System76, a American Linux computer manufacturer. It features COSMIC desktop, which was previously a customized GNOME desktop, but now a standalone desktop environment built from scratch.

Since version 18.04, Pop!_OS updated regularly with versions based on every Ubuntu releases. And, it was ranked as 12th popular Linux Distribution according to Google Trends Scores between Jan 2023 and Jan 2024.

The development however slows down since 22.04. There’s no Pop!_OS 22.10, 23,04, or 23.10.

The first Pop!_OS 24.04 development release (first alpha) was available in August of last year. Then, it got another few more alpha releases, and finally announced this Beta few days ago!

This is the first release that ships with new standalone COSMIC Desktop environment. It replaced Nautilus, Gnome Terminal, Gnome Text Editor, and Totem with its own COSMIC specific files, terminal, text editor, and video player apps.

Pop!_Shop is replaced by COSMIC Store, which prefers Flatpak when both Flatpak and Deb are available. And, the GDM display manager is replaced by new COSMIC Greeter with a redesigned login appearance.

Drag’n’dropping files from Wayland apps to X11 apps is not supported so far, though user may use the applications upload option as a work-around until the feature is added.

Other changes include new and redesigned settings app, as well as:

  • Single bottom panel layout.
  • Variable refresh rate (VRR) support.
  • NVIDIA driver 580.82.07.
  • Mesa 25.1.5-1
  • New fonts, themes, and more.

Get Pop!_OS 24.04 Beta

The official release note as well as the .iso images are available in system76 website via the link below:

For Pop!_OS 22.04 users who want to upgrade to the new beta release, it can be done by opening terminal and run command:

pop-upgrade release upgrade -f

Though, it’s highly recommended to make a backup first, as bugs are expected in beta that may break things!

  •  
❌